Lexus SC300 / Lexus SC400. Service manual — part 111

REMOVAL OF SLIDING ROOF
(See page
1.
DISCONNECT BATTERY CABLE FROM NEGATIVE
TERMINAL
CAUTION: Work must be started after approx. 20 se-
conds or longer from the time the ignition switch is
turned to the ”LOCK” position and the negative (–) termi-
nal cable is disconnected from the battery.
2.
REMOVE INTERIOR LIGHT
(a) Using a screwdriver, remove interior light lens.
HINT:
Tape the screwdriver tip before use.
(b) Remove three screws and the light.
(c) Disconnect the connector.
3.
REMOVE FOLLOWING PARTS:
(a) Front pillar garnish (See step 2 on page
(b) Sun visor (See step 3 on page
(c) Center visor (See step 4 on page
4.
REMOVE SLIDING ROOF GARNISHES
Using a screwdriver, remove four sliding roof garnishes.
HINT:
Do not scratch the glass or garnish with the screw-
driver. Tape the screwdriver tip before use.
5.
REMOVE SLIDING ROOF GLASS
(a) Remove six nuts and shims.
HINT:
Make sure of the number of shims.
(b) Pull the glass upward to remove it.
6.
REMOVE DRIVE GEAR ASSEMBLY
(a) Remove four bolts and the gear assembly.
(b) Disconnect the connectors from the gear.
–
BODY
Moon Roof (Sliding Roof)
BO–85

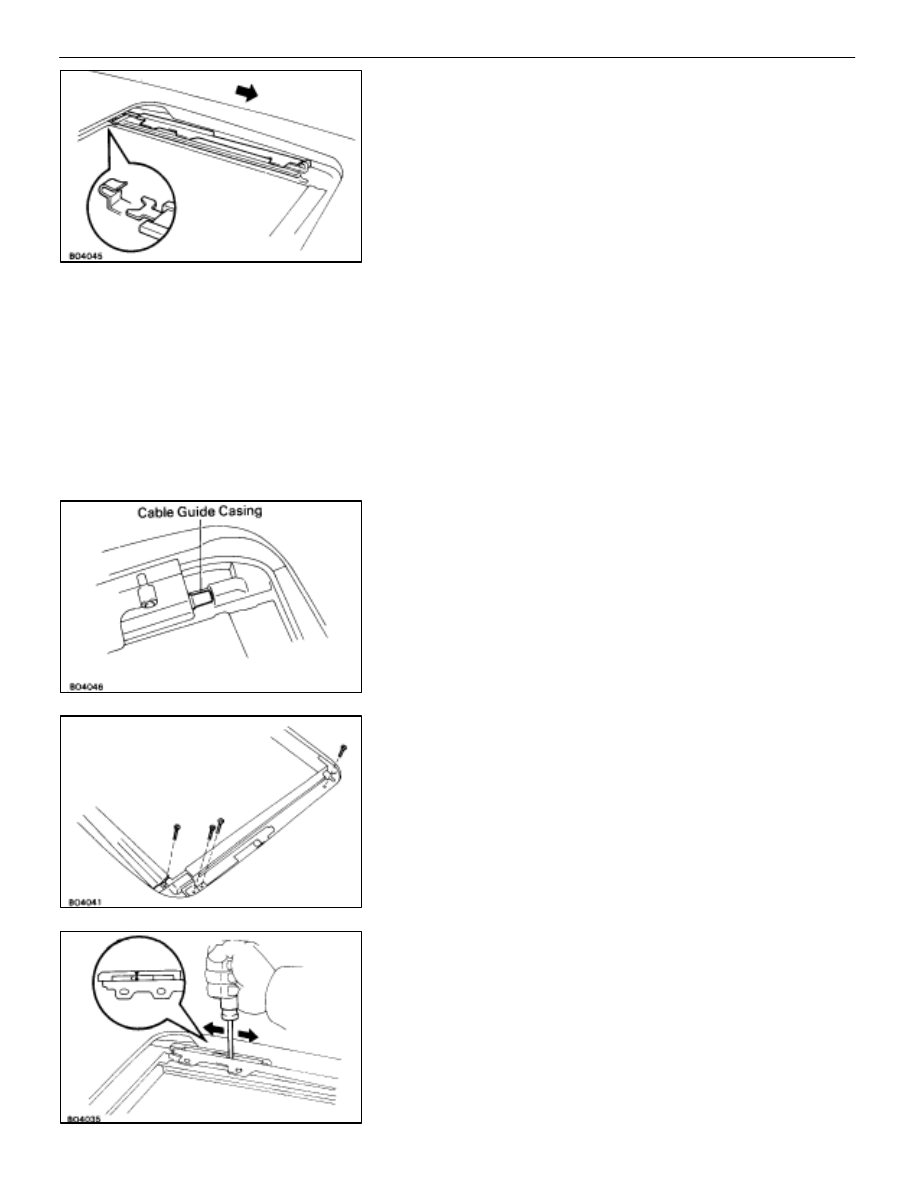
7.
REMOVE WIND DEFLECTOR
(a) Slide the drive cable backward.
(b) Remove four screws and the deflector.
8.
REMOVE CABLE GUIDE CASING
(a) Remove two screws and the guide rail cover.
(b) Remove two screws from the drive rail.
(c) Slide the drive cable forward.
(d) Pull down the roof handlining.
(e) Disconnect front side of the drain hose.
HINT:
Disconnect the drain hose from the sliding roof
housing side.
(f) Remove the sliding roof control relay.
(g) Remove the two nuts from the sliding roof housing.
(h) Remove the cable guide casing gradually from both
sides.
NOTICE:
Be careful that the oily cable doesn’t fall off.
9.
REMOVE ROOF DRIP CHANNEL
(a) Remove two screws.
(b) Pull the channel forward to remove it.
10. REMOVE SUNSHADE TRIM
While raising the drive rail, pull the trim forward to remove it.
BO–86
–
BODY
Moon Roof (Sliding Roof)
11. REMOVE DRIVE RAIL
(a) Slide the drive cable forward.
(b) Slide the rail forward and disconnect the clamp, then
remove it.
INSTALLATION OF SLIDING ROOF
(See pages
to 84)
1.
INSTALL FOLLOWING PARTS:
(a) Drive
rail
(b) Sunshade
trim
(c) Roof drip channel
2.
INSTALL CABLE GUIDE CASING
(a) Insert the cable to the casing and install the cable guide
casing gradually to both sides.
(b) Insert the casing to the drive rail as shown.
(c) Install the two nuts to the sliding roof housing.
(d) Install the sliding roof control relay.
(e) Connect the front side of drain hose.
HINT:
Place the knobs of clips to upper side.
(f) Install two screws and guide rail cover.
(g) Install two screws to the drive rail.
3.
INSTALL ROOF DRIP CHANNEL
4.
INSTALL WIND DEFLECTOR
5.
ADJUST DRIVE RAIL
HINT: Adjust
the drive rail to a closed and tilted down posi-
tion.
(a) Using a screwdriver, slide the link forward or backward
to align the two marks as shown.
(b) Slide the bracket to the forefront with your hand.
–
BODY
Moon Roof (Sliding Roof)
BO–87
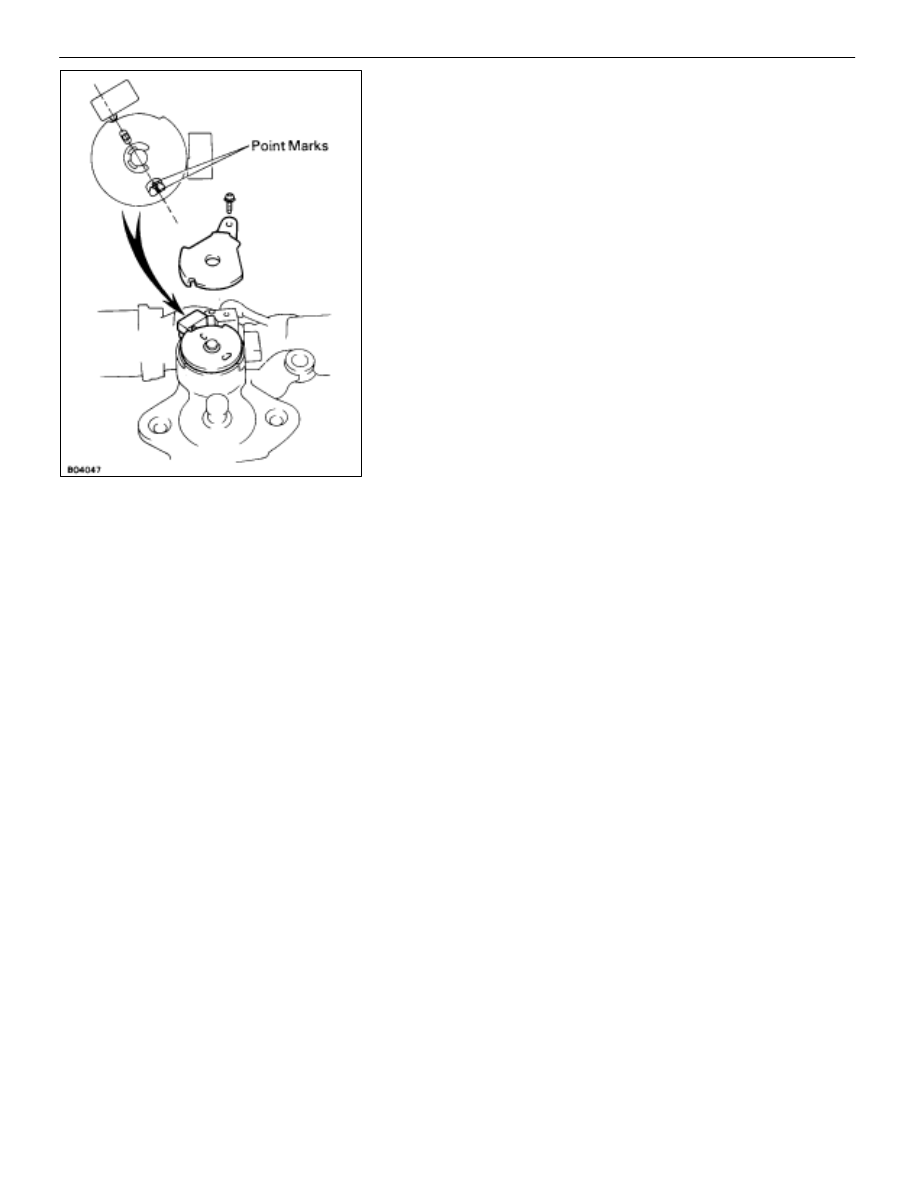
6.
ADJUST AND INSTALL DRIVE GEAR ASSEMBLY
(a) Remove the screw and cam plate cover.
(b) Remove the large screw, washers and shims.
(c) Turn the drive shaft by screwdriver to align the housing
and gear point mark as shown.
(d) Install cam plate cover with a screw.
(e) Install the drive gear assembly with four bolts.
(f) Connect the connectors.
7.
INSTALL SLIDING GLASS
HINT:
•
Confirm that the lip part of the weatherstrip housing is
not twisted.
•
Confirm that the clearance between the left and right of
the sliding roof glass and roof panel are equal.
Install six nuts and shims.
8.
INSPECT SLIDING ROOF GLASS ALIGNMENT
(See step 1 on page
9.
INSTALL FOLLOWING PARTS:
(a) Sliding roof garnishes
(b) Roof
headlining
(c) Sun
visor
(d) Center
visor
(e) Front pillar garnish
(f) Interior
light
BO–88
–
BODY
Moon Roof (Sliding Roof)
Нет комментариевНе стесняйтесь поделиться с нами вашим ценным мнением.
Текст