Nissan Qashqai (2007-2010). Manual — part 663
REAR WHEEL HUB AND HOUSING
RAX-9
< ON-VEHICLE MAINTENANCE >
[4WD]
C
E
F
G
H
I
J
K
L
M
A
B
RAX
N
O
P
ON-VEHICLE MAINTENANCE
REAR WHEEL HUB AND HOUSING
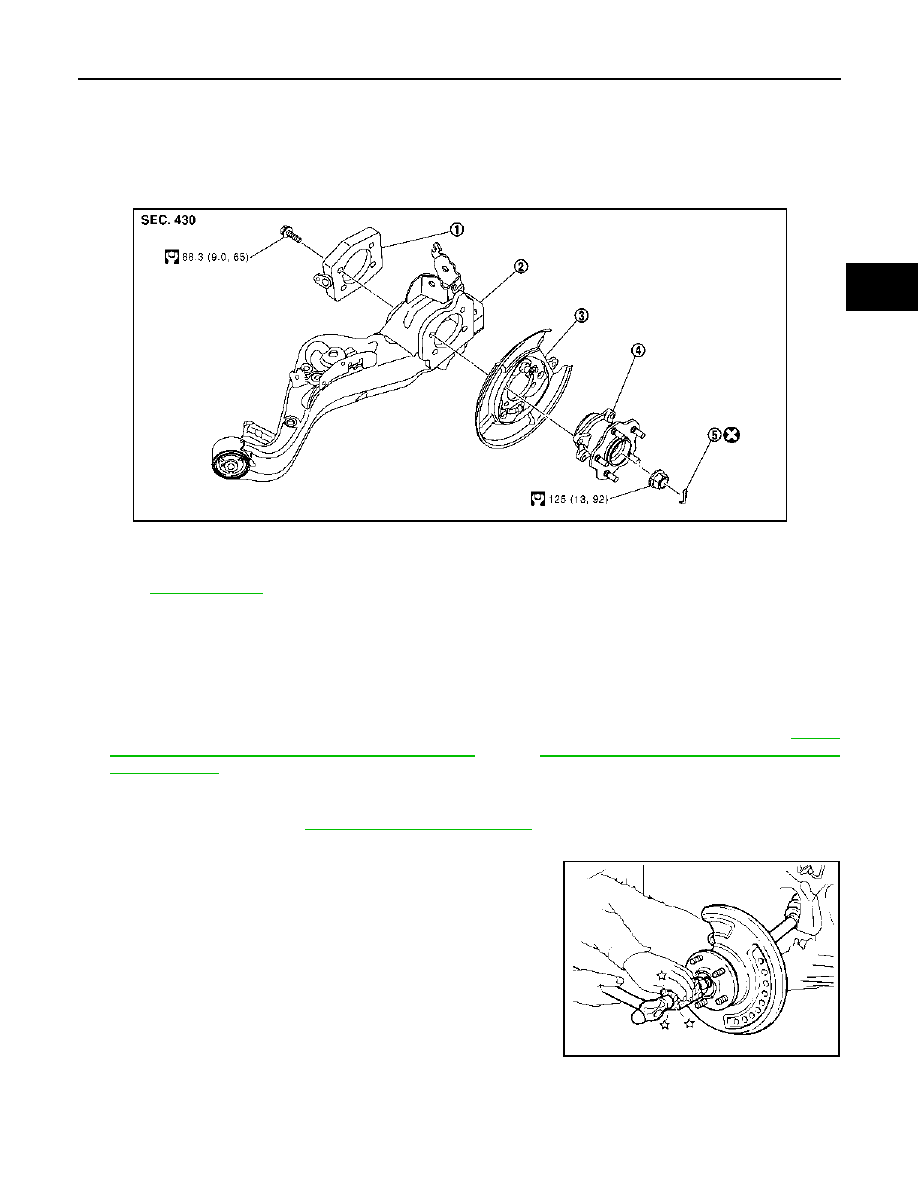
Exploded View
INFOID:0000000000970504
Inspection
INFOID:0000000000970505
MOUNTING INSPECTION
Make sure the mounting conditions (looseness, back lash) of each component and component conditions
(wear, damage) are normal.
WHEEL BEARING INSPECTION
• Move wheel hub and bearing assembly in the axial direction by hand. Make sure there is no looseness of
wheel bearing.
• Rotate wheel hub, and make sure there is no unusual noise or other irregular conditions. If there is any of
irregular conditions, replace wheel hub and bearing assembly.
Standard
Axial end play
: Refer to
RAX-10
< ON-VEHICLE MAINTENANCE >
[4WD]
REAR DRIVE SHAFT
REAR DRIVE SHAFT
Inspection
INFOID:0000000000970506
• Check drive shaft mounting point and joint for looseness and other damage.
• Check boot for cracks and other damage.
CAUTION:
Replace entire drive shaft assembly when noise or vibration occur from drive shaft.
REAR WHEEL HUB AND HOUSING
RAX-11
< ON-VEHICLE REPAIR >
[4WD]
C
E
F
G
H
I
J
K
L
M
A
B
RAX
N
O
P
ON-VEHICLE REPAIR
REAR WHEEL HUB AND HOUSING
Exploded View
INFOID:0000000000970507
Removal and Installation
INFOID:0000000000970508
REMOVAL
Wheel Hub and Bearing Assembly
1.
Remove tires from vehicle.
2.
Remove torque member mounting bolts. Hang torque member not to interfere with work. Refer to
"BRAKE CALIPER ASSEMBLY : Exploded View"
(LHD),
BR-86, "BRAKE CALIPER ASSEMBLY :
(RHD).
CAUTION:
Never depress brake pedal while brake caliper is removed.
3.
Remove disc rotor. Refer to
PB-7, "Removal and Installation"
4.
Remove cotter pin, and then loosen hub lock nut.
5.
Patch hub lock nut with a piece of wood. Hammer the wood to
disengage wheel hub and bearing assembly from drive shaft.
Remove the hub lock nut.
CAUTION:
• Never place drive shaft joint at an extreme angle. Also be
careful not to overextend slide joint.
• Never droop drive shaft. Support drive shaft by housing,
joint sub-assembly, shaft etc.
NOTE:
Use suitable puller, if wheel hub and bearing assembly and drive
shaft cannot be separated even after performing the above pro-
cedure.
6.
Remove wheel hub and bearing assembly.
INSTALLTION
Install in the reverse order of removal.
1.
Axle housing
2.
Suspension arm
3.
Back plate
4.
Wheel hub and bearing assembly
5.
Cotter pin
Refer to
JPDIG0013GB
JPDIF0003ZZ
RAX-12
< ON-VEHICLE REPAIR >
[4WD]
REAR WHEEL HUB AND HOUSING
Inspection
INFOID:0000000000970509
INSPECTION AFTER REMOVAL
Check wheel hub and bearing assembly for wear, cracks, and damage. Replace if there are.
INSPECTION AFTER INSTALLATION
Check wheel alignment. Refer to
RSU-5, "Wheel Alignment Inspection"
.
Нет комментариевНе стесняйтесь поделиться с нами вашим ценным мнением.
Текст