Nissan Qashqai (2007-2010). Manual — part 776

SR-16
< ON-VEHICLE REPAIR >
DIAGNOSIS SENSOR UNIT
DIAGNOSIS SENSOR UNIT
Exploded View
INFOID:0000000001069733
Removal and Installation
INFOID:0000000001069734
REMOVAL
CAUTION:
• Before servicing, turn ignition switch OFF, disconnect both battery terminals and wait at least 3 min-
utes.
• Before disconnecting the air bag sensor unit harness connector, be sure to disconnect the each har-
ness connector of the air bag module and pre-tensioner seat belt to prevent air bag deployment by
static electricity and pre-tensioner seat belt operation.
• Do not use air tools or electric tools for servicing.
1.
Disconnect each connector of all air bag modules and pre-tensioner seat belts.
2.
Remove the center console assembly. Refer to
3.
Disconnect diagnosis sensor unit harness connectors.
4.
Remove fixed bolts and ground bolt, and then remove diagnosis sensor unit.
CAUTION:
• Replace the diagnosis sensor unit if it has been dropped or
sustained an impact.
• Do not use old fixing bolts after removal; replace with new
bolts.
• Replace the diagnosis sensor unit of deployed SRS air bag
and deployed SRS front seat belt pre-tensioner.
INSTALLATION
Install in the reverse order of removal.
CAUTION:
• Do not damage the diagnosis sensor harness.
JMHIA0203GB
1.
Diagnosis sensor unit
A.
Harness connectors
Refer to
for symboles in the figure.
JMHIA0009ZZ

DIAGNOSIS SENSOR UNIT
SR-17
< ON-VEHICLE REPAIR >
C
D
E
F
G
I
J
K
L
M
A
B
SR
N
O
P
• In case that malfunction is detected by the air bag warning lamp, reset by the self-diagnosis function
and delete the memory by CONSULT-III.
• In case that malfunction is still detected after the above operations, perform self-diagnosis to repair
malfunctions.
• After the work is completed, check that no malfunctioning system is detected by air bag warning
lamp. Refer to
SRC-10, "Diagnosis Description"
.
ECU DISCRIMINATED NO.
After replacing the diagnosis sensor unit, confirm that the diagnosis sensor unit identification is correct for the
vehicle as equipped.
Specification
ECU DISCRIMINATED No.
LHD
Models with driver and passenger air bags, seat belt pre-tensioners, seat belt pre-tensioner2,
side air bags and curtain air bags
F902
RHD
Models with driver and passenger air bags, seat belt pre-tensioners, seat belt pre-tensioner2,
side air bags and curtain air bags
F900
SR-18
< ON-VEHICLE REPAIR >
FRONT SEAT BELT PRE-TENSIONER
FRONT SEAT BELT PRE-TENSIONER
Removal and Installation
INFOID:0000000001069735
For removal and installation procedures, refer to
SB-5, "SEAT BELT RETRACTOR : Exploded View"
.
DISPOSAL OF AIR BAG MODULE AND SEAT BELT PRE-TENSIONER
SR-19
< ON-VEHICLE REPAIR >
C
D
E
F
G
I
J
K
L
M
A
B
SR
N
O
P
DISPOSAL OF AIR BAG MODULE AND SEAT BELT PRE-TENSIONER
Caution for Air Bag Module and Seat Belt Pre-tensioner
INFOID:0000000001082527
• Before disposing of air bag module and seat belt pre-tensioner, or vehicles equipped with such systems,
deploy the systems. If such systems have already been deployed due to an accident, dispose of them as
indicated in Disposing of Air Bag Module and Seat Belt Pre-tensioner.
• When deploying the air bag module and seat belt pre-tensioner,always use the Special Service Tool; Deploy-
ment tool (SST: KV99106400).
• When deploying the air bag module and seat belt pre-tensioner,stand at least 5 m (16 ft) away from the
deployment component.
• When deploying air bag module and seat belt pre-tensioner, a fairlyloud noise is made, followed by smoke
being released. The smoke is not poisonous,however, be careful not to inhale smoke since it irritates the
throat and can cause choking.
• Always activate one air bag module at a time.
• Due to heat, leave air bag module unattended for more than 30 minutes after deployment. Also leave seat
belt pre-tensioner unattended for more than 10 minutes after deployment.
• Wear gloves when handling a deployed air bag module and seat belt pre-tensioner.
• Never apply water to the deployed air bag module and seat belt pre-tensioner.
• Wash your hands after finishing work.
• Place the vehicle outdoors with an open space of at least 6 m (20 ft) on all sides when deploying air bag
module and seat belt pre-tensioner while mounted in vehicle.
• Use a volt meter to make sure the vehicle battery is fully charged.
• Do not dispose of the air bag module and seat belt pre-tensioner undeployed.
CHECKING DEPLOYMENT TOOL
Connecting to Battery
CAUTION:
The battery must show voltage of 9.6 V or more.
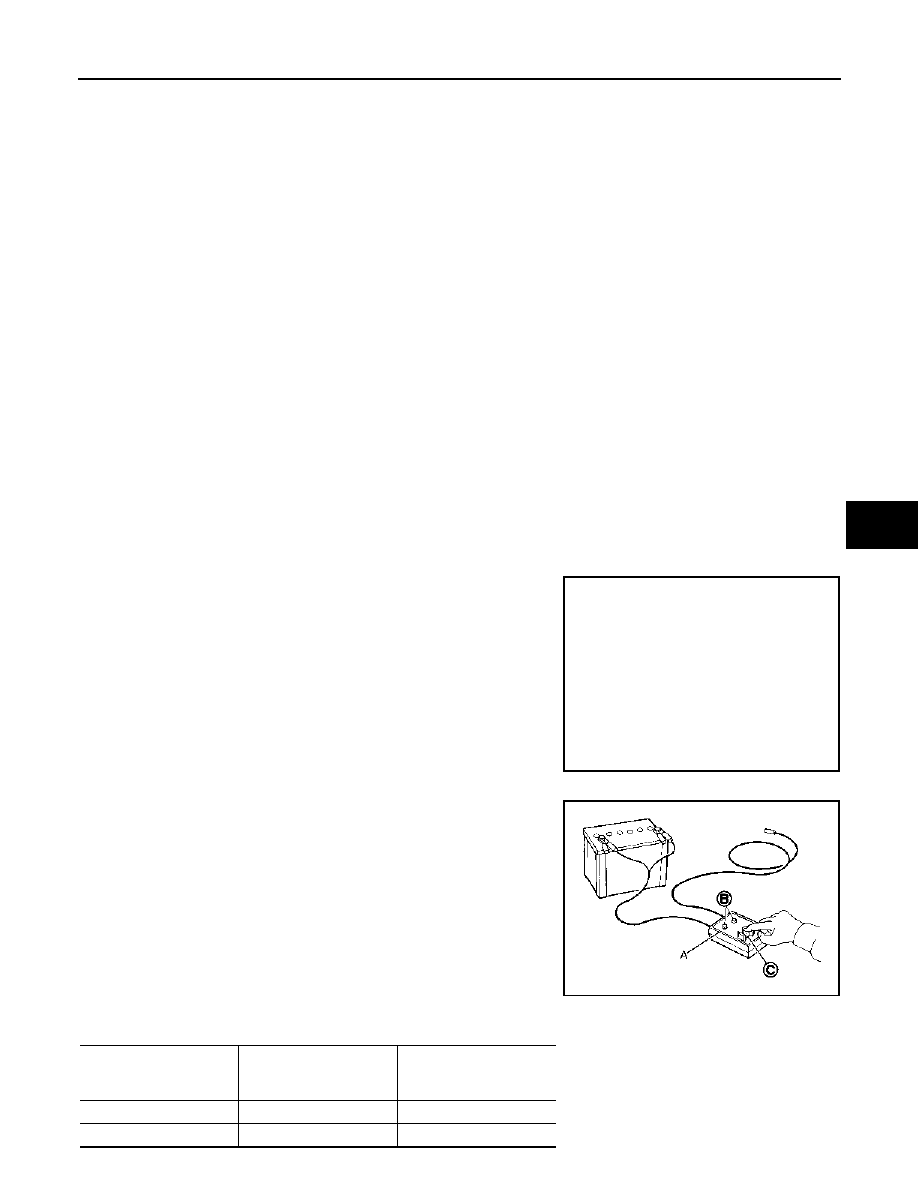
Remove the battery from the vehicle and place it on dry wood blocks
approximately 5 m (16 ft) away from the vehicle.
• Wait 3 minutes after the vehicle battery is disconnected before pro-
ceeding.
• Connect red clip of deployment tool (A) to battery positive terminal
and black clip to negative terminal.
Check that the polarity is correct. The right side lamp in the
tool, marked “deployment tool power”, should glow with a
green light. If the right side lamp glows red, reverse the connec-
tions to the battery.
Deployment Tool Check
Press the deployment tool switch (C) to the ON position. The left
side lamp in the tool, marked “air bag connector voltage” should illu-
minate (B). If it does not illuminate, replace the deployment tool (A).
Air Bag Deployment Tool Lamp Illumination Chart (Battery Connected)
JMHIA0204ZZ
JMHIA0205ZZ
Switch operation
Left side lamp, green*
“AIR BAG CONNECTOR
VOLTAGE”
Right side lamp, green*
“DEPLOYMENT TOOL
POWER”
OFF
OFF
ON
ON
ON
ON
Нет комментариевНе стесняйтесь поделиться с нами вашим ценным мнением.
Текст