Nissan Qashqai (2007-2010). Manual — part 118
RADIATOR
CO-55
< ON-VEHICLE MAINTENANCE >
[K9K]
C
D
E
F
G
H
I
J
K
L
M
A
CO
N
P
O
RADIATOR
RADIATOR CAP
RADIATOR CAP : Inspection
INFOID:0000000001062335
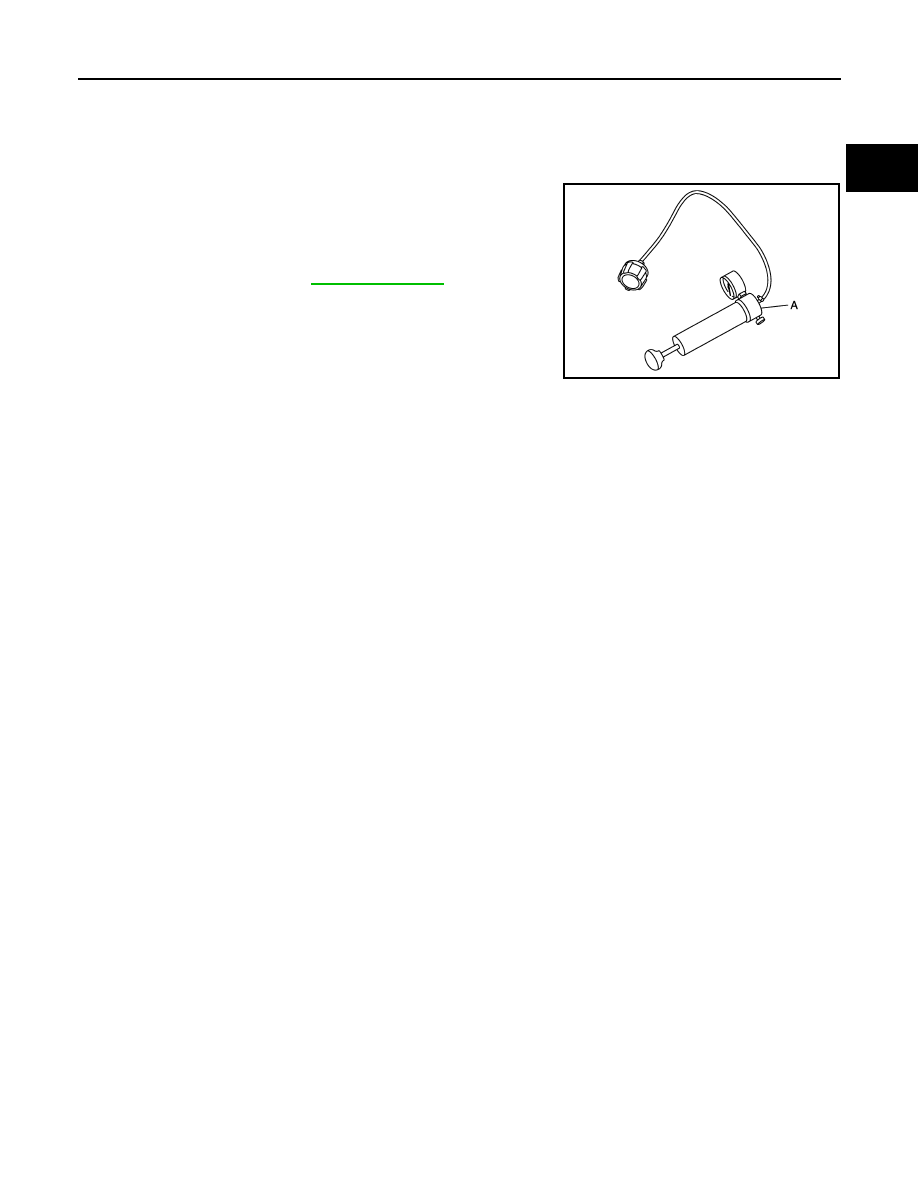
• Fit the adapter to the tester as shown.
• When connecting the reservoir tank cap to the tester [SST: —
(M.S. 554-07)] (A), apply water or LLC to the cap seal part.
• Check reservoir tank cap relief pressure.
• Replace the reservoir tank cap if the engine coolant passes
through it, or if any fur signs is detected.
RADIATOR
RADIATOR : Inspection
INFOID:0000000001062336
Check radiator for mud or clogging. If necessary, clean radiator as follows.
• Be careful not to bend or damage the radiator fins.
• When radiator is cleaned without removal, remove all surrounding parts such as radiator fan, radiator shroud
and horns. Then tape the harness and connectors to prevent water from entering.
1.
Apply water by hose to the back side of the radiator core vertically downwards.
2.
Apply water again to all radiator core surface once per minute.
3.
Stop washing if any stains no longer flow out from the radiator.
4.
Blow air into the back side of radiator core vertically downwards.
• Use compressed air lower than 490 kPa (4.9 bar 5 kg/cm
2
, 71psi) and keep distance more than 30 cm (11.8
in).
5.
Blow air again into all the radiator core surface once per minute until no water sprays out.
Standard
: Refer to
.
E1BIA0057ZZ
CO-56
< ON-VEHICLE REPAIR >
[K9K]
RADIATOR
ON-VEHICLE REPAIR
RADIATOR
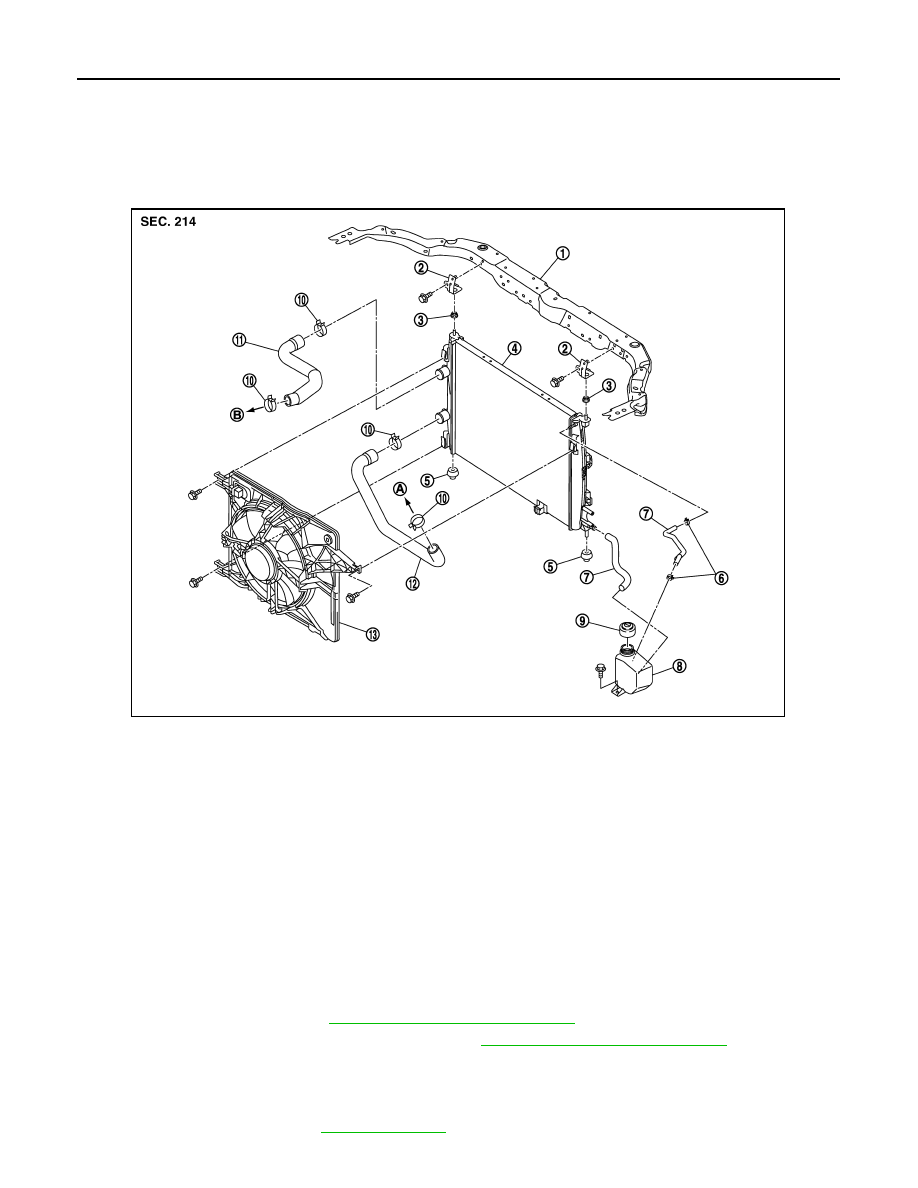
Exploded View
INFOID:0000000001062337
Removal and Installation
INFOID:0000000001062338
WARNING:
Never remove the reservoir tank cap when the engine is hot. Serious burns could occur from high
pressure coolant escaping from the radiator. Wrap a thick cloth around the cap. Slowly turn it a quar-
ter turn to allow built-up pressure to escape. Carefully remove the cap by turning it all the way.
REMOVAL
1.
Remove engine cover. Refer to
EM-266, "Removal and Installation"
.
2.
Remove air cleaner case and air duct (inlet). Refer to
EM-265, "Removal and Installation"
.
3.
Remove reservoir tank hose bracket bolt from radiator upper mounting bracket (RH side).
4.
Remove radiator fan motor harnesses.
5.
Remove engine undercover.
6.
Drain engine coolant. Refer to
1.
Radiator core support
2.
Mounting bracket
3.
Mounting rubber (upper)
4.
Radiator
5.
Mounting rubber (lower)
6.
Clamp
7.
Reservoir tank hose
8.
Reservoir tank
9.
Reservoir tank cap
10. Clamp
11. Radiator hose (upper)
12. Radiator hose (lower)
13. Cooling fan assembly
A.
To water inlet
B.
To water outlet
E1BIA0016ZZ
RADIATOR
CO-57
< ON-VEHICLE REPAIR >
[K9K]
C
D
E
F
G
H
I
J
K
L
M
A
CO
N
P
O
CAUTION:
Perform when engine is cold.
7.
Disconnect radiator upper hose, reservoir tank hose and mounting bracket.
8.
Release charge air cooler from the radiator. Refer to
EM-266, "Removal and Installation"
9.
Remove radiator and radiator fan assembly.
NOTE:
Remove radiator and condenser assembly. Refer to
HA-100, "Removal and Installation"
CAUTION:
• Do not damage or scratch radiator core when removing.
INSTALLATION
• Reinstall any parts removed in reverse order of removal.
• Check for engine coolant leaks. Refer to
.
Inspection
INFOID:0000000001115351
INSPECTION AFTER INSTALLATION
• Check for engine coolant leaks using reservoir tank cap tester. Refer to
CO-58
< ON-VEHICLE REPAIR >
[K9K]
COOLING FAN
COOLING FAN
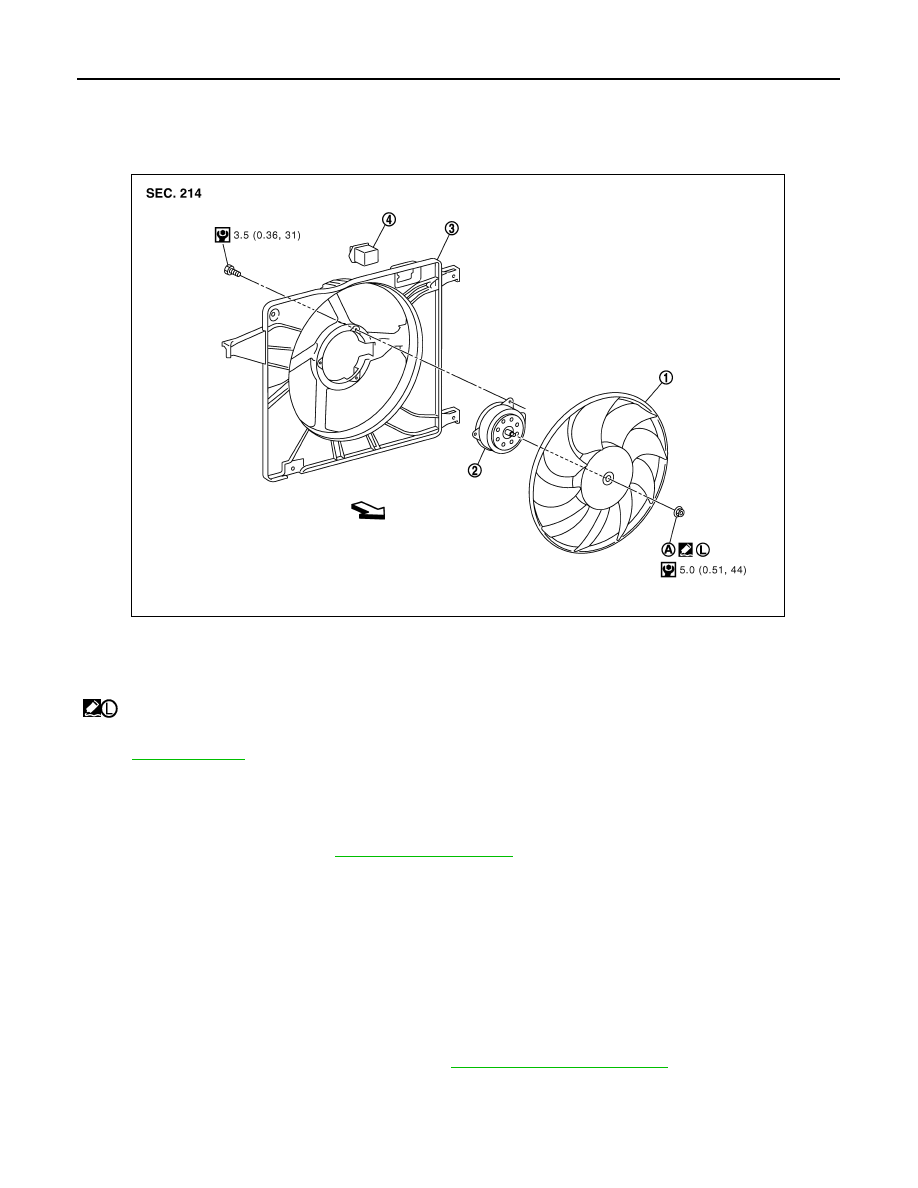
Exploded View
INFOID:0000000001111177
Removal and Installation
INFOID:0000000001111178
REMOVAL
1.
Remove air duct (inlet). Refer to
.
2.
Disconnect harness connector from resistor and fan motor, and move harness to aside.
3.
Remove cooling fan assembly.
CAUTION:
Be careful not to damage or scratch on radiator core.
INSTALLATION
Note the following, and install in the reverse order of removal.
CAUTION:
Only use genuine parts for fan shroud mounting bolt and observe the specified torque (to prevent
radiator from being damaged).
NOTE:
Cooling fan is controlled by ECM. For details, refer to
Disassembly and Assembly
INFOID:0000000001111179
DISASSEMBLY
1.
Cooling fan
2.
Fan motor
3.
Fan shroud
4.
Resistor
A.
Reverse screw
: Apply thread locking sealant.
: Vehicle front
Refer to
for symbols not described on the above.
JPBIA0314GB
Нет комментариевНе стесняйтесь поделиться с нами вашим ценным мнением.
Текст