Nissan Qashqai (2007-2010). Manual — part 84

EM-284
< ON-VEHICLE REPAIR >
[K9K]
HIGH PRESSURE SUPPLY PUMP
1.
Install the pump then position the mounting bolts without tightening them.
2.
Before fitting the new injection tube, lightly lubricate the nut threads with the oil from the sachet provided
in the new parts kit.
3.
Refit the injection tube, to do this:
• remove the protective plugs,
• insert the injection tube olive into the taper of the high pressure pump outlet,
• insert the injection tube olive into the taper of the high pressure rail inlet.
4.
Finger tighten the nuts of the injection tube starting with the one located on the rail side.
5.
Tighten the mounting bolts on the high pressure pump.
6.
Tighten the injection tube nut.
7.
Refit in the reverse order to removal for the other refitting operations.
8.
Test the sealing of the high pressure after it has been repaired (refer to “SPECIAL FEATURES” in
249, "Precaution for Diesel Equipment"
).
: 21.0 N·m (2.1 kg-m, 15 ft-lb)
: 24.0 N·m (2.4 kg-m, 18 ft-lb)

ROCKER COVER
EM-285
< ON-VEHICLE REPAIR >
[K9K]
C
D
E
F
G
H
I
J
K
L
M
A
EM
N
P
O
ROCKER COVER
Exploded View
INFOID:0000000001060356
Removal and Installation
INFOID:0000000001060455
REMOVAL
1.
Remove engine cover. Refer to
EM-266, "Removal and Installation"
.
2.
Remove air duct (suction). Refer to
.
3.
Remove inlet pipe assembly and air inlet hose, and inlet pipe bracket. Refer to
.
4.
Remove rear engine slinger.
5.
Unclip timing belt upper cover.
6.
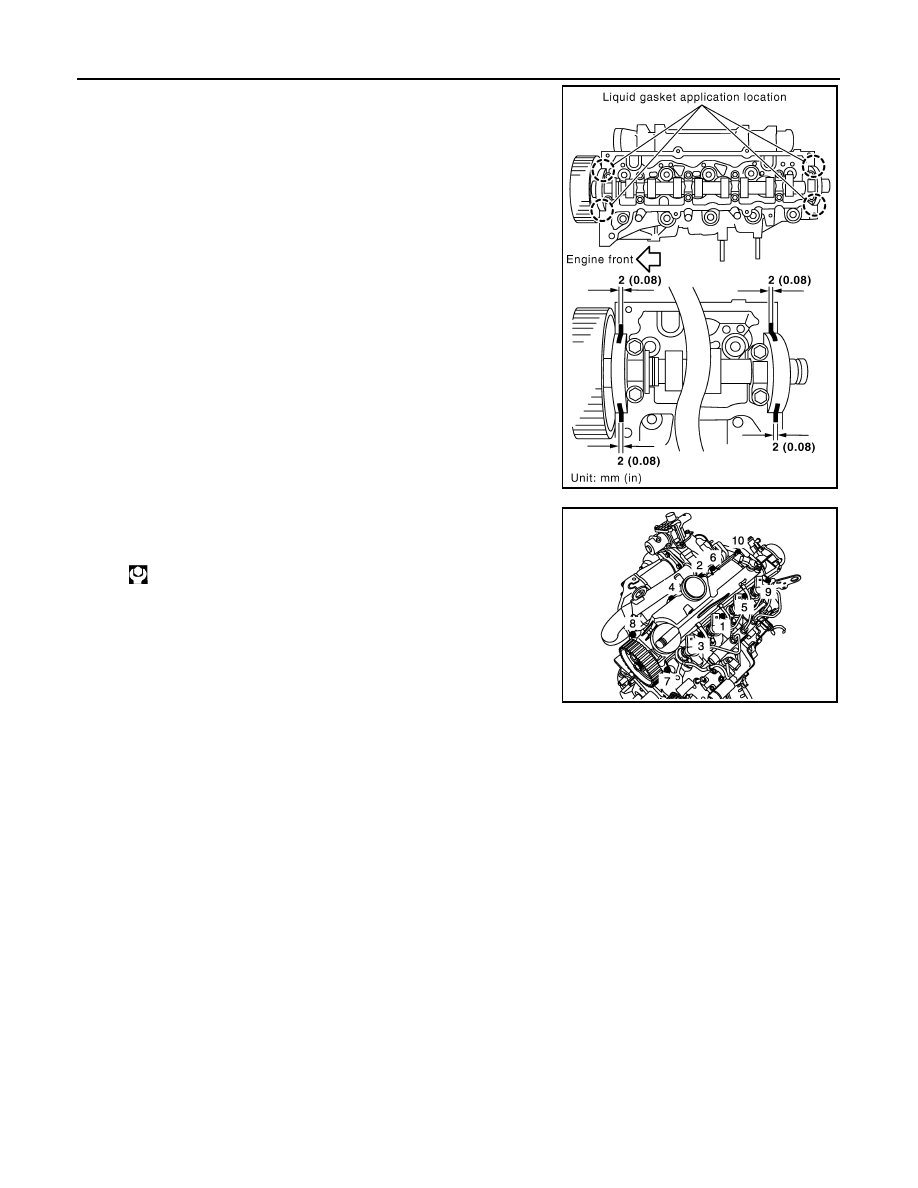
Remove rocker cover.
Loosen holding bolts in the reverse order as shown in the figure
and remove.
INSTALLATION
1.
Install new gasket to gasket.
1.
Oil filler cap
2.
Rocker cover
3.
Gasket
4.
Camshaft position sensor
Refer to
E1BIA0006GB
E1BIA0048ZZ
EM-286
< ON-VEHICLE REPAIR >
[K9K]
ROCKER COVER
2.
Apply liquid gasket on locations shown in the figure.
Use Genuine Liquid gasket or equivalent.
3.
Tighten holding bolts in the numerical order as shown in the fig-
ure.
4.
Install in the reverse order of removal after this steps.
MBIB0581E
: 12.0 N·m (1.2 kg-m, 9 ft-lb)
E1BIA0048ZZ
TIMING BELT
EM-287
< ON-VEHICLE REPAIR >
[K9K]
C
D
E
F
G
H
I
J
K
L
M
A
EM
N
P
O
TIMING BELT
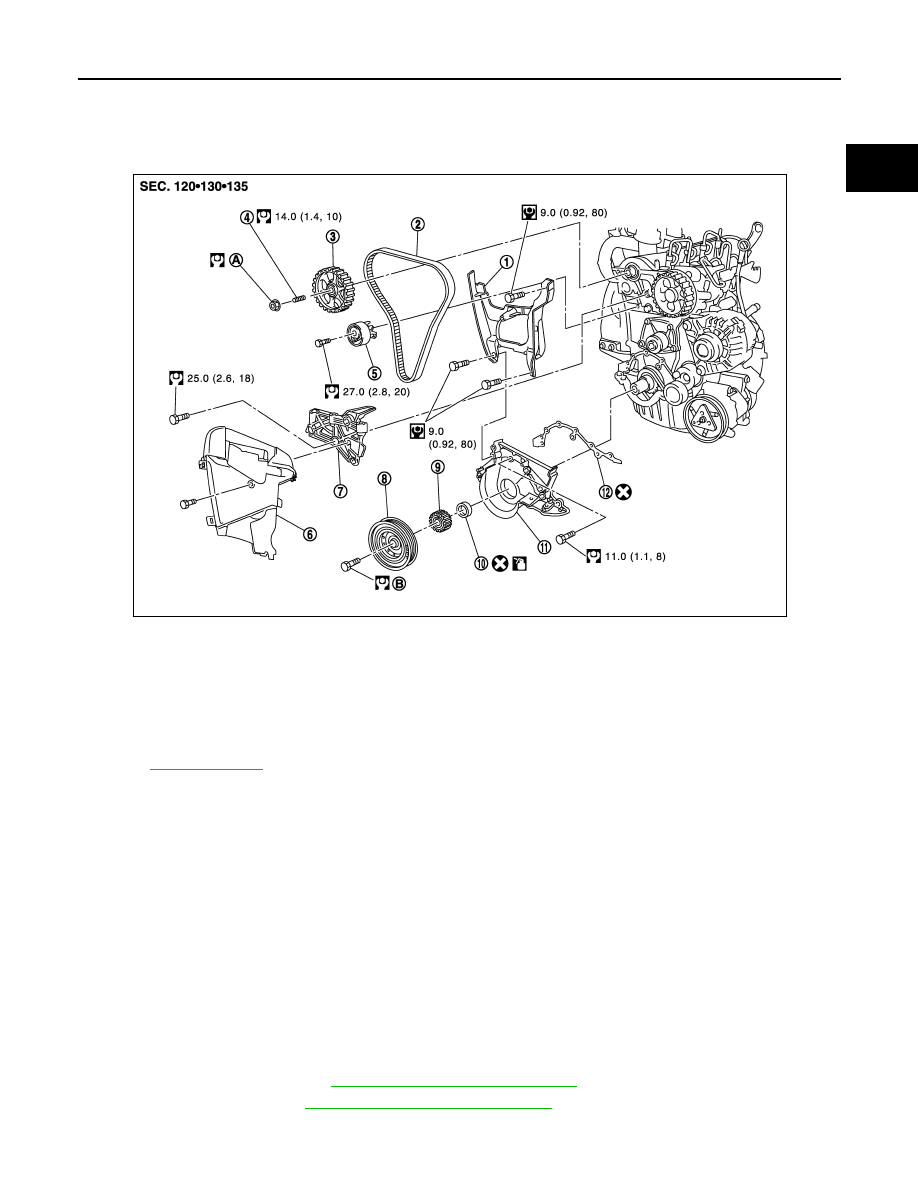
Exploded View
INFOID:0000000001060385
Removal and Installation
INFOID:0000000001060465
CAUTION:
• Apply new engine oil to parts marked in illustration before installation.
• Replace any belt that has been removed.
• Never turn the engine in the direction opposite to that of normal operation.
• When replacing the timing belt, be sure to replace the timing belt tensioner.
• Do not run the engine without the drive belts to avoid damaging the crankshaft pulley.
REMOVAL
1.
Remove the following parts.
• Battery ground cable
• Undercover
• RH front wheel
• RH head light assembly
2.
Remove right side splash cover.
3.
Remove engine cover. Refer to
EM-266, "Removal and Installation"
.
4.
Remove drive belt. Refer to
EM-287, "Removal and Installation"
5.
Remove RH engine torque rod.
1.
Timing belt inner cover
2.
Timing belt
3.
Camshaft sprocket
4.
Camshaft sprocket stud bolt
5.
Timing belt tensioner
6.
Timing belt cover
7.
Cylinder head suspended bracket
8.
Crankshaft pulley
9.
Crankshaft sprocket (timing belt)
10. Oil seal
11.
Crankshaft cover
12. Gasket
A.
30.0 N·m (3.1 kg-m, 22 ft-lb) and 86 degrees
B.
120.0 N·m (12 kg-m, 89ft-lb) and 95 degrees
Refer to
E1BIA0022GB
Нет комментариевНе стесняйтесь поделиться с нами вашим ценным мнением.
Текст