KIA Borrego (2017 year). Manual — part 7

Features of your vehicle
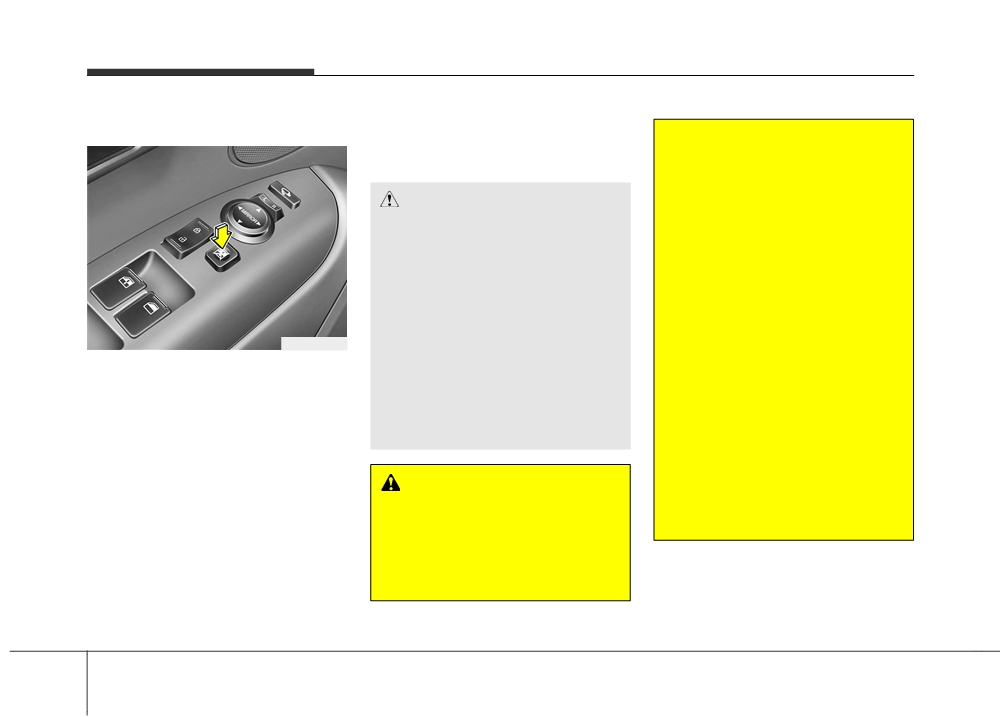
WINDOWS
(1) Driver’s door power window
switch
(2) Front passenger’s door power
window switch
(3) Rear door (left) power window
switch
(4) Rear door (right) power window
switch
(5) Window opening and closing
(6) Automatic power window up*/
down*
(7) Power window lock switch
* if equipped
✽ NOTICE
In cold and wet climates, power win-
dows may not work properly due to
freezing conditions.
OHM046017L
4 24

Features of your vehicle
Power windows
✽ NOTICE
Window opening and closing
The ignition switch must be in the ON
While driving with the rear windows
position for power windows to oper-
down or with the sunroof
(if
ate.
equipped) in an open (or partially
open position), your vehicle may
Each door has a power window
demonstrate a wind buffeting or
switch that controls the door's win-
pulsation noise. This noise is a nor-
dow. The driver has a power window
mal occurrence and can be reduced
lock button which can block the oper-
or eliminated by taking the follow-
ation of passenger windows. The
ing actions. If the noise occurs with
power windows can be operated for
one or both of the rear windows
approximately 30 seconds after the
down, partially lower both front
ignition key is removed or turned to
windows approximately one inch.
the ACC or LOCK position. However,
OHM046016
If you experience the noise with the
if the front doors are opened, the
sunroof open, slightly reduce the
To open or close a window, press
power windows cannot be operated
size of the sunroof opening.
down or pull up the front portion of
even within the 30 second period.
the corresponding switch to the first
The driver’s door has a master power
detent position (5).
window switch that controls all the
WARNING
windows in the vehicle.
Do not install any accessories in
the area of windows. It may
impact jam protection.
4 25

Features of your vehicle
Auto down window
Auto up/down window
If the power window does not operate
(if equipped) (Driver’s window)
(if equipped)
normally, the automatic power win-
dow system must be reset as follows:
1. Turn the ignition switch to the ON
position.
2. Close the window and continue
pulling up the power window
switch for at least 1 second after
the window is completely closed.
OHM046015L
OHM046015
Pressing the power window switch
Pressing or pulling up the power win-
momentarily to the second detent
dow switch momentarily to the sec-
position
(6) completely lowers the
ond detent position
(6) completely
window even when the switch is
lowers or raises the window even
released. To stop the window at the
when the switch is released. To stop
desired position while the window is
the window at the desired position
in operation, pull up the switch
while the window is in operation, pull
momentarily to the opposite direction
up or press down and release the
of the window movement.
switch.
4 26

Features of your vehicle
And if the power window switch is
pulled up continuously again within 5
WARNING
seconds after the window is lowered
Always check for obstructions
by the automatic window reversal
before raising any window to
feature, the automatic window rever-
avoid injuries or vehicle damage.
sal will not operate.
If an object less than 4 mm (0.16
in.) in diameter is caught
between the window glass and
✽ NOTICE
the upper window channel, the
The automatic reverse feature for the
automatic reverse window may
window is only active when the “auto
not detect the resistance and will
up” feature is used by fully pulling
OUN026013
not stop and reverse direction.
up the switch. The automatic reverse
Automatic reversal
feature will not operate if the window
If the upward movement of the win-
is raised using the halfway position
dow is blocked by an object or part of
on the power window switch.
WARNING
the body, the window will detect the
The automatic reverse feature
resistance and will stop upward
doesn't active while resetting
movement. The window will then
power window system.
lower approximately 30 cm (11.8 in.)
Make sure body parts or other
to allow the object to be cleared.
objects are safely out of the way
If the window detects the resistance
before closing the windows to
while the power window switch is
avoid injuries or vehicle damage.
pulled up continuously, the window
will stop upward movement then
lower approximately 2.5 cm (1 in.).
4 27
Features of your vehicle
Power window lock button
• The rear passengers’ control can-
(Continued)
not operate the rear passengers’
power window.
•
NEVER leave any child unat-
tended in the vehicle. Even
very young children may inad-
CAUTION
vertently cause the vehicle to
•
To prevent possible damage
move, entangle themselves in
to the power window system,
the windows, or otherwise
do not open or close two win-
injure themselves or others.
dows or more at the same
•
Always double check to make
time. This will also ensure the
sure all arms, hands, head
longevity of the fuse.
and other obstructions are
•
Never try to operate the main
safely out of the way before
OHM046018
switch on the driver's door
closing a window.
The driver can disable the power
and the individual door win-
•
Do not allow children play with
window switches on the rear passen-
dow switch in opposite direc-
the power windows. Keep the
gers’ doors by pressing the power
tions at the same time. If this is
driver’s door power window
window lock switch to the lock posi-
done, the window will stop and
lock button in the LOCK posi-
tion (pressed).
cannot be opened or closed.
tion (pressed). Serious injury
can result from unintentional
When the power window lock switch
is pressed :
window operation by the child.
WARNING - Windows
•
Do not extend heads or any
• The driver’s master control can
operate the front passenger’s power
•
NEVER leave the keys in your
limbs outside the window
window and the rear passengers’
vehicle with unsupervised
while the vehicle is in motion.
power windows.
children, when the engine is
running.
• The front passenger’s control can
If the window cannot be close because
operate the front passenger’s
(Continued)
it is blocked by objects, remove the
power window.
objects and close the window.
4 28

Features of your vehicle
HOOD
Opening the hood
Closing the hood
1. Before closing the hood, check the
following:
• All filler caps in the engine com-
partment must be correctly
installed.
• Gloves, rags or any other com-
bustible material must be removed
from the engine compartment.
2. Lower the hood halfway and push
OHM046020L
down to securely lock in place.
2. Go to the front of the vehicle, raise
• Then double check to be sure the
OHM048019
the hood slightly, push the second-
hood is secure.
1. Pull the release lever to unlatch
ary latch (1) left side and lift the
• If the hood can be lifted with a
the hood. The hood should pop
hood (2).
slight force, open the hood again
open slightly.
3. Raise the hood. It will completely
and close it more firmly.
rise by itself after it has been
raised about halfway.
WARNING
Open the hood after turning off
the engine on a flat surface,
shifting the shift lever to the
P(Park) position, and setting the
parking brake.
4 29

Features of your vehicle
WARNING
WARNING
• Before closing the hood,
• Always double check to be
ensure that all obstructions
sure that the hood is firmly
are removed from the hood
latched before driving away. If
opening. Closing the hood
it is not latched, the hood
with an obstruction present in
could open while the vehicle
the hood opening may result
is being driven, causing total
in property damage or severe
loss of visibility, which might
personal injury.
result in an accident.
• Do not leave gloves, rags or
• Do not move the vehicle with
any other combustible materi-
the hood raised. The view will
al in the engine compartment.
be blocked and the hood
Doing so may cause a heat-
could fall or be damaged.
induced fire.
4 30

Features of your vehicle
FUEL FILLER LID
Opening the fuel filler lid
✽ NOTICE
If the fuel filler lid does not open
because ice has formed around it,
tap lightly or push on the lid to break
the ice and release the lid. Do not pry
on the lid. If necessary, spray around
the lid with an approved de-icer fluid
(do not use radiator anti-freeze) or
move the vehicle to a warm place
and allow the ice to melt.
OHM046022L
1. Stop the engine.
OHM048021N
2. To open the fuel filler lid, pull the
The fuel filler lid must be opened
fuel filler lid opener up.
from inside the vehicle by pulling out
3. Pull open the fuel filler lid (1).
the fuel filler lid opener located on
the driver’s door.
4. To remove the cap, turn the fuel
filler cap (2) counterclockwise.
5. Refuel as needed.
4 31

Features of your vehicle
Closing the fuel filler lid
(Continued)
1. To install the cap, turn it clockwise
WARNING - Refueling
dangers
•
Do not get back into a vehicle
until it “clicks”. This indicates that
once you have begun refuel-
the cap is securely tightened.
Automotive fuels are flammable
ing since you can generate
materials. When refueling, please
2. Close the fuel filler lid and push it
static electricity by touching,
lightly and make sure that it is
note the following guidelines
rubbing or sliding against any
carefully. Failure to follow these
securely closed.
item or fabric (polyester, satin,
guidelines may result in severe
nylon, etc.) capable of produc-
personal injury, severe burns or
WARNING - Refueling
ing static electricity. Static
death by fire or explosion.
electricity discharge can
•
If pressurized fuel sprays out,
•
Read and follow all warning
ignite fuel vapors resulting in
it can cover your clothes or
posted at the gas station facility.
rapid burning. If you must re-
skin and subject you to the
•
Before refueling note the loca-
enter the vehicle, you should
risk of fire and burns. Always
tion of the Emergency
once again eliminate poten-
remove the fuel cap carefully
Gasoline Shut-Off, if available,
tially dangerous static elec-
and slowly. If the cap is vent-
at the gas station facility.
tricity discharge by touching a
ing fuel or if you hear a hiss-
•
Before touching the fuel noz-
metal part of the vehicle, away
ing sound, wait until the con-
zle, you should eliminate
from the fuel filler neck, noz-
dition stops before complete-
potentially dangerous static
zle or other gasoline source.
ly removing the cap.
electricity discharge by touch-
•
When using an approved
•
Do not "top off" after the noz-
ing another metal part of the
portable fuel container, be
zle automatically shuts off
vehicle, a safe distance away
sure to place the container on
when refueling.
from the fuel filler neck, noz-
the ground prior to refueling.
•
Always check that the fuel cap
zle, or other gas source.
Static electricity discharge
is installed securely to pre-
(Continued)
from the container can ignite
vent fuel spillage in the event
fuel vapors causing a fire.
of an accident.
(Continued)
4 32

Features of your vehicle
(Continued)
(Continued)
CAUTION
Once refueling has begun,
•
DO NOT use matches or a
•
Make sure to refuel your vehi-
contact with the vehicle
lighter and DO NOT SMOKE or
cle according to the "Fuel
should be maintained until the
leave a lit cigarette in your
requirements" suggested in
filling is complete.
vehicle while at a gas station
chapter 1.
especially during refueling.
Use only approved portable
•
If the fuel filler cap requires
Automotive fuel is highly
plastic
fuel
containers
replacement, please make sure
flammable and can, when
designed to carry and store
that you use parts designed for
ignited, result in fire.
gasoline.
replacement in your vehicle.
•
If a fire breaks out during refu-
•
Do not use cellular phones
An incorrect fuel filler cap can
while refueling. Electric cur-
eling, leave the vicinity of the
result in a serious malfunction
vehicle, and immediately con-
rent and/or electronic interfer-
of the fuel system or emission
ence from cellular phones can
tact the manager of the gas
control system. For more
station and then contact the
potentially ignite fuel vapors
detailed information, we rec-
causing a fire.
local fire department. Follow
ommend that you contact an
any safety instructions they
authorized Kia dealer.
•
When refueling, always shut
provide.
the engine off. Sparks pro-
•
Do not spill fuel on the exterior
duced by electrical compo-
surfaces of the vehicle. Any
nents related to the engine
type of fuel spilled on painted
can ignite fuel vapors causing
surfaces may damage the paint.
a fire. Once refueling is com-
•
After refueling, make sure the
plete, check to make sure the
fuel cap is installed securely
filler cap and filler door are
to prevent fuel spillage in the
securely closed, before start-
event of an accident.
ing the engine.
(Continued)
4 33

Features of your vehicle
Emergency fuel filler lid release
CAUTION
■ Type A
Do not pull the handle exces-
sively, otherwise the luggage
compartment area trim or
release handle may be damaged.
OHM048023
■ Type B
OHM048023N
If the fuel filler lid does not open
using the remote fuel filler lid
release, you can open it manually.
Remove the panel in the cargo area.
Pull the handle out slightly.
4 34

Features of your vehicle
SUNROOF (IF EQUIPPED)
✽ NOTICE
WARNING
• In cold and wet climates, the sun-
roof may not work properly due to
Never adjust the sunroof or
freezing conditions.
sunshade while driving. This
• After a vehicle is washed or in a
could result in loss of control
rainstorm be sure to wipe off any
and an accident that may cause
water that is on the sunroof before
death, serious injury, or proper-
operating it.
ty damage.
CAUTION
WARNING
OHM048024
Do not continue to move the sun-
roof control lever after the sun-
In order to prevent accidental
If your vehicle is equipped with a
operation of the sunroof, espe-
roof is fully opened, closed, or
sunroof, you can slide or tilt your
tilted. Damage to the motor or
cially by a child, do not let a
sunroof with the sunroof control lever
child operate the sunroof.
system components could occur.
located on the overhead console.
The sunroof can only be opened,
✽ NOTICE
WARNING
closed, or tilted when the ignition
• The sunroof cannot slide when it is
Do not sit on the top of the vehi-
switch is in the ON position.
in the tilt position nor can it be tilt-
cle. It may cause vehicle damage.
ed while in an open or slide posi-
tion.
• While driving the vehicle, it is rec-
ommended that you use the sun-
roof in the first detent position to
reduce possible wind noise.
4 35

Features of your vehicle
Sliding the sunroof
To open or close the sunroof (manu-
To open the sunroof automatically:
Automatic reversal
Pull the sunroof control lever back-
ward to the second detent position
and then release it. The sunroof will
slide open automatically but will not
open all the way. If you would like to
completely open the sunroof, pull the
lever once more. However, the sec-
ond time the lever is pulled the sun-
roof will open only while the lever is
pulled.
To stop the sunroof sliding at any
point, pull or push the sunroof control
OHM048025
OHM048026
lever momentarily.
If an object or part of the body is
al slide feature), pull or push the sun-
detected while the sunroof is closing
roof control lever backward or for-
To close the sunroof automatically:
automatically, it will reverse the direc-
ward to the first detent position.
Push the sunroof control lever for-
tion, and then stop.
Pulling the control lever downward
ward to the second detent position
The auto reverse function does not
also closes the sunroof.
and then release it. The sunroof will
work if a tiny obstacle is between the
automatically close all the way.
sliding glass and the sunroof sash.
To stop the sunroof sliding at any
You should always check that all pas-
point, pull or push the sunroof control
sengers and objects are away from
lever momentarily.
the sunroof before closing it.
4 36

Features of your vehicle
Tilting the sunroof
WARNING - Sunroof
CAUTION
•
Be careful that no head,
•
Periodically remove any dirt
hands and body parts are
that may accumulate on the
obstructed by a closing sun-
guide rail.
roof.
•
If you try to open the sunroof
•
Do not extend the face, neck,
when the temperature is
arms or body outside the sun-
below freezing or when the
roof while driving.
sunroof is covered with snow
or ice, the glass or the motor
•
Make sure your hands and
could be damaged.
head are safely out of the way
before closing a sunroof.
•
While using sunroof for a long
time, a dust between sunroof
OHM048027
and roof panel can make a
To open the sunroof (autotilt feature),
noise.
push the sunroof control lever
Open the sunroof and remove
upward to the second detent. The
regularly the dust using clean
sunroof will tilt all the way open. To
cloth.
stop the sunroof tilting at any point,
•
The sunroof is made to slide
operate the control lever.
together with the sunshade.
To close the sunroof, pull the sunroof
Do not leave the sunshade
lever downward until the sunroof
closed while the sunroof is
moves to the desired position.
opened.
4 37

Features of your vehicle
Sunshade
Resetting the sunroof
5.Push the sunroof control lever
upward (about 6 seconds) until the
Whenever the vehicle battery is dis-
sunroof operates as follows;
connected or discharged, you must
reset your sunroof system as follows:
TILT DOWN SLIDE OPEN
1.Turn the ignition switch to the ON
SLIDE CLOSE
position.
2.According to the position of the
Then, release the lever.
sunroof, do the following.
1) In case the sunroof is closed
When this is complete, the sunroof
completely or tilted:
system has been reset.
Push the sunroof control lever
OHM048028
upward until the sunroof tilts
CAUTION
The sunshade will automatically
completely upward.
open with the glass panel when the
If the sunroof is not reset when
2) In case the sunroof is open:
glass panel is moved. Close it manu-
the vehicle battery is discon-
Push the sunroof control lever
ally if you want it closed.
nected or discharged, or related
forward until the sunroof closes
fuse is blown, the sunroof may
completely. Push the sunroof
operate improperly.
control lever upward until the
sunroof tilts completely upward.
3.Release the sunroof control lever.
4.Push the sunroof control lever
upward (about 10 seconds) until
the sunroof has returned to the
original tilt position after it is raised
a little higher than the maximum tilt
position. Then, release the lever.
4 38

Features of your vehicle
STEERING WHEEL
Power steering
✽ NOTICE
Tilt steering
Power steering uses energy from the
If the power steering drive belt
Tilt steering allows you to adjust the
engine to assist you in steering the
breaks or if the power steering
steering wheel before you drive. You
vehicle. If the engine is off or if the
pump malfunctions, the steering
can also raise it to give your legs
power steering system becomes
effort will greatly increase.
more room when you exit and enter
inoperative, the vehicle may still be
the vehicle.
steered, but it will require increased
✽ NOTICE
steering effort.
If the vehicle is parked for extended
The steering wheel should be posi-
Should you notice any change in the
periods outside in cold weather (below
tioned so that it is comfortable for
effort required to steer during normal
-10°C(14°F)), the power steering may
you to drive, while permitting you to
vehicle operation, we recommend
require increased effort when the
see the instrument panel warning
that the system be checked by an
engine is first started. This is caused by
lights and gauges.
authorized Kia dealer.
increased fluid viscosity due to the cold
weather and does not indicate a mal-
function.
WARNING
CAUTION
When this happens, increase the
• Never adjust the angle of the
Never hold the steering wheel to
engine RPM by depressing the accel-
steering wheel while driving.
the extreme right or left for more
erator until the RPM reaches 1,500
You may lose steering control
than 5 seconds with the engine
rpm then release or let the engine idle
and cause severe personal
running. Holding the steering
for two or three minutes to warm up
injury, death or accidents.
wheel for more than 5 seconds
the fluid.
• After adjusting, push the
in either position may cause
steering wheel both up and
damage to the power steering
down to be certain it is locked
pump.
in position.
4 39

Features of your vehicle
Manual type (if equipped)
Electric type (if equipped)
Heated steering wheel
(if equipped)
OHM046034L
OHM046035L
To change the steering wheel angle,
Adjust the steering wheel angle (2)
OHM046339
adjust the steering wheel to the
and position
(3) with the control
With the ignition switch in the ON
desired angle (2) while pulling the
switch (1). Never adjust the position
position, pressing the heated steer-
lock-release lever
(1) and then
of the steering wheel while driving.
ing wheel button warms the steering
release the lock-release lever to lock
wheel. The indicator on the button
the steering wheel in place. Be sure
will illuminate.
to adjust the steering wheel to the
To turn the heated steering wheel off,
desired position before driving.
press the button once again. The
indicator on the button will turn off.
✽ NOTICE
The heated steering wheel will turn
off automatically approximately 30
minutes after the heated steering
wheel is turned on.
4 40
Большое спасибо!
Ваше мнение очень важно для нас.
Нет комментариевНе стесняйтесь поделиться с нами вашим ценным мнением.
Текст