Peugeot 107 Dag (2010.5). Manual — part 6

9
77
PRACTICAL INFORMATION
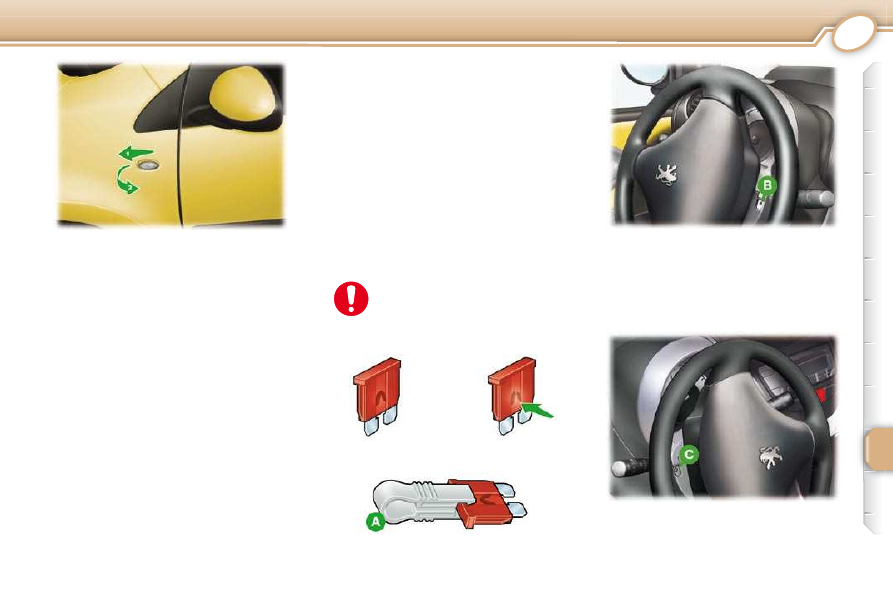
DIRECTION INDICATOR
SIDE REPEATERS
(WY 5 W AMBER)
Push the repeater forwards or
rearwards and detach it by pull-
ing towards you.
Disconnect the bulb holder and
change it.
CHANGING A FUSE
The fuseboxes are located under the
instrument panel trim and next to the
battery in the engine compartment.
Good
Removing and fitting a fuse
Before changing a fuse, the cause of
the incident must be found and recti-
fi ed.
Use the tweezer A located in the
fusebox under the bonnet.
Failed
Tweezer A
Instrument panel fuseboxes
These are located on each side of
the instrument panel under the trim.
Turn the steering wheel to the
left, remove bolt B .
Turn the steering wheel to the
right (do not forget to release the
steering wheel using the key), re-
move bolt C .
Always replace a faulty fuse
with a fuse of the same rat-
ing (same colour).

9
75
PRACTICAL INFORMATION
3. Dipped/Main beam headlamps
(H4 - 60/55W)
Disconnect the connector.
Remove the rubber cap C .
Push the side of the tongue D .
Remove the bulb holder and
change the bulb.
Refi t the bulb holder, the tongue
then the rubber cap.
If you encounter any diffi culties,
contact a PEUGEOT dealer or a
qualifi ed workshop.
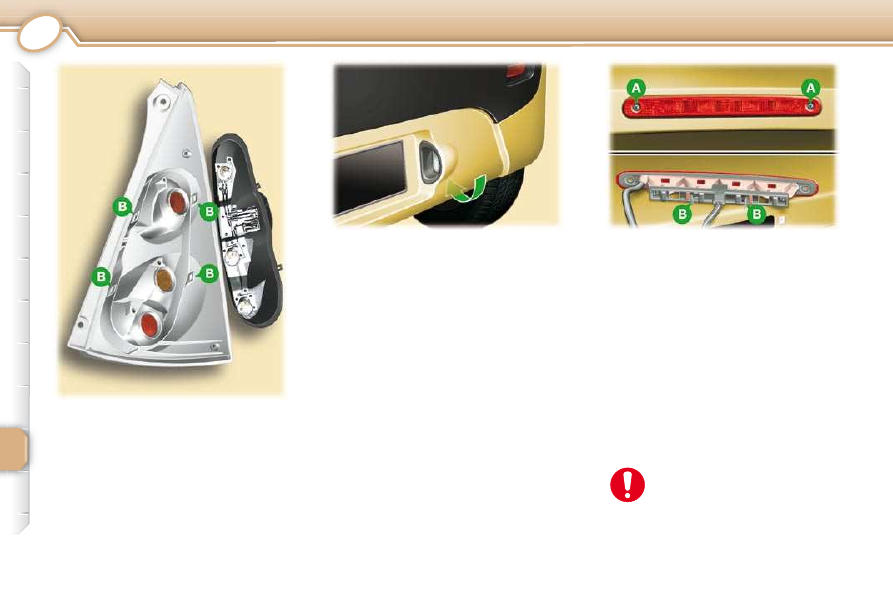
Rear lamps
1. Brake/sidelamps
(P 21/5 W)
2. Direction indicators
(P 21 W)
3. Reversing lamp (P 21 W),
right side
These 3 bulbs are changed by re-
moving the lamp unit:
open the boot,
unscrew the two lamp fi xing nuts A ,
remove the lamp unit by pulling
outwards,
unclip the harness,
Foglamp (P 21 W),
left side
9
76
PRACTICAL INFORMATION
Third brake lamp
(Four W 5 W bulbs)
Unscrew the 2 fi xing bolts A .
Release the lamp unit by pushing
the two tabs B inwards.
Disconnect the connector and the
rear wash-wipe pipe.
Remove the bulb holder.
Remove the bulb and change it.
When refi tting, proceed in the reverse
order and ensure that the lamp unit
seal and the rear wash-wipe pipe have
been put back in place correctly.
Number plate lamps (W 5 W)
Pass your hand under the bumper.
Remove the bulb holder turning it
one quarter of a turn.
Remove the bulb and change it.
Do not tighten the bolts more
than is necessary at the risk
of breaking the light.
remove the bulb holder by spread-
ing the four tongues B ,
remove the bulb and change it.
Note:
when refi tting, proceed in the
reverse order and take care to posi-
tion the bulb holder, the tongues and
the lamp unit correctly.

9
77
PRACTICAL INFORMATION
DIRECTION INDICATOR
SIDE REPEATERS
(WY 5 W AMBER)
Push the repeater forwards or
rearwards and detach it by pull-
ing towards you.
Disconnect the bulb holder and
change it.
CHANGING A FUSE
The fuseboxes are located under the
instrument panel trim and next to the
battery in the engine compartment.
Good
Removing and fitting a fuse
Before changing a fuse, the cause of
the incident must be found and recti-
fi ed.
Use the tweezer A located in the
fusebox under the bonnet.
Failed
Tweezer A
Instrument panel fuseboxes
These are located on each side of
the instrument panel under the trim.
Turn the steering wheel to the
left, remove bolt B .
Turn the steering wheel to the
right (do not forget to release the
steering wheel using the key), re-
move bolt C .
Always replace a faulty fuse
with a fuse of the same rat-
ing (same colour).

9
78
PRACTICAL INFORMATION
Raise the instrument panel trim,
and the rev counter trim if neces-
sary, to gain access to the fuses
located on the left and on the
right.
For the rev counter, partially un-
screw bolt D located behind it.
9
79
PRACTICAL INFORMATION
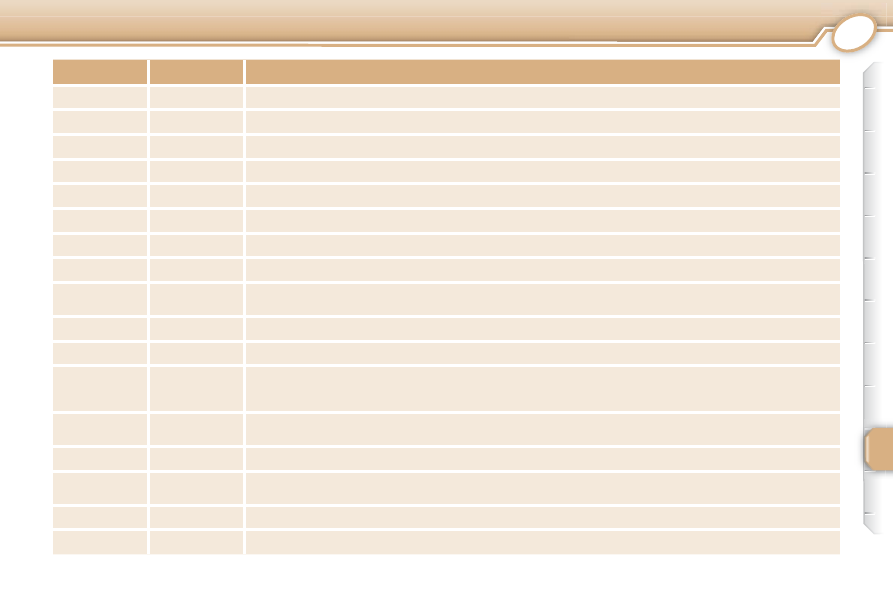
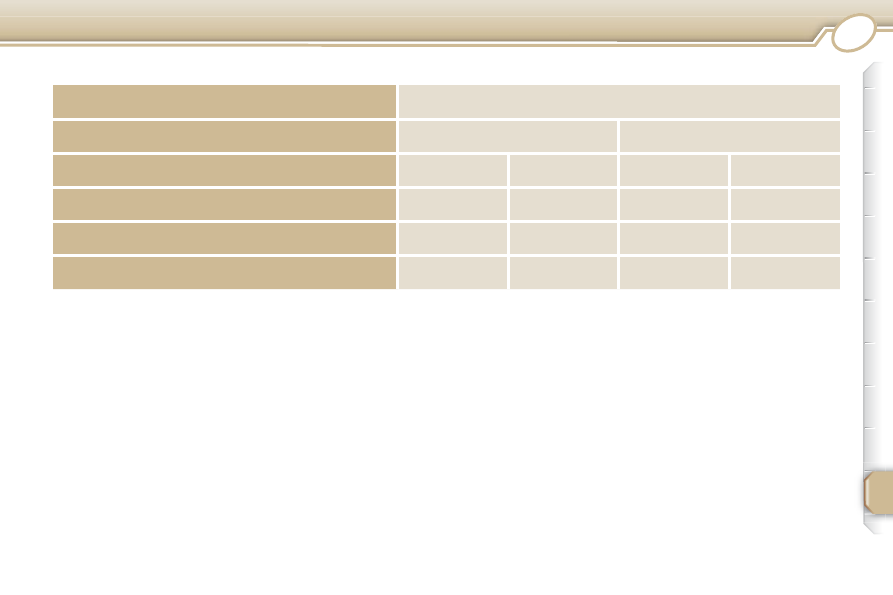
* Fuses located behind the instrument panel. To change them, contact a PEUGEOT dealer or a qualifi ed workshop.
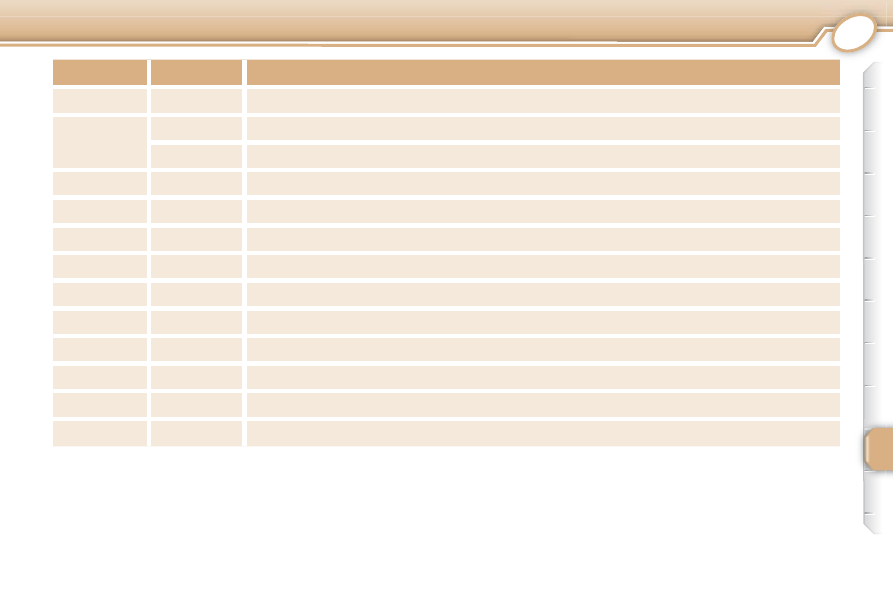
Fuse N°
Rating (A)
Functions
1
10
Brake lamps - ABS - "2 Tronic" gearbox
2
25
Central locking/unlocking
3
20
Rear screen demisting
4
7.5
Rear lamps - Number plate lamps - Instrument panel - Screen
5
7.5
Diagnostic socket
6
7.5
Rear foglamp - Instrument panel - "2 Tronic" gearbox
7
-
Not used
8
7.5
ABS - Power steering - Air conditioning - Fan assembly
9
10
Rear lamps - Central locking/unlocking - Electric windows - Rear screen demisting -
Speedometer - Air conditioning - Heating - Rev counter
10
20
Front and rear wipers
11
15
Audio equipment - Electronic engine immobiliser - 12 V socket (120 W max)
12
7.5
Rear screen demisting - ABS - Fan assembly - Front and rear wipers - Power steering -
Central locking/unlocking - Air conditioning - Electric windows - Speedometer - Rev counter
13
15
Airbag - Engine control unit - Electronic engine immobiliser - "2 Tronic" gearbox -
Instrument panel
14
7.5
Air conditioning
15 *
40
Accessories - Demisting - ABS - Fan assembly relay - Front and rear wipers
16 *
30
Electric windows
17 *
40
Heating - Air conditioning
9
80
PRACTICAL INFORMATION
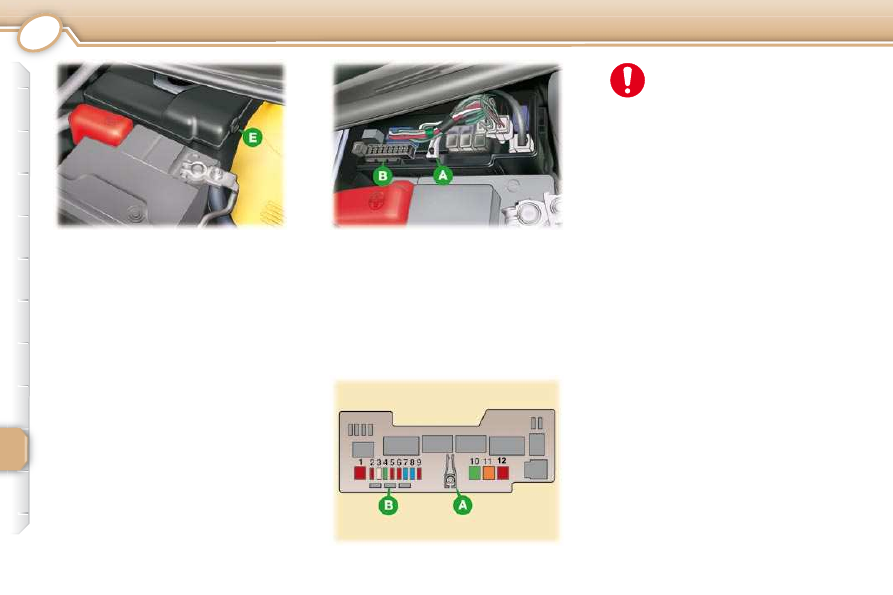
Engine compartment fusebox
Unclip the cover, pressing on the
right on lug E , to gain access to
the fuses.
Your vehicle's electrical cir-
cuit is designed to operate
with standard or optional
equipment.
Before installing
other electrical
equipment or accessories on your
vehicle, contact a PEUGEOT dealer
or a qualifi ed workshop.
The tweezer A and the replacement
fuses B
are fi xed at the front of the
box.
When you have fi nished, close the
cover very carefully.
Some electrical accessories or the
way in which they are fi tted may
have an adverse effect on the opera-
tion of your vehicle (audio circuits,
control circuit and electrical charging
circuit).
PEUGEOT will not accept any re-
sponsibility for the costs incurred in
repairing your vehicle or for the mal-
functions resulting from the installa-
tion of auxiliary accessories which
were not supplied or recommended
by PEUGEOT and which were not in-
stalled in accordance with its instruc-
tions, in particular in the case of any
equipment the consumption of which
exceeds 10 milliamps.
9
81
PRACTICAL INFORMATION
Fuse N°
Rating (A)
Functions
1
50
"2 Tronic" gearbox
2
10
Headlamps
20
Headlamps with daytime running lamps
3
30
ABS/ESP control unit
4
30
Ignition switch supply
5
10
Hazard warning lamps - Instrument panel warning lamps - Direction indicators
6
10
Headlamps
7
15
Courtesy lamp - Speedometer - Audio equipment - Instrument panel - Rev counter
8
15/25
Petrol/Diesel engine control unit
9
10
Horn
10
30
Fan assembly (petrol)
11
50
ABS/ESP
12
50
Power steering
9
82
PRACTICAL INFORMATION
BATTERY
Do not push the vehicle to
start the engine if you have a
"2 Tronic" gearbox.
Before
disconnecting
the
battery, you must wait for
2 minutes after switching off
the ignition.
Starting the vehicle from
another battery
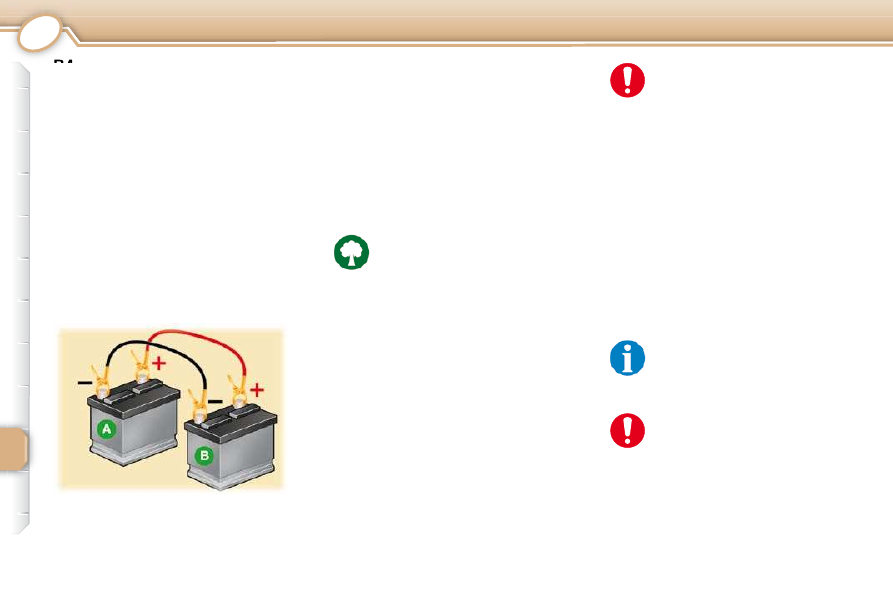
-
Connect the red cable to the posi-
tive (+) terminals of the two batteries,
-
connect the green or black cable
to the negative (-) terminals of the
two batteries,
-
operate the starter, let the engine
run,
-
wait for the engine to return to
idle, then disconnect the cables.
It is advisable to disconnect
the battery if the vehicle is
not to be used for a period of
more than one month.
The batteries contain harm-
ful substances such as sul-
phuric acid and lead. They
must be discarded in accor-
dance with the provisions of the law
and must not, in any circumstances,
be discarded with household waste.
Take used batteries to an authorised
waste disposal site.
Charging the battery using
a battery charger
-
Disconnect the battery,
-
follow the instructions for use giv-
en by the battery charger manu-
facturer,
-
reconnect starting with the nega-
tive (-) terminal,
-
check that the terminals and con-
nectors are clean. If they are
covered with sulphate (white or
greenish
deposit),
disconnect
them and clean them.
A. Failed battery
B. Slave battery
Never disconnect a terminal when
the engine is running.
Never charge a battery without fi rst
disconnecting the terminals.
Close the windows and doors before
disconnecting the battery.
After every reconnection of the bat-
tery, switch on the ignition and wait
1 minute before starting to allow the
electronic systems to be initialised. If
some diffi culties are experienced af-
ter this, please contact a PEUGEOT
dealer or a qualifi ed workshop.
9
83
PRACTICAL INFORMATION
FITTING AUDIO EQUIPMENT
Your vehicle is equipped with certain
factory-fi tted audio equipment:
-
roof aerial,
-
coaxial aerial cable,
-
basic interference suppression,
-
wiring for front speakers,
-
two 8-way connectors.
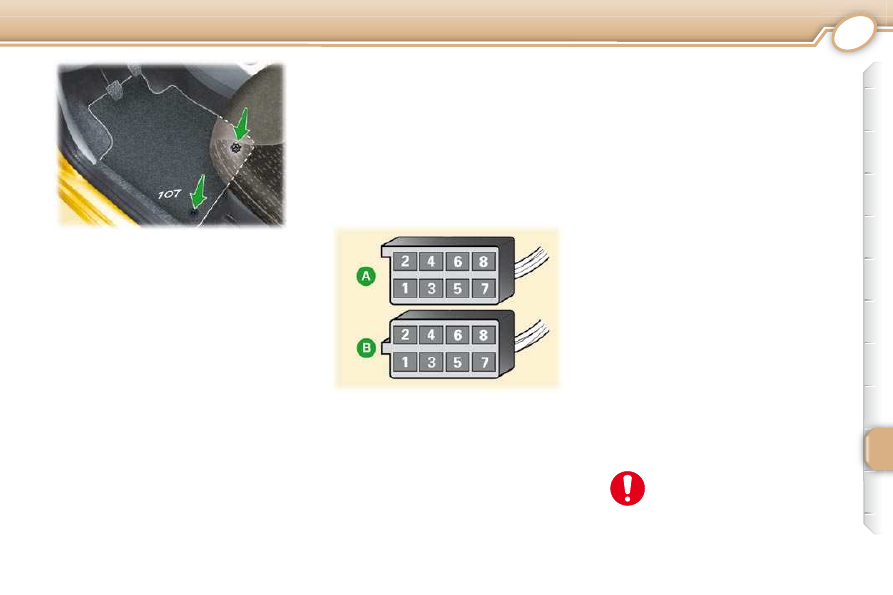
FITTING SPEAKERS
The factory-fi tted equipment allows
the fi tting of 100 mm diameter speak-
ers on the dashboard.
As accessories, you can fi t 165 mm
diameter speakers on the rear shelf.
Making the connections
A1: -
A2: -
A3: -
A4: (+) Accessories
A5: -
A6: (+ve) Sidelamps
A7: (+ve) Permanent
A8: Earth
Consult a PEUGEOT dealer
or a qualifi ed workshop be-
fore installing audio equip-
ment or speakers in your
vehicle.
MAT *
When removing the mat on the driv-
er's side, push the seat as far back as
possible and remove the two fi xings.
When refi tting, position the mat
correctly on the pins and clip the
fi xings. Check that the mat is secured
correctly.
To prevent the mat from becoming
caught under the pedals:
- only use mats suited to the fi xings
already present in the vehicle. It
is imperative that these fi xings be
used.
- never fi t one mat on top of another.
* According to version.
B1: (+) Rear right speaker
B2: (-) Rear right speaker
B3: (+) Front right speaker
B4: (-) Front right speaker
B5: (+) Front left speaker
B6: (-) Front left speaker
B7: (+) Rear left speaker
B8: (-) Rear left speaker
9
84
PRACTICAL INFORMATION
TOWING THE VEHICLE
Your vehicle can only be towed at
the front.
Lifting (2 wheels only on
the road)
Never use the radiator crossmember.
Towing with fours wheels on the road
must be carried out at very low speed
over a very short distance (in accor-
dance with the legislation in force).
Without lifting (4 wheels on
the road)
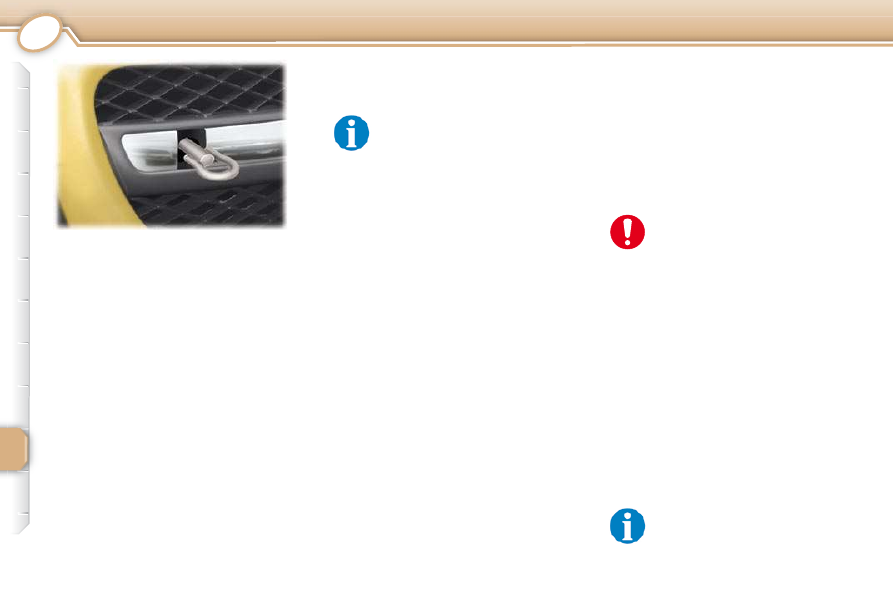
The removable towing eye is stored
in the spare wheel, under the boot
carpet.
press the lower part of the cover
in order to take hold of the upper
part,
pull the cover to unclip it,
screw in the towing eye fully.
Place the gear lever in posi-
tion N for the "2 Tronic" gear-
box.
FITTING ROOF BARS
Please refer to national legis-
lation in order to comply with
the regulations concerning the
transportation of objects which
are longer than the vehicle.
Vehicles fitted with a manual
gearbox
In the case of vehicles fi tted with a
manual gearbox, the gear lever must
be in the neutral position.
Failure to observe this special condi-
tion may result in damage to certain
braking components and the ab-
sence of braking assistance the next
time the engine is started.
When fi tting transverse roof bars,
use the accessories recommended
by PEUGEOT and follow the manu-
facturer's fi tting instructions.
For more information, contact a PEUGEOT
dealer or a qualifi ed workshop.
Maximum weight authorised on
the bars, for a loading height not
exceeding 40 cm (except bicycle
carrier): 50 kg.
If the height exceeds 40 cm, adapt
the speed of the vehicle to the pro-
fi le of the road to avoid damaging
the roof bars.
General recommendations
Observe the legislation in
force in your country.
Ensure that the weight of the tow-
ing vehicle is higher than that of the
towed vehicle.
The driver must stay at the wheel of
the towed vehicle.
Driving on motorways and fast roads
is prohibited when towing.
When towing a vehicle with all four
wheels on the ground, always use an
approved towing bar; rope and straps
are prohibited.
When towing a vehicle with the en-
gine off, there is no longer any power
assistance for braking or steering.
In the following cases, you must al-
ways call on a professional recovery
service:
-
vehicle broken down on a motor-
way or fast road,
-
when it is not possible to put the
gearbox into neutral, unlock the
steering, or release the parking
brake,
-
towing with only two wheels on
the ground,
-
where there is no approved towing
bar available...
In all other cases, your vehicle must
be transported on a trailer.
9
85
PRACTICAL INFORMATION
ACCESSORIES
A wide range of accessories and
genuine parts is available from the
PEUGEOT dealer network.
These accessories and parts have
been tested and approved for reli-
ability and safety.
They are all adapted to your vehicle
and benefi t from PEUGEOT's recom-
mendation and warranty.
Installation of radio
communication transmitters
Before installing any after-market
radio
communication
transmitter,
you can contact a PEUGEOT dealer
for the specifi cation of transmitters
which can be fi tted (frequency, maxi-
mum power, aerial position, specifi c
installation requirements), in line with
the Vehicle Electromagnetic Compat-
ibility Directive (2004/104/EC).
Depending on the legisla-
tion in force in the country, it
may be compulsory to have
a high visibility safety vest,
warning triangle and spare bulbs and
fuses available in the vehicle.
The fi tting of electrical equipment or
accessories which are not recom-
mended by PEUGEOT may result in
a failure of your vehicle's electronic
system and excessive electrical con-
sumption.
Please note this precaution. You are
advised to contact a PEUGEOT rep-
resentative to be shown the range
of recommended equipment and ac-
cessories.
* France only.
"Comfort": front and rear parking sen-
sors, portable ashtray, glove box lid,
insulated module, centre armrest, door
defl ectors, sun blinds, sunroof, ...
"Transport solutions": boot liner,
boot carpet, roof bars, bicycle car-
rier, ski carrier, rigid and fl exible roof
boxes, boot dividers, ...
You can obtain "Van" conversion kits to
convert a private vehicle to a van * .
"Styling": 14 inch alloy wheels,
15 inch allow wheels, spoiler, Spor-
tium and Envy styling stickers, "Cris-
tal" rear lamps, "aluminium" and
"carbon fi bre" styling kit, chromed ex-
haust tailpipe, leather steering wheel,
"aluminium" interior kit, ...
"Security and safety": anti-theft
alarm, security wheel bolts, snow
chains and non-skid covers, tyre in-
fl ator, high visibility jacket, warning
triangle, breathalyzer, child seats,
fi rst aid kit, foglamps kit, ...
"Protection": mats,
seat
covers,
front and rear mudfl aps, protective
side rubbing strips, door sill protec-
tors, boot sill protector, car cover, ...
To prevent the mat from becoming
caught under the pedals:
-
ensure that the mat is positioned
and secured correctly,
- never fi t one mat on top of another.
" Multimedia ": semi-integrated Garmin
®
navigation system, iPod
®
dock, USB
Box, satellite navigation systems, audio
systems, speakers, Bluetooth hands-free
system, auxiliary cable for audio equip-
ment, ...

10
10
86
TECHNICAL DATA
PETROL ENGINES
Model codes PM, PN
CFB0/CFB4
CFB0/P
Engines
1.0 litre (≈ 68 hp)
Cubic capacity (cc)
998
Bore x stroke (mm)
71 x 84
EU standard maximum power (kW)
50
Max power engine speed (rpm)
6 000
EU standard max torque (Nm)
93
Max torque engine speed (rpm)
3 600
Fuel
Unleaded
Catalytic converter
Yes
Gearbox
Manual (5-speed)
"2 Tronic" (5-speed)
Oil capacity (in litres)
Engine (with fi lter replacement)
3.2
10
10
87
TECHNICAL DATA
PETROL WEIGHTS (IN KG)
The design of your vehicle does not permit the fi tting of a towbar.
Engines
1.0 litre
Gearbox
Manual
" 2 Tronic "
Versions
3-door
5-door
3-door
5-door
Model codes
PMCFB0/
PMCFB4
PNCFB0 /
PNCFB4
PMCFB0 /P
PNCFB0/P
Kerb weight
800
805
830
840
Gross vehicle weight
1 180
1 190
1 180
1 190
10
10
88
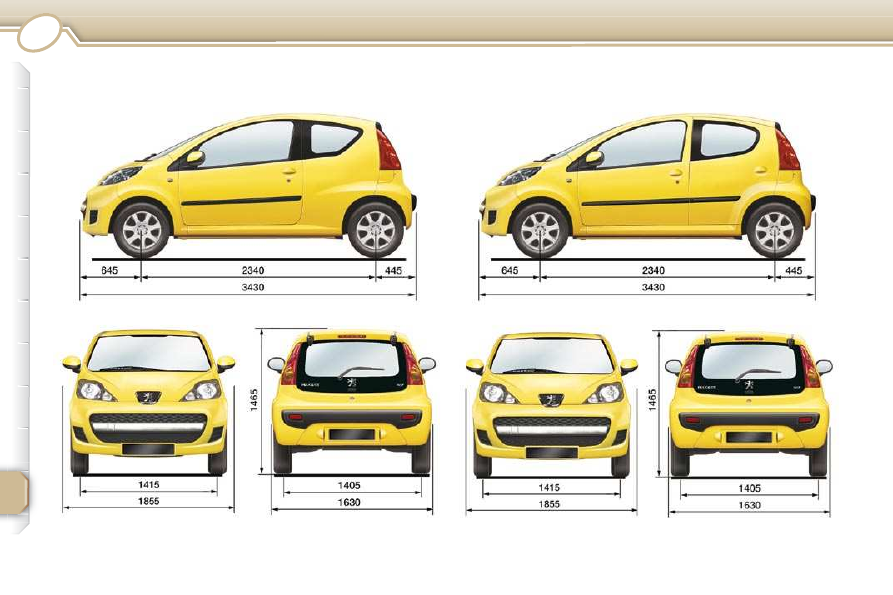
TECHNICAL DATA
DIMENSIONS (IN MM)
Нет комментариевНе стесняйтесь поделиться с нами вашим ценным мнением.
Текст