Subaru Impreza 3 / Impreza WRX / Impreza WRX STI. Service manual — part 22
PM-26
Brake Fluid
PERIODIC MAINTENANCE SERVICES
17.Brake Fluid
A: INSPECTION
1) Check that the amount of brake fluid is between
the lines of “MIN” and “MAX”. If out of the specified
range, refill or drain the fluid. If the fluid level is
close to “MIN”, check the brake pad for wear and
refill the fluid.
2) Check the fluid for discoloration. If the fluid is ex-
tremely discolored, replace with the new fluid.
B: REPLACEMENT
CAUTION:
• Do not let brake fluid come into contact with
the painted surface of the vehicle body. Wash
away with water immediately and wipe off if it is
spilled by accident.
• Avoid mixing brake fluid of different brands
to prevent fluid performance from degrading.
• Be careful not to allow dirt or dust to enter the
reservoir tank.
• If the brake fluid is spilt over exhaust pipe,
wipe it off with cloth to avoid emitting smoke or
causing a fire.
NOTE:
• During the operation, keep the reservoir tank
filled with brake fluid to prevent entry of air.
• Operate the brake pedal slowly.
• For convenience and safety, perform the work
with 2 people.
• The required amount of brake fluid is approxi-
mately 500 mL (16.9 US fl oz, 17.6 Imp fl oz) for the
entire brake system.
1) Either jack-up the vehicle and place a rigid rack
under it, or have the vehicle lifted.
2) Remove all the wheels.
3) Drain brake fluid from the reservoir tank.
4) Refill the reservoir tank with recommended
brake fluid.
Recommended brake fluid:
Refer to “RM” section. <Ref. to RM-4, FLUID,
RECOMMENDED MATERIALS, Recommend-
Perform the same procedure as for bleeding the
brake line, until new brake fluid comes out from vi-
nyl tube. <Ref. to BR-41, PROCEDURE, Air Bleed-
ing.>
NOTE:
Perform brake fluid replacement starting in the or-
der from the farthest wheel cylinder from the mas-
ter cylinder.
5) Install one end of a vinyl tube onto the air bleeder
and insert the other end of the tube into a container
to collect the brake fluid.
NOTE:
For calipers with two air bleeder screws, bleed air
from the inner side first and then the outer side.
6) Instruct your co-worker to depress the brake
pedal slowly two or three times and then hold it de-
pressed.
7) Loosen the bleeder screw approximately 1/4
turn until a small amount of brake fluid drains into
the container, and then quickly tighten the screw.
8) Repeat steps 6) and 7) until there are no air bub-
bles in drained brake fluid and new fluid flows
through vinyl tube.
NOTE:
Add brake fluid as necessary while performing the
air bleed operation, in order to prevent the tank
from running short of brake fluid.
9) After completing the bleeding operation, hold the
brake pedal depressed and tighten the screw and
install bleeder cap.
Tightening torque:
Brembo type: 20 N·m (2.0 kgf-m, 14.8 ft-lb)
Except for brembo type: 8 N·m (0.8 kgf-m, 5.9
ft-lb)
10) Bleed air from each wheel cylinder by following
steps from 5) to 9).
11) Depress the brake pedal with a force of approx.
294 N (30 kgf, 66 lbf) and hold it there for approx.
20 seconds. At this time check the pedal to see if it
makes any unusual movement. Visually inspect the
bleeder screws and brake pipe joints to confirm
there is no fluid leakage.
(1) Inner side air bleeder screw
(2) Outer side air bleeder screw
BR-00376
(2)
(1)
gi14usena07.fm 26 ページ 2013年9月10日 火曜日 午後3時59分
PM-27
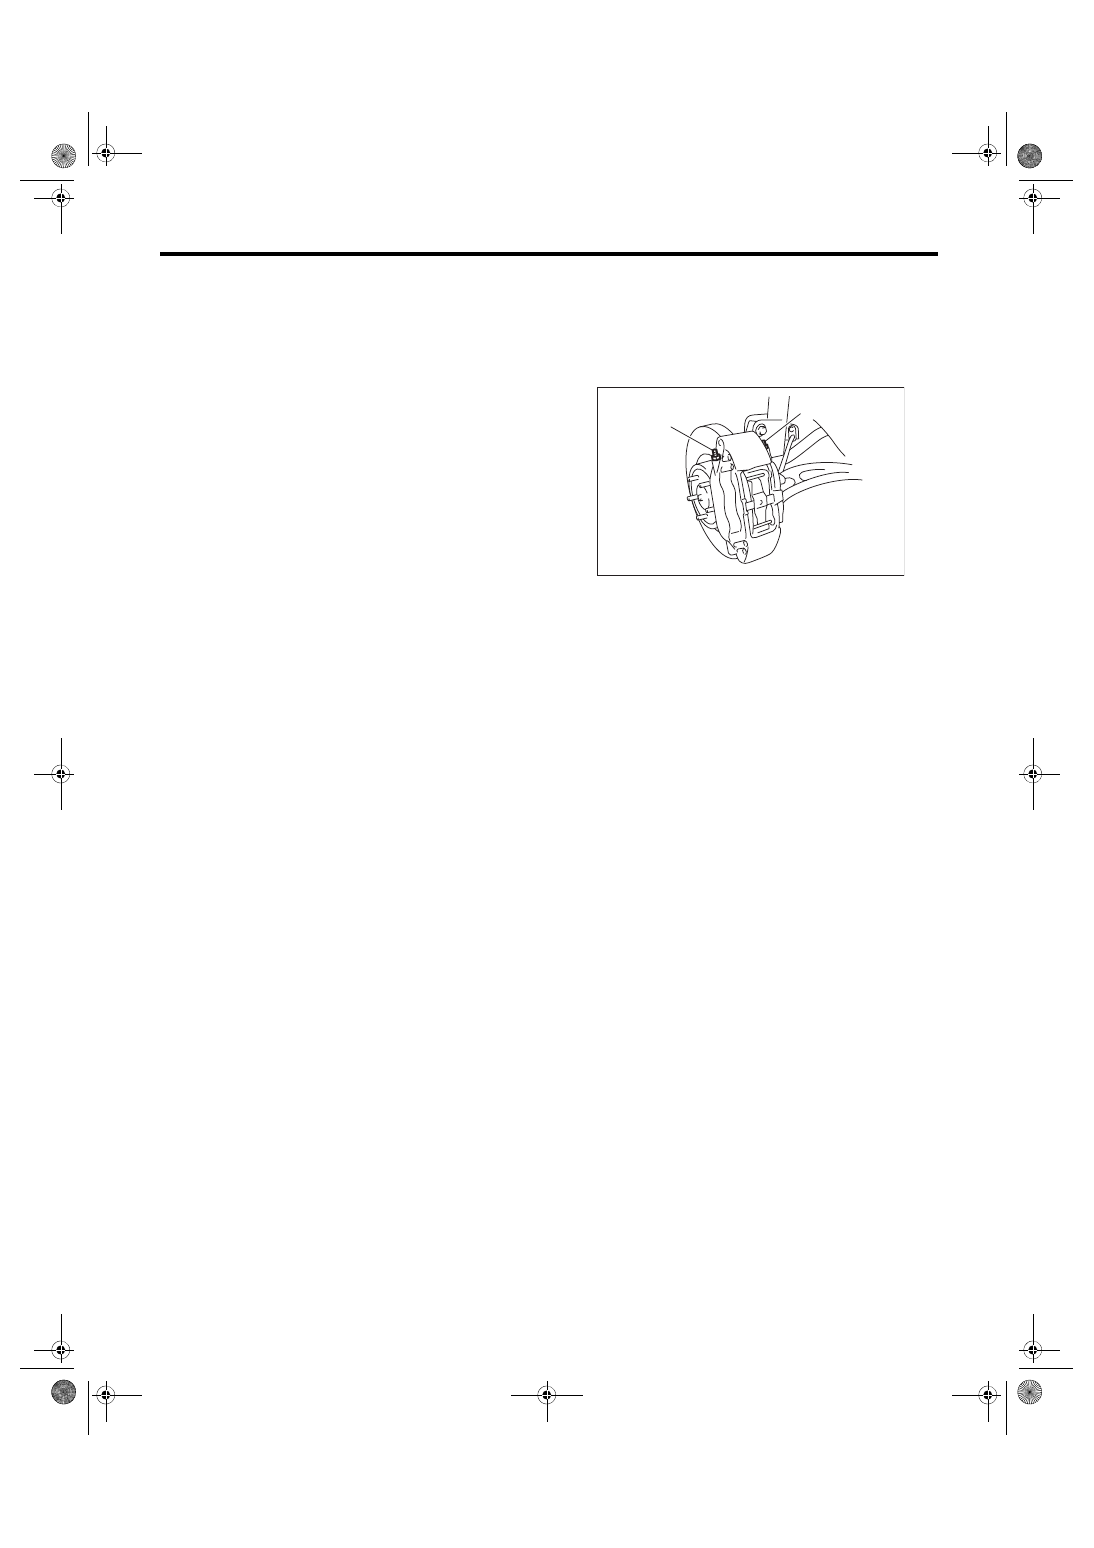
Disc Brake Pad and Disc
PERIODIC MAINTENANCE SERVICES
18.Disc Brake Pad and Disc
A: INSPECTION
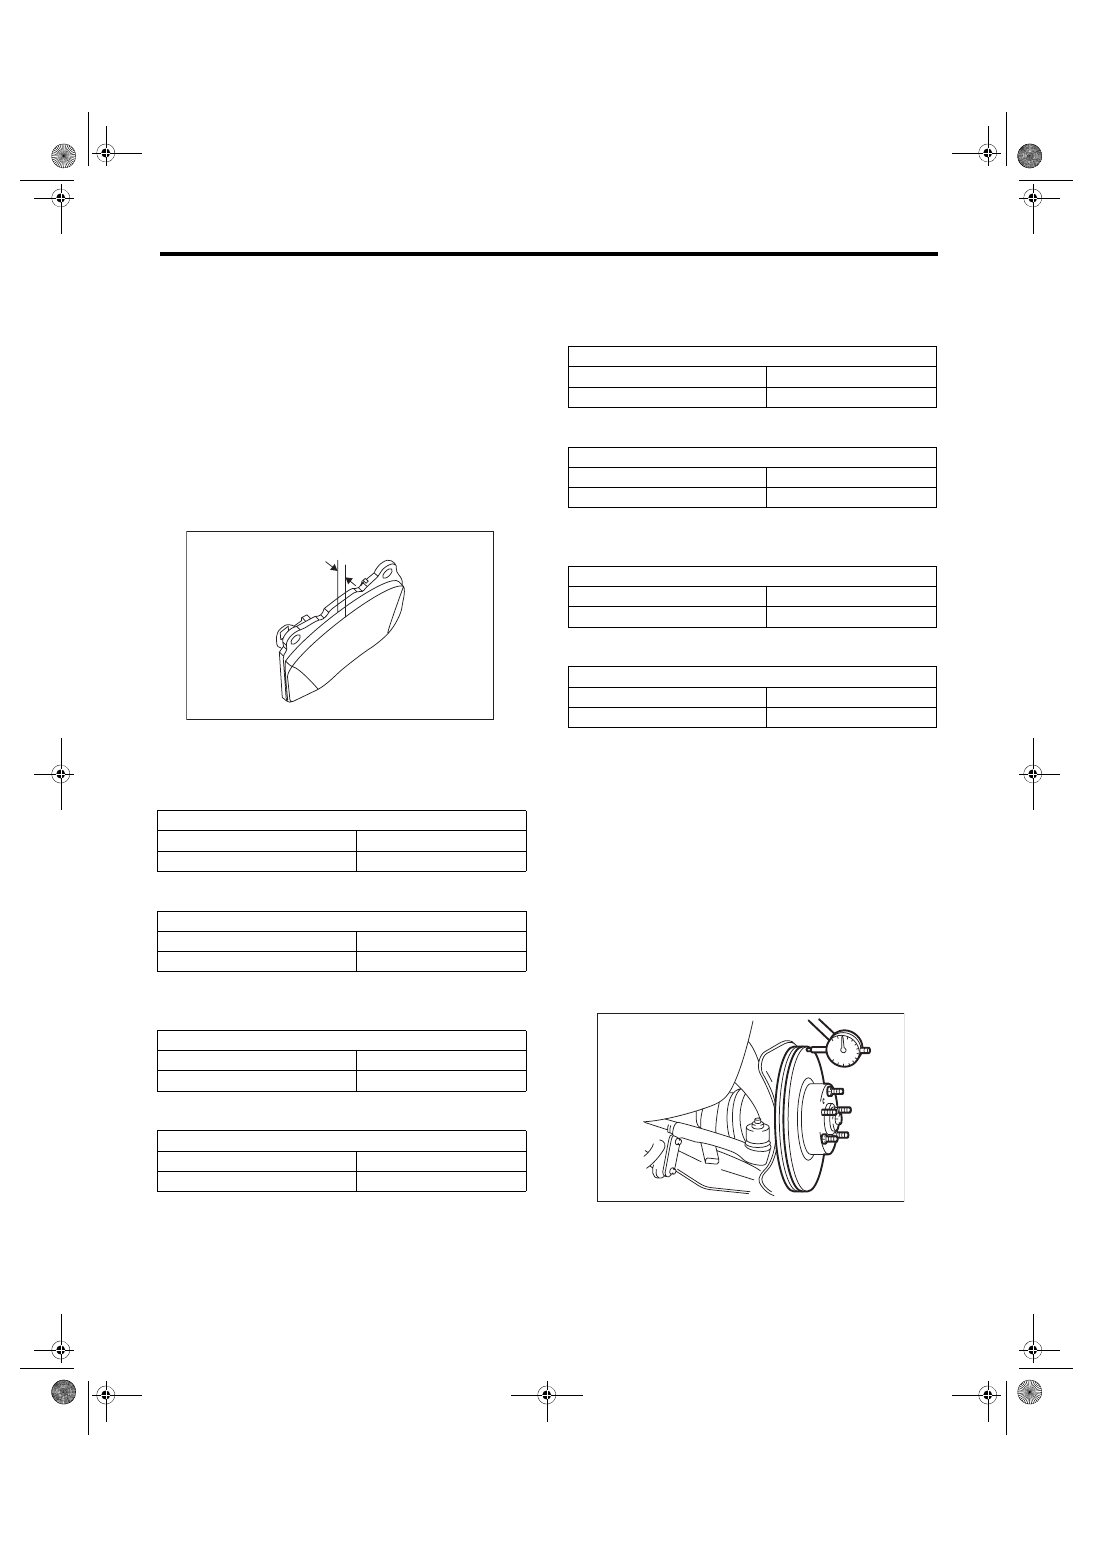
1. DISC BRAKE PAD AND DISC
1) Jack-up the vehicle and support it with rigid
racks. Remove the wheels.
2) Visually check the pad thickness through inspec-
tion hole of disc brake assembly. Replace the pad if
necessary.
NOTE:
When replacing a pad, always replace the pads for
both the left and right wheels at the same time. Also
replace the pad clips if they are twisted or worn.
• Front (back metal not included)
Brembo type
Except for brembo type
• Rear (back metal not included)
Brembo type
Except for brembo type
3) Check the disc rotor, and correct or replace if it is
damaged or worn.
• Front
Brembo type
Except for brembo type
• Rear
Brembo type
Except for brembo type
4) Remove the caliper body. <Ref. to BR-19, Front
Disc Brake Assembly.> <Ref. to BR-29, Rear Disc
5) Tighten the wheel nuts to secure disc rotor.
6) Set a dial gauge at a point of 10 mm (0.39 in) or
less from outer periphery of the rotor, and then
measure the disc rotor runout.
Disc rotor runout limit:
Brembo type
Front: 0.075 mm (0.0030 in)
Rear: 0.070 mm (0.0028 in)
Except for brembo type
Front: 0.050 mm (0.0020 in)
Rear: 0.050 mm (0.0020 in)
(A) Pad thickness
Pad thickness
mm (in)
Standard
8.9 (0.350)
Wear limit
1.2 (0.047)
Pad thickness
mm (in)
Standard
11 (0.43)
Wear limit
1.5 (0.059)
Pad thickness
mm (in)
Standard
9.0 (0.354)
Wear limit
1.2 (0.047)
Pad thickness
mm (in)
Standard
9.0 (0.354)
Wear limit
1.5 (0.059)
A
BR-00296
Disc rotor thickness
mm (in)
Standard
30 (1.18)
Wear limit
28 (1.10)
Disc rotor thickness
mm (in)
Standard
24 (0.94)
Wear limit
22 (0.87)
Disc rotor thickness
mm (in)
Standard
20 (0.79)
Wear limit
18 (0.71)
Disc rotor thickness
mm (in)
Standard
10 (0.39)
Wear limit
8.5 (0.33)
PM-00051
gi14usena07.fm 27 ページ 2013年9月10日 火曜日 午後3時59分
PM-28
Parking Brake
PERIODIC MAINTENANCE SERVICES
19.Parking Brake
A: INSPECTION
1) Measure the inner diameter of the brake disc ro-
tor. If scoring or worn is found on the disk, replace
the brake disc rotor.
Disc rotor inner diameter:
Standard
190 mm (7.48 in)
Service limit
191 mm (7.52 in)
2) Measure the lining thickness. If it exceeds the
limit, replace the brake shoe.
Lining thickness:
Standard
2.8 mm (0.11 in)
Service limit
1.5 mm (0.059 in)
NOTE:
Replace the right and left primary and secondary
brake shoes as a set.
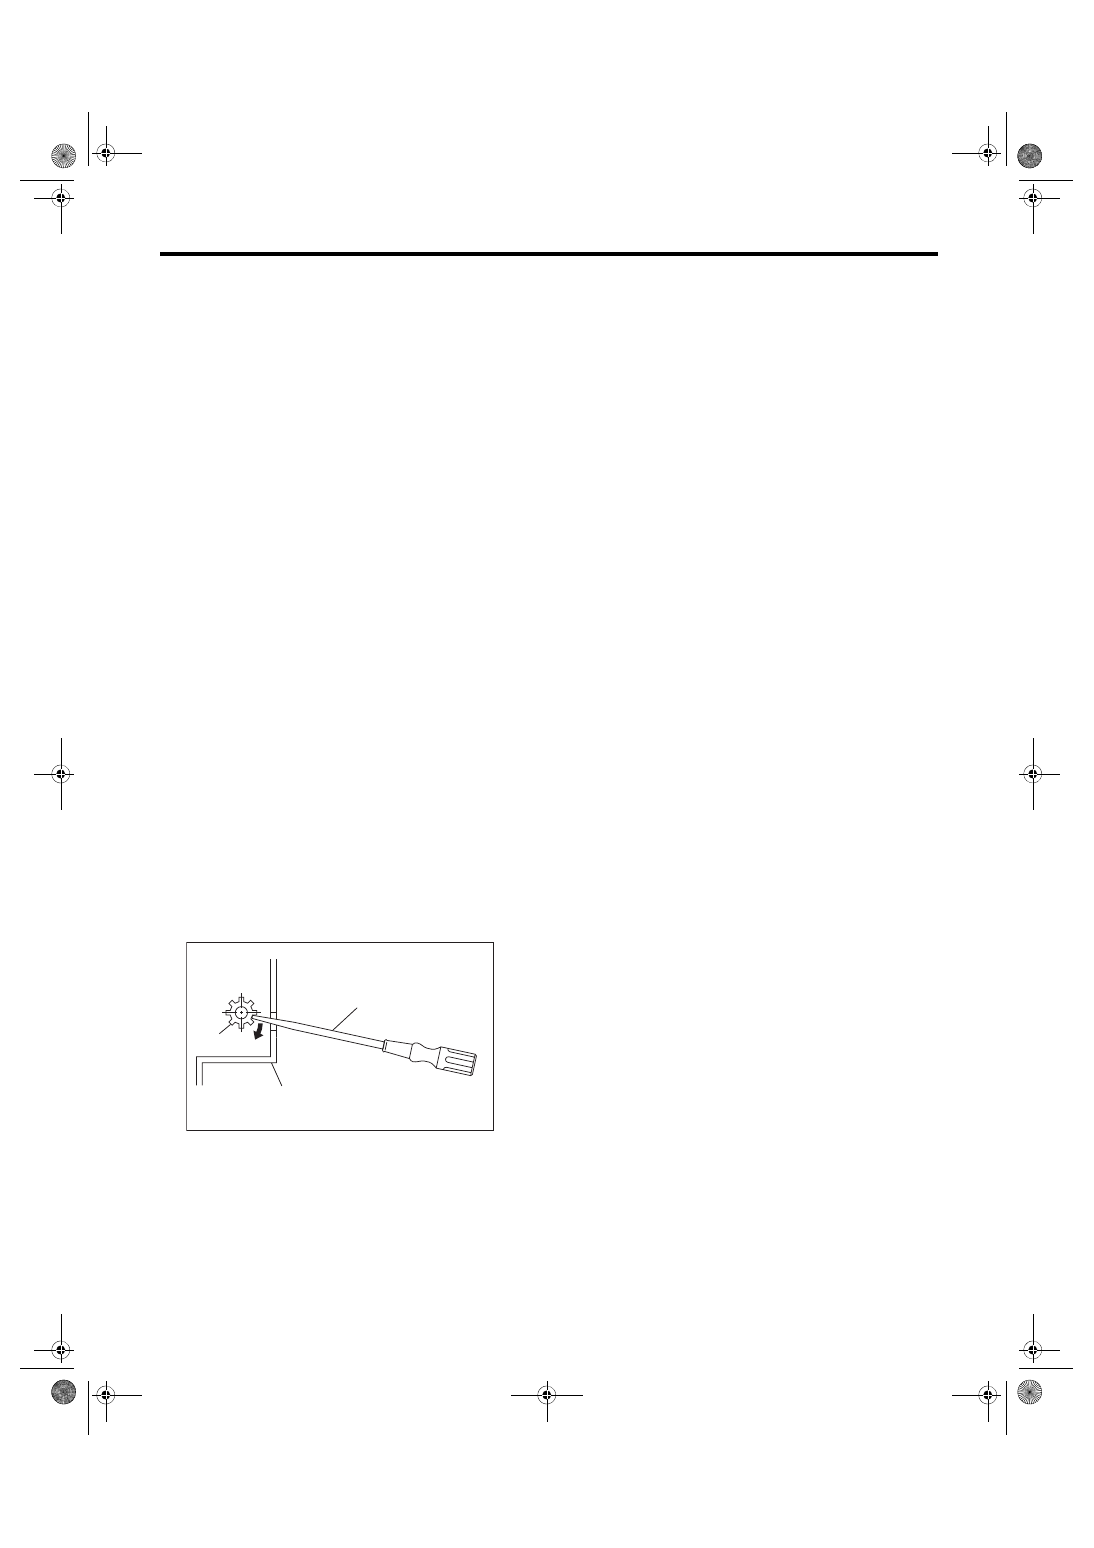
B: ADJUSTMENT
For rear disc brake, adjust the parking brake after
bleeding air.
1) Return the parking brake pedal fully.
2) Loosen the adjusting nut, and make the cable
free.
3) Remove the adjusting hole cover from the disc
rotor.
4) Using a flat tip screwdriver, turn the adjusting
screw in the direction of the arrow (shoe extension
direction) as shown in the figure until it is locked
slightly (until the disc no longer rotates with both
hands).
5) Loosen the adjusting screw by 5 notches to op-
posite direction of arrow.
CAUTION:
• Check there is no brake drag.
• If the amount that the adjusting screw is
turned back is little, securely loosen it by 5
notches to avoid dragging.
6) Install the adjusting hole cover to the disc rotor.
7) Adjust the parking brake lever stroke. <Ref. to
PB-8, LEVER STROKE, ADJUSTMENT, Parking
Brake Assembly (Rear Disc Brake).>
(1) Adjusting screw
(2) Flat tip screwdriver
(3) Disc rotor
(1)
(3)
(2)
PM-00537
gi14usena07.fm 28 ページ 2013年9月10日 火曜日 午後3時59分
PM-29
Suspension
PERIODIC MAINTENANCE SERVICES
20.Suspension
A: INSPECTION
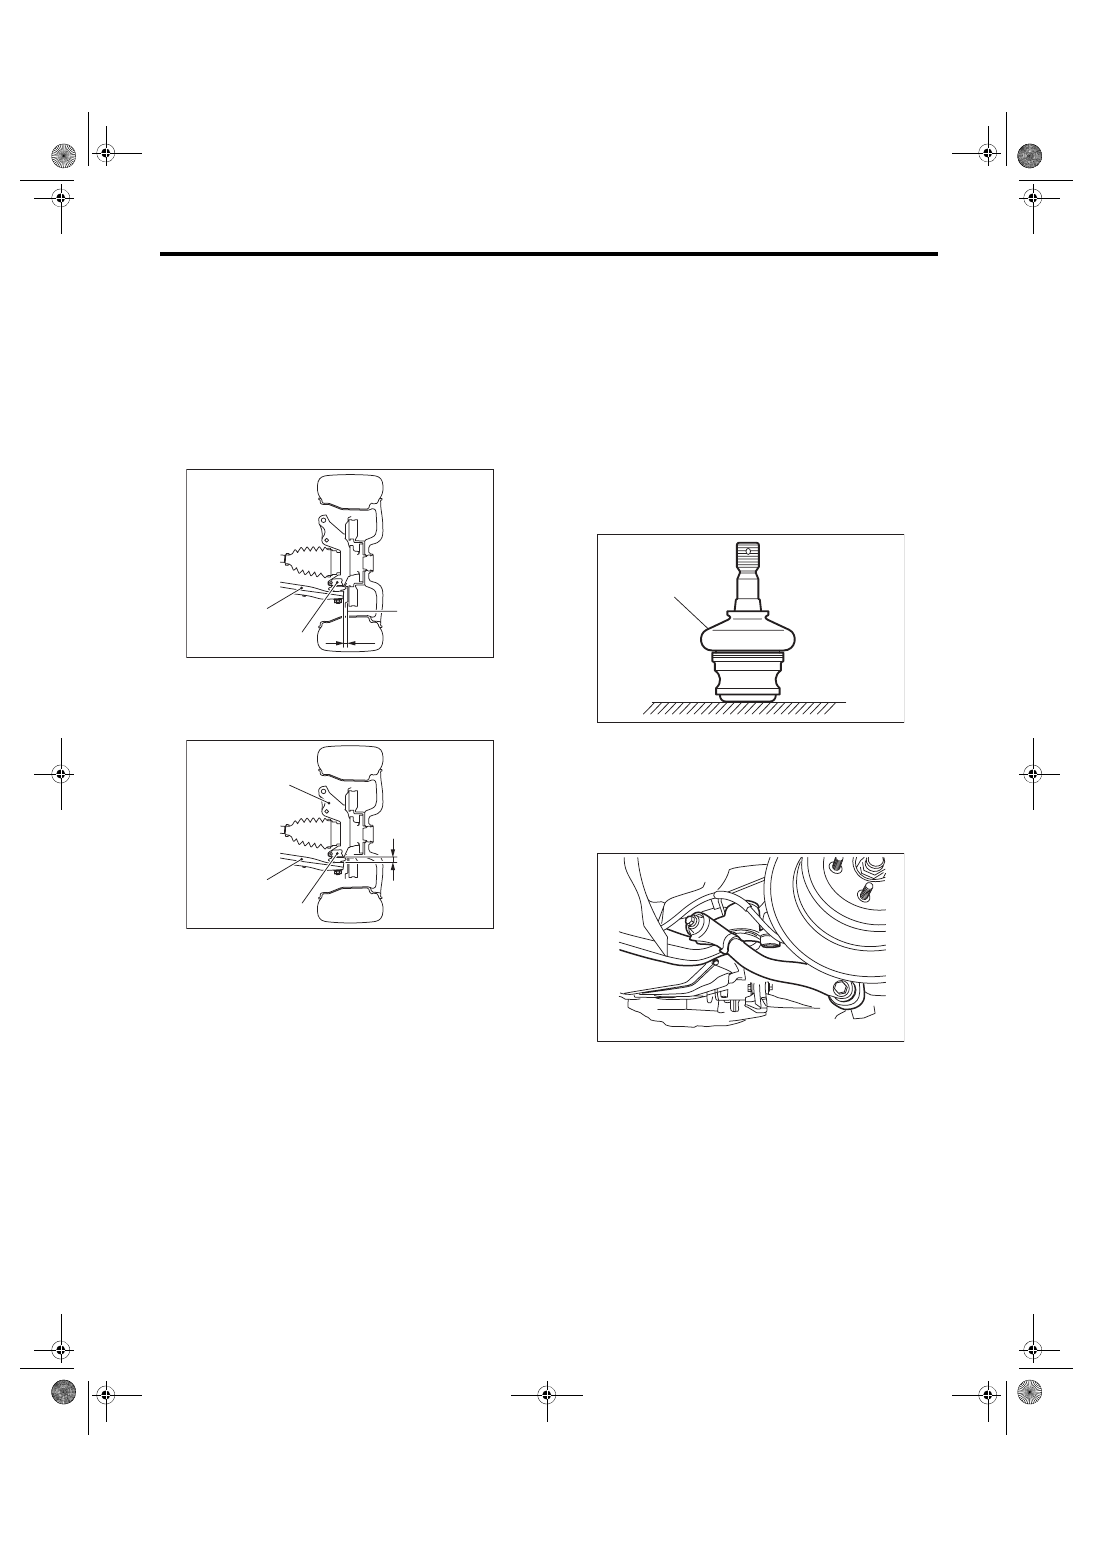
1. SUSPENSION BALL JOINT
1) Jack up the vehicle until front tires are off
ground.
2) Grasp the bottom of tire and move it in and out in
axial direction. If relative movement (B) is observed
between the brake disc cover (A) and end of front
arm (D), ball joint (C) may be excessively worn.
3) Grasp the end of front arm and move it up and
down. Relative movement (A) between the housing
(D) and front arm (C) boss indicates ball joint (B)
may be excessively worn.
4) If the relative movement is observed in the pre-
ceding two steps, remove and inspect the ball joint.
If the free play exceeds standard value, replace the
ball joint. <Ref. to FS-18, Front Ball Joint.>
5) Damage of dust cover
Visually inspect the ball joint dust cover. If it is dam-
aged, remove the front arm. <Ref. to FS-20, Front
Arm.> Measure the play of the ball joint. <Ref. to
(1) If the free play exceeds standard value, re-
place the ball joint.
(2) If the dust cover is damaged, replace with a
new ball joint.
NOTE:
When the front arm ball joint has been removed or
replaced, check the toe of front wheel. If the front
wheel toe is outside the specified range, <Ref. to
FS-8, Wheel Alignment.> adjust toe-in.
2. FRONT, REAR SUSPENSION BUSHING
Apply pressure with tire lever or similar tool to in-
spect the bushing for fatigue or other damage. If
defective, replace the bushing.
(D)
(C)
(A)
(B)
PM-00258
(D)
(C)
(B)
(A)
PM-00259
(A) Dust cover
(A)
PM-00059
PM-00405
gi14usena07.fm 29 ページ 2013年9月10日 火曜日 午後3時59分
Нет комментариевНе стесняйтесь поделиться с нами вашим ценным мнением.
Текст