Subaru Impreza 3 / Impreza WRX / Impreza WRX STI. Service manual — part 496
DI-29
Rear Differential (T-type)
DIFFERENTIALS
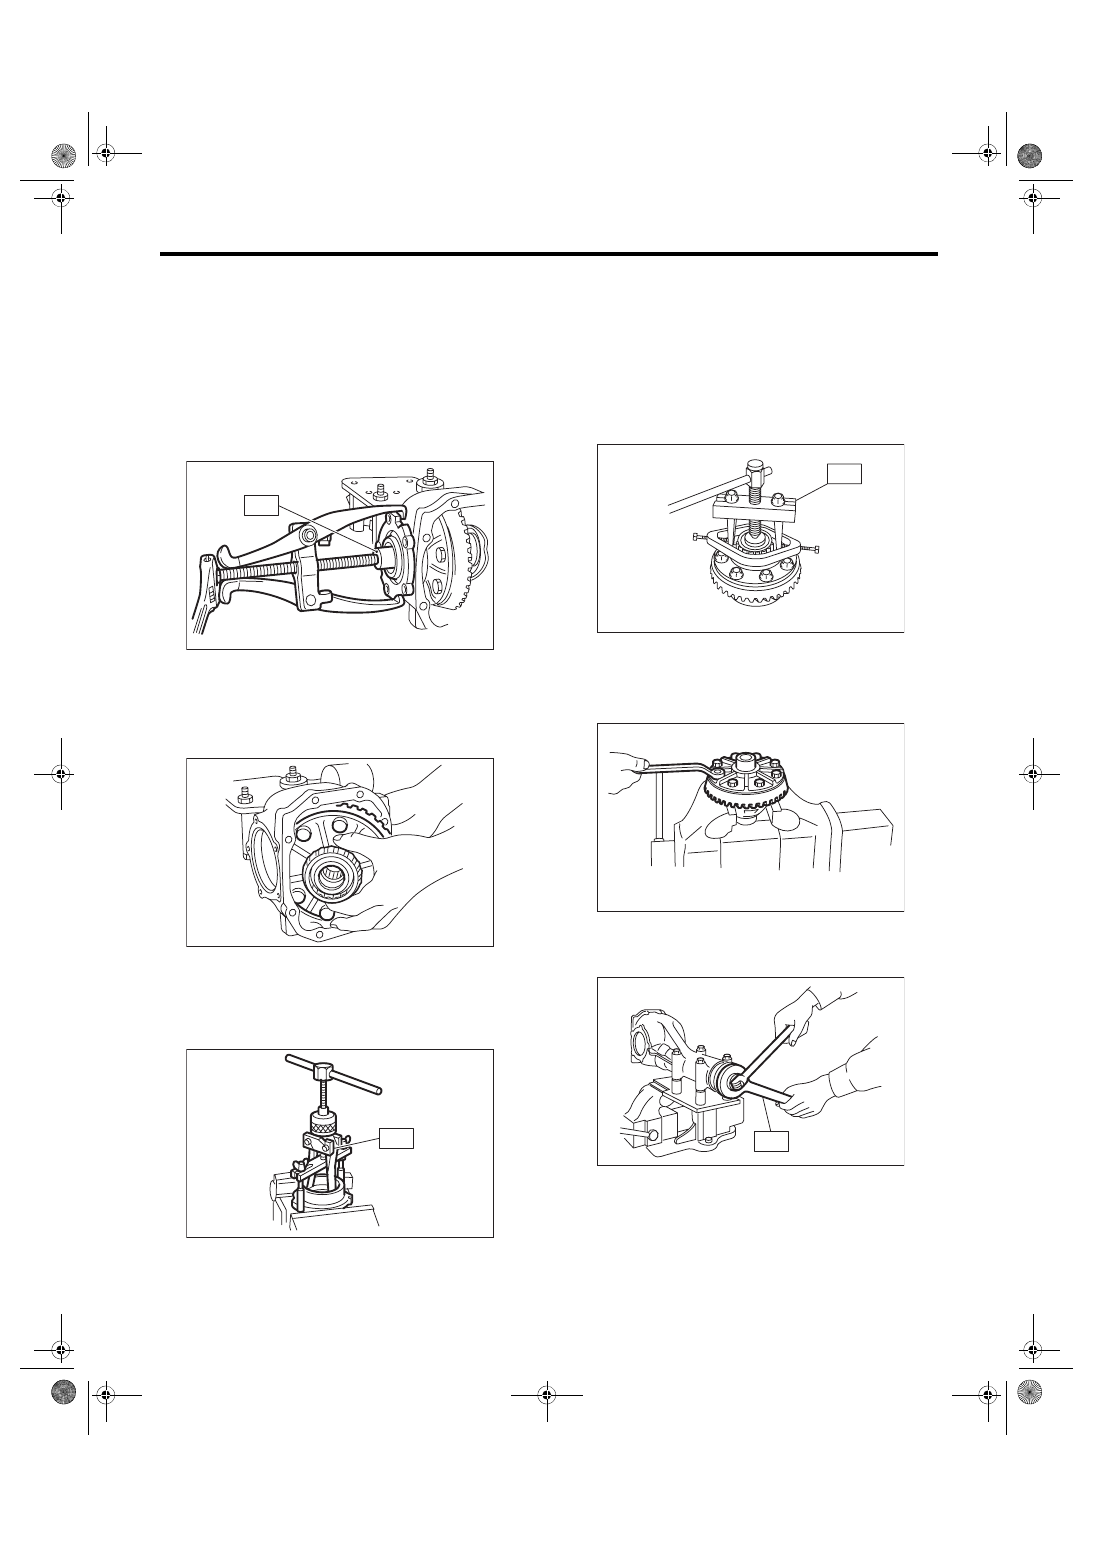
5) Remove the side retainer attachment bolts, set
the ST to differential case, and extract the side re-
tainers RH and LH with a puller.
NOTE:
• Side retainer shim of each side should be kept
together with its mating retainer.
• Keep the side retainers separate by attaching
tags or in similar ways to make it possible to identify
RH and LH sides during reassembly.
ST 398457700
ATTACHMENT
6) Pull out the differential case assembly from the
differential carrier.
NOTE:
Be careful not to hit the teeth of hypoid driven gear
against the differential carrier.
7) Remove the oil seal and O-ring from the side re-
tainer.
8) When replacing the side bearing, remove the
bearing race from the side retainer using ST.
ST 398527700
PULLER ASSY
9) Using the ST, remove the bearing cone.
NOTE:
• Do not attempt to disassemble the parts unless
necessary.
• Set the puller so that its claws catch the edge of
the bearing cone.
• Never mix up the RH and LH bearing races and
cones.
ST 18759AA000 PULLER ASSY
10) Remove the hypoid driven gear by loosening
hypoid driven gear bolts.
NOTE:
Do not disassemble the differential case assembly.
11) Remove the self-locking nut while securing the
companion flange with ST.
ST 18633AA000 WRENCH COMPL
DI-00064
ST
DI-00065
DI-00066
ST
DI-00316
ST
DI-00068
DI-00071
ST
DI-30
Rear Differential (T-type)
DIFFERENTIALS
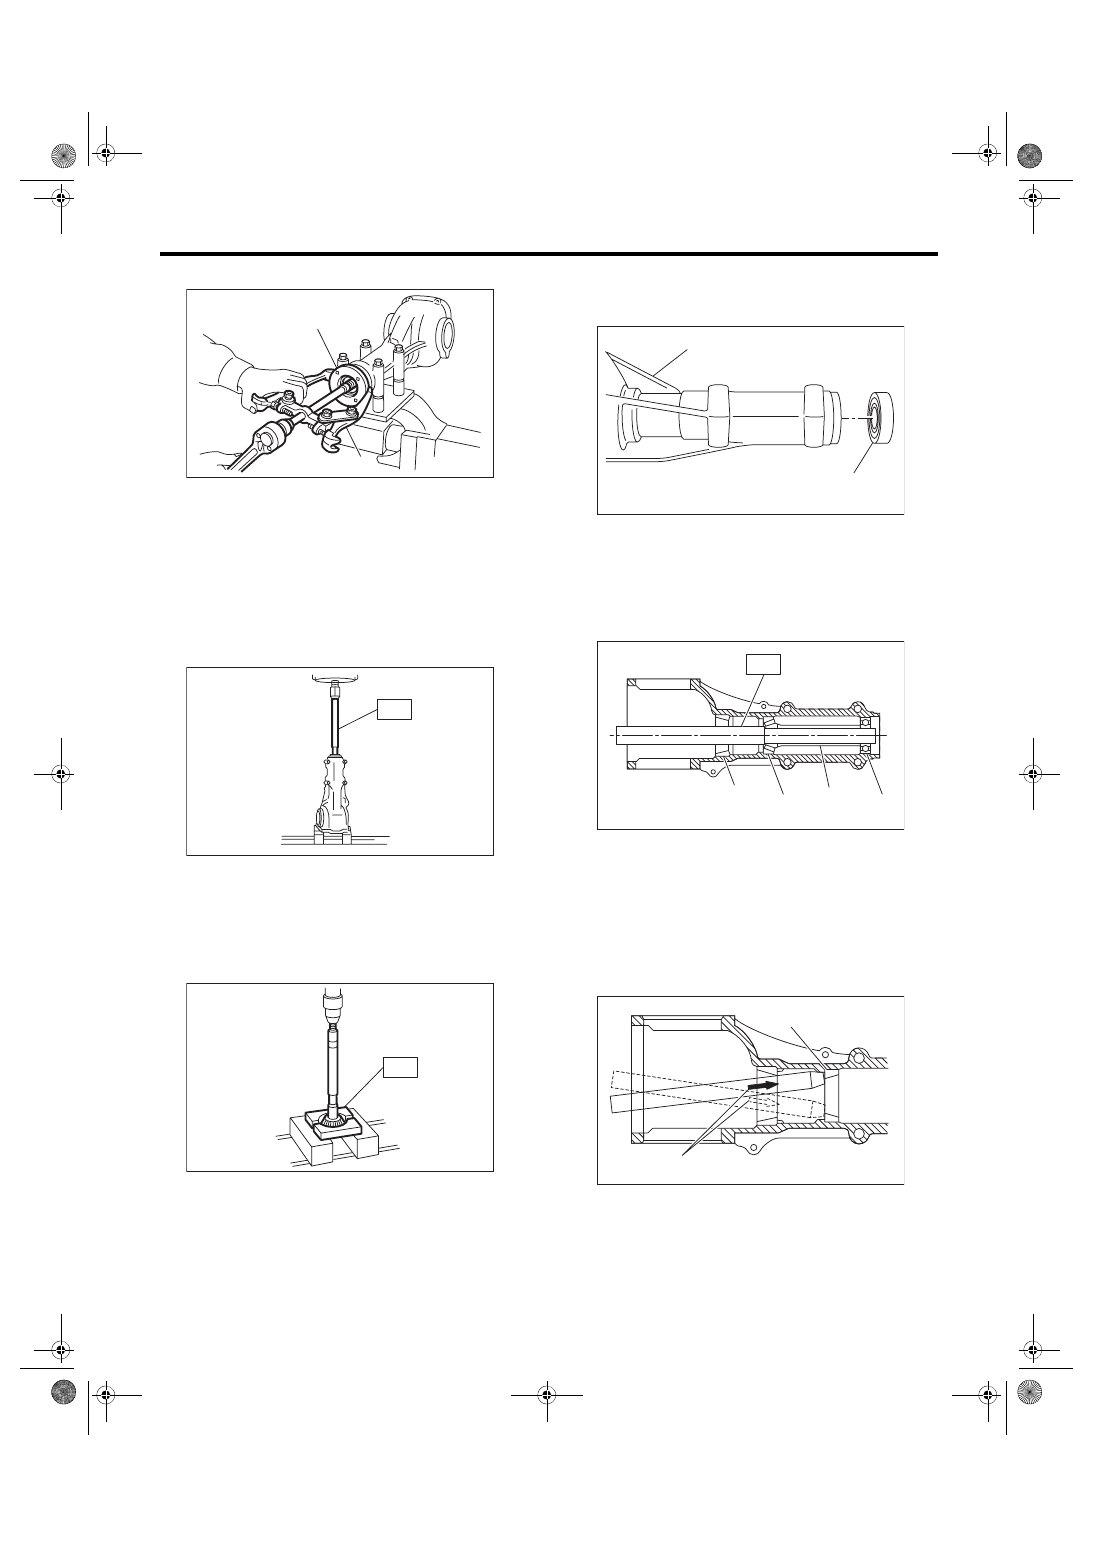
12) Extract the companion flange with a puller.
13) Press the end of drive pinion shaft by using the
ST, and remove the drive pinion shaft, rear bearing
cone, preload adjusting spacer and washer.
NOTE:
Hold the drive pinion so as not to drop it.
ST 398467700
DRIFT
14) Remove the rear bearing cone from drive pin-
ion by supporting the cone with ST.
NOTE:
Place the replacer so that its center-recessed side
faces the bearing cone.
ST 398517700
REPLACER
15) Remove the front oil seal from differential carri-
er using ST.
ST 398527700
PULLER ASSY
16) Remove the pilot bearing together with the front
bearing cone and spacer using the ST.
ST 398467700
DRIFT
17) When replacing the bearings, use a brass bar
to tap out the front bearing race and rear bearing
race in this order to remove them.
(A) Companion flange
(B) Puller
DI-00142
(B)
(A)
DI-00073
ST
DI-00074
ST
(A) Differential carrier
(B) Front oil seal
(A) Pilot bearing
(B) Spacer
(C) Front bearing
(D) Rear bearing race
(A) 2 cutout portions along diagonal lines
(B) Tap alternately with brass bar.
DI-00145
(B)
(A)
DI-00076
ST
(B)
(A)
(C)
(D)
DI-00077
(B)
(A)
DI-31
Rear Differential (T-type)
DIFFERENTIALS
D: ASSEMBLY
1. T-TYPE (B2)
NOTE:
• Assemble in the reverse order of disassembly.
• Check and adjust each part during assembly.
• Keep the shims and washers in order, so that
they are not improperly installed.
• Thoroughly clean the surfaces on which the
shims, washers and bearings are to be installed.
• Apply gear oil when installing the bearings and
thrust washers.
• Be careful not to mix up the RH and LH bearing
races.
• Use a new O-ring and gasket.
• Replace the oil seal with a new part at every dis-
assembly.
• Be careful not to mix up the oil seal RH and LH.
• Apply differential gear oil to the lips when install-
ing the oil seal.
1) Adjusting preload for front and rear bearings
NOTE:
Adjust the bearing preload between front and rear
bearings with spacer and washer. Pinion height ad-
justing washer is not affected by this adjustment.
The adjustment must not be carried out with oil seal
inserted.
(1) Install the rear bearing race into the differen-
tial carrier using ST1 and ST2.
ST1 398477701
HANDLE
ST2 398477703
DRIFT 2
(2) Install the front bearing race to the differen-
tial carrier using ST1 and ST2.
ST1 398477701
HANDLE
ST2 398477702
DRIFT
(3) Insert the ST1 (DUMMY SHAFT) into carrier
with the pinion height adjusting washer and rear
bearing cone fitted onto it.
NOTE:
If tooth contact (drive pinion, hypoid driven gear) is
normal in the inspection before disassembling, ver-
ify that the washer is not deformed, and then re-use
the used washer.
(4) Install the preload adjusting spacer and
washer, front bearing cone, ST2, companion
flange and self-locking nut.
NOTE:
Use new front bearing cone.
ST1 398507702
DUMMY SHAFT
ST2 398507703
DUMMY COLLAR
DI-00697
DI-00079
ST2
ST1
(A) Pinion height adjusting washer
(B) Preload adjusting spacer
(C) Preload adjusting washer
DI-00080
(B)
(A)
(C)
ST2
ST1
DI-32
Rear Differential (T-type)
DIFFERENTIALS
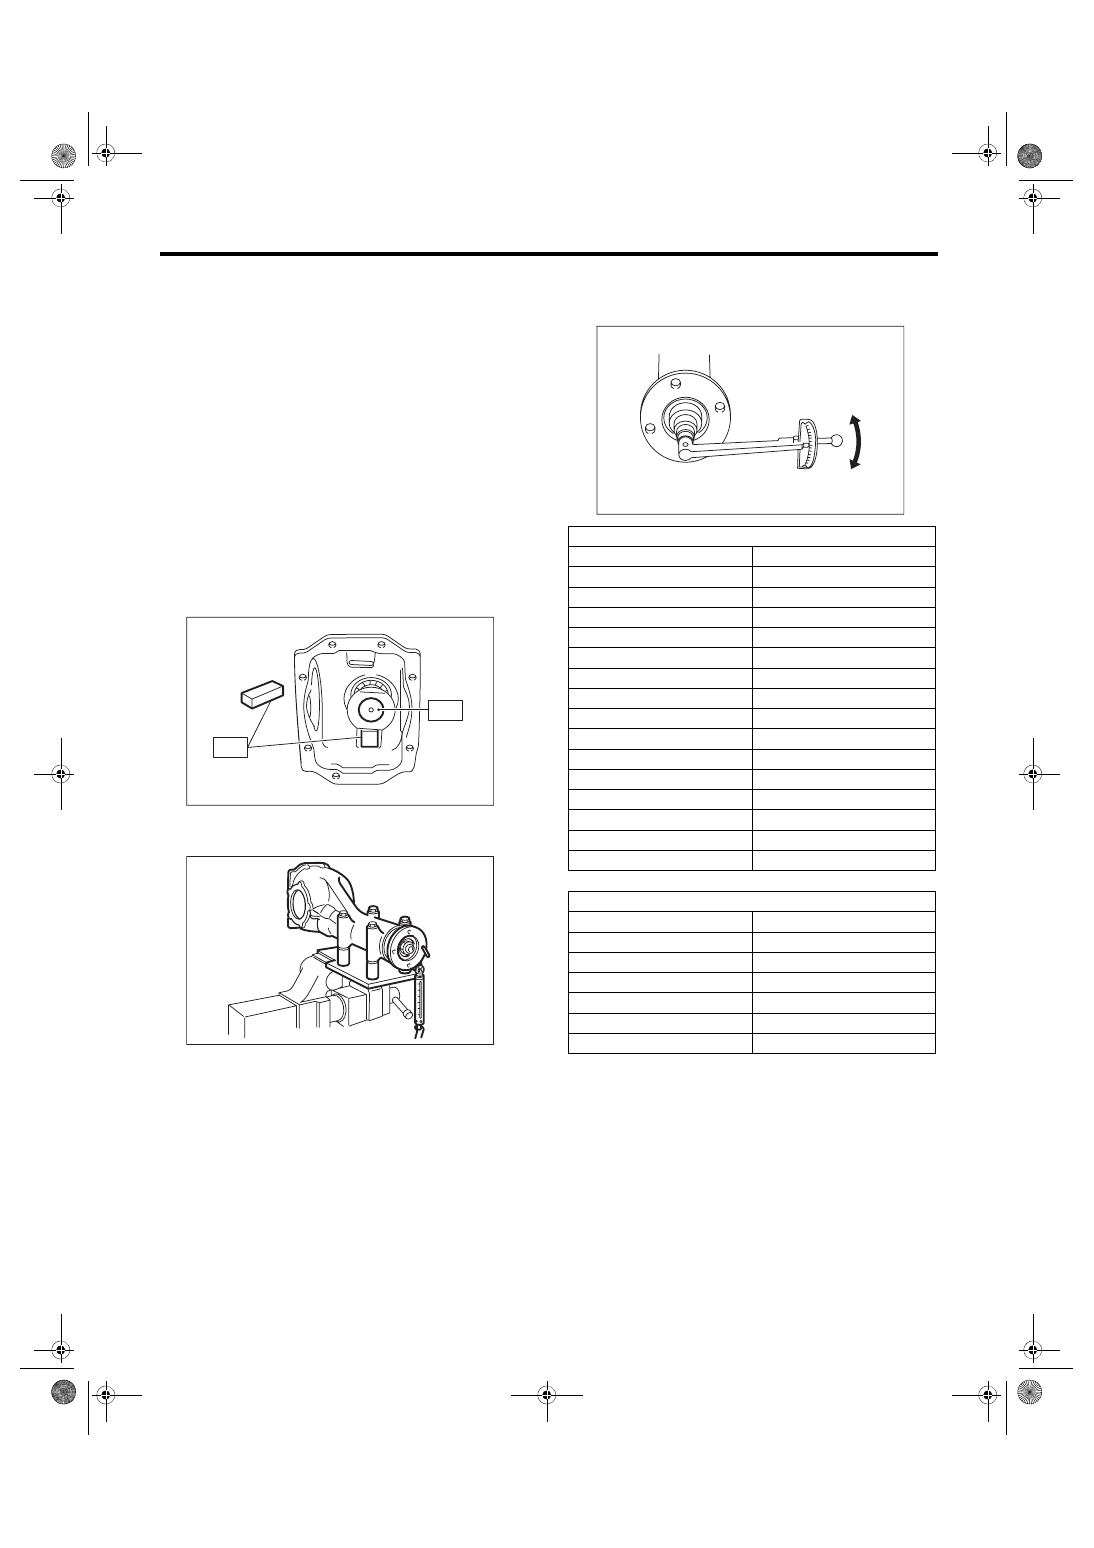
(5) Turn the ST1 by hand to smooth the bear-
ing, and tighten the self-locking nut while mea-
suring the initial load or initial torque with a
spring scale or torque wrench. Select the pre-
load adjusting washer and spacer so that the
specified preload is obtained when nut is tight-
ened to the specified torque.
NOTE:
• Use a new self-locking nut.
• Measure the preload in direction of tangent to the
flange.
• Be careful not to give excessive preload.
• When tightening the self-locking nut, lock ST1
with ST2 as shown in the figure.
ST1 398507702
DUMMY SHAFT
ST2 398507704
BLOCK
Tightening torque:
181.5 N·m (18.5 kgf-m, 133.9 ft-lb)
Initial load:
18.1 — 38.8 N (1.8 — 4.0 kgf, 4.1 — 8.7 lbf)
Initial torque:
0.69 — 1.47 N·m (0.07 — 0.15 kgf-m, 0.51 —
1.08 ft-lb)
DI-00081
ST1
ST2
DI-00715
Preload adjusting washer
Part No.
Thickness mm (in)
383705200
2.59 (0.1020)
383715200
2.57 (0.1012)
383725200
2.55 (0.1004)
383735200
2.53 (0.0996)
383745200
2.51 (0.0988)
383755200
2.49 (0.0980)
383765200
2.47 (0.0972)
383775200
2.45 (0.0965)
383785200
2.43 (0.0957)
383795200
2.41 (0.0949)
383805200
2.39 (0.0941)
383815200
2.37 (0.0933)
383825200
2.35 (0.0925)
383835200
2.33 (0.0917)
383845200
2.31 (0.0909)
Preload adjusting spacer
Part No.
Length mm (in)
383695201
56.2 (2.213)
383695202
56.4 (2.220)
383695203
56.6 (2.228)
383695204
56.8 (2.236)
383695205
57.0 (2.244)
383695206
57.2 (2.252)
DI-00481
Нет комментариевНе стесняйтесь поделиться с нами вашим ценным мнением.
Текст