Subaru Impreza 3 / Impreza WRX / Impreza WRX STI. Service manual — part 12
PI-2
Pre-delivery Inspection
PRE-DELIVERY INSPECTION
1. Pre-delivery Inspection
A: GENERAL DESCRIPTION
The purposes of the pre-delivery inspection (PDI) are as follows.
• Remove the additional parts used for ensuring the vehicle quality during transportation and restore the ve-
hicle to its normal condition.
• Check the vehicle before delivery is in normal condition.
• Check the vehicle or parts for any damage occurred during transportation or storage.
• Check the vehicle after repair is in normal condition.
• Make sure to provide a complete vehicle to customer.
For above reasons, all SOAs (dealerships) must carry out the PDIs before delivery of vehicle.
Refer to this manual unless otherwise specified.
B: PRE-DELIVERY INSPECTION (PDI) PROCEDURE
Perform the procedures indicated in the table below.
Static checks just after vehicle receipt
Operation
Check point
1. Appearance
1. If the vehicle is covered with protective coating, visually check the vehicle body
for damage and dents. If the protective coating has been removed, visually check
the painted body surfaces in detail for damage or rust.
2. Visually check the glass and light lenses for any damage, cracks or excessive
gaps between body panels.
3. Visually check the plated parts for any damage.
4. Check the instrument panel, console and trim for stains or dirt.
2. Tire
1. Check the tires for damage, defective, and dents on wheels.
2. Check the tire air pressure.
3. Fuses
If the vehicle is about to be delivered to customer, attach the room light fuse.
4. Door lock/unlock & open/close
1. Using the key, check the door can be locked or unlocked normally.
2. Open and close all doors to check that there are no problems.
3. Operate the power door lock switch to check that the rear gate locks and unlocks
normally.
5. Child safety lock system
Check the child safety lock system operates normally.
6. Trunk lid open/close operations
1. Operate the trunk opener button and trunk opener lever to check that the trunk
lid opens normally.
2. Open and close the trunk lid to see that there are no abnormal conditions.
7. Rear gate lock/unlock & open/close
1. Check if the rear gate can be unlocked normally through the emergency hole.
2. Open and close the rear gate to check that there are no problems.
8. Fuel lid opener lock release lever
Operate the fuel lid opener to check that the fuel filler lid can be unlocked normally.
9. Accessory
Check that the following accessories are equipped.
• Owner’s manual
• Warranty booklet
• Maintenance note
• Spare key
• Key No. plate
• Jack
• Jack handle
• Tool set
• Spare tire
• Towing hook (eyebolt)
• Security ID plate
10. Front hood lock release system
Operate the front hood lock release lever to check that the front hood opens normally.
11. Battery
Check the battery for any abnormal conditions such as rust or traces of battery fluid
leaks.
12. Brake fluid
Check the fluid level.
13. Engine oil
Check the engine oil amount.
14. Transmission gear oil
• Check that the transmission gear oil level is normal. (5MT model)
• Check for leakage of the transmission gear oil. (6MT model)
PI-3
Pre-delivery Inspection
PRE-DELIVERY INSPECTION
Checks with the engine running
Dynamic test with the vehicle running
15. Differential gear oil
Check for leakage of gear oil from the rear differential.
16. Engine coolant
Check the engine coolant level.
17. Clutch fluid
Check the clutch fluid amount.
18. Window washer fluid
Check the window washer fluid amount.
19. Front hood latch
Check that the front hood is closed normally and locked securely.
20. Keyless entry system
Check that the keyless entry system operates normally.
21. Security system
Check that the security system operates normally.
22. Seat
1. Check the seat surfaces for stains or dirt.
2. Check the seat installation conditions and functionality.
23. Seat belt
Check the seat belt installation conditions and functionality.
24. TPMS (U.S. models only)
1. Turn the TPMS transmitter power supply to ON.
2. If the display of TPMS warning light does not operate normally, perform the diag-
nosis by referring to TPMS (Diagnosis).
25. ECM protector
For Canada model, check the ECM protector installation conditions.
Operation
Check point
26. Delivery (test) mode connector
Turn the ignition switch to ON and check that the malfunction indicator light starts
blinking.
27. Immobilizer system
1. Check that the engine starts with all keys that are equipped on vehicle.
2. Check that the security indicator light operates normally.
28. Starting condition
Start the engine and check that the engine starts smoothly.
29. Exhaust system
Check that the exhaust noise is normal and no leaks are found.
30. Indicator light and warning lights
Check that all indicator lights and warning lights are operating correctly.
31. Heater & ventilation
Check that the heater & ventilation system operates normally.
32. Air conditioner
Check that the air conditioner operates normally.
33. Clock
Check that the clock operates normally.
34. Audio
Check the radio and AUX operate normally.
35. Navigation
Check the navigation and AUX operate normally.
36. Front accessory power supply socket
Check that the front accessory power supply socket operates normally.
37. Lighting system
Check that the lighting system operates normally.
38. Window washer
Check that the window washer system operates normally.
39. Wiper
Check that the wiper system operates normally.
40. Power window
Check that the power window operates normally.
41. Sunroof
Check that the sunroof operates normally.
42. Rear defogger system
Check that the rear defogger system operates normally.
43. Parking brake
Check the parking brake for normal operations.
44. Diagnostic trouble code (DTC) check
Check that the diagnostic trouble code (DTC) is not detected.
Operation
Check point
45. Brake test
Check the foot brake for normal operations.
46. Shift control
Check that the shift patterns are correct.
47. Cruise control
Check that the cruise control system operates normally.
Operation
Check point

PI-4
Pre-delivery Inspection
PRE-DELIVERY INSPECTION
Checks after dynamic test
1. APPEARANCE
• If the vehicle is covered with protective coating,
visually check the vehicle body for damage and
dents.
• When there is no protective coating, check the
body paints for damage or stains in detail and re-
pair as necessary.
• Check the window glass, door glass, and lights
for any cracks or damage, and replace as neces-
sary.
• Visually check the plated parts, such as the
grilles and door knobs, for damage or loss of gloss
and replace the parts as necessary.
• Check the instrument panel, console and trim for
stains or dirt.
2. TIRE
• Check for damage on the outside surface of the
tires.
• Check and correct the tire size, spare tire and tire
air pressure described on the tire air pressure label
(driver’s side).
3. FUSE
Fuses for the room light circuit on initially delivered
vehicles are removed to prevent battery discharge.
Attach the 20 A fuse (A) as shown in the figure.
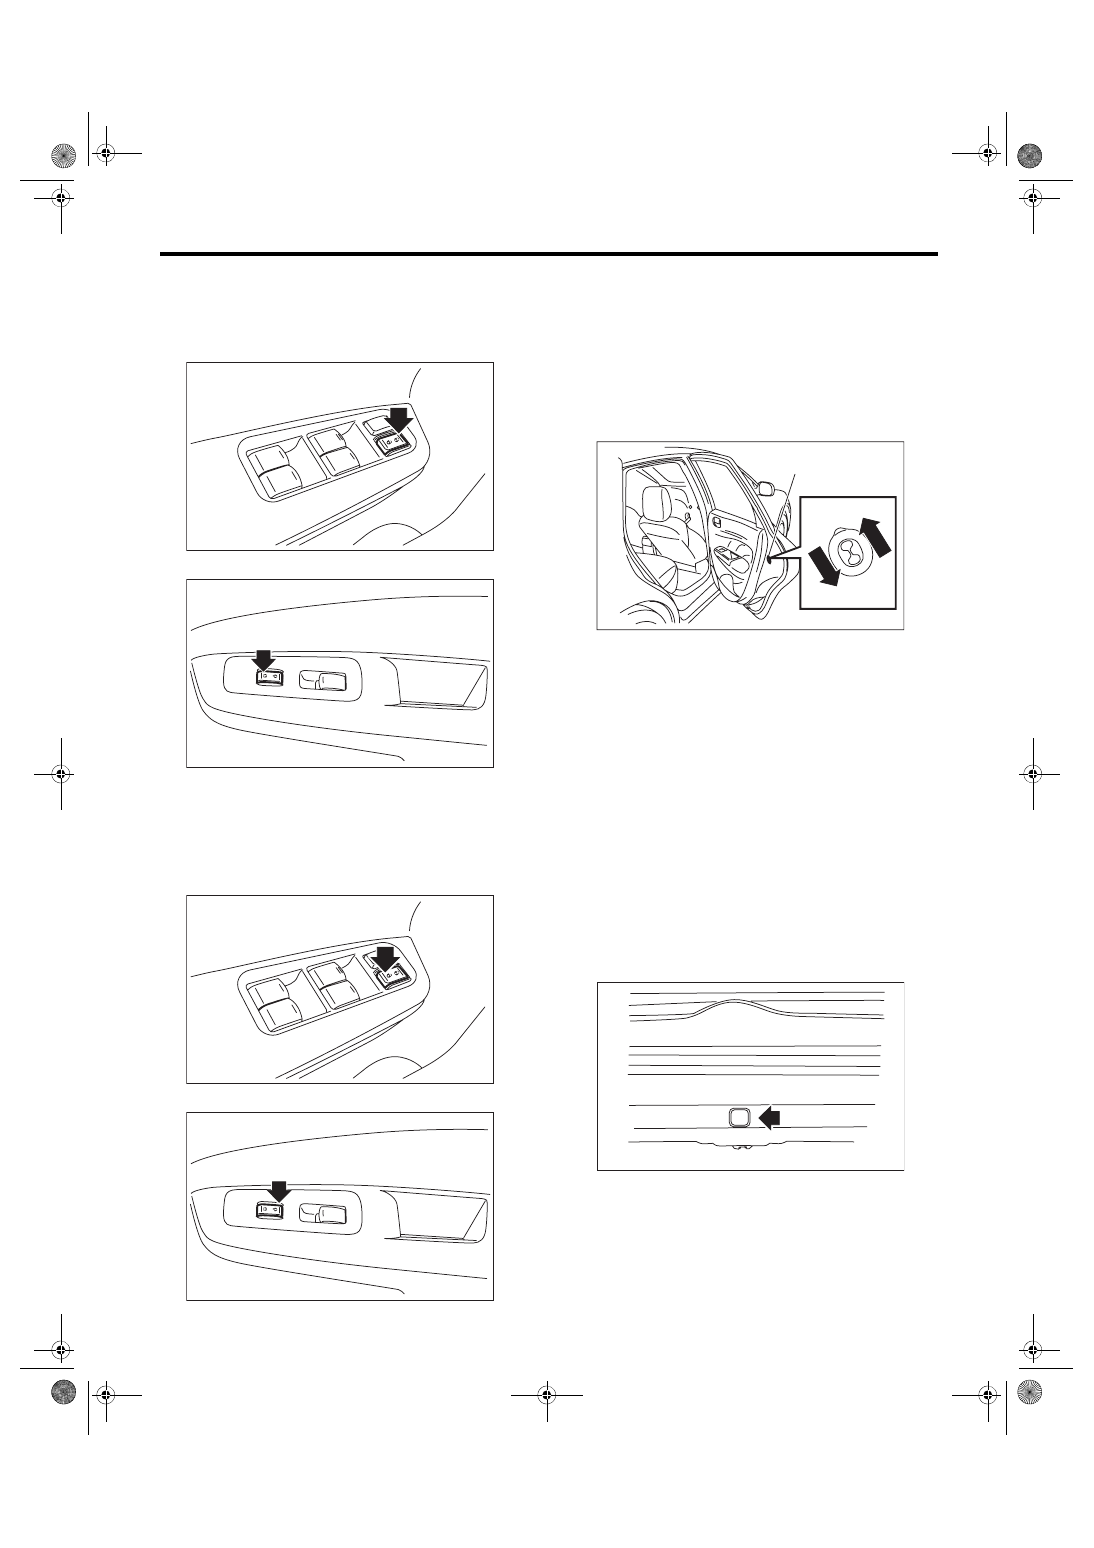
4. DOOR LOCK/UNLOCK AND OPEN/
CLOSE OPERATIONS
1) Using the key, lock and unlock the door several
times to check for normal operation. Open and
close the door several times for smooth movement.
2) Close the door of driver seat completely, and
place the door lock knob (A) to the lock position.
Then pull the inner remote (B) to ensure that doors
will not open.
For other doors, place the door lock knob (A) to lock
position and then pull the inner remote (B) to en-
sure that doors will not open.
Operation
Check point
48. Power steering fluid level
Check that the power steering fluid level is normal.
49. Fluid leakage
Check for fluid/oil leaks.
50. Water leakage
Spray the vehicle with water and check for water leaks.
51. Appearance 2
1. Remove the protective coating (if equipped).
2. Check the body paints for damage and stain.
3. Check the plated parts for damage and rust.
PI-00399
(A)
(A) Unlock
(B) Lock
(A) Door lock knob
(B) Inner remote
PI-00425
(A)
(B)
PI-00401
(A)
(B)
PI-5
Pre-delivery Inspection
PRE-DELIVERY INSPECTION
3) Close all doors, and press the lock side of power
door lock switch on the driver’s and passenger’s
sides. Check that all doors (including the rear gate)
lock.
• Driver’s side
• Passenger’s side
4) Press the unlock side of the power door lock
switch on the driver and passenger sides. Check
that all doors including rear gate are unlocked.
NOTE:
Pressing the release button will open the rear gate.
• Driver’s side
• Passenger’s side
5. CHILD SAFETY LOCK SYSTEM
1) Set the child safety lock lever on both rear doors
to the lock position.
2) Close the rear doors completely.
3) Check that the lock levers of the rear doors are in
the unlock position. Then, pull inner remote of rear
doors to ensure that doors will not open.
4) Pull the outer handles to ensure that doors will
open.
6. TRUNK LID OPEN/CLOSE OPERATIONS
1) Operate the trunk opener button and trunk open-
er lever to check that the trunk lid opens.
2) Open and close the trunk lid several times for
smooth movement.
7. REAR GATE LOCK/UNLOCK AND
OPEN/CLOSE OPERATIONS
1) Open and close the rear gate several times for
smooth movement.
2) Operate the rear gate emergency release lever
to check that the rear gate can be locked and un-
locked properly.
(1) Remove the cover inside the rear gate.
PI-00720
PI-00722
PI-00721
PI-00723
(A) Unlock
(B) Lock
(C) Child safety lock lever
PI-00404
K
C
O L
E
E
R
F
(A)
(C)
(B)
PI-00405
Нет комментариевНе стесняйтесь поделиться с нами вашим ценным мнением.
Текст