Subaru Impreza 3 / Impreza WRX / Impreza WRX STI. Service manual — part 566
BR-49
Stop Light Switch
BRAKE
15.Stop Light Switch
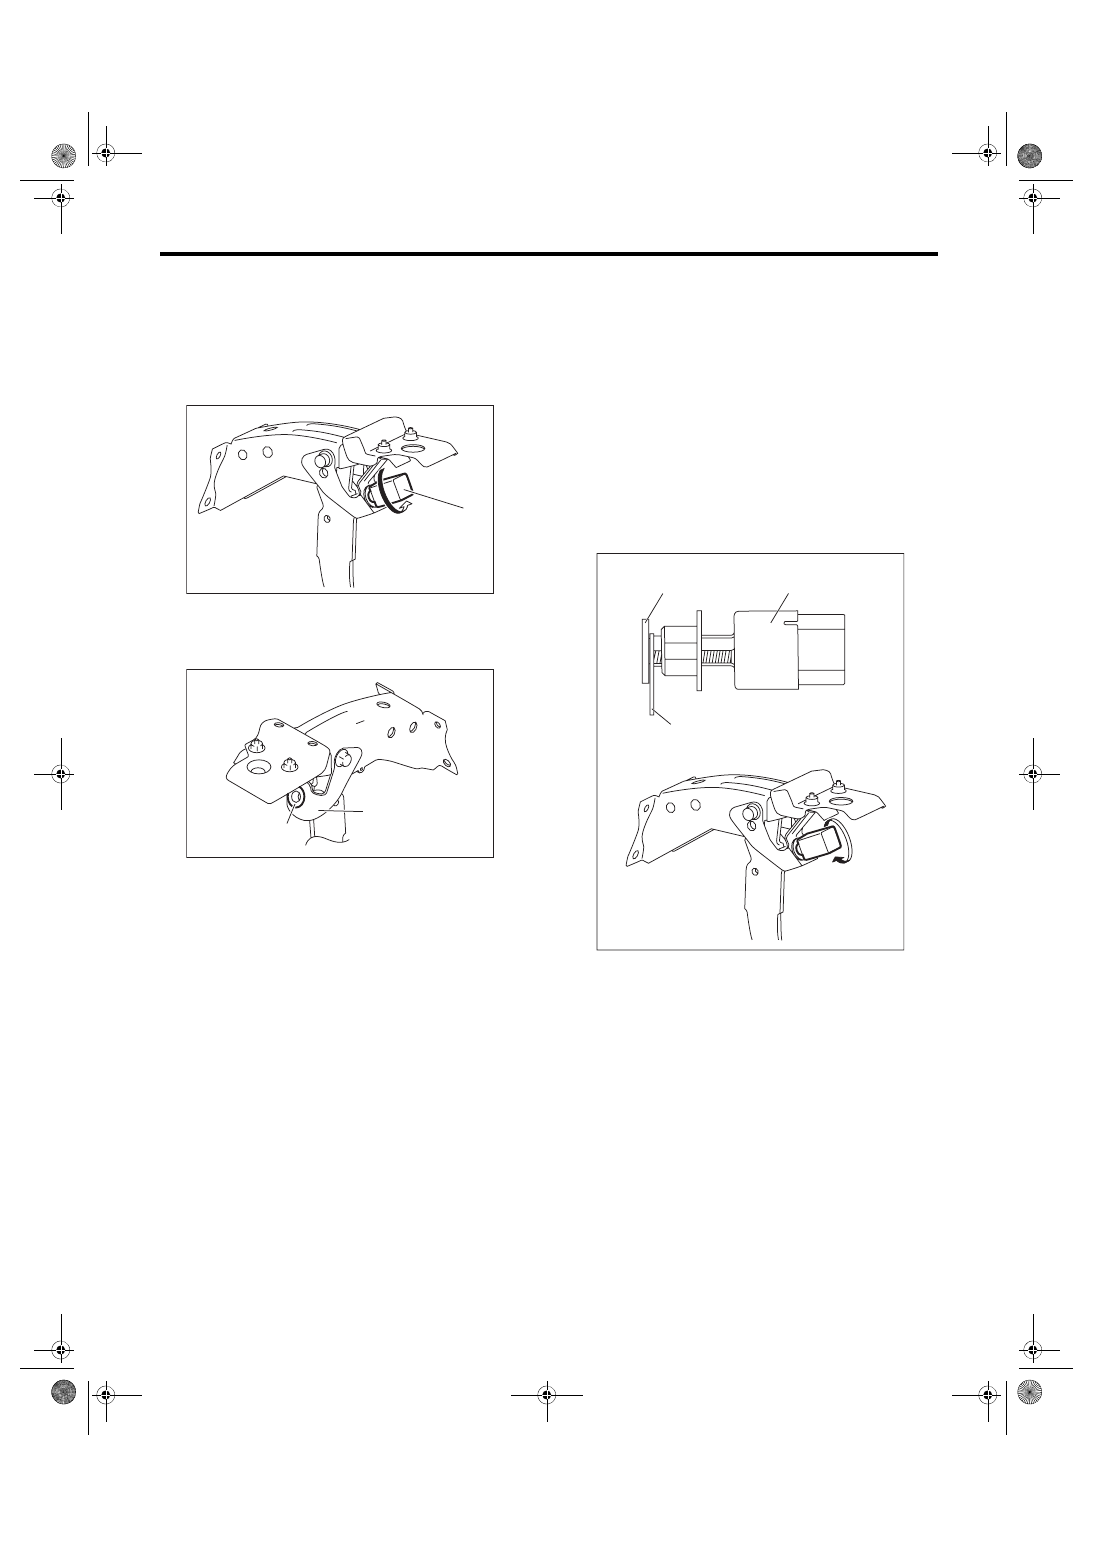
A: REMOVAL
1) Disconnect the ground cable from battery.
2) Disconnect the stop light switch connector.
3) Turn the stop light switch (1) counterclockwise
and remove the stop light switch.
B: INSTALLATION
1) Make sure that the holder is securely installed to
the brake pedal bracket.
2) Install the stop light switch.
CAUTION:
• When pushing the stop light switch against
the spacer, do not apply excessive force.
• Tighten the stop light switch with a turning
torque of 3.0 N·m (0.31 kgf-m, 2.2 ft-lb) or less.
(1) Prepare the spacer (a) with approx. 0.5 mm
(0.020 in) in thickness.
(2) Align the groove of holder with the cutout
portion of stop light switch push rod.
(3) While pulling up the brake pedal toward you,
set the spacer (a) between the stopper (b) and
stop light switch (c).
(4) Insert the stop light switch (c) and turn it
clockwise by 45° to secure.
(1) Holder
(2) Brake pedal bracket
(1)
BR-00671
BR-00680
(1)
(2)
BR-01218
(b)
(c)
(a)
BR-50
Stop Light Switch
BRAKE
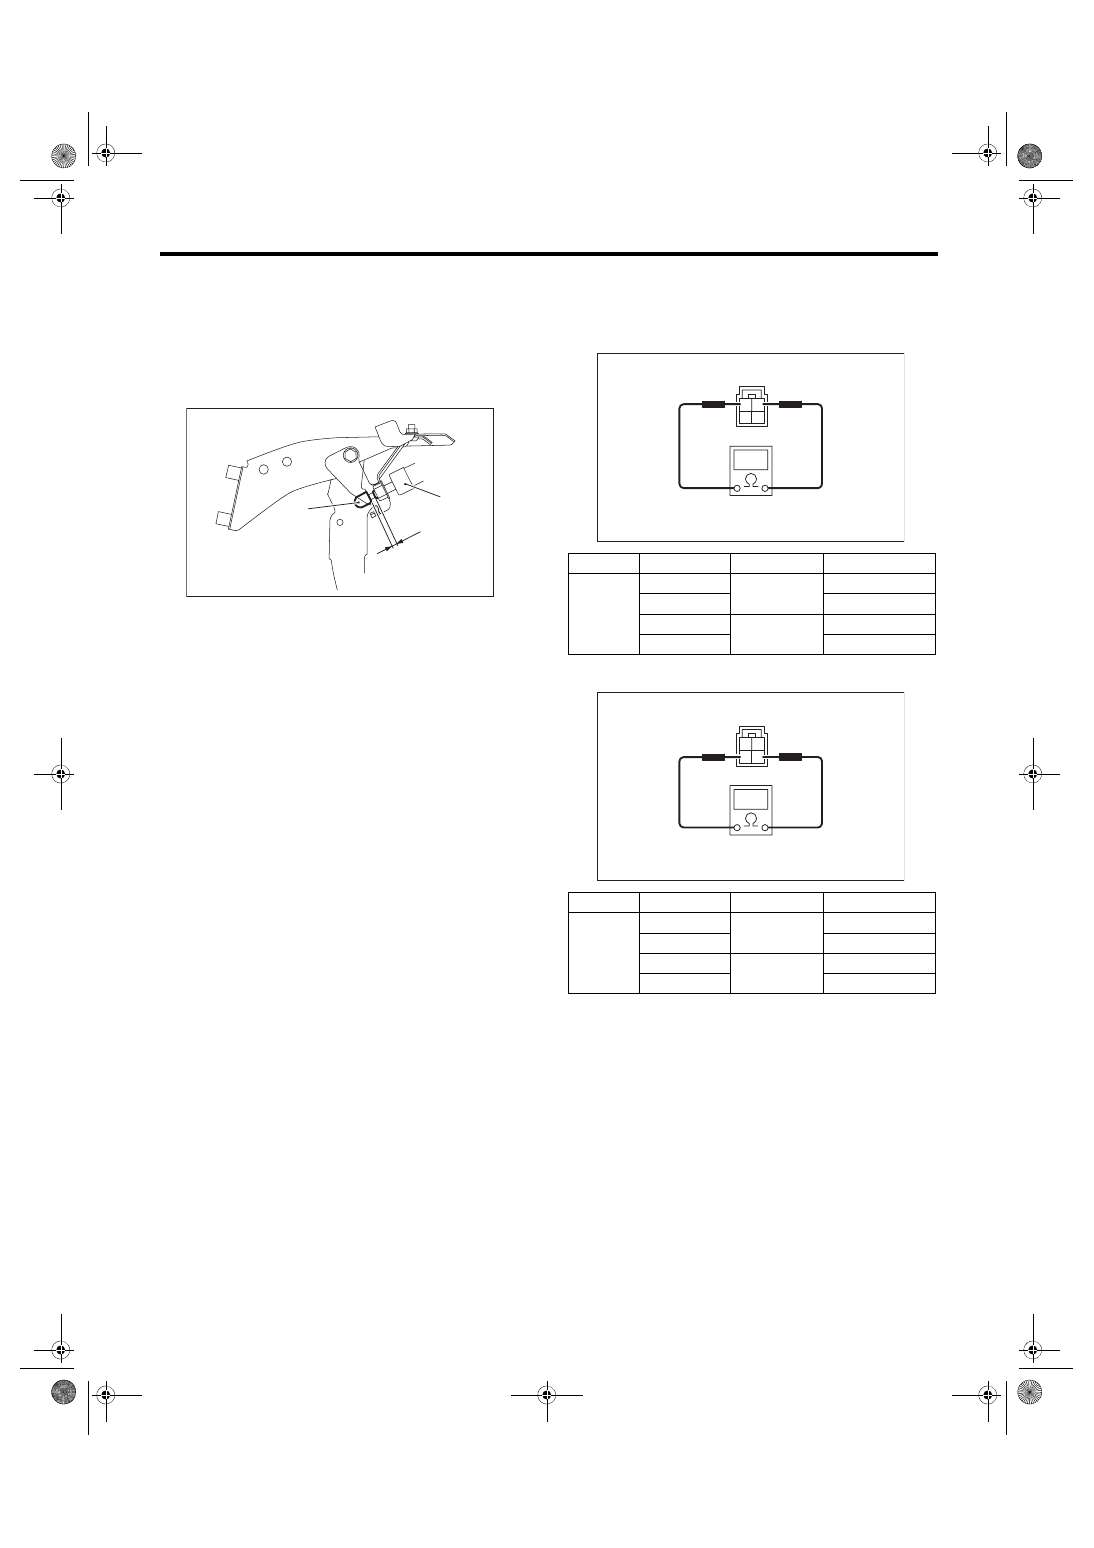
3) Remove the spacer (a).
4) Pull up the brake pedal and make sure that the
clearance (A) between the stop light switch end
and the stopper is 1.5 — 2.5 mm (0.06 — 0.1 in).
Stop light switch clearance (A):
Standard
1.5 mm — 2.5 mm (0.06 in — 0.1 in)
5) Connect the stop light switch connector.
6) Connect the battery ground terminal.
7) Check that the brake light operate properly.
NOTE:
Operate the brake pedal by 5 mm (0.2 in) or more,
check that the stop light illuminates.
8) Check the stop light switch operation.
(1) Turn to IG OFF and connect the Subaru Se-
lect Monitor.
(2) Turn to IG ON and display the data of the
“Brake Switch” and “Pressure Sensor Output”
according to the Subaru Select Monitor display.
(3) Check that the stop light switch is OFF with
the brake pedal not depressed.
(4) Quickly depress the brake pedal 5 times.
(5) Slowly release the brake pedal depressed at
the fifth time and check that the master cylinder
pressure is within the standard value when the
stop light switch changes from OFF to ON.
Specification:
Less than 1 Mpa (10 bar)
C: INSPECTION
1) Measure the resistance between stop light
switch terminals.
• 5 door model
• 4 door model
2) Replace the stop light switch if the inspection re-
sult is not within the standard value.
(b) Stopper
(c) Stop light switch
BR-01220
(c)
(b)
(A)
Switch
Pedal
Terminal No.
Standard
Stop light
Released
1 and 2
1 MΩ or more
Depressed
Less than 1 Ω
Released
3 and 4
Less than 1 Ω
Depressed
1 MΩ or more
Switch
Pedal
Terminal No.
Standard
Stop light
Released
3 and 4
1 MΩ or more
Depressed
Less than 1 Ω
Released
1 and 2
Less than 1 Ω
Depressed
1 MΩ or more
3
4
1
2
LI-00840
3
4
1
2
LI-00841
BR-51
Hill Start Assist
BRAKE
16.Hill Start Assist
A: NOTE
For procedure and diagnosis procedure of each component in the hill start assist, refer to the respective sec-
tion.
• VEHICLE DYNAMICS CONTROL (VDC): <Ref. to VDC-2, General Description.>
• VEHICLE DYNAMICS CONTROL (VDC) (DIAGNOSTICS): <Ref. to VDC(diag)-2, Basic Diagnostic Pro-
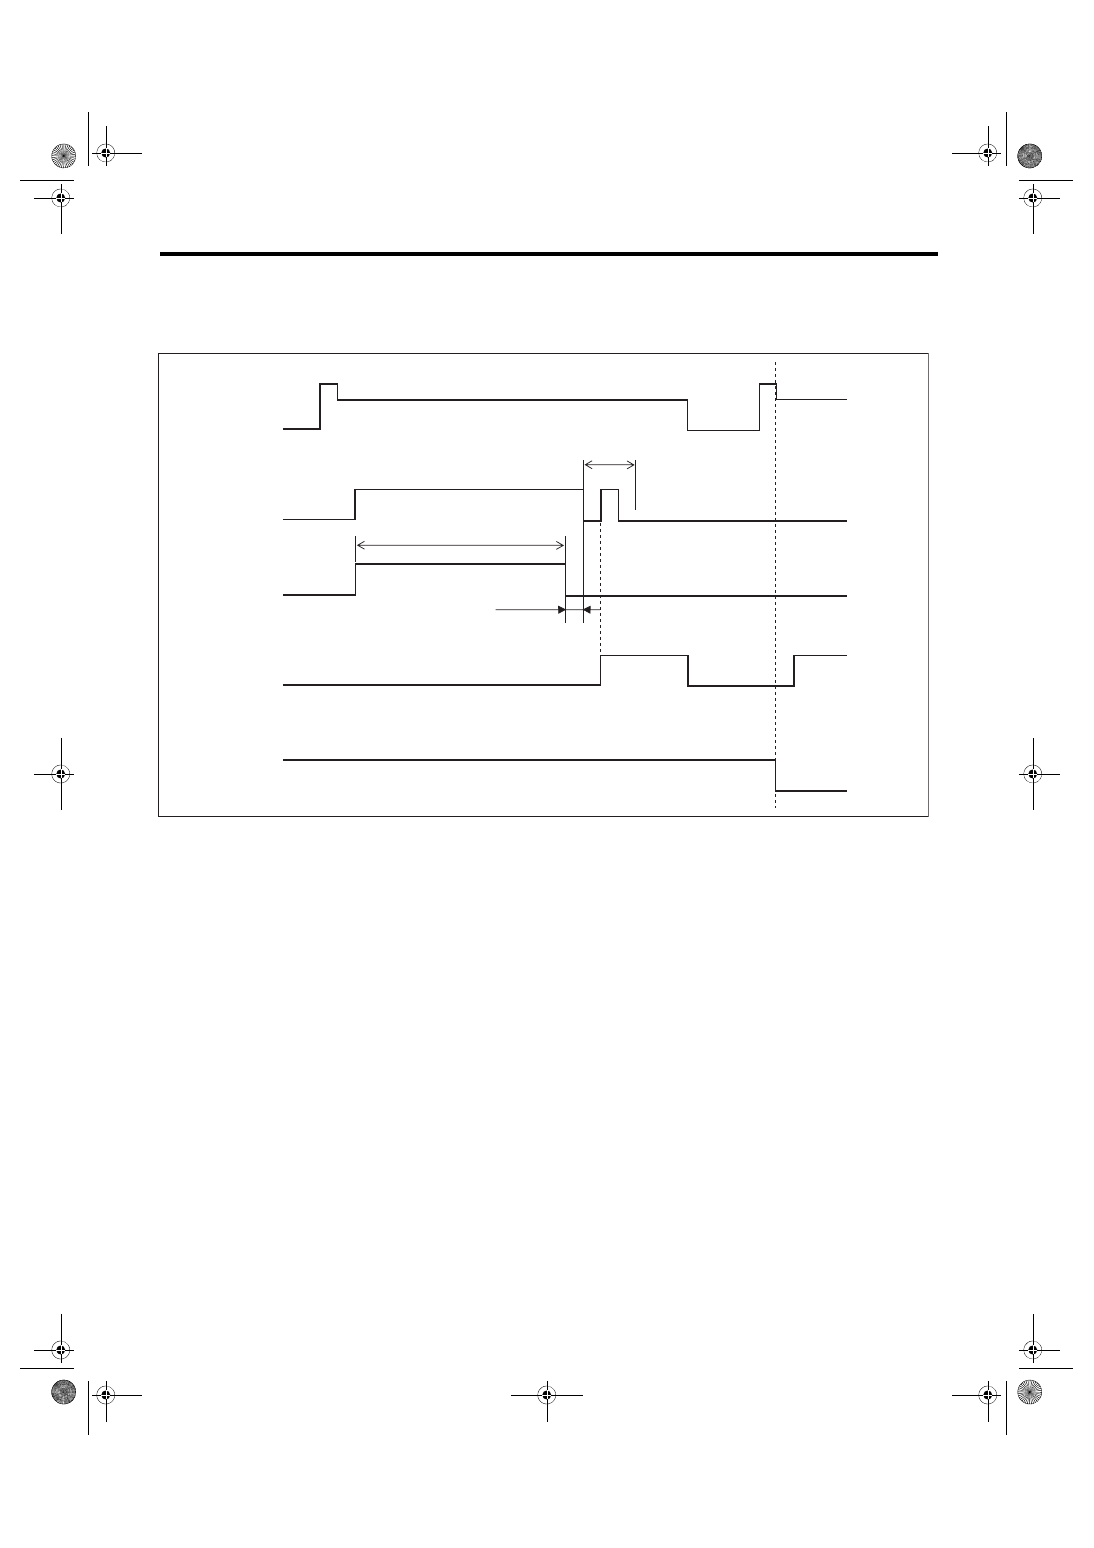
B: OPERATION
1. HILL START ASSIST OFF MODE (6 MT MODEL)
CAUTION:
• Hill start auxiliary function by brake force does not operate when turning the hill start assist func-
tion to OFF. Be sure to perform the hill start operation with parking brake.
• Hill start assist warning light always illuminates to inform that the hill start assist does not operate
during hill start assist OFF mode.
1) Park the vehicle on a level surface, and apply the parking brake.
2) Stop the engine.
3) Restart the engine.
4) After restarting the engine, check that the ABS and VDC warning light go off and brake warning light illu-
minates.
5) Continue to push the VDC mode change switch with the engine starting condition.
6) VDC warning light & VDC multi mode indicator light illuminate to yellow from green, and after 8 seconds,
VDC warning light & VDC multi mode indicator light go off.
7) Within 5 seconds after going off the VDC warning light & VDC multi mode indicator light, release the VDC
mode change switch and push the VDC mode change switch once again within 2 seconds.
8) Hill start assist warning light illuminates.
9) Stop the engine.
BR-52
Hill Start Assist
BRAKE
10) Restart the engine.
NOTE:
• Hill start assist function can not be turned to OFF until restarting the engine.
• In case of wrong operation procedure, stop the engine and start from the step (1) again.
(1)
Ignition key
(6)
2 seconds or less
(11) Hill start assist warning light
(2)
OFF
(7)
VDC warning light & VDC multi
mode indicator light
(12) Yellow illumination
(3)
Start
(8)
Approx. 8 seconds (until the (7)
stops appearing)
(13) Hill start assist function
(4)
ON
(9)
Change to yellow illumination from
green illumination.
(5)
VDC mode change switch
(10) 5 seconds or less
VDC00689
(1)
(2)
(2)
(2)
(2)
(2)
(2)
(4)
(4)
(4)
(12)
(12)
(2)
(2)
(2)
(4)
(9)
(10)
(8)
(3)
(3)
(4)
(6)
(4)
(4)
(5)
(7)
(11)
(13)
Нет комментариевНе стесняйтесь поделиться с нами вашим ценным мнением.
Текст