Subaru Impreza 3 / Impreza WRX / Impreza WRX STI. Service manual — part 174
ME(w/o STI)-77
Cylinder Block
MECHANICAL
20.Cylinder Block
A: REMOVAL
NOTE:
Before conducting this procedure, drain the engine
oil completely.
1) Remove the engine from the vehicle. <Ref. to
ME(w/o STI)-29, REMOVAL, Engine Assembly.>
2) Remove the rear side belt. <Ref. to ME(w/o STI)-
38, REAR SIDE BELT, REMOVAL, V-belt.>
3) Remove the intake manifold. <Ref. to FU(w/o
STI)-18, REMOVAL, Intake Manifold.>
4) Remove the crank pulley. <Ref. to ME(w/o STI)-
5) Remove the timing belt cover. <Ref. to ME(w/o
STI)-47, REMOVAL, Timing Belt Cover.>
6) Remove the timing belt. <Ref. to ME(w/o STI)-
7) Remove the cam sprocket. <Ref. to ME(w/o
STI)-57, REMOVAL, Cam Sprocket.>
8) Remove the crank sprocket. <Ref. to ME(w/o
STI)-58, REMOVAL, Crank Sprocket.>
9) Remove the generator and A/C compressor with
their brackets.
10) Remove the camshaft. <Ref. to ME(w/o STI)-
11) Remove the cylinder head. <Ref. to ME(w/o
STI)-68, REMOVAL, Cylinder Head.>
12) Remove the clutch disc and cover. <Ref. to CL-
11, REMOVAL, Clutch Disc and Cover.>
13) Remove the flywheel. <Ref. to CL-14, REMOV-
14) Remove the oil separator cover.
15) Remove the water by-pass pipe for heater.
16) Remove the oil filter. <Ref. to LU(STI)-31, RE-
17) Remove the water pump. <Ref. to CO(w/o
STI)-15, REMOVAL, Water Pump.>
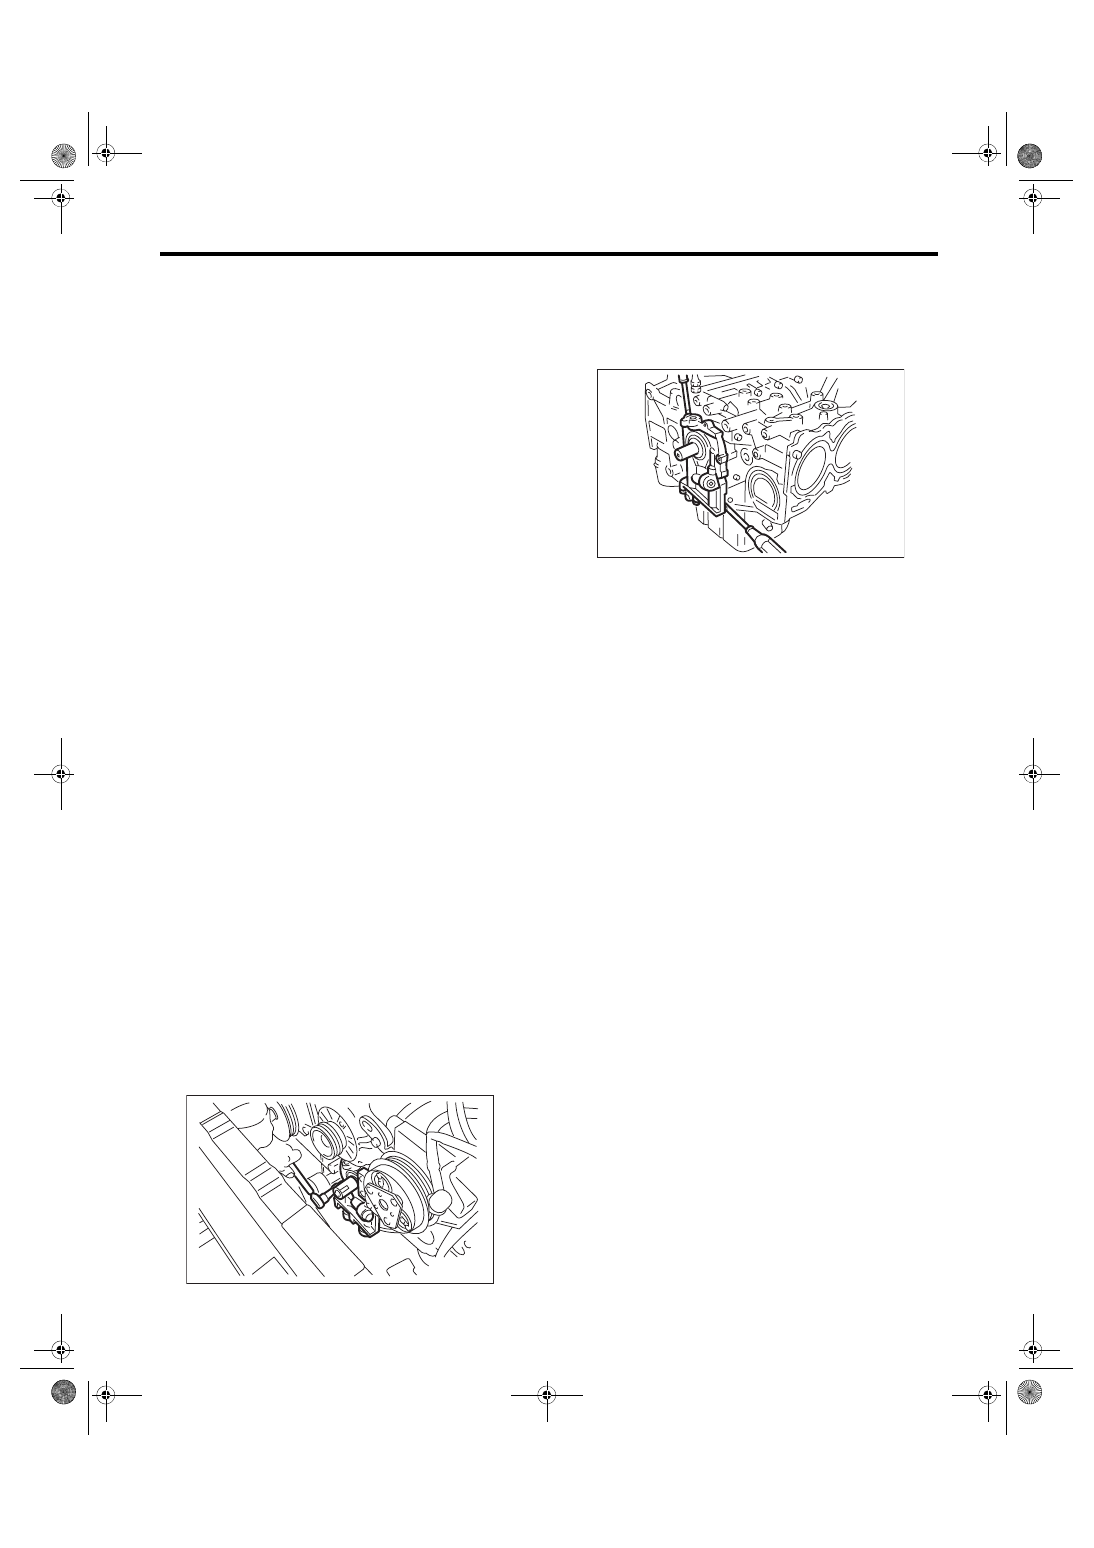
18) Remove the bolts which secure oil pump to cyl-
inder block.
NOTE:
When disassembling and checking the oil pump,
loosen the relief valve plug before removing the oil
pump.
19) Remove the oil pump from cylinder block using
a flat tip screwdriver.
CAUTION:
Be careful not to scratch the mating surface of
the cylinder block and oil pump.
20) Remove the front oil seal from the oil pump.
21) Remove the oil pan.
(1) Set the part so that the cylinder block LH is
on the upper side.
(2) Remove the bolts which secure oil pan to
cylinder block.
(3) Insert an oil pan cutter blade between cylin-
der block-to-oil pan clearance and remove the
oil pan.
CAUTION:
Do not use a screwdriver or similar tools in
place of oil pan cutter.
22) Remove the oil strainer.
23) Remove the baffle plate.
LU-00015
ME-00138

ME(w/o STI)-78
Cylinder Block
MECHANICAL
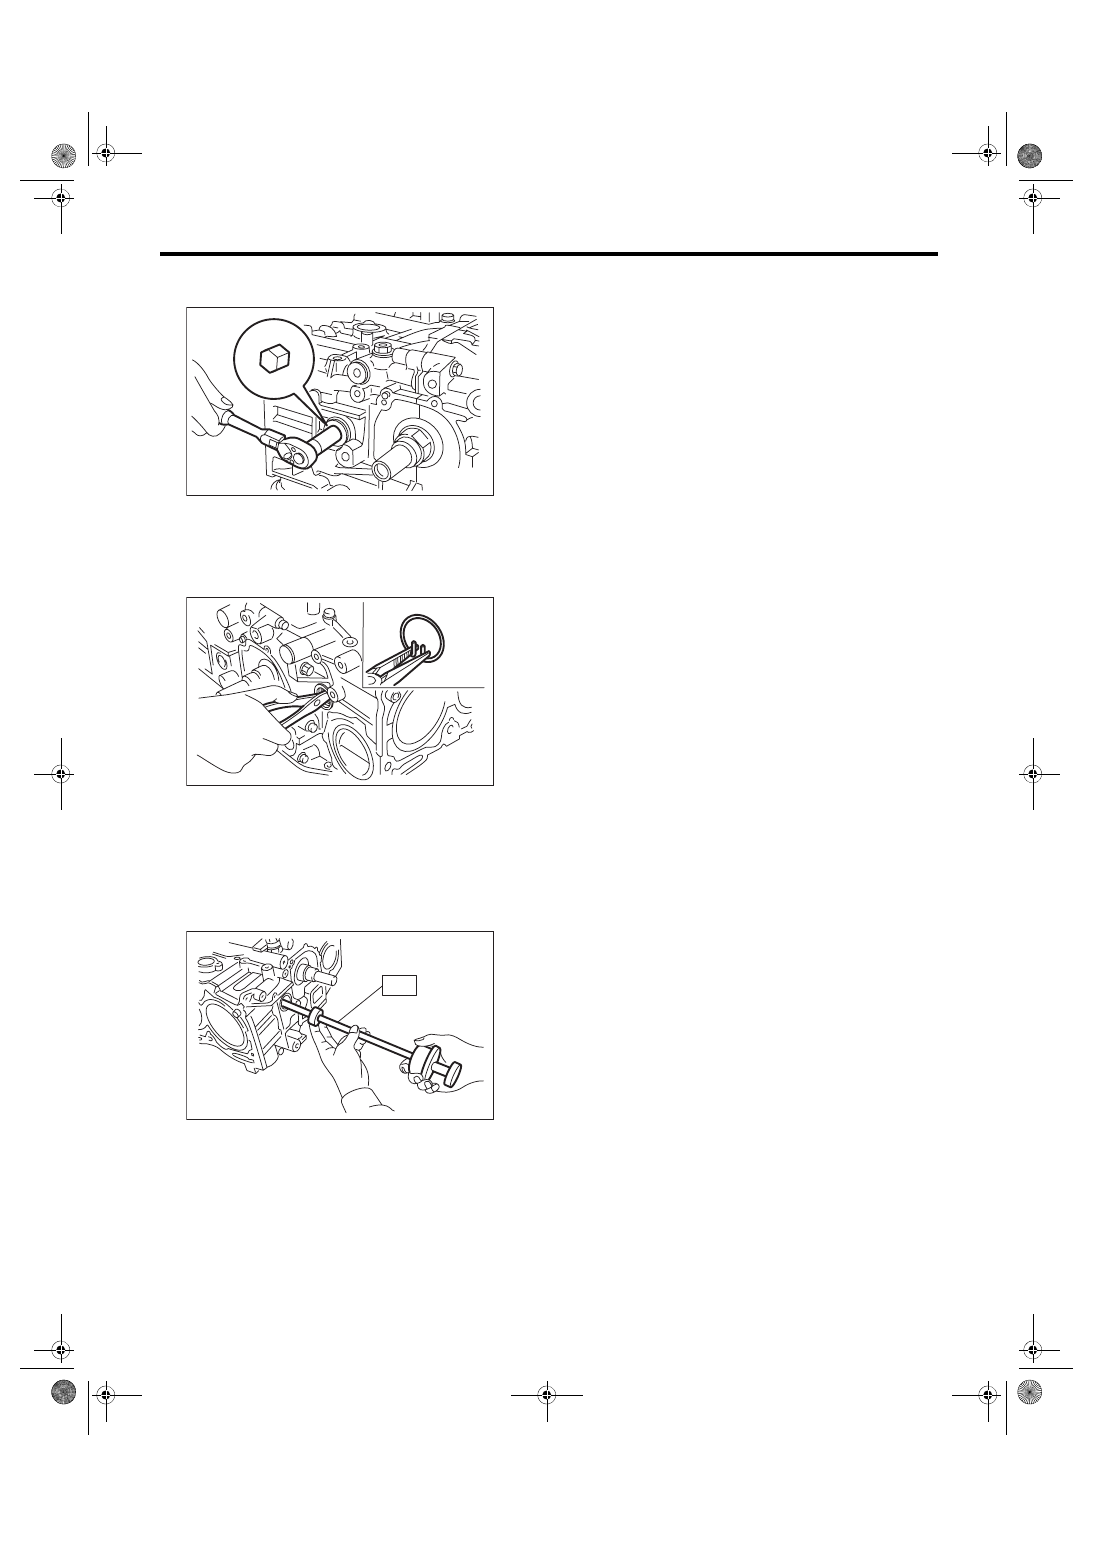
24) Remove the water tank pipe assembly from the
cylinder block RH.
NOTE:
Pinch the clamp of the water tank pipe assembly by
fitting the cut out in the ST with the protrusion on
the clamp as shown in the figure, and unlock the
clamp.
ST 18353AA000 CLAMP PLIERS
ME-04374
ST
(1)
Service hole plug
(4)
Piston pin
(7)
Seal washer
(2)
Gasket
(5)
Service hole cover
(8)
Washer
(3)
Snap ring
(6)
O-ring
ME-04723
(3)
(4)
(2)
(1)
(3)
(4)
(5)
(6)
(2)
(3)
(2)
(1)
(3)
(4)
(4)
(8)
(7)
(1)
(7)
ME(w/o STI)-79
Cylinder Block
MECHANICAL
25) Remove the service hole plugs using a hexa-
gon wrench [14 mm].
26) Remove the service hole cover.
27) Rotate the crankshaft to bring #1 and #2 pis-
tons to bottom dead center position, then remove
the piston snap ring through service hole of #1 and
#2 cylinders.
28) Draw out the piston pin from #1 and #2 pistons
using ST.
ST 499097700
PISTON PIN REMOVER
ASSY
NOTE:
Be careful not to confuse the original combination
of piston, piston pin and cylinder.
29) Similarly draw out the piston pins from #3 and
#4 pistons.
30) Remove the cylinder block connecting bolt on
the RH side.
31) Loosen the cylinder block connecting bolt on
the LH side by 2 to 3 turns.
32) Set the part so that the cylinder block LH is on
the upper side, and remove the cylinder block con-
necting bolt.
ME-00140
ME-00141
ME-03325
ST
ME(w/o STI)-80
Cylinder Block
MECHANICAL
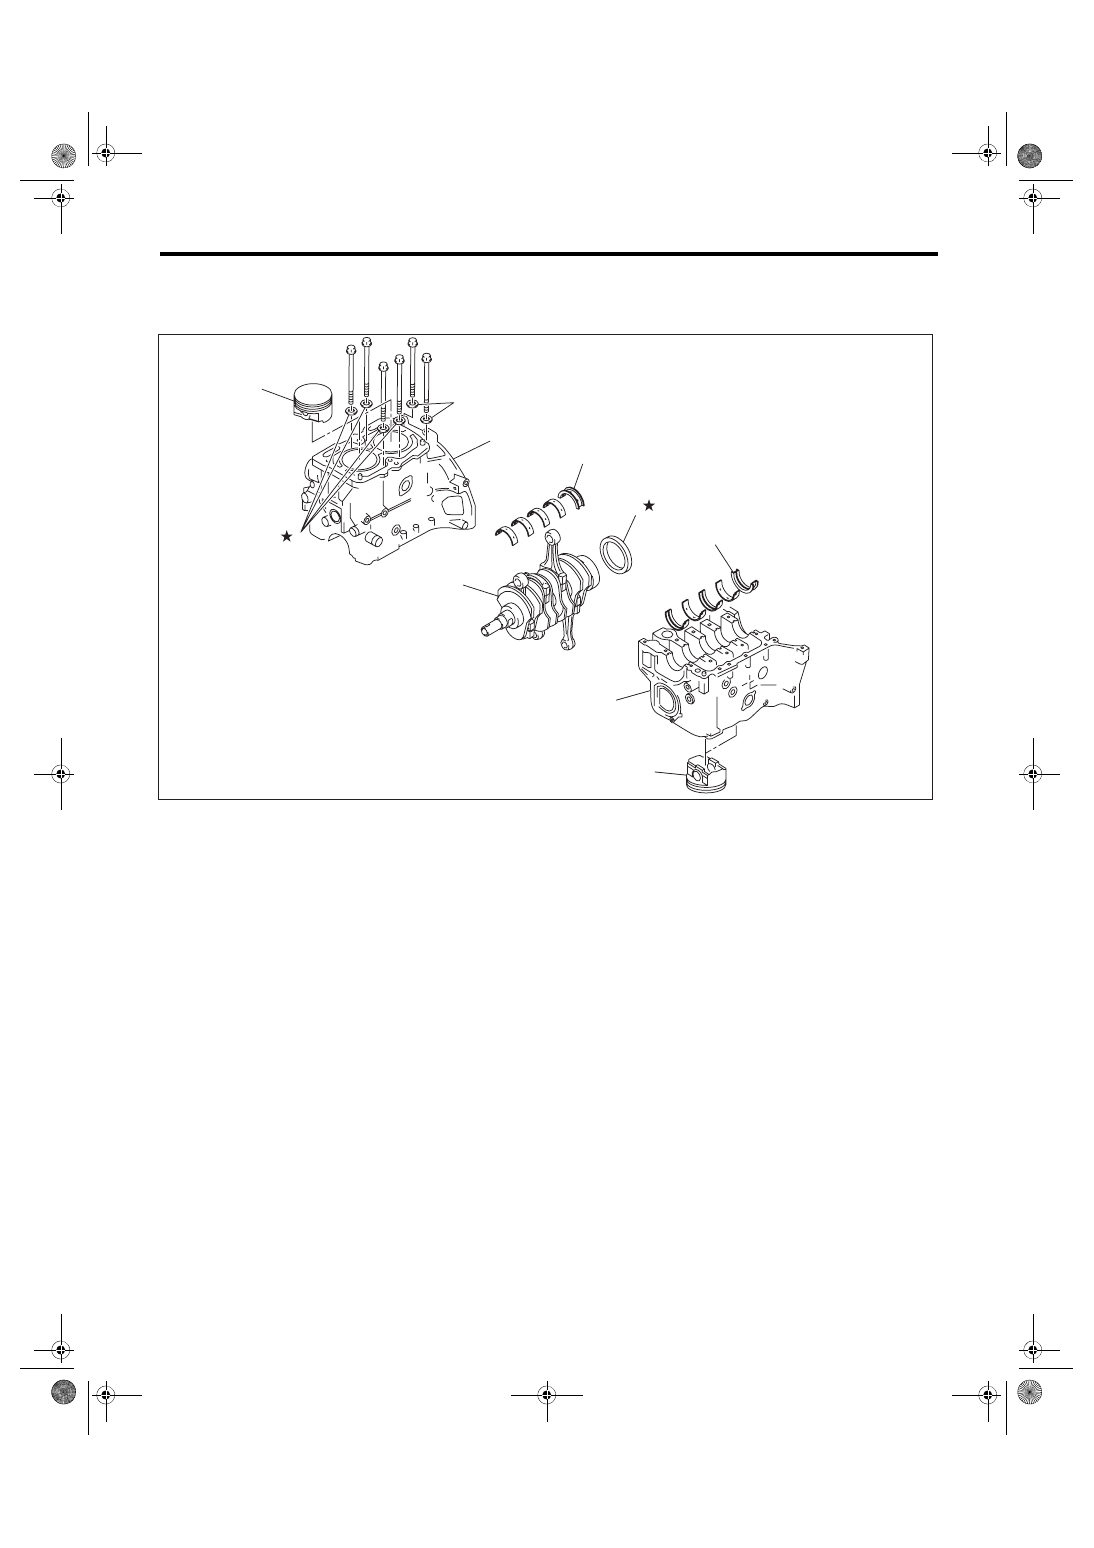
33) Separate the cylinder block LH and RH.
NOTE:
When separating the cylinder block, do not allow the connecting rod to fall or damage the cylinder block.
34) Remove the rear oil seal.
35) Remove the crankshaft together with connect-
ing rod.
36) Remove the crankshaft bearings from cylinder
block using a hammer handle.
NOTE:
• Press the crankshaft bearing at the end opposite
to locking lip to remove.
• Be careful not to confuse the crankshaft bearing
combination.
37) Remove each piston from the cylinder block us-
ing a wooden bar or hammer handle.
NOTE:
Be careful not to confuse the original combination
of piston and cylinder.
(1)
Cylinder block
(4)
Crankshaft bearing
(6)
Seal washer
(2)
Rear oil seal
(5)
Piston
(7)
Washer
(3)
Crankshaft
ME-04724
(2)
(3)
(4)
(4)
(5)
(6)
(5)
(1)
(1)
(7)
Нет комментариевНе стесняйтесь поделиться с нами вашим ценным мнением.
Текст