Subaru Impreza 3 / Impreza WRX / Impreza WRX STI. Service manual — part 423
6MT-29
Transmission Mounting System
MANUAL TRANSMISSION AND DIFFERENTIAL
5. Transmission Mounting Sys-
tem
A: REMOVAL
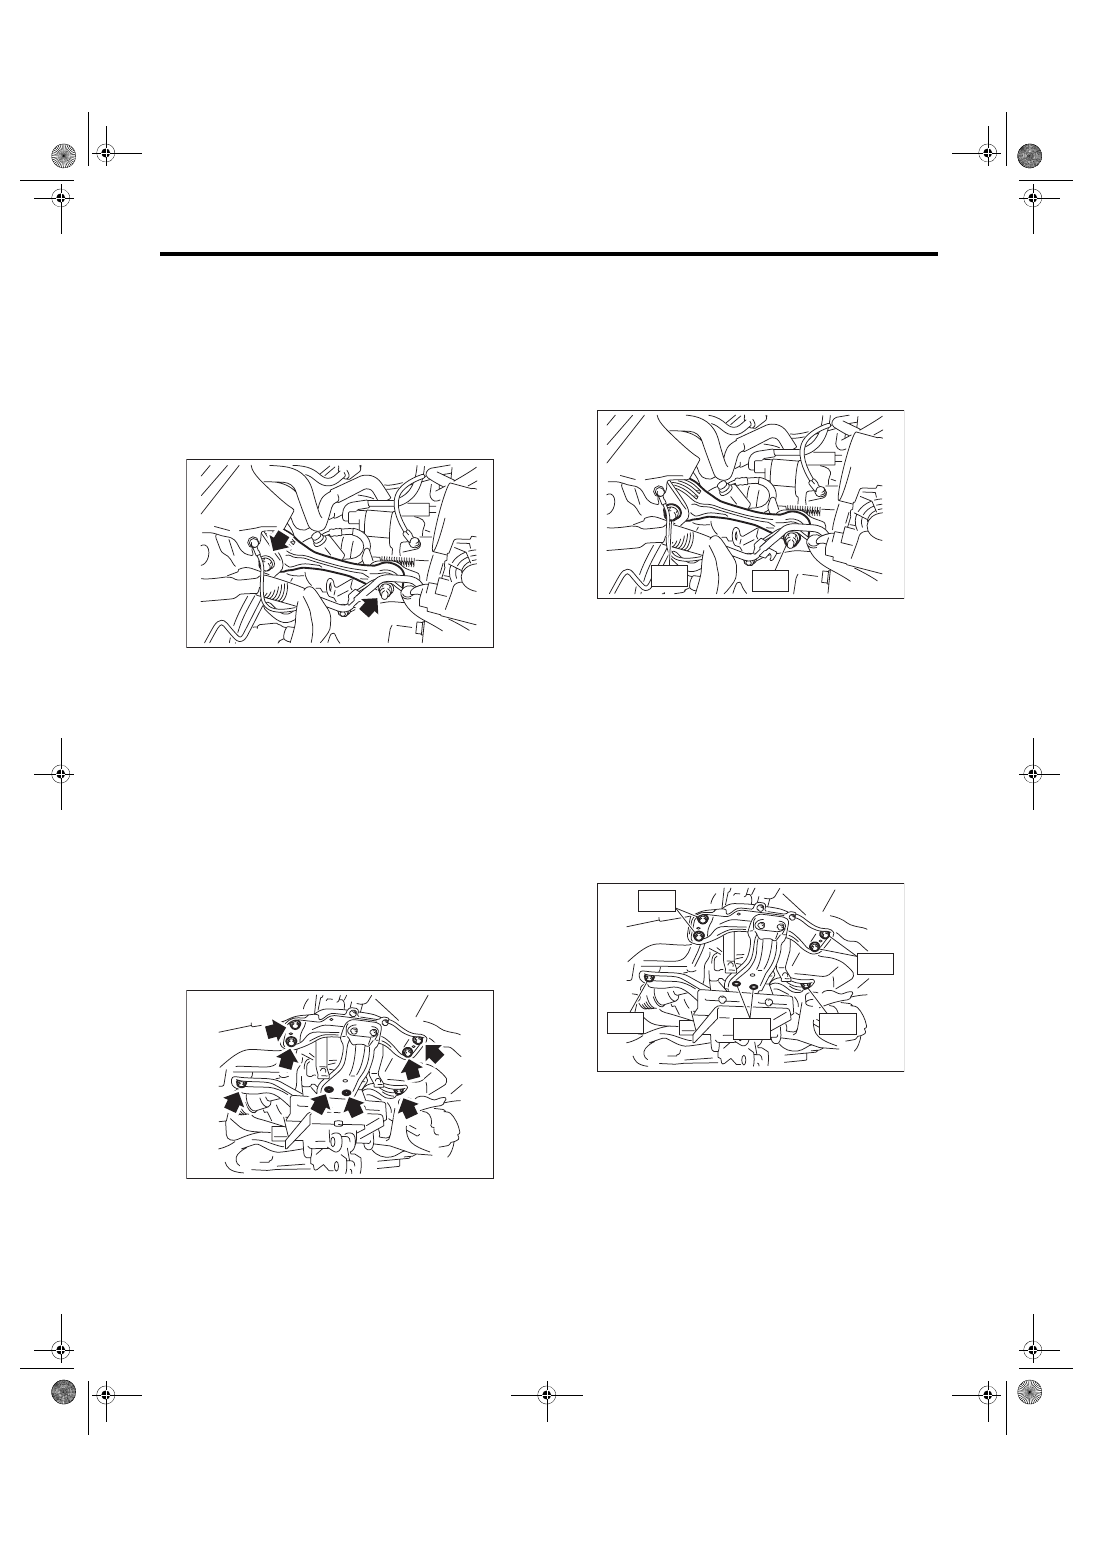
1. PITCHING STOPPER
1) Disconnect the ground cable from battery.
2) Remove the intercooler. <Ref. to IN(STI)-12,
3) Remove the pitching stopper.
2. CROSSMEMBER AND CUSHION RUB-
BER
1) Disconnect the ground cable from battery.
2) Lift up the vehicle.
3) Remove the transmission under cover.
4) Remove the center exhaust pipe. <Ref. to
EX(STI)-8, REMOVAL, Center Exhaust Pipe.>
5) Remove the rear exhaust pipe and muffler.
<Ref. to EX(STI)-13, REMOVAL, Rear Exhaust
Pipe.> <Ref. to EX(STI)-15, REMOVAL, Muffler.>
6) Remove the heat shield cover.
7) Set the transmission jack under the transmission
body.
CAUTION:
Always support the transmission case with a
transmission jack.
8) Remove the rear crossmember.
9) Remove the transmission cushion rubber.
B: INSTALLATION
1. PITCHING STOPPER
1) Install the pitching stopper.
Tightening torque:
T1: 50 N·m (5.1 kgf-m, 36.9 ft-lb)
T2: 58 N·m (5.9 kgf-m, 42.8 ft-lb)
2) Install the intercooler. <Ref. to IN(STI)-13, IN-
3) Connect the ground cable to battery.
2. CROSSMEMBER AND CUSHION RUB-
BER
1) Install the transmission cushion rubber.
Tightening torque:
35 N·m (3.6 kgf-m, 25.8 ft-lb)
2) Install the crossmember.
Tightening torque:
T1: 35 N·m (3.6 kgf-m, 25.8 ft-lb)
T2: 70 N·m (7.1 kgf-m, 51.6 ft-lb)
T3: 140 N·m (14.3 kgf-m, 103 ft-lb)
3) Remove the transmission jack.
4) Install the heat shield cover.
5) Install the rear exhaust pipe and muffler. <Ref. to
EX(STI)-13, INSTALLATION, Rear Exhaust Pipe.>
<Ref. to EX(STI)-15, INSTALLATION, Muffler.>
6) Install the center exhaust pipe. <Ref. to EX(STI)-
9, INSTALLATION, Center Exhaust Pipe.>
MT-01938
MT-01939
MT-01301
T1
T2
MT-01940
T2
T3
T3
T2
T1
6MT-30
Transmission Mounting System
MANUAL TRANSMISSION AND DIFFERENTIAL
C: INSPECTION
Perform the following inspection procedures and
repair or replace faulty parts.
1. PITCHING STOPPER
Check the pitching stopper for bends or damage.
Check that the rubber is not stiff, cracked or other-
wise damaged.
2. CROSSMEMBER AND CUSHION RUB-
BER
Check the crossmember for bending or damage.
Check that the cushion rubber is not stiff, cracked,
or otherwise damaged.
6MT-31
Manual Transmission Assembly
MANUAL TRANSMISSION AND DIFFERENTIAL
6. Manual Transmission As-
sembly
A: REMOVAL
1) Change the bolt installation position from (A) to
(B), then open the front hood completely.
Tightening torque:
7.5 N·m (0.8 kgf-m, 5.5 ft-lb)
2) Disconnect the ground cable from battery.
3) Remove the intercooler. <Ref. to IN(STI)-12,
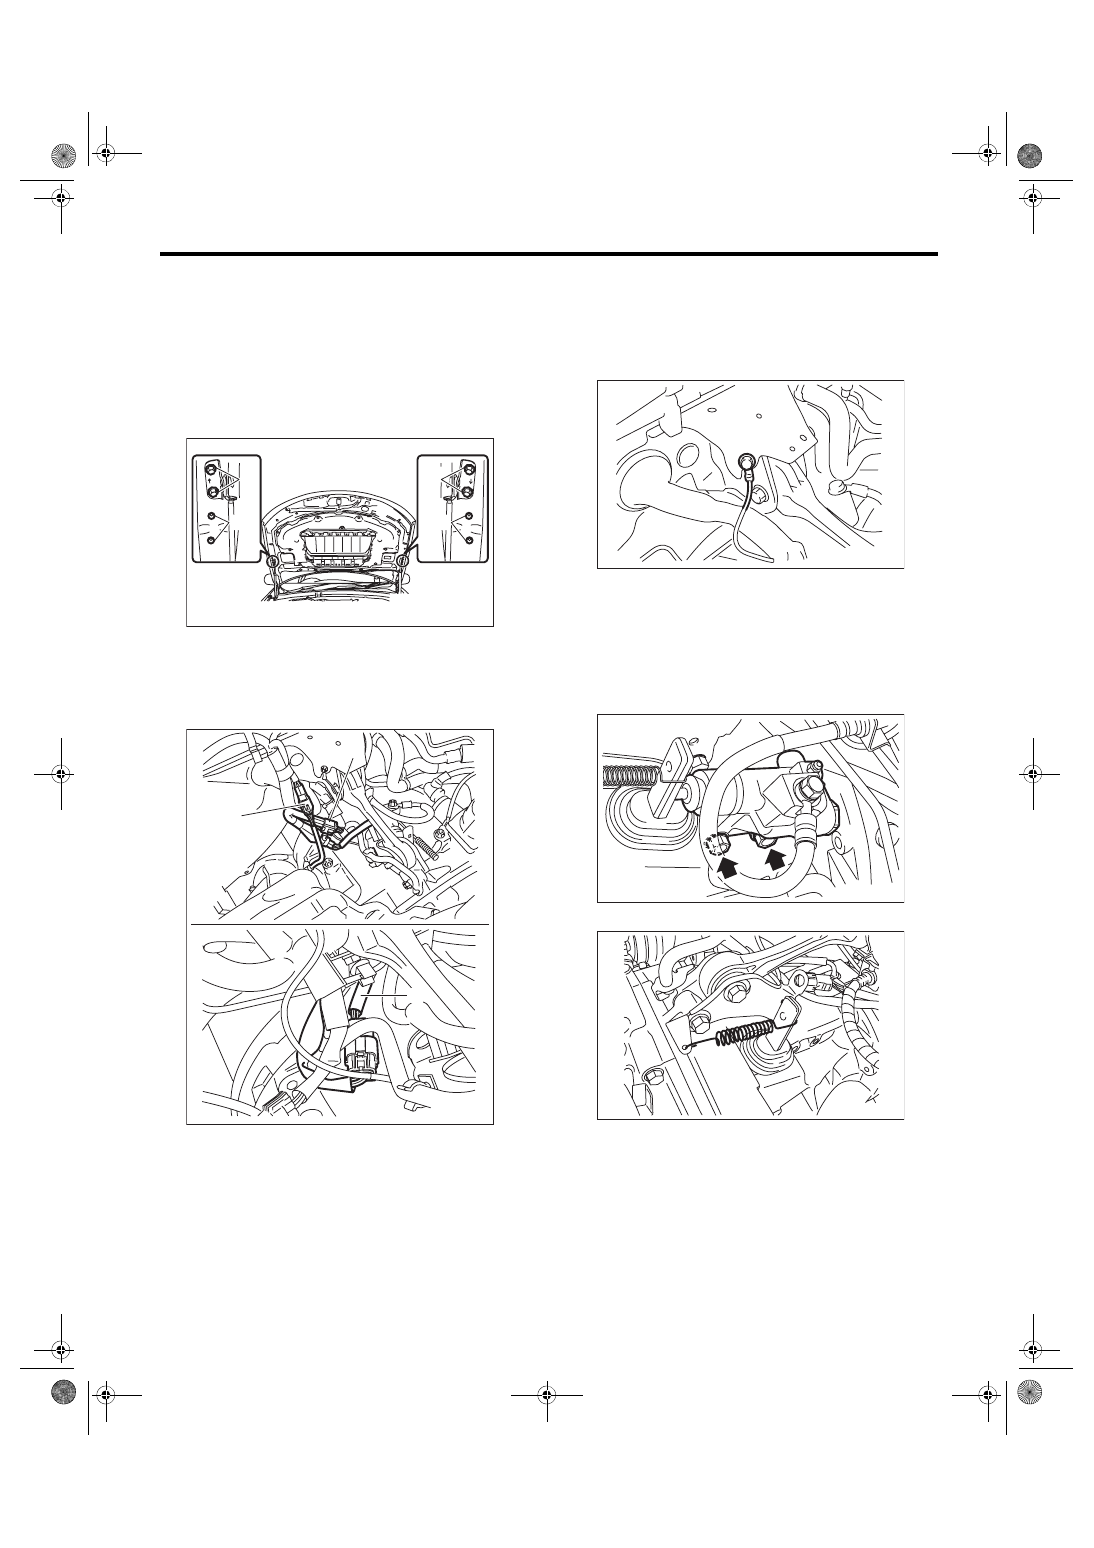
4) Disconnect the following harness connectors,
and then remove the engine hanger rear.
5) Remove the secondary air combination valve.
<Ref. to EC(STI)-29, SECONDARY AIR COMBI-
NATION VALVE LH, REMOVAL, Secondary Air
6) Disconnect the transmission radio ground termi-
nal.
7) Remove the starter assembly. <Ref. to SC(STI)-
8) Remove the operating cylinder from the trans-
mission.
NOTE:
Hang the removed operating cylinder with a piece
of wire.
9) Remove the return spring from the release fork.
10) Remove the pitching stopper. <Ref. to 6MT-29,
PITCHING STOPPER, REMOVAL, Transmission
11) Remove the pitching stopper bracket, return
spring bracket, and transmission radio ground ca-
ble.
(A) Front oxygen (A/F) sensor connector
(B) Rear oxygen sensor connector
(C) Neutral position switch backup light switch con-
nector
ME-03614
(A)
(B)
(A)
(B)
MT-01740
(A)
(B)
(C)
MT-01266
CL-00445
MT-02302
6MT-32
Manual Transmission Assembly
MANUAL TRANSMISSION AND DIFFERENTIAL
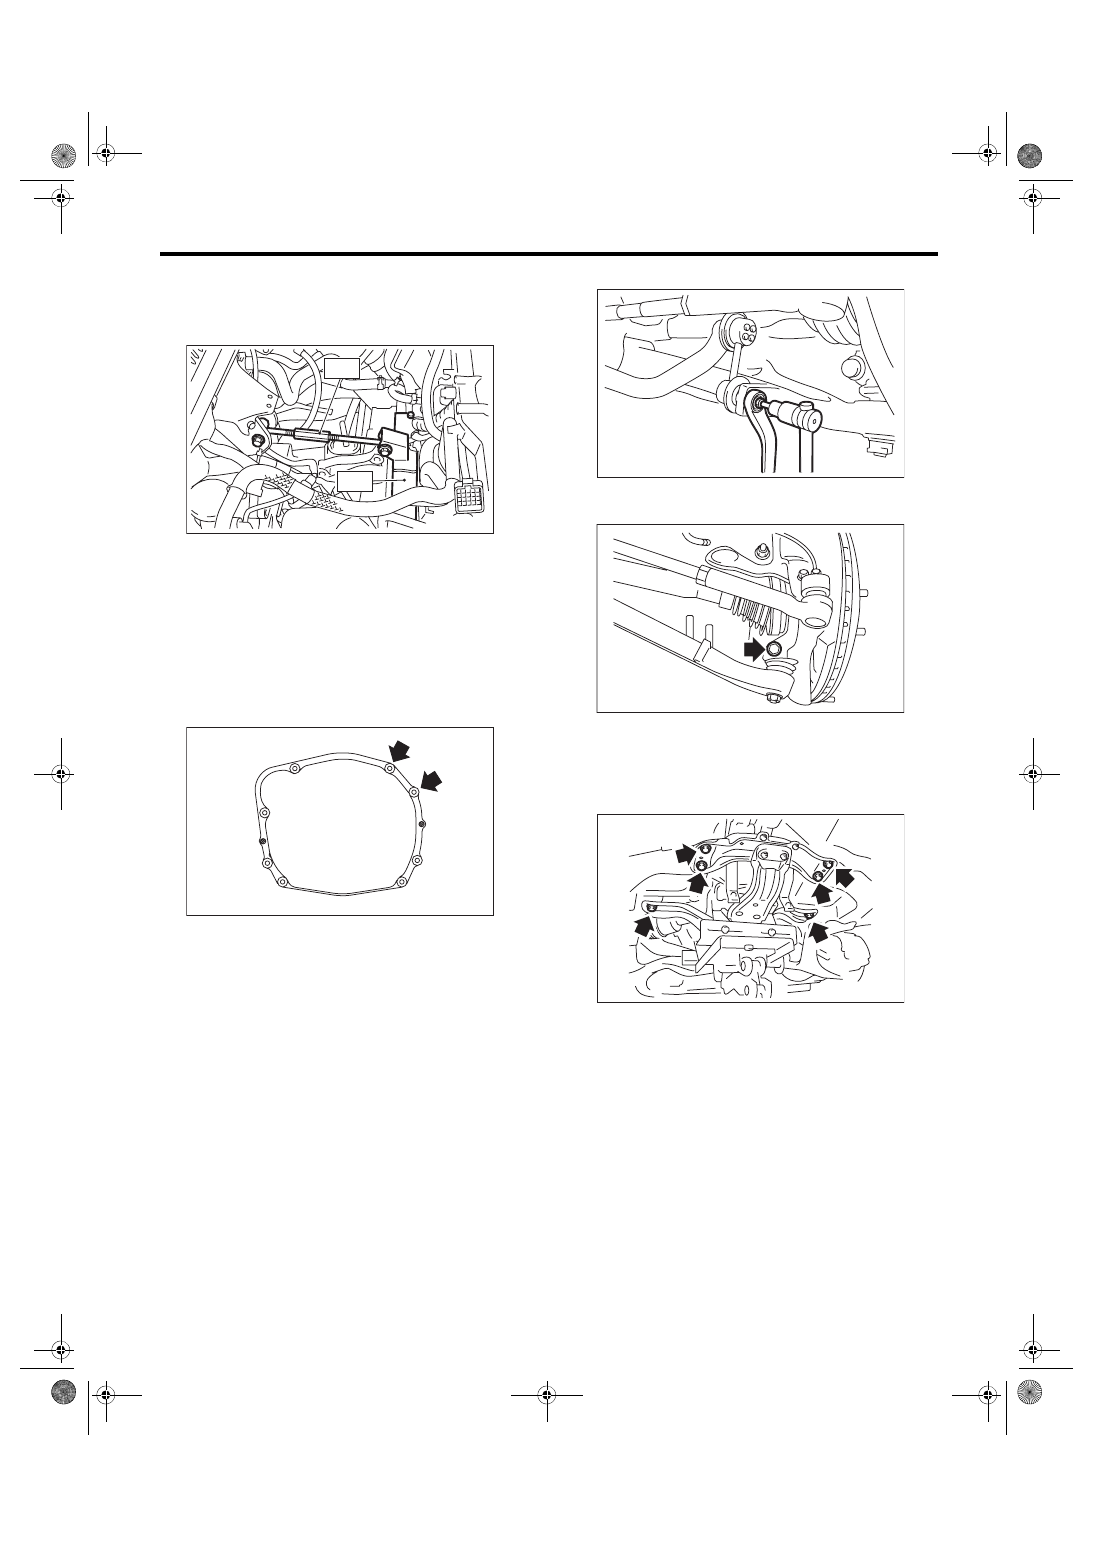
12) Set the ST.
ST1 41099AA010
ENGINE SUPPORT
BRACKET
ST2 41099AA020
ENGINE SUPPORT
13) Remove the clutch release shaft.
(1) Remove the plug using a hexagon wrench.
(2) Attach a 6 mm (0.24 in) bolt to the release
shaft, and pull out the release shaft.
(3) Lift the release fork, and remove from the
claw of the release bearing. Pull the release
fork to the engine side, and make it so that it
moves freely.
14) Remove the bolts which hold upper side of
transmission to engine.
15) Remove the front wheels.
16) Lift up the vehicle, and remove the transmis-
sion under cover.
17) Drain transmission gear oil completely. <Ref. to
6MT-26, REPLACEMENT, Transmission Gear
18) Remove the center exhaust pipe. <Ref. to
EX(STI)-8, REMOVAL, Center Exhaust Pipe.>
19) Remove the heat shield cover.
20) Remove the propeller shaft. <Ref. to DS-11,
21) Remove the front stabilizer link.
22) Remove the ball joint of front arm from the
housing.
23) Remove the front drive shaft. <Ref. to DS-27,
24) Set the transmission jack under the transmis-
sion, and remove the front crossmember and rear
crossmember.
MT-01526
ST2
ST1
MT-01524
FS-00117
FS-00106
MT-01264
Нет комментариевНе стесняйтесь поделиться с нами вашим ценным мнением.
Текст