Subaru Impreza 3 / Impreza WRX / Impreza WRX STI. Service manual — part 668
SB-17
Seat Belt Warning System
SEAT BELT SYSTEM
20
CHECK CURRENT DATA.
Select “Current Data Display” and read the data
of the “Front Wheel Speed”. <Ref. to LAN(diag)-
30, OPERATION, Read Current Data.>
Does the data display the wheel
speed data correctly?
Check the follow-
ing items.
• LAN system
<Ref. to
LAN(diag)-60,
DTC U1223 CAN-
HS VDC/ABS NO-
RECEIVE DATA,
Diagnostic Proce-
dure with Diagnos-
tic Trouble Code
(DTC).>
• VDC
<Ref. to
VDC(diag)-2,
Basic Diagnostic
Procedure.>
Step
Check
Yes
No

SB-18
Front Seat Belt
SEAT BELT SYSTEM
5. Front Seat Belt
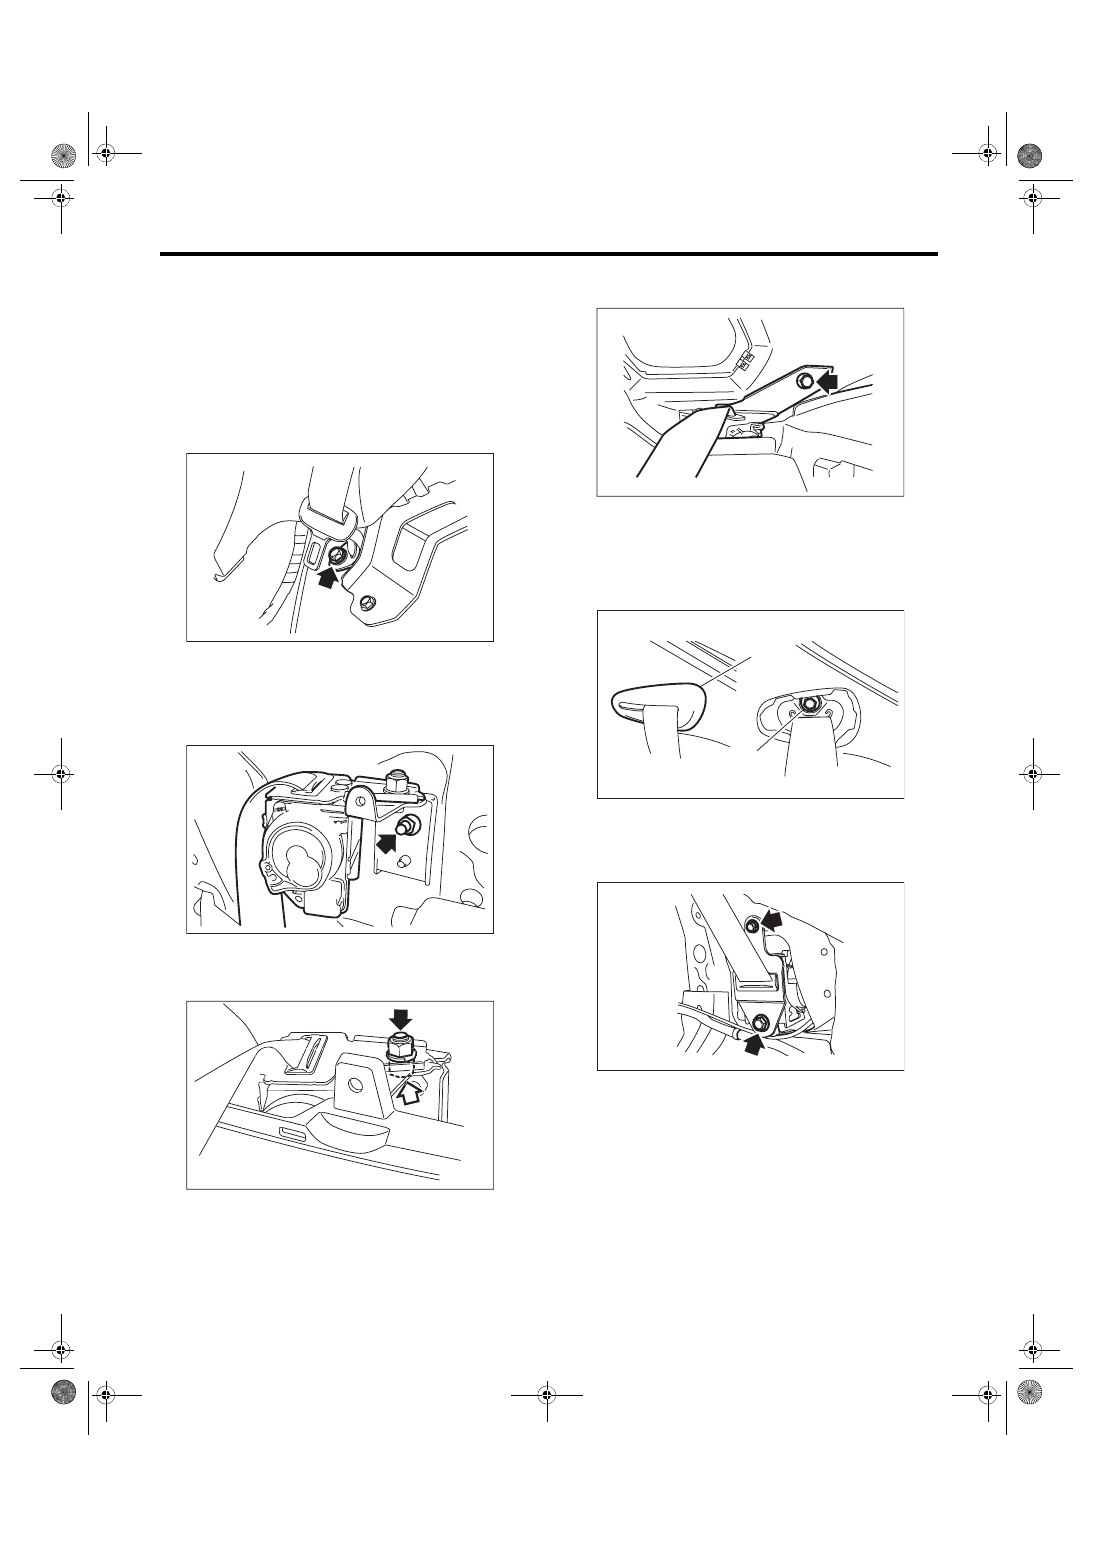
A: REMOVAL
1. OUTER SEAT BELT ASSEMBLY
CAUTION:
• Do not drop or subject the pretensioner to
any impact.
• Since the pretensioner and bracket are inte-
grated as a unit, do not disassemble them.
1) Before starting the work, turn the ignition switch
to OFF, disconnect the battery ground cable, and
wait for 60 seconds or more.
2) Tilt the backrest forward and move the seat to
the front most position.
3) Remove the center pillar lower trim. <Ref. to EI-
57, REMOVAL, Lower Inner Trim.>
4) Remove the anchor cover (A).
5) Loosen the shoulder anchor bolt (B), and then
detach the shoulder anchor from center pillar.
6) Disconnect the connector of the belt tension
sensor on passenger’s seat.
7) Turn over the floor mat and disconnect the pre-
tensioner connector (A).
8) Remove the bolts, then remove the front outer
belt.
9) Remove the center pillar upper trim. <Ref. to EI-
59, REMOVAL, Upper Inner Trim.>
10) Remove the bolts and then remove adjustable
anchor assembly.
2. INNER SEAT BELT ASSEMBLY
1) Turn the ignition switch to OFF, disconnect the
battery ground cable, and wait for 60 seconds or
more.
2) Remove the front seats. <Ref. to SE-6, REMOV-
3) Disconnect the seat belt warning light connector
under the seat.
4) Remove the seat belt harness from the harness
holder on the backside of seat cushion assembly.
5) Remove the TORX
®
bolt, and then remove the
inner seat belt assembly.
B: INSTALLATION
CAUTION:
• Before installation, make sure that the cor-
rect part is used.
• Be careful not to twist the seat belts during
installation.
• Check that there is no pinching of the seat
belt harness. Wrong harness rooting may
cause the harness short from pinch.
Install each part in the reverse order of removal.
Tightening torque:
Seat belt: <Ref. to SB-2, FRONT SEAT BELT,
COMPONENT, General Description.>
Upper inner trim: 7.5 N·m (0.76 kgf-m, 5.5 ft-lb)
SB-00350
(A)
(B)
(A)
SB-00351
SB-00352
SE-00332
SB-19
Front Seat Belt
SEAT BELT SYSTEM
C: INSPECTION
Check for the following, and replace with new parts
if necessary.
• Pretensioner is cracked or deformed.
• Seat belt is slackened, bent or worn.
• Seat belt is abnormally wound or extended.
• Inner seat belt assembly is deformed or dam-
aged.
• Seat belt buckle cannot be engaged properly.
SB-20
Rear Seat Belt
SEAT BELT SYSTEM
6. Rear Seat Belt
A: REMOVAL
1. OUTER SEAT BELT ASSEMBLY RH &
LH
1) Remove the luggage floor mat.
2) Remove the rear seat cushion. <Ref. to SE-13,
3) Remove the seat belt lower anchor bolt.
4) Remove the rear quarter trim. <Ref. to EI-60,
5) Remove the outer seat belt assembly.
• 5 door model
Remove the nut.
CAUTION:
Do not remove the bolt and nut securing the re-
tractor and bracket.
• 4 door model
Remove the bolt.
2. SHOULDER SEAT BELT CENTER AS-
SEMBLY (5 DOOR MODEL)
1) Remove the shoulder anchor bolt cover (A).
2) Remove the shoulder anchor bolt (B) and re-
move the shoulder anchor from the quarter pillar.
3) Remove the rear quarter trim. <Ref. to EI-60,
4) Remove the bolts, and then detach the outer belt
center assembly.
SB-00353
SB-00361
SB-00388
NG
N
N
N
N
N
N
N
N
N
N
N
N
N
NG
NG
NG
NG
NG
G
G
G
N
N
N
NG
G
G
G
G
G
G
G
G
G
G
G
G
G
G
G
G
G
G
N
N
N
G
G
G
SB-00360
SB-00355
(A)
(B)
SB-00356
Нет комментариевНе стесняйтесь поделиться с нами вашим ценным мнением.
Текст