Subaru Impreza 3 / Impreza WRX / Impreza WRX STI. Service manual — part 68
ME(STI)-34
Engine Assembly
MECHANICAL
B: INSTALLATION
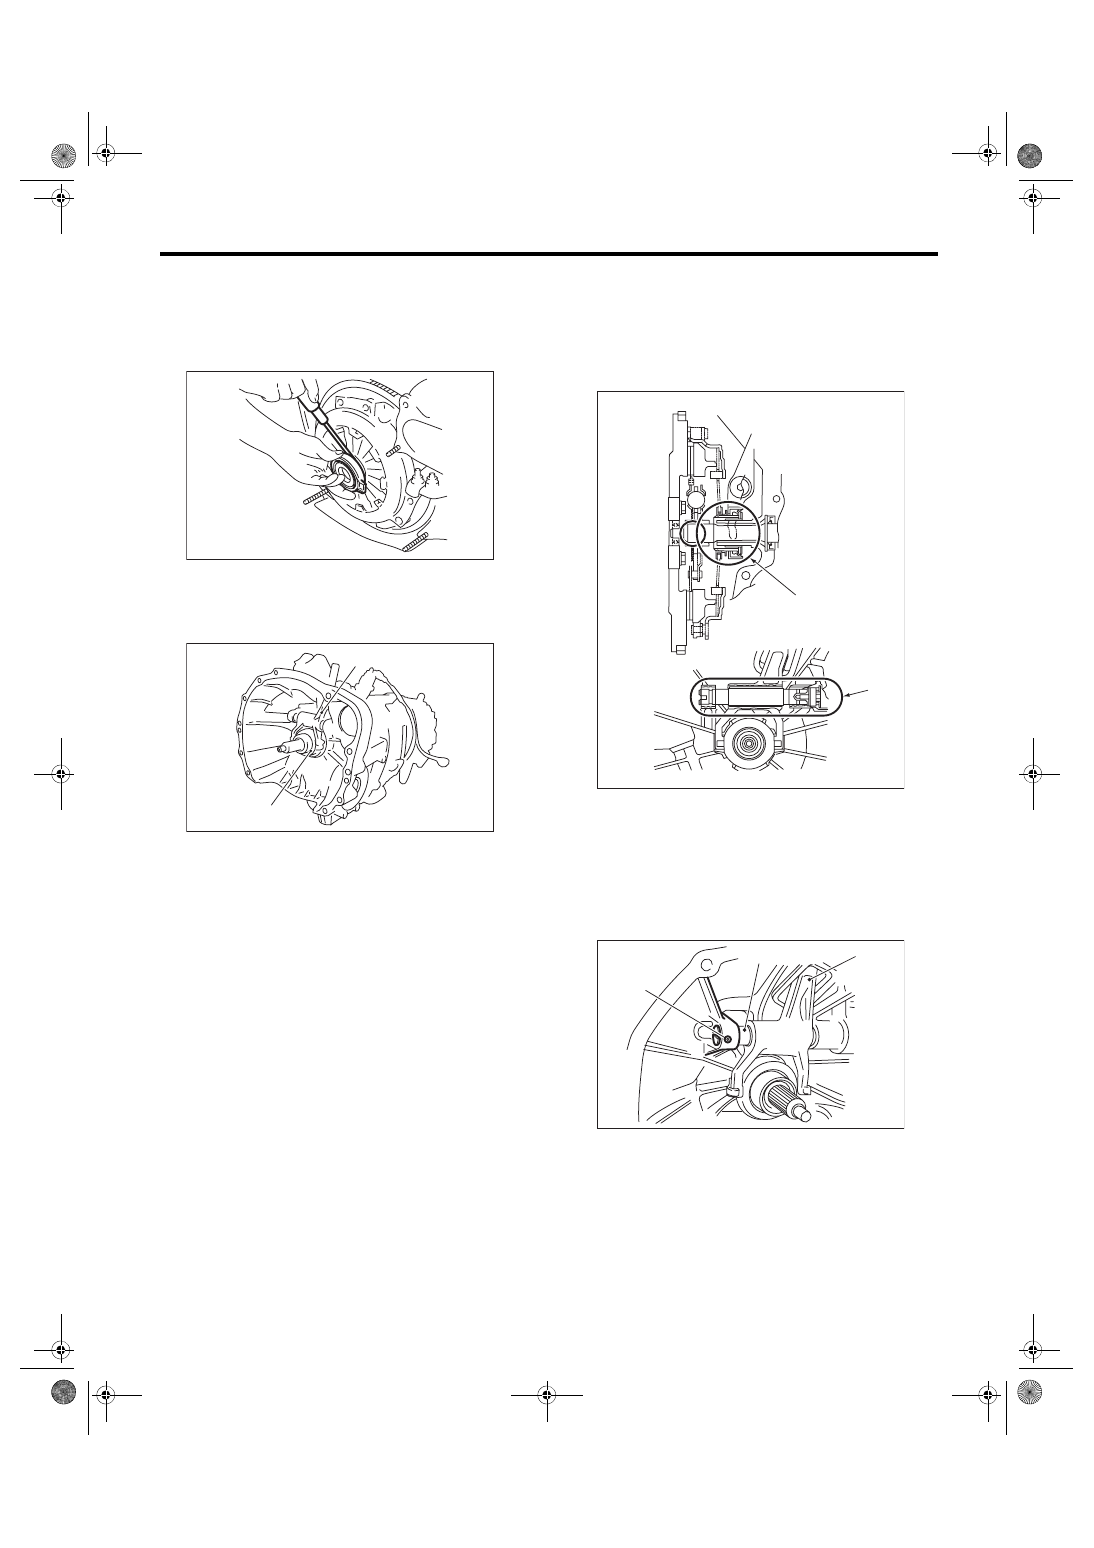
1) Install the clutch release fork and bearing to the
transmission.
(1) Using a flat tip screwdriver, remove the re-
lease bearing from the clutch cover.
(2) Attach the release bearing to the transmis-
sion.
(3) Install the release fork into the release bear-
ing tab.
(4) Apply grease to the specified areas.
Grease:
Spline part
NICHIMOLY N-130 or equivalent
Shaft part
KOPR-KOTE or equivalent
(5) Insert the release shaft to release fork.
NOTE:
Allow the cutout portion of release shaft to come
into contact with the spring pin.
(A) Release fork
(B) Release bearing
ME-00051
ME-02591
(A)
(B)
(A) Spline
(B) Shaft
(A) Release fork
(B) Release shaft
(C) Spring pin
CL-00304
(A)
(B)
ME-00054
(A)
(B)
(C)
ME(STI)-35
Engine Assembly
MECHANICAL
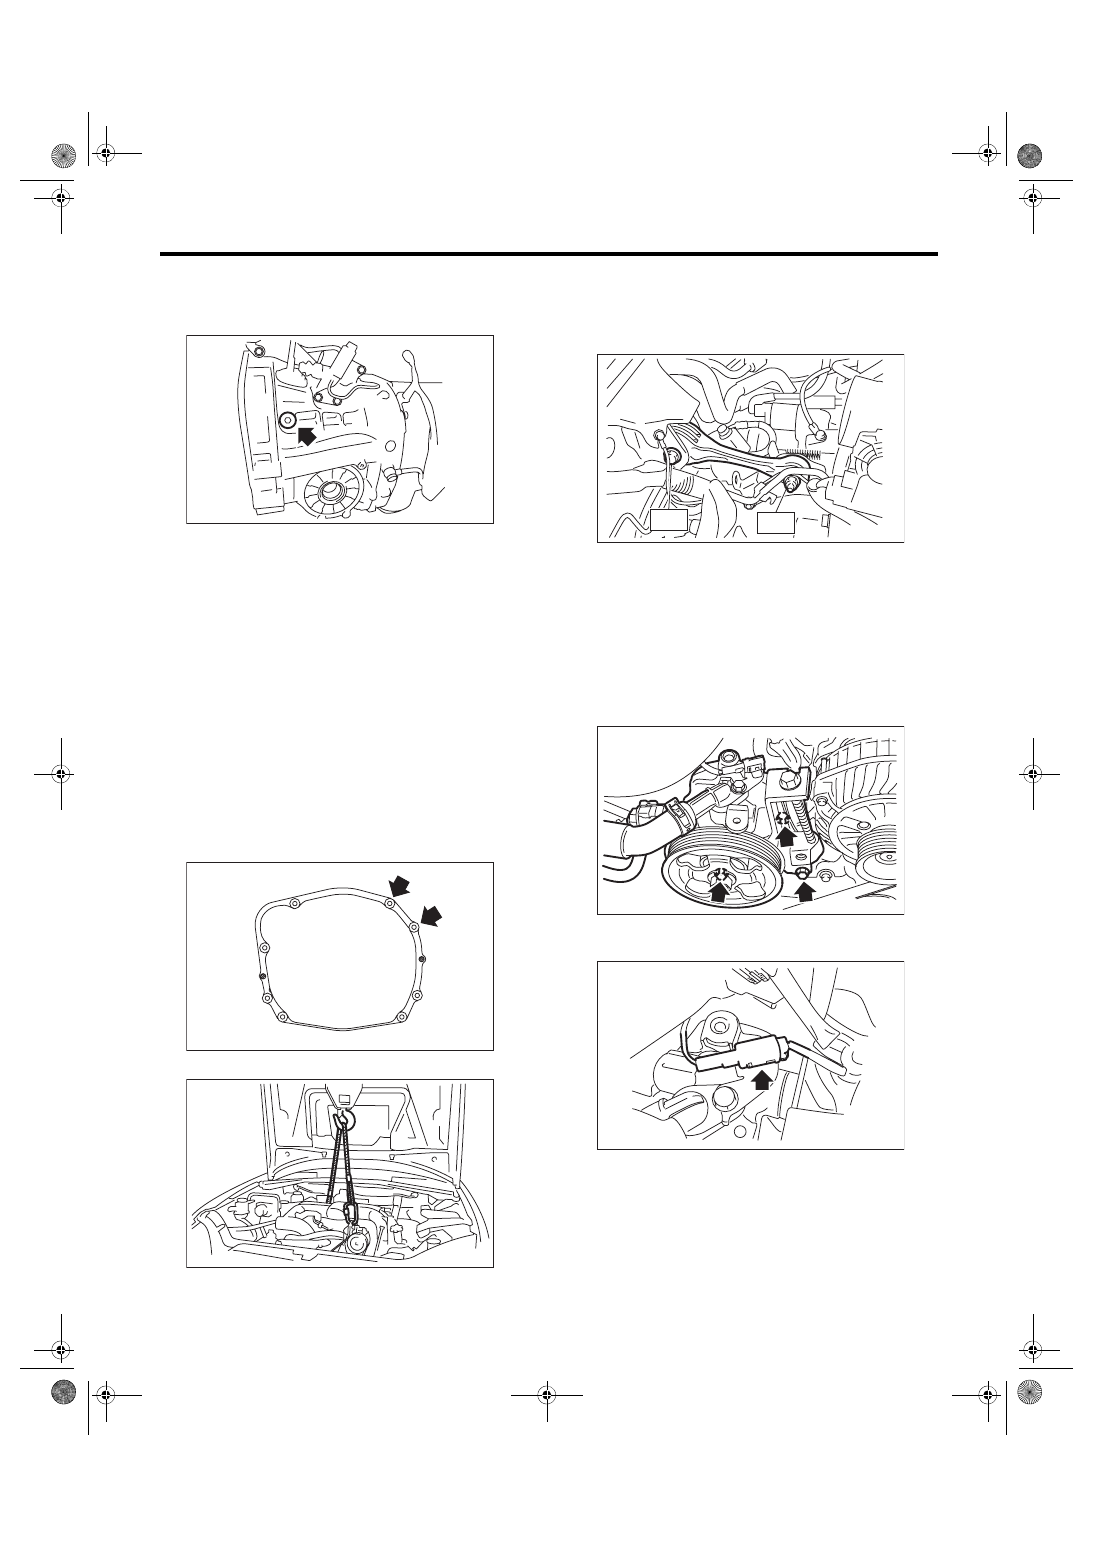
(6) Install the service hole plug.
Tightening torque:
44 N·m (4.5 kgf-m, 32.5 ft-lb)
2) Install the engine mounting onto the engine.
Tightening torque:
35 N·m (3.6 kgf-m, 25.8 ft-lb)
3) Apply a small amount of grease to splines of
main shaft.
Grease:
NICHIMOLY N-130 or equivalent
4) Position the engine in engine compartment and
align it with transmission.
NOTE:
Be careful not to damage adjacent parts or body
panels with crank pulley, oil level gauge, etc.
5) Install the bolts which hold upper side of trans-
mission to engine.
Tightening torque:
50 N·m (5.1 kgf-m, 36.9 ft-lb)
6) Remove the lifting device and wire ropes.
7) Remove the garage jack.
8) Install the pitching stopper.
Tightening torque:
T1: 50 N·m (5.1 kgf-m, 36.9 ft-lb)
T2: 58 N·m (5.9 kgf-m, 42.8 ft-lb)
9) Install the starter. <Ref. to SC(STI)-8, INSTAL-
10) Install the power steering pump.
(1) Install the power steering pump onto the en-
gine.
Tightening torque:
Refer to “COMPONENT” of “Power Steering”
for the tightening torque. <Ref. to PS-4, COM-
(2) Connect the connector to the power steering
pump switch.
(3) Install the front side belt. <Ref. to ME(STI)-
40, FRONT SIDE BELT, INSTALLATION, V-
11) Lift up the vehicle.
ME-02592
MT-01524
LU-00222
EX-02521
T2
T1
ME-03617
FU-04598
ME(STI)-36
Engine Assembly
MECHANICAL
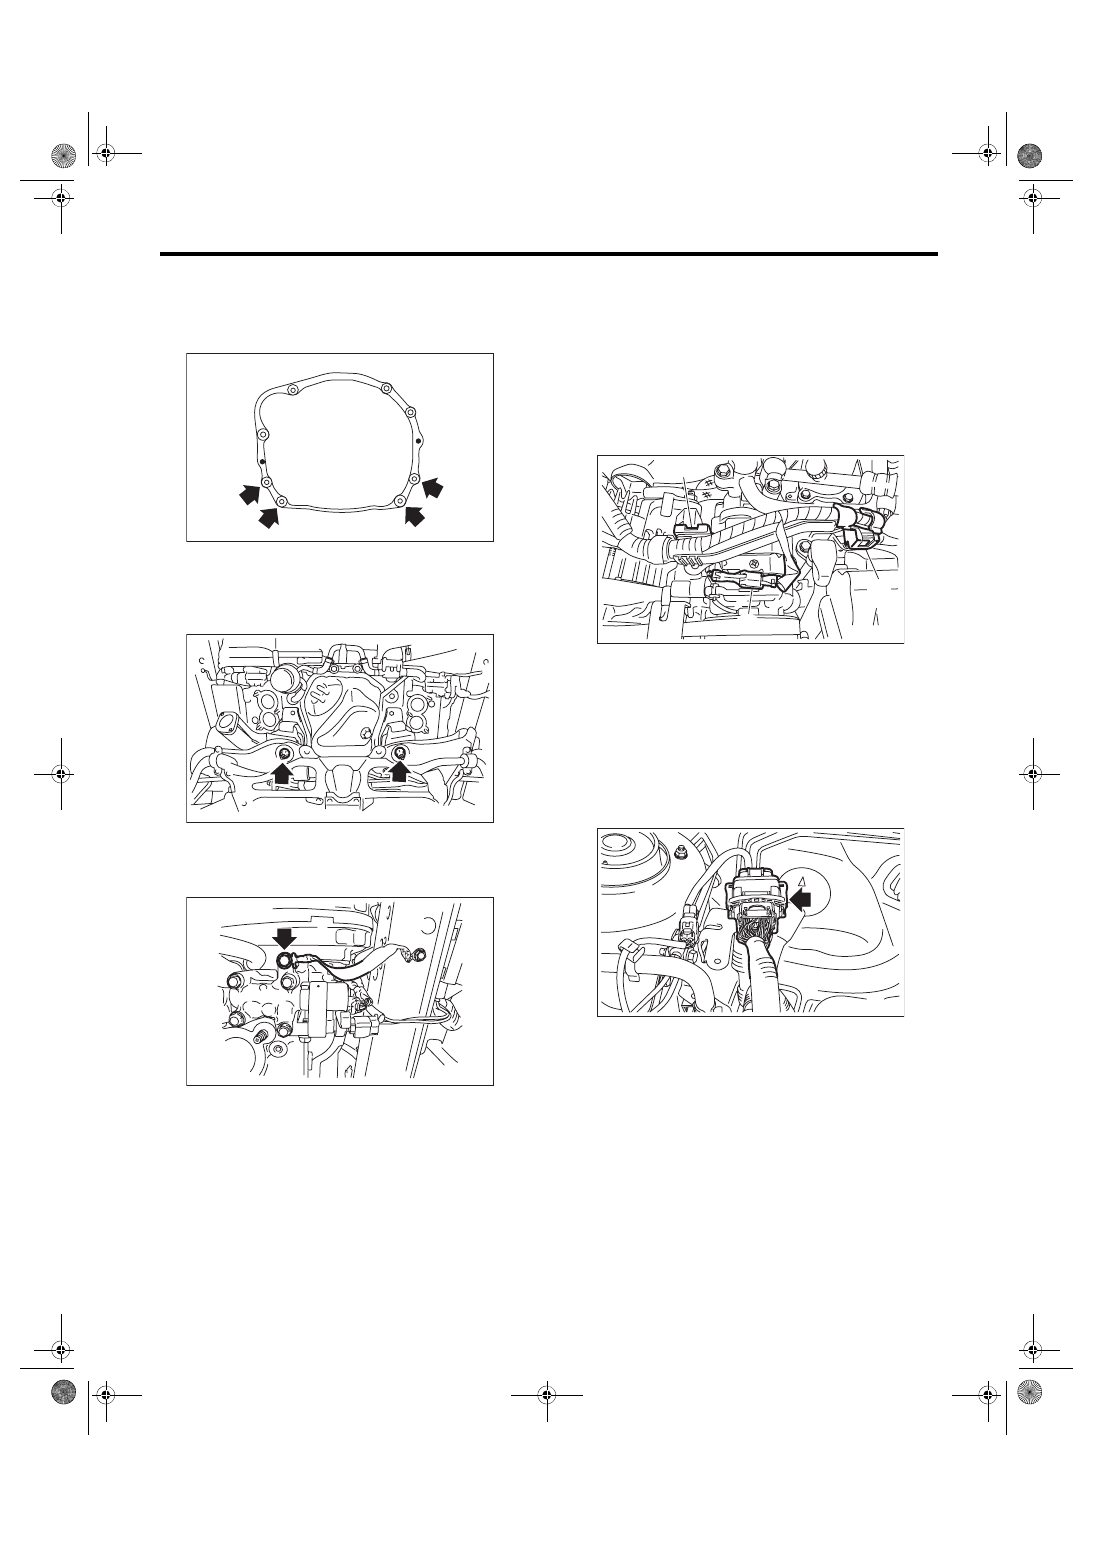
12) Install the bolts and nuts which hold lower side
of the transmission to engine.
Tightening torque:
50 N·m (5.1 kgf-m, 36.9 ft-lb)
13) Install the nuts which hold the engine mounting
to the crossmember.
Tightening torque:
45 N·m (4.6 kgf-m, 33.2 ft-lb)
14) Connect the ground cable.
Tightening torque:
7.5 N·m (0.8 kgf-m, 5.5 ft-lb)
15) Install the joint pipe and front exhaust pipe.
<Ref. to EX(STI)-6, INSTALLATION, Front Ex-
haust Pipe.> <Ref. to EX(STI)-12, INSTALLATION,
16) Install the turbocharger. <Ref. to IN(STI)-16,
17) Install the center exhaust pipe. <Ref. to
EX(STI)-9, INSTALLATION, Center Exhaust
18) Connect the following hoses.
(1) Fuel delivery hose, fuel return hose and
evaporation hose
(2) Heater inlet hose and heater outlet hose
(3) Brake booster vacuum hose and pressure
regulator vacuum hose
(4) A/C pressure hose <Ref. to AC-41, INSTAL-
19) Secure the generator cord using the clip (B)
and connect the connector (A) to A/C compressor.
20) Connect the following connectors and termi-
nals.
(1) Generator connector and terminal
Tightening torque:
15 N·m (1.5 kgf-m, 11.1 ft-lb)
(2) Secondary air pump connector
21) Install the engine harness connector to engine
harness bracket, then connect the bulkhead har-
ness connector to the engine harness connector.
22) Install the intercooler. <Ref. to IN(STI)-13, IN-
23) Install the radiator. <Ref. to CO(STI)-20, IN-
24) Install the coolant filler tank. <Ref. to CO(STI)-
28, INSTALLATION, Coolant Filler Tank.>
25) Install the air cleaner case and air intake duct.
<Ref. to IN(STI)-8, INSTALLATION, Air Cleaner
Case.> <Ref. to IN(STI)-10, INSTALLATION, Air
26) Install the battery. <Ref. to SC(STI)-27, IN-
27) Fill engine coolant. <Ref. to CO(STI)-13, FILL-
ING OF ENGINE COOLANT, REPLACEMENT,
MT-00077
LU-02415
ME-04976
ME-04681
(B)
(A)
(B)
FU-06571

ME(STI)-37
Engine Assembly
MECHANICAL
28) Charge the A/C system with refrigerant. <Ref.
to AC-20, PROCEDURE, Refrigerant Charging
29) Install the V-belt cover.
Tightening torque:
13 N·m (1.3 kgf-m, 9.6 ft-lb)
30) Change the bolt installation position from (B) to
(A), then close the front hood.
Tightening torque:
7.5 N·m (0.8 kgf-m, 5.5 ft-lb)
C: INSPECTION
1) Check that pipes, hoses, connectors and clamps
are installed firmly.
2) Check the engine coolant is at specified level.
3) Start the engine and check for exhaust gas, en-
gine coolant, leaks of fuel, etc. Also check for noise
and vibrations.
FU-03487
ME-03614
(A)
(B)
(A)
(B)
Нет комментариевНе стесняйтесь поделиться с нами вашим ценным мнением.
Текст