Subaru Impreza 3 / Impreza WRX / Impreza WRX STI. Service manual — part 69
ME(STI)-38
Engine Mounting
MECHANICAL
10.Engine Mounting
A: REMOVAL
1) Remove the front crossmember. <Ref. to FS-27,
2) Remove the engine mounting from the engine.
B: INSTALLATION
Install in the reverse order of removal.
Tightening torque:
35 N·m (3.6 kgf-m, 25.8 ft-lb)
C: INSPECTION
Make sure that no crack or other damages do not
exist.
ME(STI)-39
Preparation for Overhaul
MECHANICAL
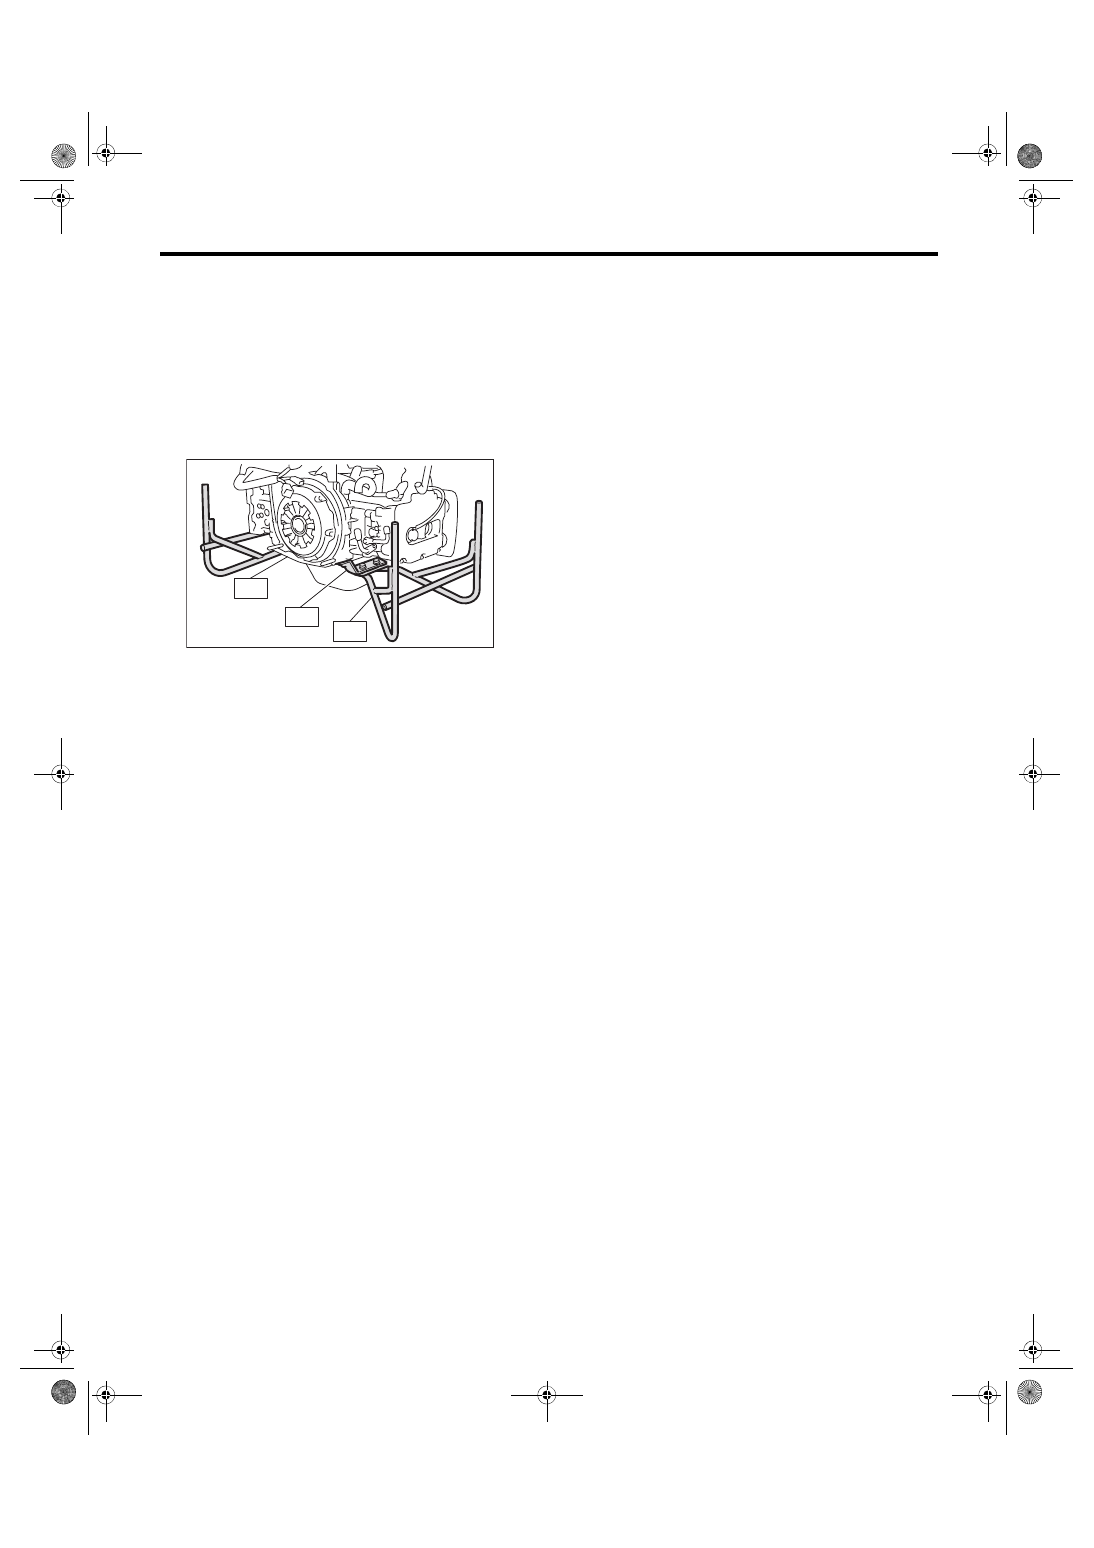
11.Preparation for Overhaul
A: PROCEDURE
1) After removing the engine from vehicle body, at-
tach the ST to the engine as shown in the figure.
ST1 498457000
ENGINE STAND ADAPTER
RH
ST2 498457100
ENGINE STAND ADAPTER
LH
ST3 499817100
ENGINE STAND
2) In this section the procedures described under
each index are all connected and stated in order.
The procedure for overhauling of the engine will be
completed when you go through all steps in the
process.
Therefore, in this section, to conduct the particular
procedure within the flow of a section, you need to
go back and conduct the procedure described pre-
viously in order to do that particular procedure.
ME-00057
ST3
ST2
ST1
ME(STI)-40
V-belt
MECHANICAL
12.V-belt
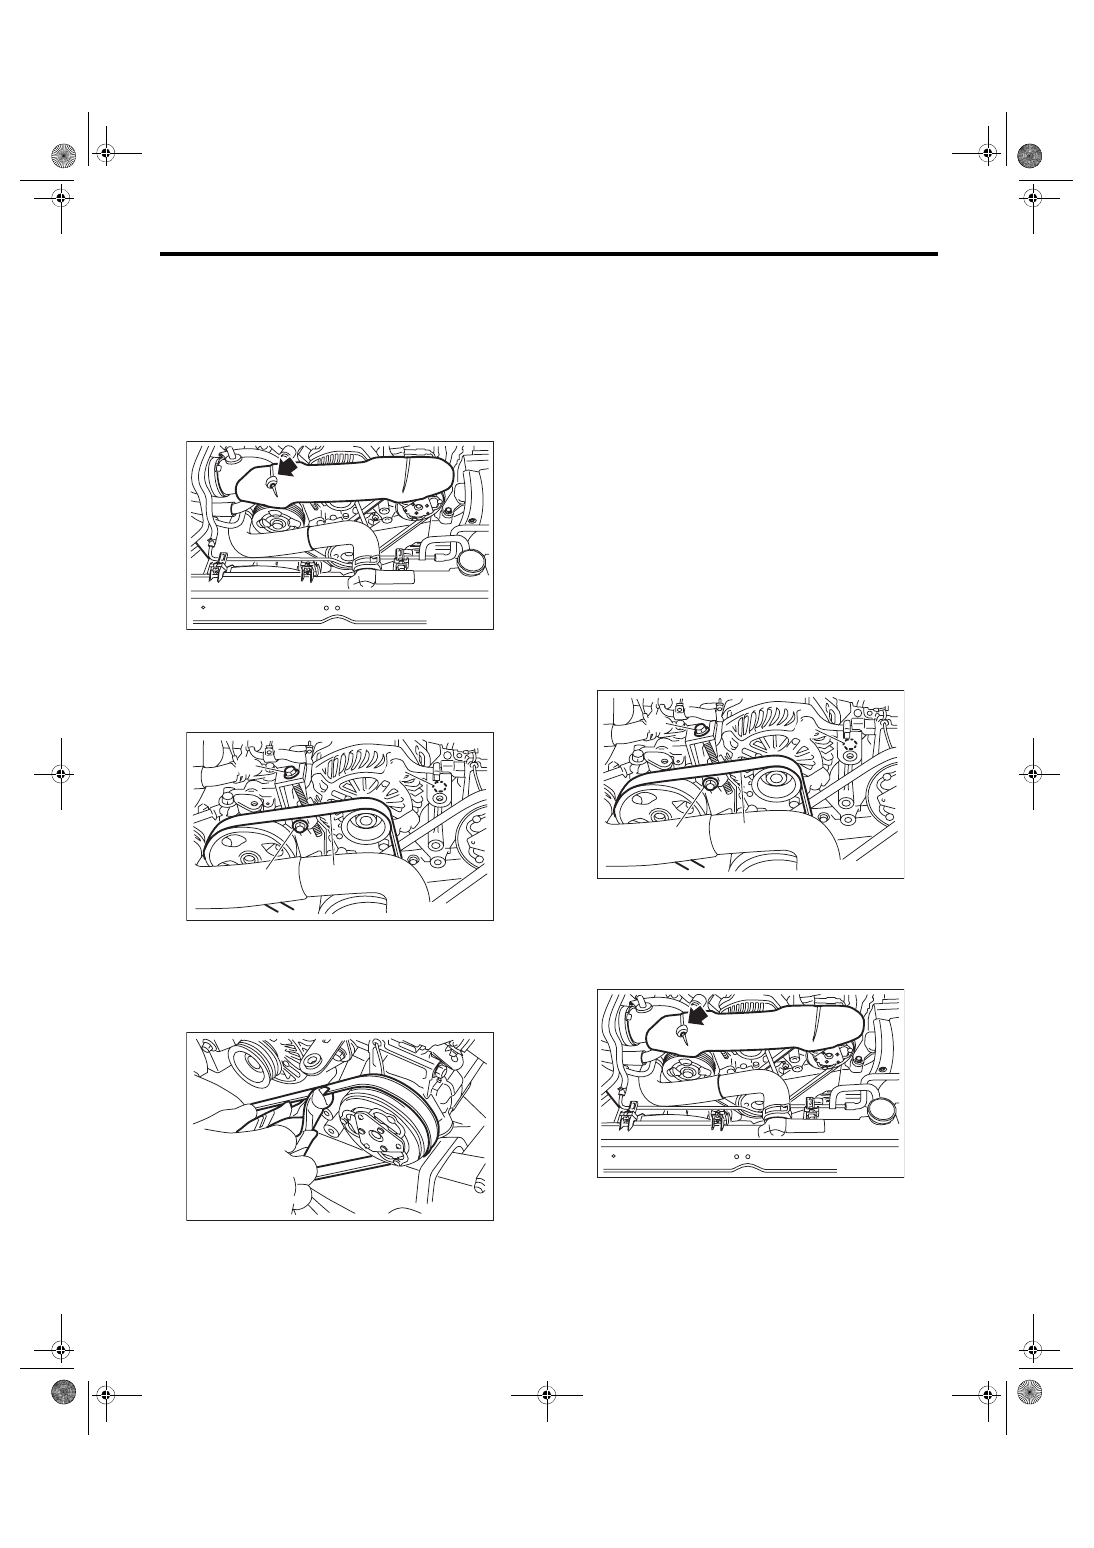
A: REMOVAL
NOTE:
When replacing a single part, perform the work with
the engine assembly installed to body.
1. FRONT SIDE BELT
1) Remove the V-belt covers.
2) Remove the air intake duct. <Ref. to IN(STI)-10,
3) Loosen the bolt (A).
4) Loosen the slider bolt (B).
5) Remove the front side belt (C).
2. REAR SIDE BELT
1) Remove the front side belts. <Ref. to ME(STI)-
40, FRONT SIDE BELT, REMOVAL, V-belt.>
2) Cut the rear side belt with a wire cutter, etc., and
discard.
B: INSTALLATION
1. FRONT SIDE BELT
CAUTION:
• When reusing the front side belt, wipe off
dust and water with cloth.
• Do not use the front side belt if there is any
oil, grease or coolant on the belt.
• Be careful not to rub the belt end surface with
bare hands; exposed core may cause injury.
1) Wipe off any dust, oil and water on the groove of
each pulley with cloth.
2) Install the front side belt (C), and adjust the slider
bolt (B) so as to obtain the specified belt tension.
<Ref. to ME(STI)-46, INSPECTION, V-belt.>
3) Tighten the bolt (A).
4) Tighten the slider bolt (B).
Tightening torque:
Bolt (A)
25 N·m (2.5 kgf-m, 18.4 ft-lb)
Slider bolt (B)
8 N·m (0.8 kgf-m, 5.9 ft-lb)
5) Install the air intake duct. <Ref. to IN(STI)-10, IN-
6) Install the V-belt cover.
Tightening torque:
13 N·m (1.3 kgf-m, 9.6 ft-lb)
FU-03487
ME-04947
(A)
(A)
(A)
(C)
(B)
(A)
ME-03343
ME-04947
(A)
(A)
(A)
(C)
(B)
(A)
FU-03487
ME(STI)-41
V-belt
MECHANICAL
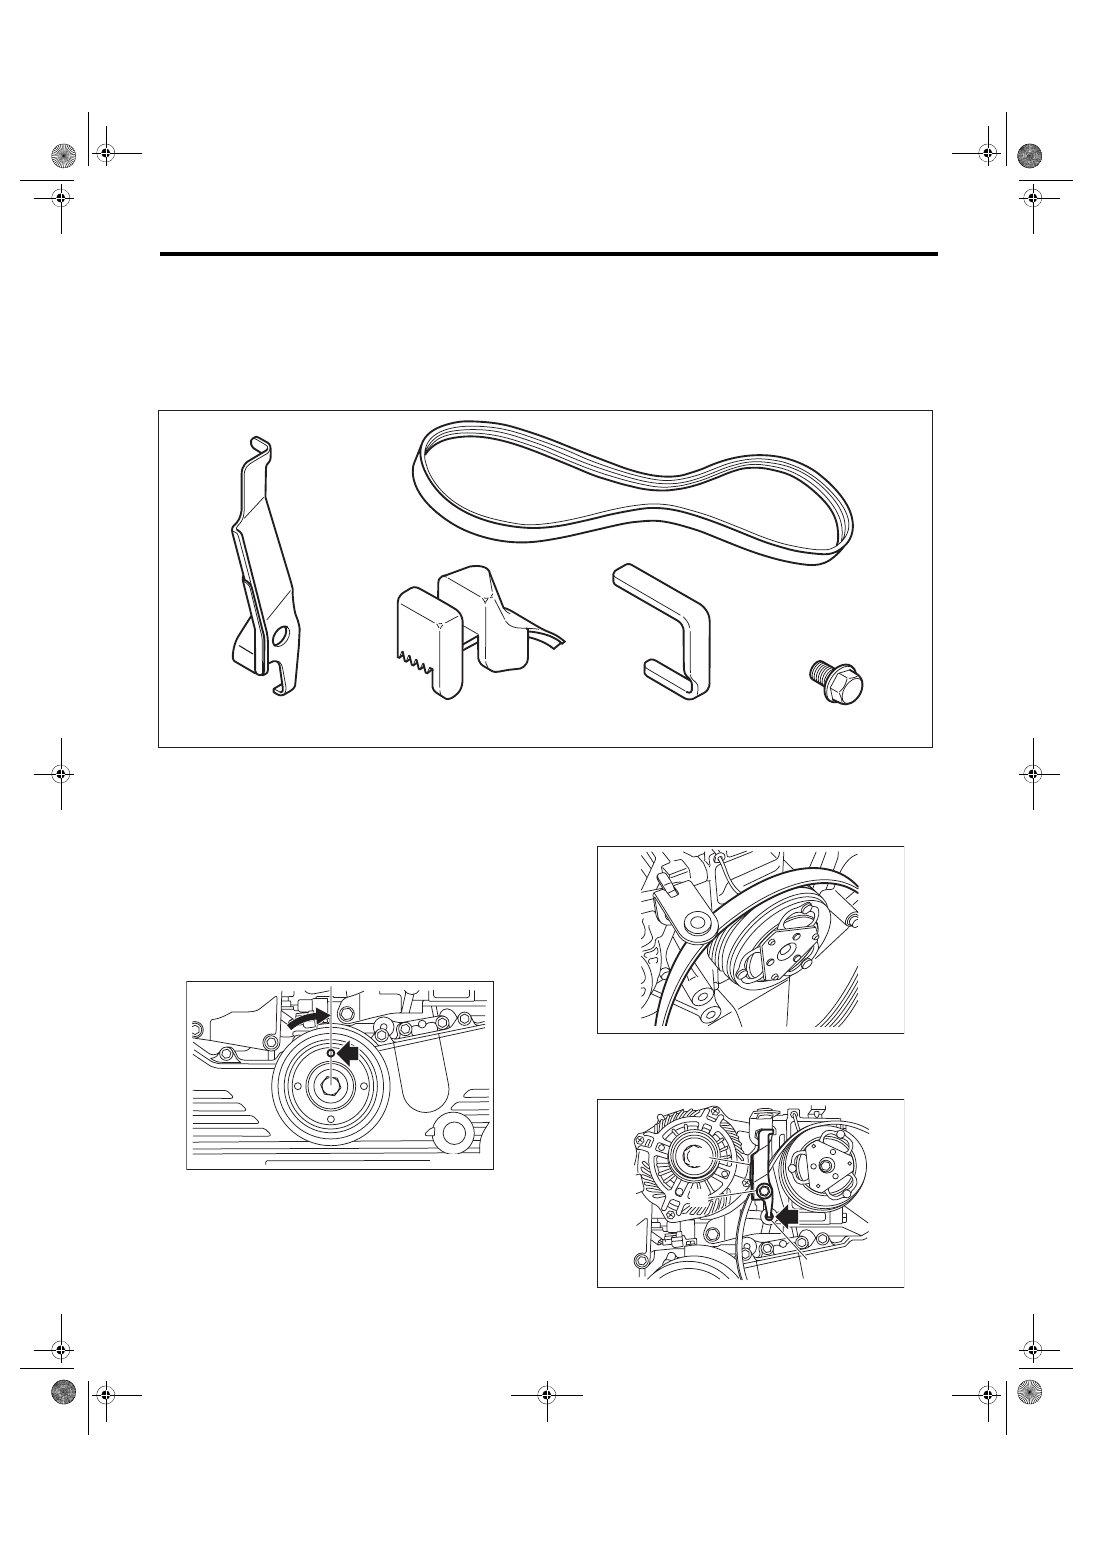
2. REAR SIDE BELT
CAUTION:
• Do not re-use the rear side belt.
• Be careful not to let oil, grease or coolant contact a new rear side belt.
• Be careful not to rub the belt end surface with bare hands; exposed core may cause injury.
• To install the rear side belt, always use the provided tools (belt stopper, belt guide, belt guide hold-
er, and bolt).
1) Wipe off any dust, oil and water on the groove of
each pulley with cloth.
2) Wipe off any oil, water, dirt, and rust on the front
of the crank pulley with cloth.
3) Slowly turn the crank pulley clockwise so that the
service hole of the crank pulley comes around the
top.
CAUTION:
Do not turn the crank pulley counterclockwise.
4) Hook a new rear side belt on the A/C compres-
sor pulley.
5) As shown in the figure, insert the claw of the belt
stopper (A) to the lower hole (B) of the compressor
bracket, then attach with bolt (C).
(A)
Rear side belt
(C)
Belt guide
(E)
Bolt
(B)
Belt stopper
(D)
Belt guide holder
ME-04287
(A)
(B)
(C)
(D)
(E)
ME-03500
ME-03501
ME-04670
(A)
(C)
(B)
Нет комментариевНе стесняйтесь поделиться с нами вашим ценным мнением.
Текст