Subaru Impreza 3 / Impreza WRX / Impreza WRX STI. Service manual — part 71
ME(STI)-46
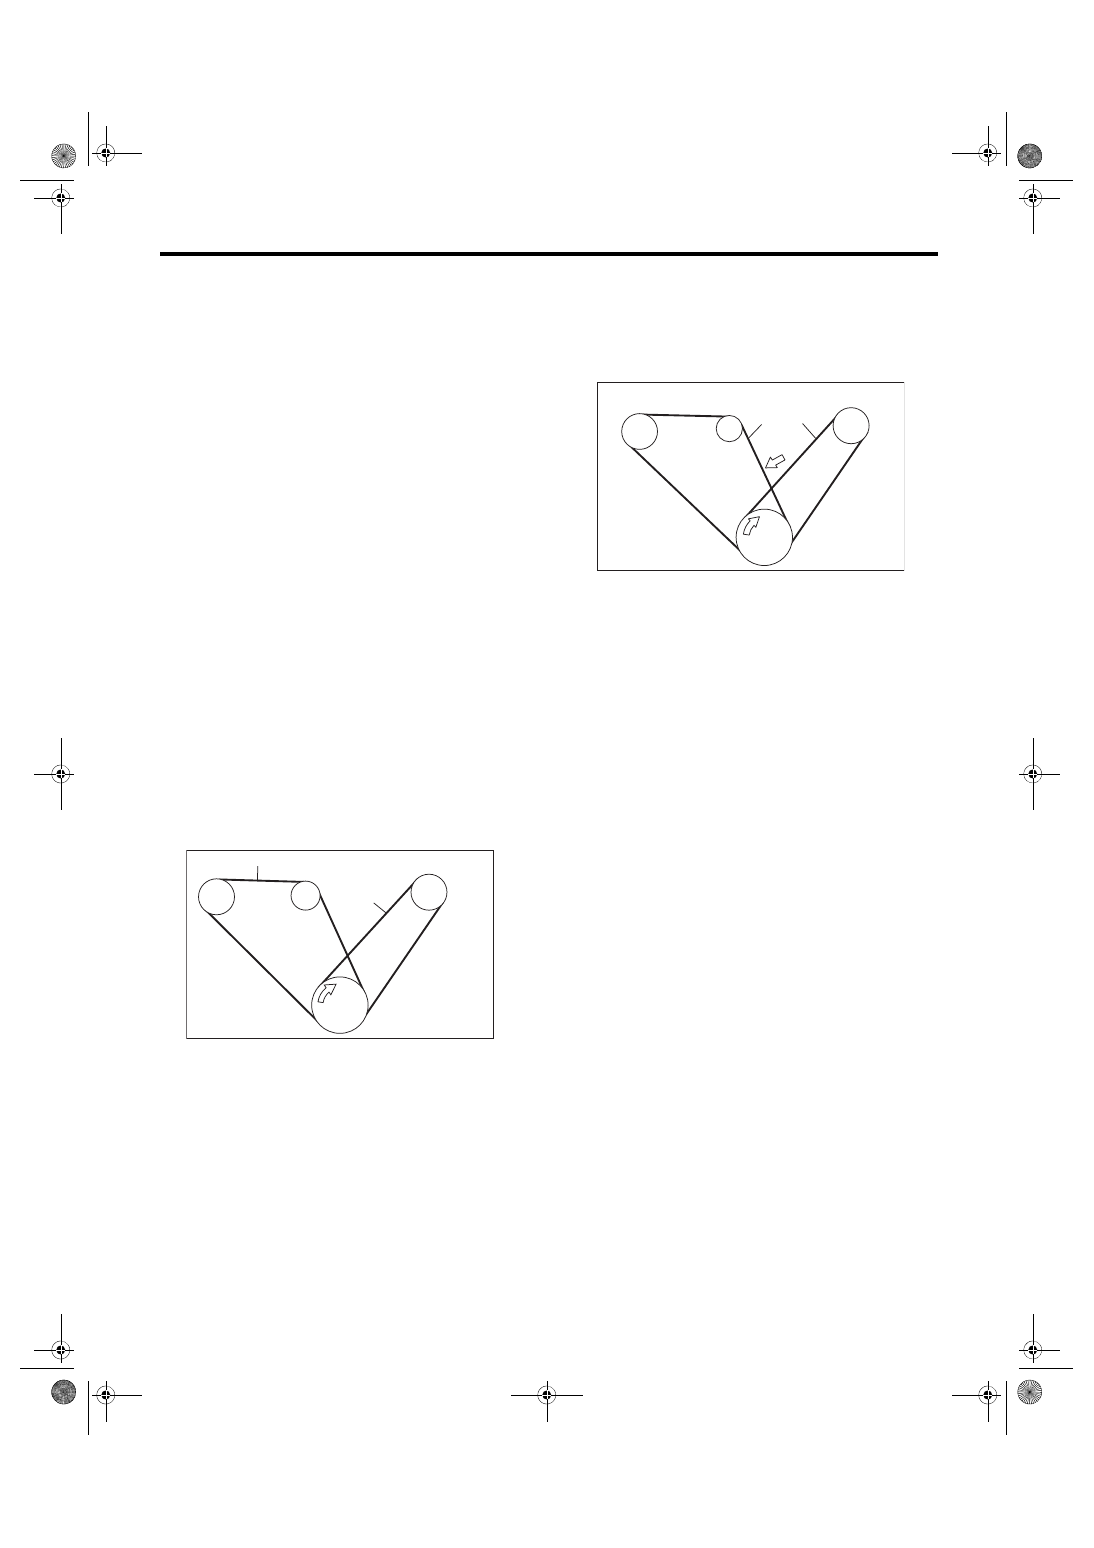
V-belt
MECHANICAL
C: INSPECTION
1. FRONT SIDE BELT
CAUTION:
Check and adjust the front side belt tension so
that it is within the specified range. Using the
belt with a tension out of the specified range
may result in a fault such as the following:
• If the front side belt tension is higher, unex-
pected force is generated at the power steering
oil pump, generator and crankshaft bearing,
causing abnormal noise due to abnormal wear
of the bearing.
• If the front side belt tension is lower, the front
side belt and crank pulley slip, causing abnor-
mally high temperature on the crank pulley due
to frictional heat. If this condition repeatedly
occurs, the front side belt may abnormally
wear, causing abnormal noise, front side belt
damage or crank pulley damage.
1) Replace the front side belt, if crack, fraying or
wear is found.
2) Check the front side belt tension and adjust it if
necessary by changing the generator installing po-
sition.
Front side belt tension (with belt tension
gauge):
When installing new parts
640 — 780 N (65 — 80 kgf, 144 — 175 lbf)
At inspection
490 — 640 N (50 — 65 kgf, 110 — 144 lbf)
Front side belt tension (without belt tension
gauge):
When installing new parts
7 — 9 mm (0.276 — 0.354 in)
At inspection
9 — 11 mm (0.354 — 0.433 in)
2. REAR SIDE BELT
Replace the rear side belt, if crack, fraying or wear
is found, or noise is emitted.
NOTE:
For the rear side belt, a stretch type belt is used,
and therefore, it is not necessary to check deflec-
tion nor tension.
(A) Front side belt
(B) Rear side belt
C/P Crank pulley
GEN Generator pulley
P/S Power steering oil pump pulley
A/C A/C compressor pulley
ME-03313
C/P
P/S
A/C
GEN
(A)
(B)
(A) Front side belt
(B) Rear side belt
(C) 98 N (10 kgf, 22 lbf)
C/P Crank pulley
GEN Generator pulley
P/S Power steering oil pump pulley
A/C A/C compressor pulley
ME-03314
(A)
(B)
GEN
C/P
A/C
P/S
(C)
ME(STI)-47
Crank Pulley
MECHANICAL
13.Crank Pulley
A: REMOVAL
NOTE:
When replacing a single part, perform the work with
the engine assembly installed to body.
1) Remove the V-belts. <Ref. to ME(STI)-40, RE-
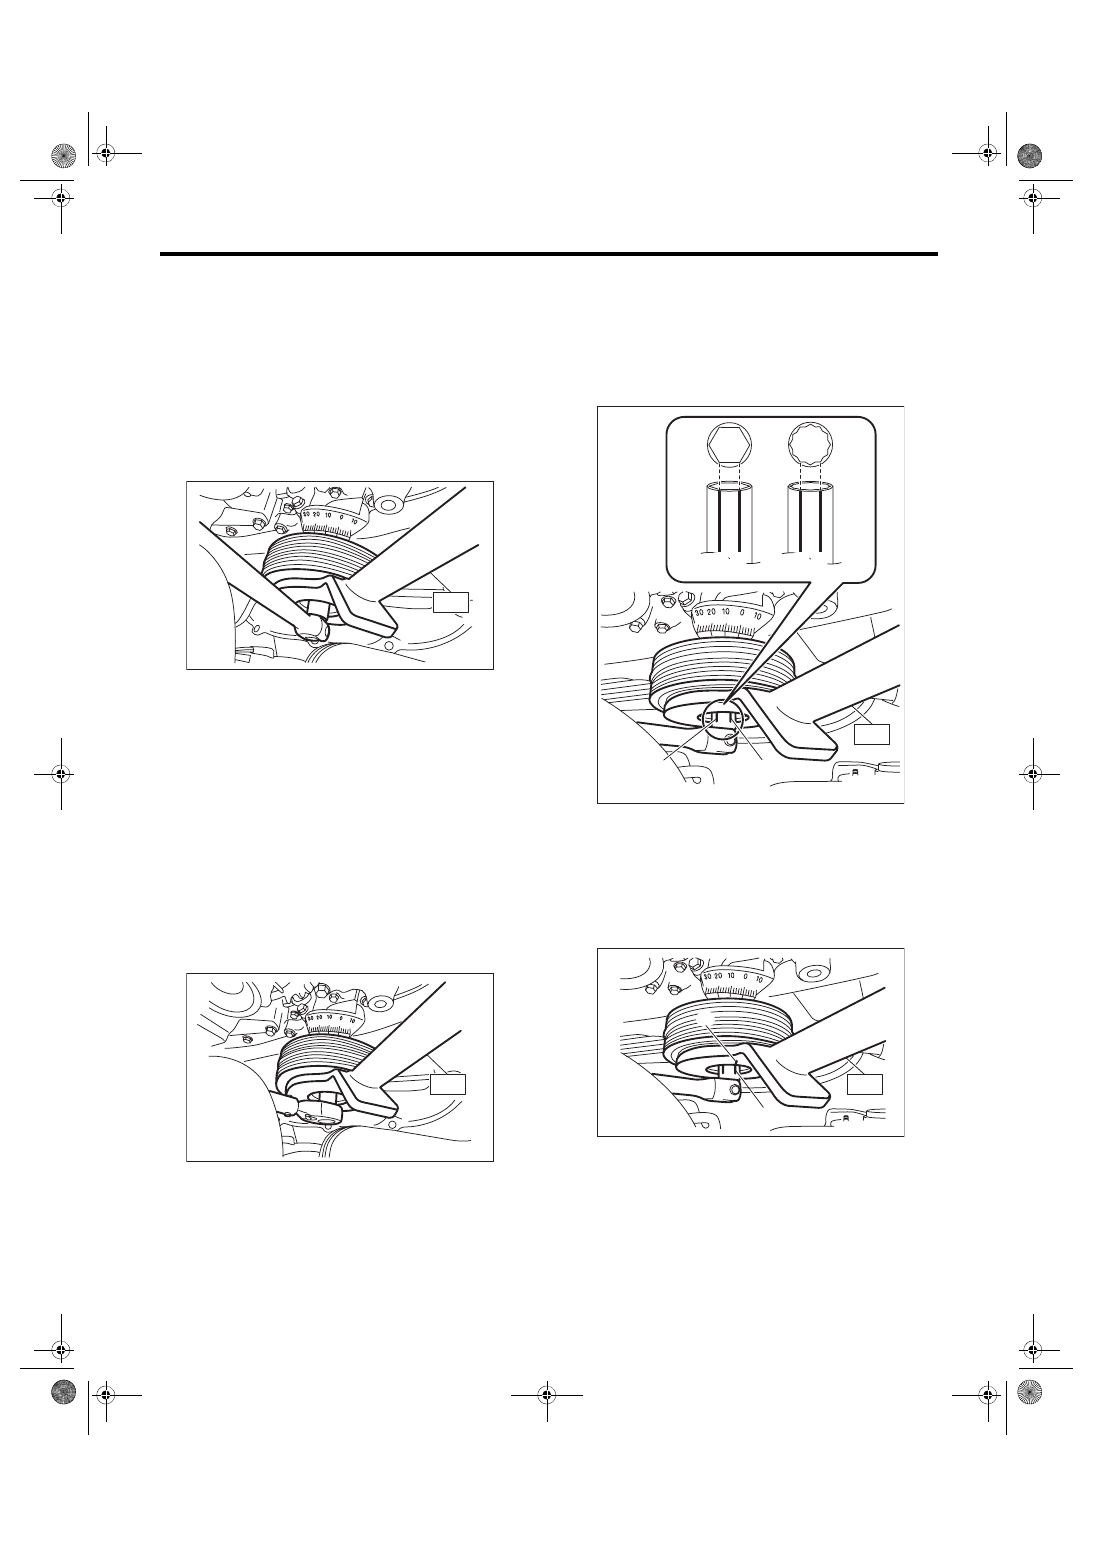
2) Use the ST to lock the crank pulley, and remove
the crank pulley bolt.
ST 499977100
CRANK PULLEY WRENCH
3) Remove the crank pulley.
B: INSTALLATION
1. METHOD WITHOUT ANGLE GAUGE
1) Clean the crankshaft thread using compressed
air.
2) Install the crank pulley.
3) Apply engine oil to the crank pulley bolt seat and
thread.
4) Tighten the crank pulley bolts.
(1) Use the ST to lock the crank pulley, and
temporarily tighten the crank pulley bolt.
ST 499977100
CRANK PULLEY WRENCH
Tightening torque:
47 N·m (4.8 kgf-m, 34.7 ft-lb)
(2) Draw reference lines (A) and (B) using a
marker to set the socket to the crank pulley bolt
as shown in the figure.
NOTE:
Set the socket onto the crank pulley bolt so that ref-
erence lines (A) and (B) is visible.
ST 499977100
CRANK PULLEY WRENCH
(3) Draw end line (C) on ST using a marker at
the same position as reference line (B) drawn
on the socket in step (2).
ST 499977100
CRANK PULLEY WRENCH
ME-04141
ST
ST
ME-04142
(a) When using 6-point socket
(b) When using 12-point socket
ME-04955
(B)
ST
(A)
(a)
(B)
(A)
(b)
(B)
(A)
ME-04144
(B)
ST
(C)
ME(STI)-48
Crank Pulley
MECHANICAL
(4) Use the ST to lock the crank pulley, and
tighten the crank pulley bolt to the angle where
reference line (A) and end line (C) are aligned.
NOTE:
It should be approx. 60° when reference line (A)
and end line (C) are aligned.
ST 499977100
CRANK PULLEY WRENCH
Tightening angle:
60°
±
5°
5) Install the V-belts. <Ref. to ME(STI)-40, IN-
2. METHOD WITH ANGLE GAUGE
1) Clean the crankshaft thread using compressed
air.
2) Install the crank pulley.
3) Apply engine oil to the crank pulley bolt seat and
thread.
4) Tighten the crank pulley bolts.
(1) Remove the radiator main fan motor assem-
bly and radiator sub fan motor assembly. <Ref.
to CO(STI)-23, REMOVAL, Radiator Main Fan
and Fan Motor.> <Ref. to CO(STI)-25, REMOV-
AL, Radiator Sub Fan and Fan Motor.>
(2) Use the ST to lock the crank pulley, and
temporarily tighten the crank pulley bolt.
ST 499977100
CRANK PULLEY WRENCH
Tightening torque:
47 N·m (4.8 kgf-m, 34.7 ft-lb)
(3) Set the angle gauge, use the ST to lock the
crank pulley, and tighten the crank pulley bolt to
the specified angle.
ST 499977100
CRANK PULLEY WRENCH
Tightening angle:
60°
±
5°
(4) Install the radiator main fan motor assembly
and radiator sub fan motor assembly. <Ref. to
CO(STI)-23, INSTALLATION, Radiator Main
Fan and Fan Motor.> <Ref. to CO(STI)-25, IN-
STALLATION, Radiator Sub Fan and Fan Mo-
5) Install the V-belts. <Ref. to ME(STI)-40, IN-
C: INSPECTION
1) Check that the crank pulley has no deformation,
cracks or other damages.
ME-04145
ST
(A)
(C)
ME-07558
ST
ME-07555
ST
ME(STI)-49
Timing Belt Cover
MECHANICAL
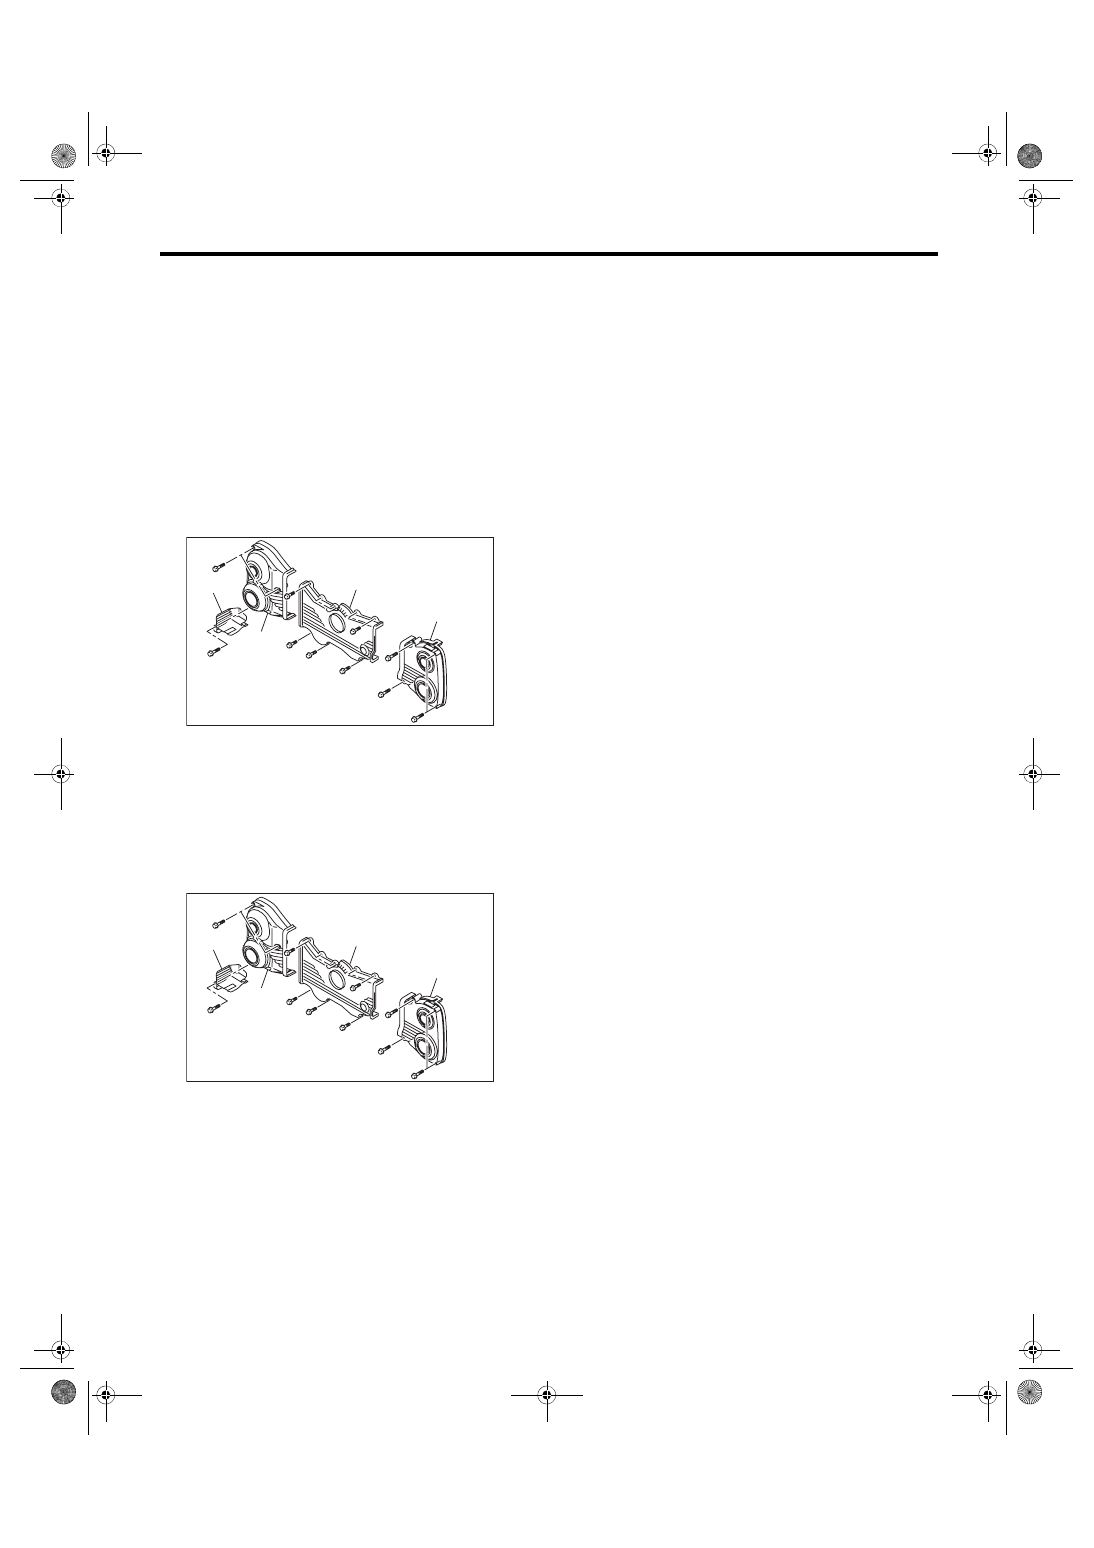
14.Timing Belt Cover
A: REMOVAL
NOTE:
When replacing a single part, perform the work with
the engine assembly installed to body.
1) Remove the secondary air pump. <Ref. to
EC(STI)-27, REMOVAL, Secondary Air Pump.>
2) Remove the crank pulley. <Ref. to ME(STI)-47,
3) Remove the timing belt cover RH (B) together
with the engine harness cover (A).
4) Remove the timing belt cover LH (C).
5) Remove the front timing belt cover (D).
B: INSTALLATION
1) Install the front timing belt cover (D).
Tightening torque:
5 N·m (0.5 kgf-m, 3.7 ft-lb)
2) Install the timing belt cover LH (C).
Tightening torque:
5 N·m (0.5 kgf-m, 3.7 ft-lb)
3) Install the timing belt cover RH (B) together with
the engine harness cover (A).
Tightening torque:
5 N·m (0.5 kgf-m, 3.7 ft-lb)
4) Install the crank pulley. <Ref. to ME(STI)-47, IN-
5) Install the secondary air pump. <Ref. to
EC(STI)-27, INSTALLATION, Secondary Air
C: INSPECTION
Check the timing belt cover for damage.
ME-04762
(B)
(D)
(C)
(A)
ME-04762
(B)
(D)
(C)
(A)
Нет комментариевНе стесняйтесь поделиться с нами вашим ценным мнением.
Текст