Subaru Legacy (2005 year). Service manual — part 721
WT-3
WHEEL AND TIRE SYSTEM
General Description
2. SERVICE DATA
3. ADJUSTING PARTS
B: PREPARATION TOOL
1. GENERAL TOOL
Part
Axial runout
Radial runout
Steel wheel
1.5 mm (0.059 in)
Aluminum wheel
1.0 mm (0.039 in)
Wheel balancing
Specification
Service limit
Dynamic unbalance
10 g (0.35 oz) or less
Balance weight part number
(Knock-on type weight for steel
wheel)
Weight
28101TC000
5 g (0.18 oz)
28101SA060
10 g (0.35 oz)
28101SA070
15 g (0.53 oz)
28101SA080
20 g (0.71 oz)
28101SA090
25 g (0.88 oz)
723141340
30 g (1.06 oz)
723141350
35 g (1.23 oz)
723141360
40 g (1.41 oz)
723141370
45 g (1.59 oz)
723241380
50 g (1.76 oz)
723241580
55 g (1.94 oz)
723241590
60 g (2.12 oz)
Balance weight part number
(Knock-on type weight for alumi-
num wheel)
Weight
28101SA000
5 g (0.18 oz)
28101SA010
10 g (0.35 oz)
28101SA020
15 g (0.53 oz)
28101SA030
20 g (0.71 oz)
28101SA040
25 g (0.88 oz)
23141GA512
30 g (1.06 oz)
23141GA522
35 g (1.23 oz)
23141GA532
40 g (1.41 oz)
23141GA542
45 g (1.59 oz)
23141GA552
50 g (1.76 oz)
—
55 g (1.94 oz)
23141GA572
60 g (2.12 oz)
Balance weight part number
(Adhesive type weight for alumi-
num wheel)
Weight
28101AG000
5 g (0.18 oz)
28101AG010
7.5 g (0.26 oz)
28101AG020
10 g (0.35 oz)
28101AG030
12.5 g (0.44 oz)
28101AG040
15 g (0.53 oz)
28101AG050
17.5 g (0.62 oz)
28101AG060
20 g (0.71 oz)
28101AG070
22.5 g (0.79 oz)
28101AG080
25 g (0.88 oz)
28101AG090
27.5 g (0.97 oz)
28101AG100
30 g (1.06 oz)
28101AG110
32.5 g (1.15 oz)
28101AG120
35 g (1.23 oz)
28101AG130
37.5 g (1.32 oz)
28101AG140
40 g (1.41 oz)
28101AG150
42.5 g (1.50 oz)
28101AG160
45 g (1.59 oz)
28101AG170
47.5 g (1.68 oz)
28101AG180
50 g (1.76 oz)
28101AG190
52.5 g (1.85 oz)
28101AG200
55 g (1.94 oz)
28101AG210
57.5 g (2.03 oz)
28101AG220
60 g (2.12 oz)
28101AG230
62.5 g (2.20 oz)
28101AG240
65 g (2.29 oz)
28101AG250
67.5 g (2.38 oz)
28101AG260
70 g (2.47 oz)
28101AG270
72.5 g (2.56 oz)
28101AG280
75 g (2.65 oz)
28101AG290
77.5 g (2.73 oz)
28101AG300
80 g (2.82 oz)
28101AG310
82.5 g (2.91 oz)
28101AG320
85 g (3.00 oz)
28101AG330
87.5 g (3.09 oz)
28101AG340
90 g (3.17 oz)
28101AG350
92.5 g (3.26 oz)
28101AG360
95 g (3.35 oz)
28101AG370
97.5 g (3.44 oz)
28101AG380
100 g (3.53 oz)
TOOL NAME
REMARKS
Air pressure gauge
Used for measuring tire inflation pres-
sure.
Dial gauge with
magnet stand
Used for measuring wheel runout.
Wheel balancer
Used for adjusting wheel balance.
WT-4
WHEEL AND TIRE SYSTEM
Tire
2. Tire
A: INSPECTION
1) Take stones, glass, nails etc. out of the tread
groove.
2) Replace the tire if as follows.
CAUTION:
When replacing a tire, make sure to use only
the same size, construction and load range as
originally installed.
(1) When large crack on side wall, damage or
crack on tread is found.
(2) When the “tread wear indicator” appears as
a solid band across the tread.
3) When a crack on tire valve is found, replace the
tire valve.
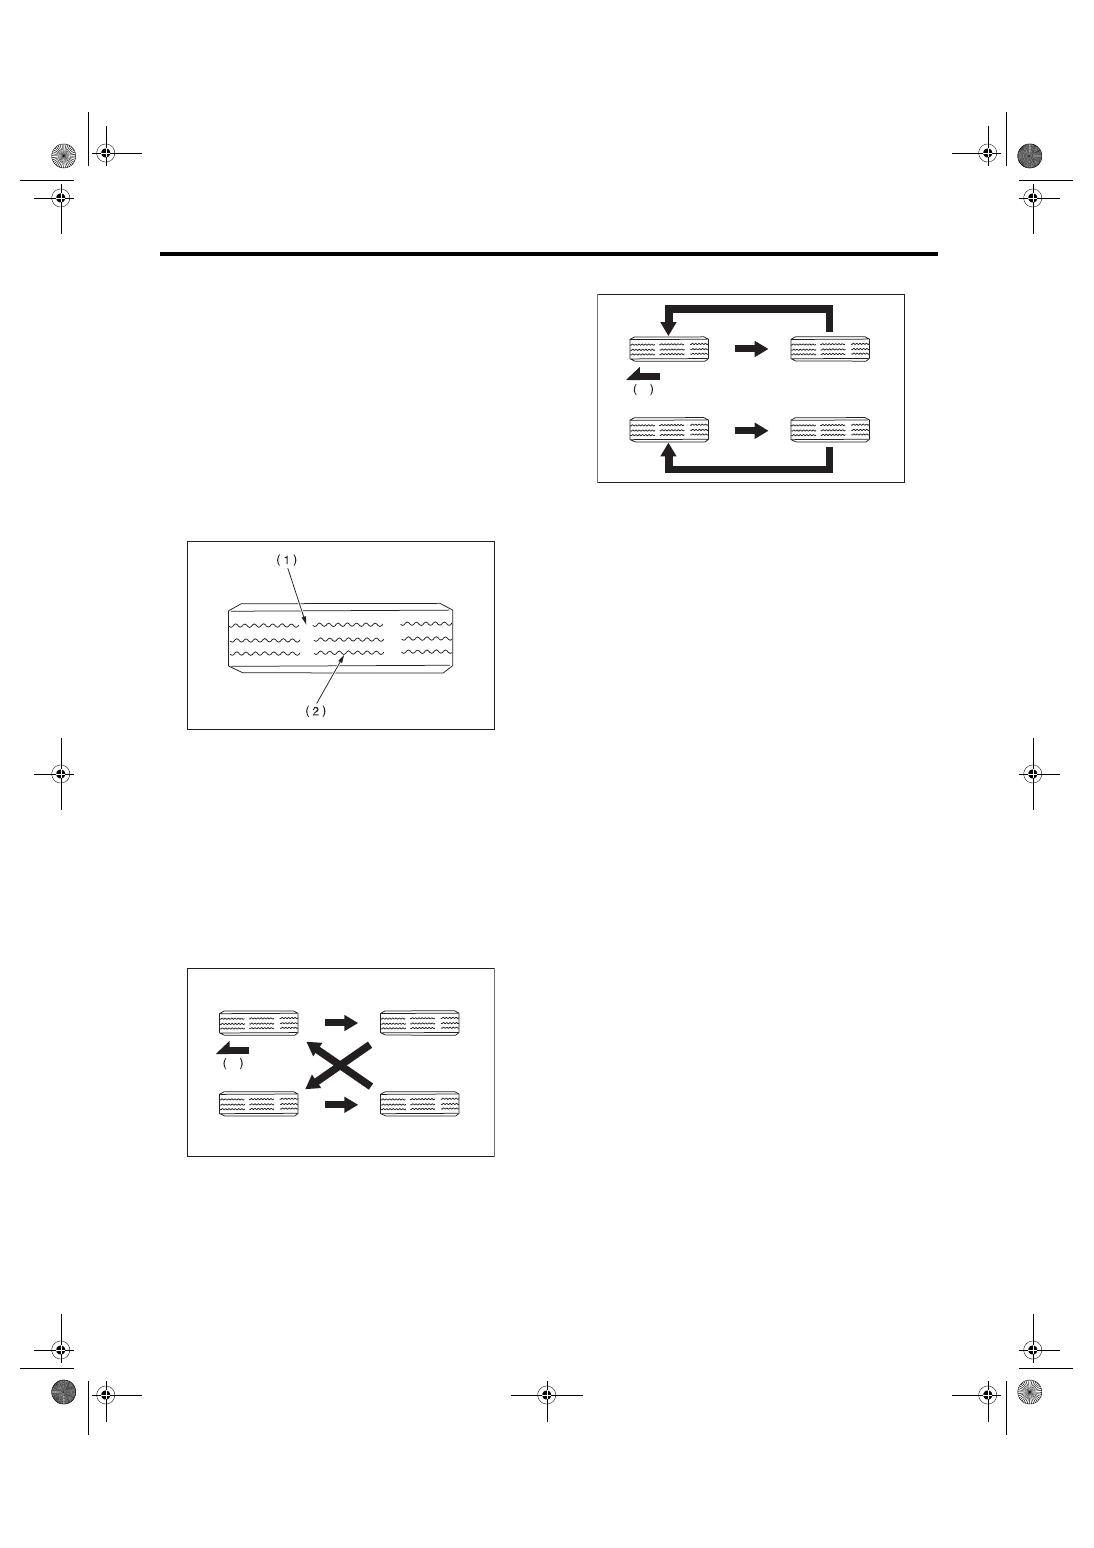
1. TIRE ROTATION
Rotate tires periodically (5,000 km/3,100 miles) as
shown in the figure, in order to prevent them from
uneven wear and to prolong their life.
• Without instruction for the direction of tire rota-
tion.
• With instruction for the direction of tire rotation.
(1) Tread wear indicator
(2) Tire tread
(1) Front
WT-00002
WT-00113
1
(1) Front
WT-00115
1
WT-5
WHEEL AND TIRE SYSTEM
Steel Wheel
3. Steel Wheel
A: REMOVAL
1) Apply the parking brake, and position the select
lever to “P” or “LOW”.
2) Set the shop jacks or a lift to specified point, and
support the vehicle with its wheels slightly contact-
ing the floor.
3) Loosen the wheel nuts.
4) Raise the vehicle until its wheels take off the
ground using a jack or a lift.
5) Remove the wheel nuts and wheels.
NOTE:
• When removing the wheels, prevent hub bolts
from damage.
• Place the wheels with their outer sides facing up-
ward to prevent wheels from damage.
B: INSTALLATION
1) Remove dirt from the mating surface of wheel
and brake rotor.
2) Attach the wheel to the hub by aligning the wheel
bolt hole with the hub bolt.
3) Temporarily attach the wheel nuts to the hub
bolts. (In the case of aluminum wheel, use SUBA-
RU genuine wheel nut for aluminum wheel.)
4) Manually tighten the nuts making sure the wheel
hub hole is aligned correctly to the guide portion of
hub.
5) Tighten the wheel nuts in a diagonal selection to
the specified torque. Use a wheel nut wrench.
Wheel nut tightening torque:
90 N
⋅
m (9.1 kgf-m, 65.7 ft-lb)
CAUTION:
• Tighten the wheel nuts in two or three steps
by gradually increasing the torque and working
diagonally, until they reach the specified
torque.
• Do not depress the wrench with foot. Always
use both hands when tightening.
• Make sure the bolt, nut and the nut seating
surface of the wheel are free from oil.
6) If a wheel is removed for replacement or for re-
pair of a puncture, retighten the wheel nuts to the
specified torque after running 1,000 km (600
miles).
C: INSPECTION
1) Deformation or damage on the rim may cause
air leakage. Check the rim flange for deformation,
crack or damage, and repair or replace as neces-
sary.
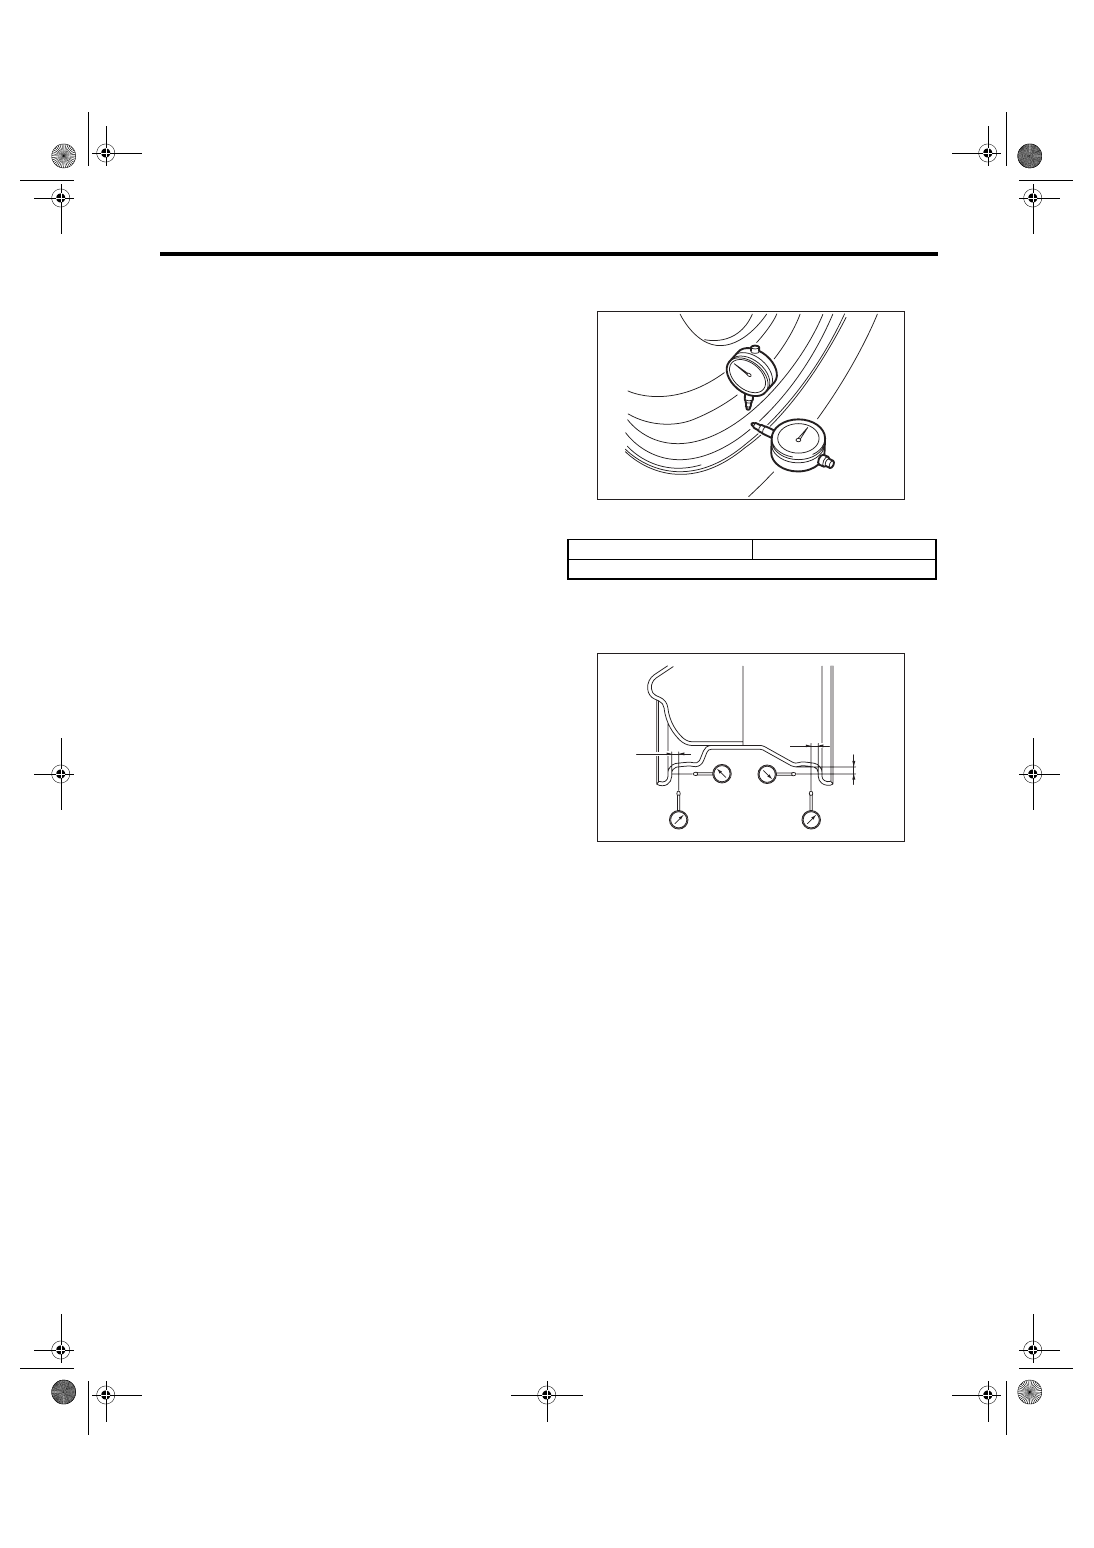
2) Jack-up the vehicle until wheels clear the floor.
3) Slowly rotate the wheel to check rim “runout” us-
ing a dial gauge.
Rim runout:
4) If the rim runout exceeds specification, remove
the tire from wheel and check runout while attach-
ing the dial gauge to positions shown in the figure.
5) If the measured runout still exceeds specifica-
tion, replace the wheel.
Axial runout specification
Radial runout specification
1.5 mm (0.059 in)
(1) Approx. 7 mm (0.28 in)
WT-00004
WT-00005
(1)
(1)
(1)
WT-6
WHEEL AND TIRE SYSTEM
Aluminum Wheel
4. Aluminum Wheel
A: REMOVAL
Refer to “Steel Wheel” for removal procedure of
aluminum wheels. <Ref. to WT-5, REMOVAL,
Steel Wheel.>
B: INSTALLATION
Refer to “Steel Wheel” for installation procedure of
aluminum wheels. <Ref. to WT-5, INSTALLATION,
Steel Wheel.>
C: INSPECTION
Refer to “Steel Wheel” for inspection procedure of
aluminum wheels. <Ref. to WT-5, INSPECTION,
Steel Wheel.>
Rim runout:
D: CAUTION
Aluminum wheels are easily scratched. To main-
tain their appearance and safety, do the followings:
1) Do not damage the aluminum wheels during re-
moval, installation, wheel balancing, etc. After re-
moving the aluminum wheels, place them on a
rubber mat, etc.
2) When washing the aluminum wheel, use neutral
synthetic detergent and water. Avoid using the
cleanser including abrasive, hard brushes or an au-
tomatic car washer.
Axial runout specification
Radial runout specification
1.0 mm (0.039 in)
Нет комментариевНе стесняйтесь поделиться с нами вашим ценным мнением.
Текст