Subaru Legacy IV (2008 year). Service manual — part 804
6MT-29
Differential Side Retainer Oil Seal
MANUAL TRANSMISSION AND DIFFERENTIAL
4. Differential Side Retainer Oil
Seal
A: INSPECTION
Check that there is no oil leaking from the differen-
tial side retainer oil seal. If there is oil leakage, per-
form the following procedures.
• Replace the oil seal.
• Check the front drive shaft.
B: REPLACEMENT
1) Lift up the vehicle.
2) Remove the front exhaust pipe and center ex-
haust pipe. <Ref. to EX(H4DOTC)-5, REMOVAL,
Front Exhaust Pipe.>
3) Drain transmission gear oil completely. <Ref. to
6MT-27, REPLACEMENT, Transmission Gear
Oil.>
4) Separate the front drive shaft from the transmis-
sion. <Ref. to DS-22, REMOVAL, Front Drive
Shaft.>
5) Remove the differential side retainer oil seal by
using a flat tip screwdriver or similar tools.
6) Using the ST, install the differential side retainer
oil seal by lightly tapping with a hammer.
ST
18675AA000
DIFFERENTIAL SIDE OIL
SEAL INSTALLER
7) Apply transmission gear oil to the oil seal lips.
8) Set the ST to the side retainer.
ST
28399SA010
OIL SEAL PROTECTOR
9) Install the front drive shaft into the transmission.
NOTE:
Replace the circlip of drive shaft with a new part.
10) Install the front drive shaft into transmission, re-
move the ST and insert the drive shaft securely.
ST
28399SA010
OIL SEAL PROTECTOR
11) Install the front exhaust pipe and the center ex-
haust pipe. <Ref. to EX(H4DOTC)-6, INSTALLA-
TION, Front Exhaust Pipe.>
12) Lower the vehicle.
13) Fill with transmission gear oil through the oil
level gauge hole.
Recommended gear oil:
GL-5 (75W-90) or equivalent
Transmission gear oil capacity:
4.1
2
(4.3 US qt, 3.6 Imp qt)
14) Check the level of the transmission gear oil.
<Ref. to 6MT-27, INSPECTION, Transmission
Gear Oil.>
6MT-30
Transmission Mounting System
MANUAL TRANSMISSION AND DIFFERENTIAL
5. Transmission Mounting
System
A: REMOVAL
1. PITCHING STOPPER
1) Disconnect the ground cable from the battery.
2) Remove the intercooler. <Ref. to IN(H4DOTC)-
12, REMOVAL, Intercooler.>
3) Remove the pitching stopper.
2. CROSSMEMBER AND CUSHION RUBBER
1) Disconnect the ground cable from the battery.
2) Lift up the vehicle.
3) Remove the center exhaust pipe. <Ref. to
EX(H4DOTC)-7, REMOVAL, Center Exhaust
Pipe.>
4) Remove the rear exhaust pipe and muffler.
<Ref. to EX(H4DOTC)-12, REMOVAL, Rear Ex-
haust Pipe.> <Ref. to EX(H4DOTC)-14, REMOV-
AL, Muffler.>
5) Remove the heat shield cover. (If equipped)
6) Set the transmission jack under the transmission
body.
CAUTION:
Always support the transmission case with a
transmission jack.
7) Remove the front and rear crossmembers.
8) Remove the transmission cushion rubber.
B: INSTALLATION
1. PITCHING STOPPER
1) Install the pitching stopper.
Tightening torque:
T1: 50 N·m (5.1 kgf-m, 36.9 ft-lb)
T2: 58 N·m (5.9 kgf-m, 42.8 ft-lb)
2) Install the intercooler.
<Ref. to IN(H4DOTC)-13, INSTALLATION, Inter-
cooler.>
3) Connect the ground cable to battery.
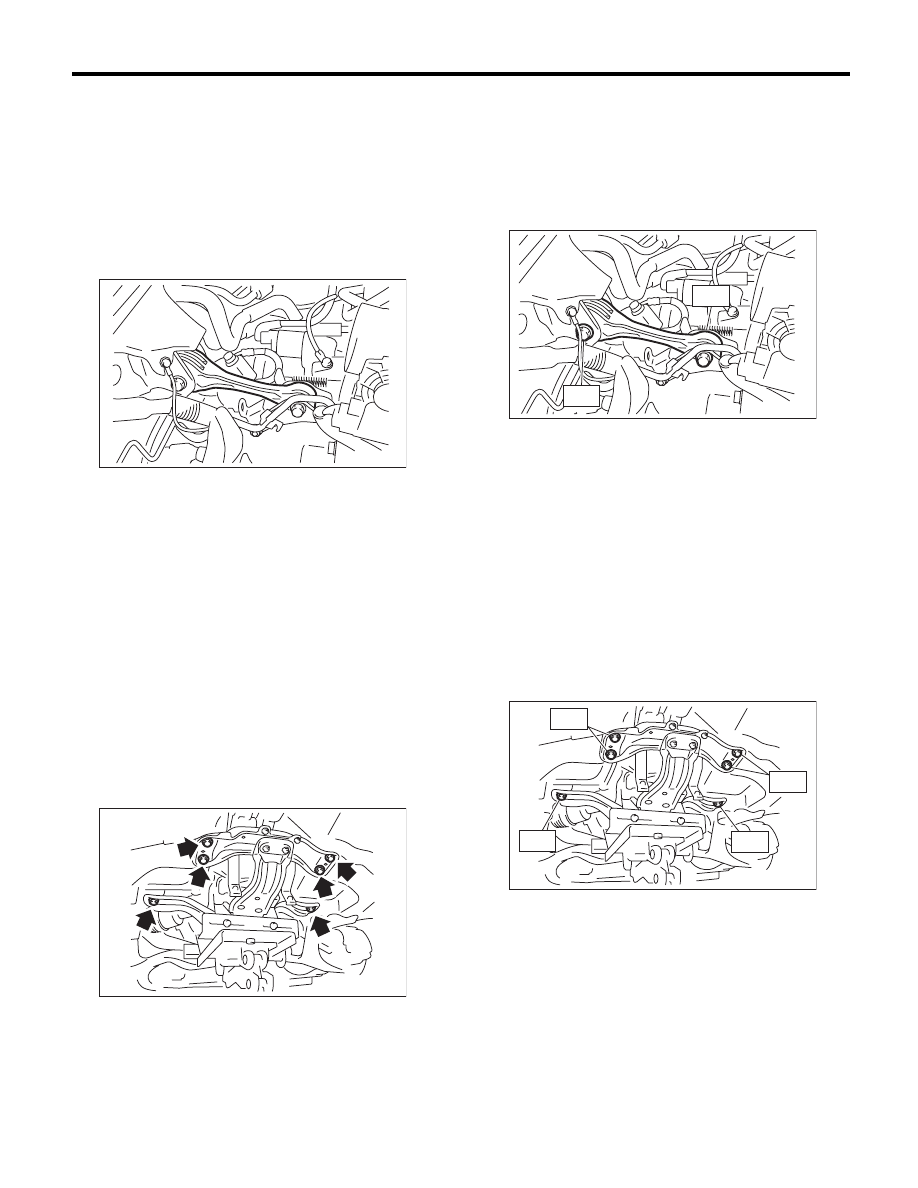
2. CROSSMEMBER AND CUSHION RUBBER
1) Install the transmission cushion rubber.
Tightening torque:
35 N·m (3.6 kgf-m, 25.8 ft-lb)
2) Install the front crossmember and rear cross-
member.
Tightening torque:
T1: 75 N·m (7.6 kgf-m, 55.3 ft-lb)
T2: 140 N·m (14.3 kgf-m, 103.3 ft-lb)
3) Remove the transmission jack.
4) Install the heat shield cover. (If equipped)
5) Install the center exhaust pipe. <Ref. to
EX(H4DOTC)-9, INSTALLATION, Center Exhaust
Pipe.>
6) Install the rear exhaust pipe and muffler. <Ref. to
EX(H4DOTC)-13, INSTALLATION, Rear Exhaust
Pipe.> <Ref. to EX(H4DOTC)-14, INSTALLATION,
Muffler.>
MT-01559
MT-01264
MT-01560
T1
T2
MT-01265
T1
T2
T2
T1
6MT-31
Transmission Mounting System
MANUAL TRANSMISSION AND DIFFERENTIAL
C: INSPECTION
Perform the following inspection procedures and
repair or replace faulty parts.
1. PITCHING STOPPER
Check the pitching stopper for bends or damage.
Check that the rubber is not stiff, cracked or other-
wise damaged.
2. CROSSMEMBER AND CUSHION RUBBER
Check crossmember for bends or damage. Check
that the cushion rubber is not stiff, cracked, or oth-
erwise damaged.

6MT-32
Manual Transmission Assembly
MANUAL TRANSMISSION AND DIFFERENTIAL
6. Manual Transmission
Assembly
A: REMOVAL
1) Set the vehicle on a lift. Open the front hood, and
support it with the stay.
NOTE:
Set the hood stay into the specified hole.
2) Disconnect the ground cable from the battery.
3) Remove the collector cover.
4) Remove the intercooler. <Ref. to IN(H4DOTC)-
12, REMOVAL, Intercooler.>
5) Remove the front wheels.
6) Disconnect the following harness connectors,
and then remove the engine hanger rear.
7) Disconnect the ground cable on the upper side
of the transmission case and body.
8) Remove the starter assembly. <Ref. to
SC(H4SO)-6, REMOVAL, Starter.>
9) Remove the operating cylinder from the trans-
mission.
NOTE:
Hang the removed operating cylinder with a piece
of wire.
10) Remove the pitching stopper and pitching stop-
per bracket.
11) Set the ST.
ST1
41099AA010
ENGINE SUPPORT
BRACKET
ST2
41099AA020
ENGINE SUPPORT
12) Remove the clutch release shaft.
(1) Remove the plug using a hexagon wrench.
(2) Attach a 6 mm (0.24 in) bolt to the release
shaft, and pull out the release shaft.
(3) Lift the release fork, and remove from the
claw of the release bearing. Pull the release
fork to the engine side, and make it so that it
moves freely.
13) Lift up the vehicle.
14) Remove the center exhaust pipe. <Ref. to
EX(H4DOTC)-7, REMOVAL, Center Exhaust
Pipe.>
15) Remove the rear exhaust pipe and muffler.
<Ref. to EX(H4DOTC)-12, REMOVAL, Rear Ex-
haust Pipe.> <Ref. to EX(H4DOTC)-14, REMOV-
AL, Muffler.>
CAUTION:
When removing the exhaust pipes, be careful
each exhaust pipe does not drop out.
(A) Neutral position switch backup light switch con-
nector
(B) Rear oxygen sensor connector
(C) Pitching stopper
MT-01540
(A)
(B)
(C)
MT-01266
MT-01267
CL-00445
MT-01526
ST2
ST1
Нет комментариевНе стесняйтесь поделиться с нами вашим ценным мнением.
Текст