Subaru Legacy IV (2008 year). Service manual — part 673
4AT-40
Automatic Transmission Assembly
AUTOMATIC TRANSMISSION
23) Insert the front drive shaft into the transmission
securely by pressing the front housing from the out-
side.
24) Install the ball joint into the housing.
25) Tighten the attachment bolts.
Tightening torque:
50 N·m (5.1 kgf-m, 36.9 ft-lb)
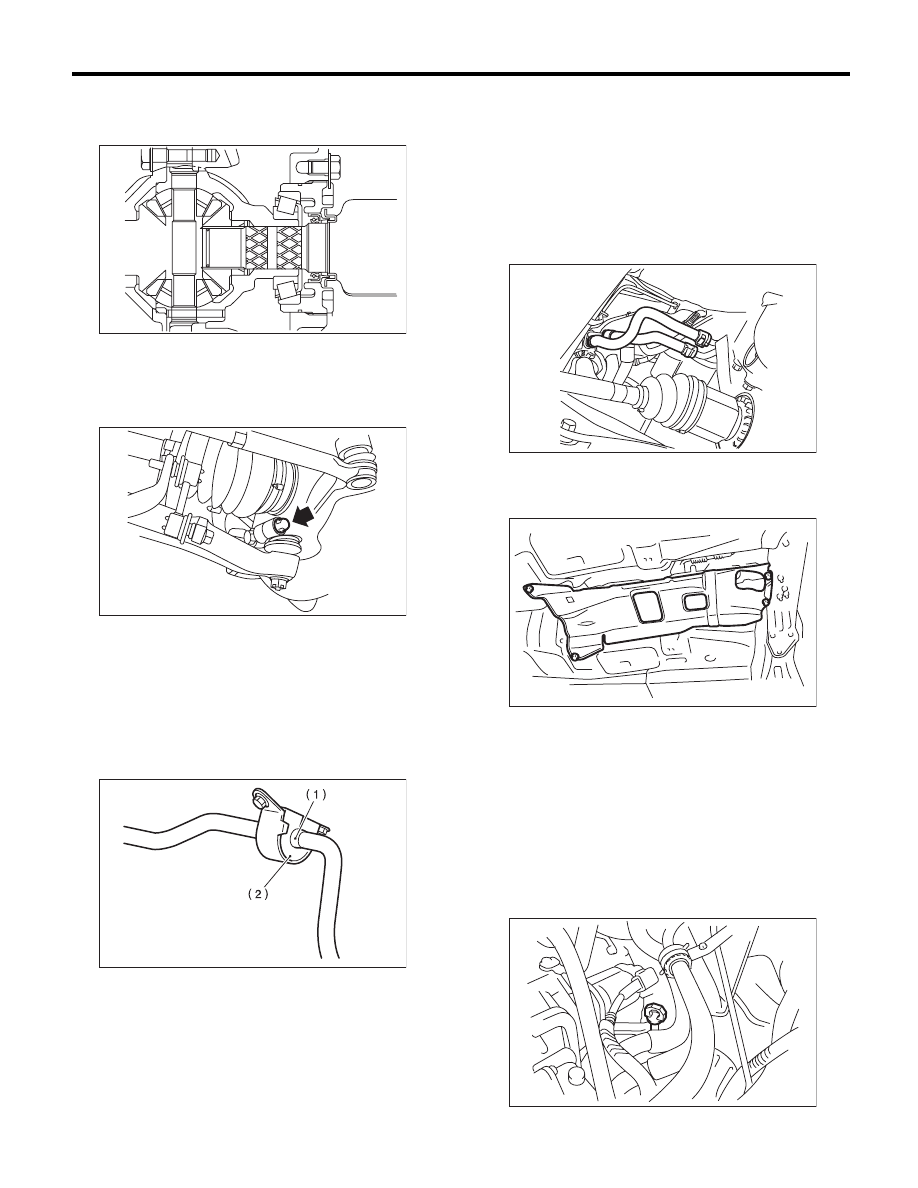
26) Install the stabilizer to the front crossmember.
NOTE:
• Install the bushing (on front crossmember side)
while aligning it with the paint mark on the stabiliz-
er.
• Make sure the bushing and stabilizer are marked
with the same identification colors (paint mark)
when installing.
27) Always tighten the rubber bushing locations
with wheels in full contact with the ground and the
vehicle at curb weight.
Tightening torque:
25 N·m (2.5 kgf-m, 18.4 ft-lb)
28) Install the shift select cable onto select lever.
<Ref. to CS-30, INSTALLATION, Select Cable.>
29) Install the oil charge pipe, and connect the ATF
cooler hoses to the pipe.
30) Install the propeller shaft. <Ref. to DS-11, IN-
STALLATION, Propeller Shaft.>
31) Install the heat shield cover.
32) Install the rear exhaust pipe and muffler. <Ref.
to EX(H4SO)-8, INSTALLATION, Rear Exhaust
Pipe.> <Ref. to EX(H4SO)-10, INSTALLATION,
Muffler.>
33) Install the front and center exhaust pipe. <Ref.
to EX(H4SO)-5, INSTALLATION, Front Exhaust
Pipe.> <Ref. to EX(H4SO)-7, INSTALLATION,
Center Exhaust Pipe.>
34) Install the under cover.
35) Lower the vehicle.
36) Install the ATF level gauge.
(1) Identification mark on stabilizer
(2) Bushing identification color
AT-00111
AT-00809
FS-00050
AT-04831
AT-01331
AT-01330
4AT-41
Automatic Transmission Assembly
AUTOMATIC TRANSMISSION
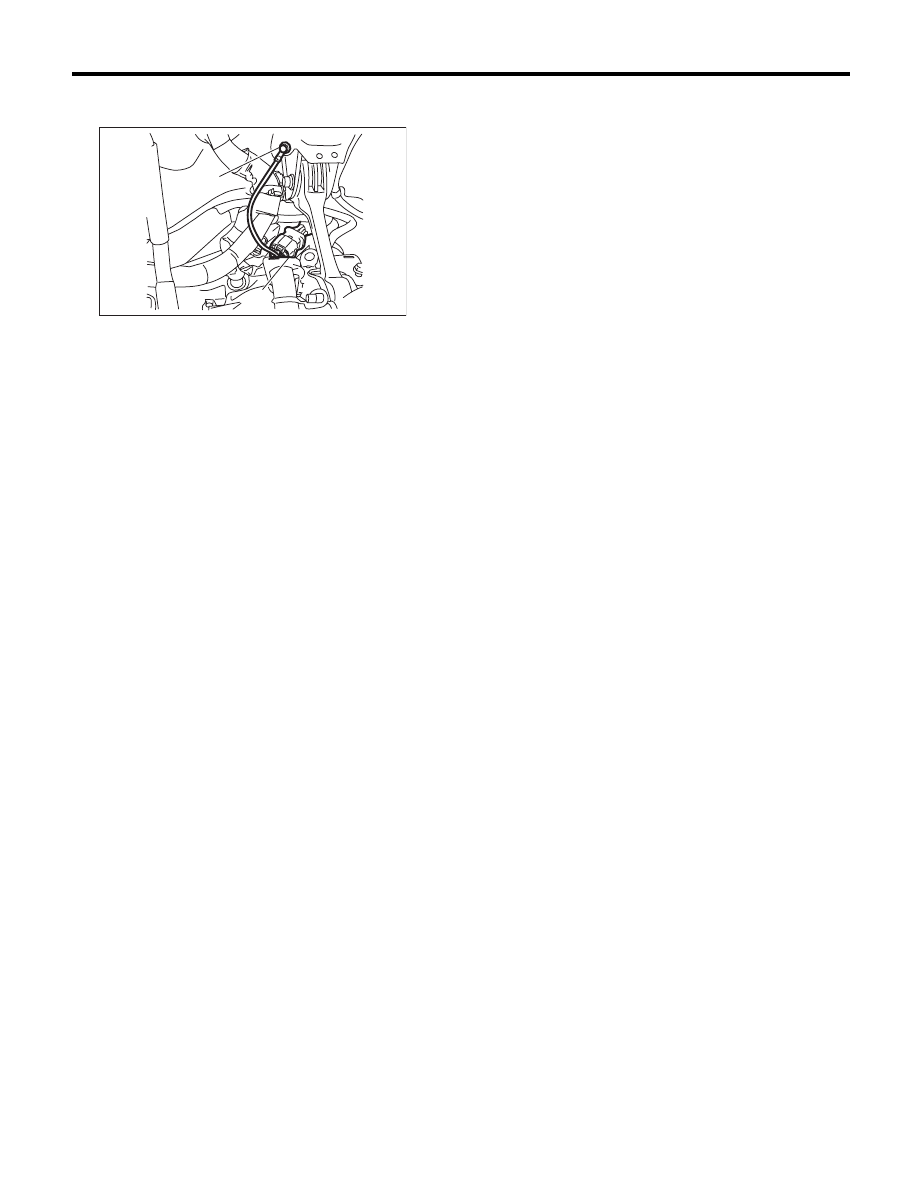
37) Connect the following connectors and termi-
nals.
38) Install the air intake chamber stay.
Tightening torque:
16 N·m (1.6 kgf-m, 11.8 ft-lb)
39) Install the air intake chamber and intake boot.
<Ref. to IN(H4SO)-7, INSTALLATION, Air Intake
Chamber.>
40) Connect the ground cable to battery.
41) Pour in the ATF using the oil charge pipe. <Ref.
to 4AT-26, Automatic Transmission Fluid.>
42) Check the differential gear oil level. <Ref. to
4AT-28, Differential Gear Oil.>
43) Check the select lever operation. <Ref. to 4AT-
46, INSPECTION, Inhibitor Switch.>
44) Bleed the air of control valve. <Ref. to 4AT-59,
Air Bleeding of Control Valve.>
45) Check the ATF level. <Ref. to 4AT-26, IN-
SPECTION, Automatic Transmission Fluid.>
46) Execute the learning control promotion. <Ref.
to 4AT(diag)-18, FACILITATION OF LEARNING
CONTROL, OPERATION, Subaru Select Moni-
tor.>
47) Perform the road test. <Ref. to 4AT-29, Road
Test.>
(A) Transmission harness connectors
(B) Transmission ground terminal
AT-04902
(A)
(B)
4AT-42
Transmission Mounting System
AUTOMATIC TRANSMISSION
10.Transmission Mounting
System
A: REMOVAL
1. PITCHING STOPPER
1) Remove the air intake chamber and intake boot.
<Ref. to IN(H4SO)-7, REMOVAL, Air Intake Cham-
ber.>
2) Remove the pitching stopper.
2. TRANSMISSION REAR CROSSMEMBER
AND REAR CUSHION RUBBER
1) Disconnect the ground cable from battery.
2) Lift up the vehicle.
3) Remove the front, center and rear exhaust pipes
and the muffler. <Ref. to EX(H4SO)-4, REMOVAL,
Front Exhaust Pipe.> <Ref. to EX(H4SO)-7, RE-
MOVAL, Center Exhaust Pipe.> <Ref. to
EX(H4SO)-8, REMOVAL, Rear Exhaust Pipe.>
<Ref. to EX(H4SO)-10, REMOVAL, Muffler.>
4) Remove the heat shield cover.
5) Set the transmission jack under transmission.
NOTE:
Make sure that the support plate of transmission
jack does not touch the oil pan.
6) Remove the transmission rear crossmember.
7) Remove the rear cushion rubber.
B: INSTALLATION
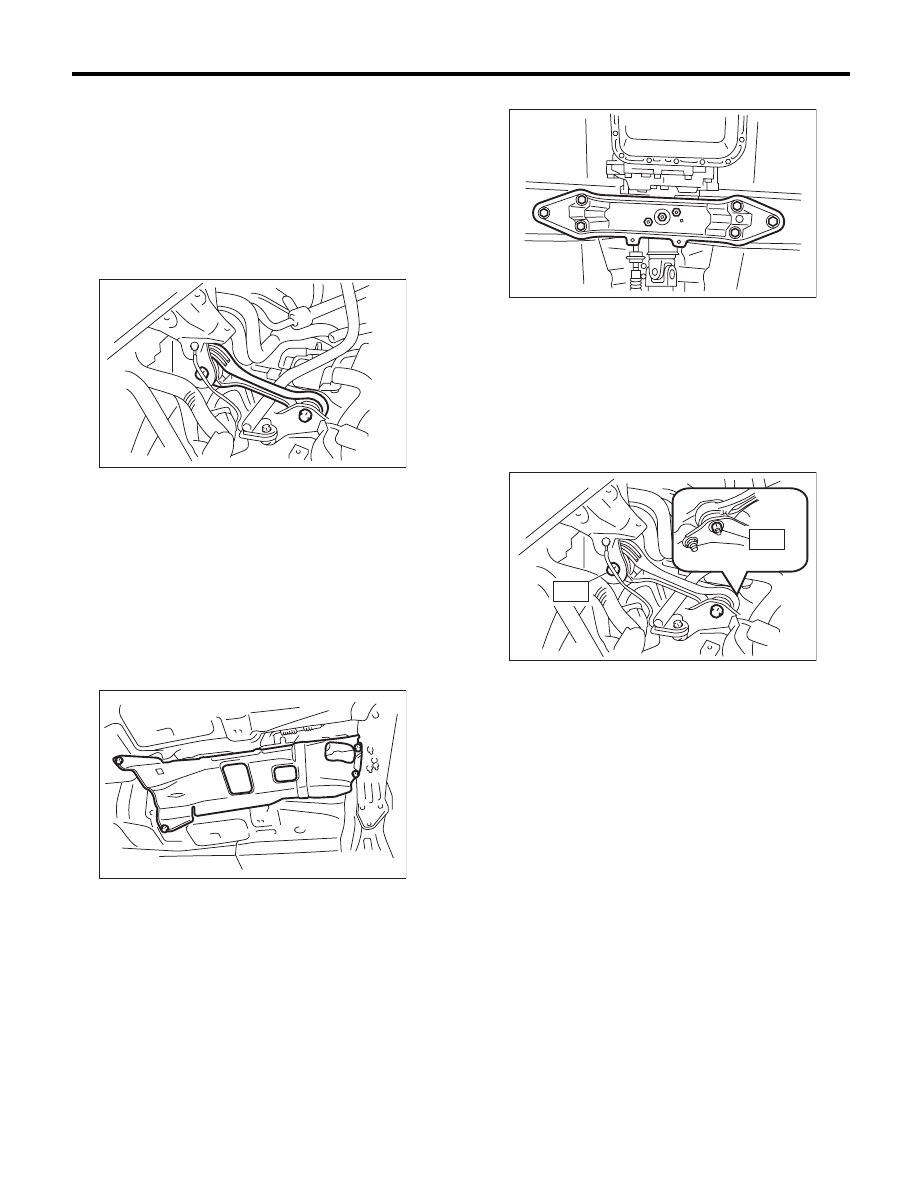
1. PITCHING STOPPER
1) Install the pitching stopper.
Tightening torque:
T1: 50 N·m (5.1 kgf-m, 36.9 ft-lb)
T2: 58 N·m (5.9 kgf-m, 42.8 ft-lb)
2) Install the air intake chamber and intake boot.
<Ref. to IN(H4SO)-7, INSTALLATION, Air Intake
Chamber.>
AT-03877
AT-01331
AT-03697
T2
T1
AT-03878
4AT-43
Transmission Mounting System
AUTOMATIC TRANSMISSION
2. TRANSMISSION REAR CROSSMEMBER
AND REAR CUSHION RUBBER
1) Install the rear cushion rubber.
Tightening torque:
40 N·m (4.1 kgf-m, 29.5 ft-lb)
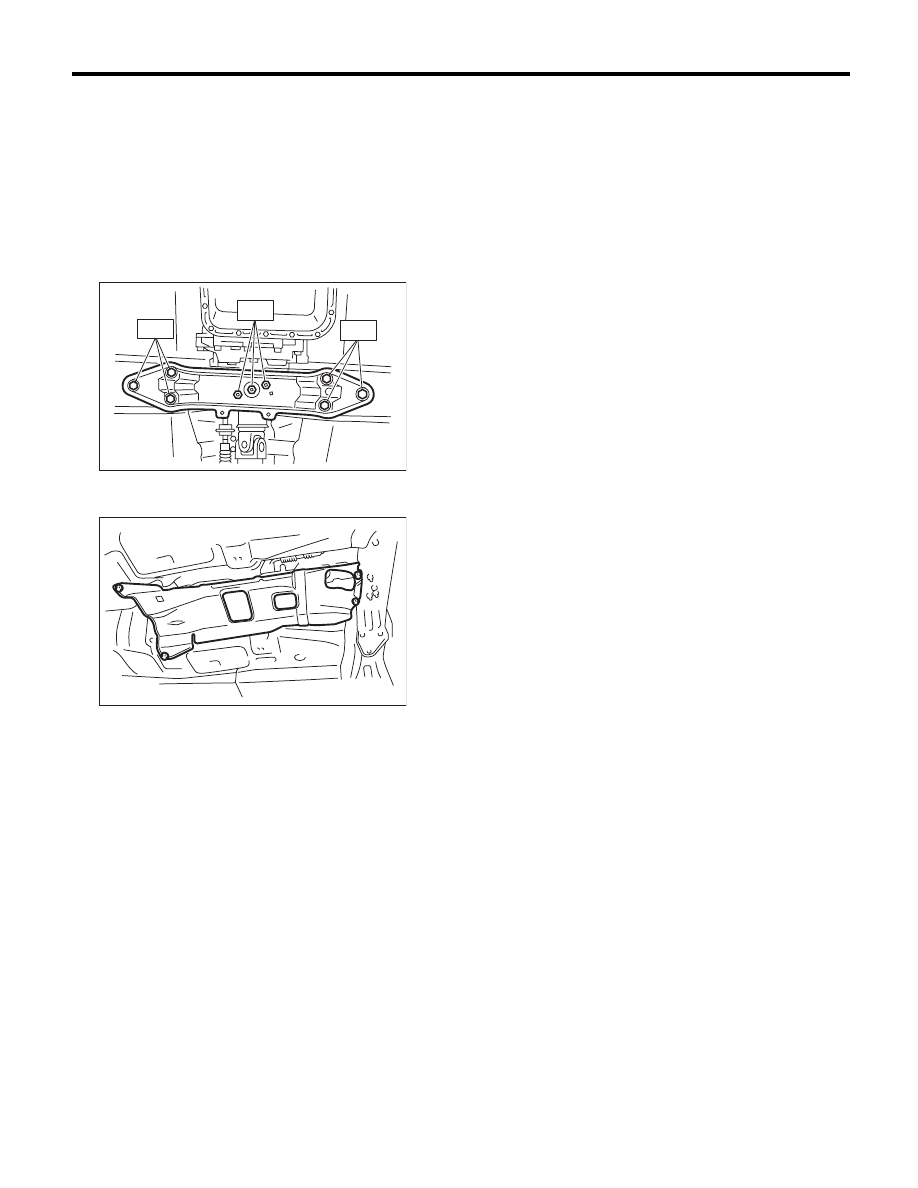
2) Install the transmission rear crossmember.
Tightening torque:
T1: 35 N·m (3.6 kgf-m, 25.8 ft-lb)
T2: 75 N·m (7.6 kgf-m, 55.3 ft-lb)
3) Remove the transmission jack.
4) Install the heat shield cover.
5) Install the front, center and rear exhaust pipes,
and the muffler. <Ref. to EX(H4SO)-5, INSTALLA-
TION, Front Exhaust Pipe.> <Ref. to EX(H4SO)-7,
INSTALLATION, Center Exhaust Pipe.> <Ref. to
EX(H4SO)-8, INSTALLATION, Rear Exhaust
Pipe.> <Ref. to EX(H4SO)-10, INSTALLATION,
Muffler.>
6) Lower the vehicle.
7) Connect the ground cable to battery.
C: INSPECTION
If problems are found in the following inspection,
repair or replace the part.
1. PITCHING STOPPER
Make sure that the pitching stopper is not bent or
damaged. Check that there are no cracks, harden-
ing or damage on rubber parts.
2. TRANSMISSION REAR CROSSMEMBER
AND REAR CUSHION RUBBER
Make sure that the crossmember is not bent or
damaged. Check that there are no cracks, harden-
ing, or damage on cushion rubbers.
T 2
T 2
T 1
AT-03698
AT-01331
Нет комментариевНе стесняйтесь поделиться с нами вашим ценным мнением.
Текст