Subaru Legacy IV (2008 year). Service manual — part 1171
LAN(diag)-18
Subaru Select Monitor
LAN SYSTEM (DIAGNOSTICS)
6. REGISTRATION BODY INTEGRATED
UNIT (EQUIPMENT SETTING)
CAUTION:
Body integrated unit is core of LAN system, and
also can select the function of all vehicle sys-
tem control. To perform normal operation of ve-
hicle and diagnosis, the above settings must
match the actual vehicle equipment.
If registrations and function setting are differ-
ent from vehicle equipment, vehicle system
does not operate normally and diagnosis can-
not be performed correctly. Pay attention to fol-
lowing item.
• Be sure to correspond registrations and
function settings to vehicle equipment.
• Do not change the settings of vehicle improp-
erly.
• Confirm key illumination does not blink or
“Factory or Market setting” of body integrated
unit registrations is “Market”. If “Factory or
Market setting” is set to “Factory,” key illumi-
nation blinks when ignition key is turned ON, to
notify that the settings are unconfirmed.
• Key illumination does not blink with ignition
switch turned to ON and go off with door
closed.
• Be sure to register immobilizer if body inte-
grated unit is replaced with a new part. (models
with immobilizer)
• Make a registration of immobilizer when the
parts related to immobilizer have been re-
placed. For details, refer to the “PC application
help for Subaru Select Monitor”.
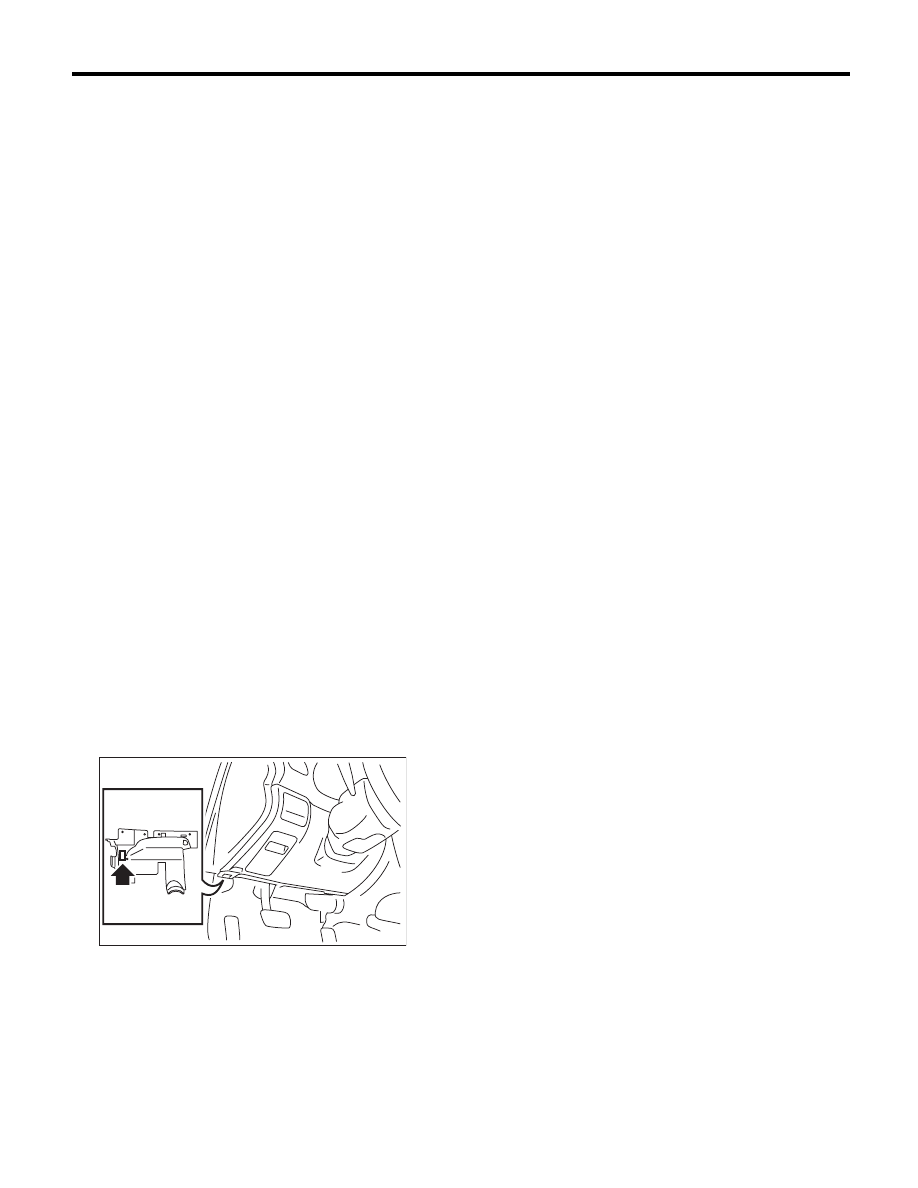
1) Turn the ignition switch to OFF.
2) Connect the Subaru Select Monitor to data link
connector.
3) Turn the ignition switch to ON and run the Suba-
ru Select Monitor.
4) On the «Main Menu» display, select the {Each
System Check}.
5) On the «Each System Check» display, select the
{Integ. unit mode} and then select the «ECM cus-
tomizing».
LAN00110

LAN(diag)-19
Subaru Select Monitor
LAN SYSTEM (DIAGNOSTICS)
6) Change the setting with UP/DOWN key and select the [OK].
List of body integrated unit registration item
NOTE:
Setting is different depending on the grade of vehicle.
CAUTION:
• To perform normal operation of vehicle and diagnosis, the above settings must match the actual
vehicle equipment.
• When body integrated unit is a new part or “Factory” mode, key illumination blinks to show
equipment settings have not been completed.
• Be sure not to change Factory or Market setting except when installing a new body integrated unit.
NOTE:
“Factory” mode:
• Body integrated unit has not been set yet. It can be recognized by key illumination blinking with ignition
switch turned to ON.
• All replacement body integrated units are set to “Factory” mode. When replacing a body integrated unit,
be sure to perform the registration operation.
“Market” mode:
Each settings have been set. It can be recognized by key illumination coming on in concocting with room light
and going off with ignition switch turned to ON.
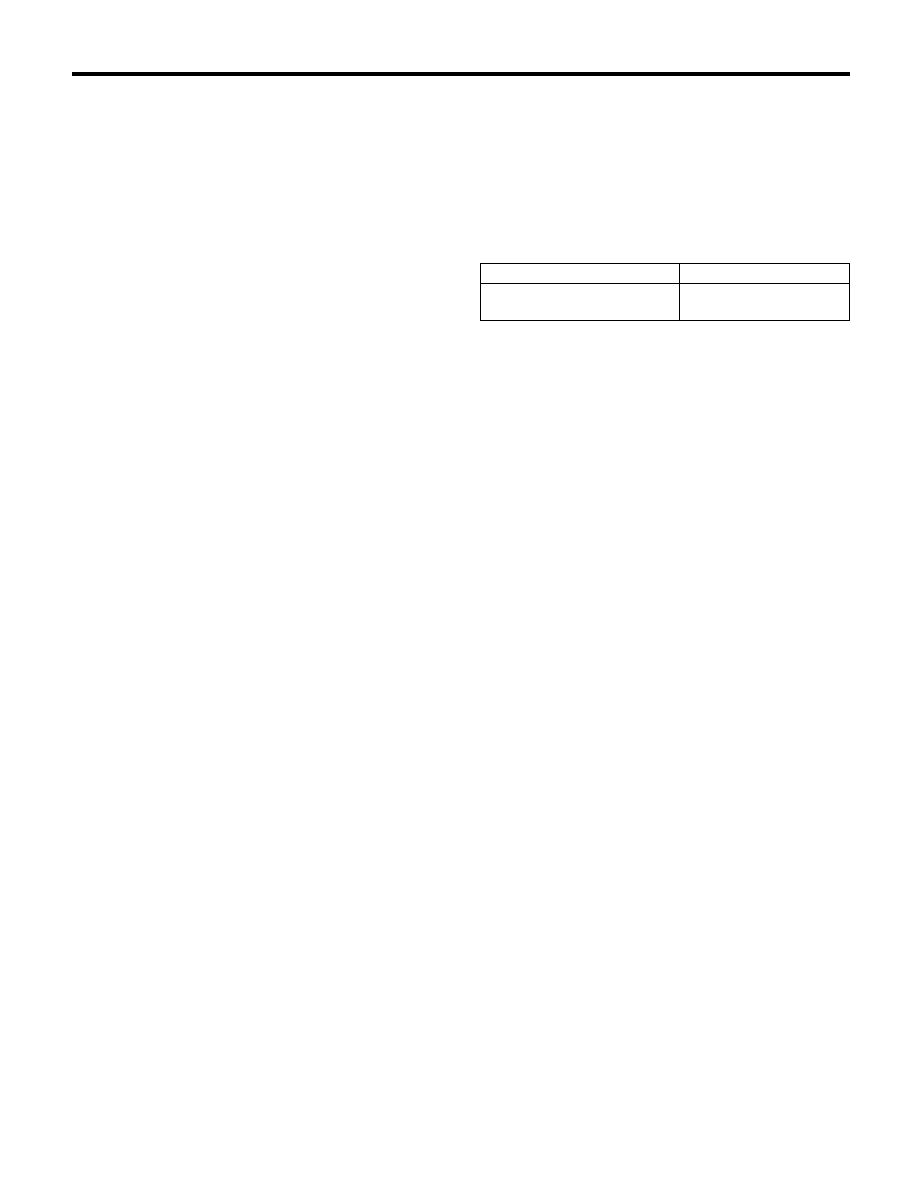
Data
Initial setting
Registration
Remarks
A/C ECM setting
OFF
ON
Illumination control does not operate if A/C ECM setting is
set to “OFF” in case of model with auto A/C.
OFF
If A/C ECM setting is set to “ON” in case of model without
auto A/C, illumination change to night illumination and it is
difficult to be recognized.
P/W ECM setting
OFF
ON
Set to “OFF”.
OFF
wiper deicer
OFF
ON
ON signal does not output with operation of wiper deicer
switch if wiper deicer is set to “OFF” in models with a wiper
deicer.
OFF
Rear fog light setting
OFF
ON
Set to “OFF”.
OFF
Factory or Market setting
(Reset of body integrated unit)
Factory
Factory (Reset)
If Factory or Market setting is set to “Factory”, registrations
of items above is changed to “OFF”. After setting, be sure to
set to “Market”.
Market
(Confirmed)
LAN(diag)-20
Subaru Select Monitor
LAN SYSTEM (DIAGNOSTICS)
7) Perform the Factory setting. On the «ECM custom-
izing” display screen of Subaru Select Monitor, select
the {Factory or Market setting} and select the [OK].
8) Change the mode from Factory to Market.
9) Change to the immobilizer cartridge, and regis-
ter the immobilizer key. (For models with immobiliz-
er, perform the operation according to the “PC
application help for Subaru Select Monitor”.)
10) When key registration is completed, “Do you
want to register remote engine start?” is displayed.
Perform registration only for equipped models.
11) Perform the function setting (ECM customiz-
ing). <Ref. to LAN(diag)-21, FUNCTION SETTING
(ECM CUSTOMIZING), OPERATION, Subaru Se-
lect Monitor.>
NOTE:
For details concerning the operation procedure, re-
fer to the “PC application help for Subaru Select
Monitor”.
7. CLEAR MEMORY MODE
1) On the «Main Menu» display, select the {2. Each
System Check}.
2) On the «System Selection Menu» display, select
the {Integ. unit mode}.
3) Select the [OK] after the information of body in-
tegrated unit type is displayed.
4) On the «Integ. unit mode failure diag» display,
select the {Clearing Memory}.
5) When “Done” is shown on the display screen,
turn the ignition switch to OFF.
NOTE:
For details concerning the operation procedure, re-
fer to the “PC application help for Subaru Select
Monitor”.
8. FREEZE FRAME DATA
NOTE:
• Data stored at the time of trouble occurrence is
shown on the display.
• Freeze frame data will be memorized maximum
to 20.
• If freeze frame data is not stored in memory cor-
rectly (caused by low power supply of body inte-
grated unit), DTC will be displayed with “?” on the
head of it in the Subaru Select Monitor display. This
shows it may be an unreliable reading.
Display
Contents to be displayed
Clear Memory ?
Clear function of DTC and
freeze frame data

LAN(diag)-21
Subaru Select Monitor
LAN SYSTEM (DIAGNOSTICS)
9. FUNCTION SETTING (ECM CUSTOMIZING)
1) On the «Main Menu» display, select the {Each System Check}.
2) On the «System Selection Menu» display, select the {Integ. unit mode}.
3) On the «Integ. unit mode failure diag» display, select the {ECM customizing}.
4) Change the setting with UP/DOWN key and set with the [OK].
List of function setting item (ECM customizing)
Data
Initial setting
value
Customize
setting
Remarks
Destination Specifications
Off delay time
Normal
Delay time below can be selected by setting.
After door closed
After keyless unlock
OFF
0 sec.
0 sec.
Short
3 sec.
10 sec.
Normal
5 sec.
20 sec.
Long
8 sec.
30 sec.
Outside Temp.
Offset
0°C
–2 — +2
(increment
of 0.5)
If it is set to +2.0°C at outside temperature of 12°, the
displayed outside temperature will be 14°C.
Rr defogger
op. mode
15 min.
15 min.
Automatically stops in 15 minutes after switch is
turned to ON.
Continuous
Repeats active condition for 15 minutes and inactive
condition for 2 minutes until switch is turned to OFF.
Wiper deicer
op. mode
15 min.
15 min.
Automatically stops in 15 minutes after switch is
turned to ON.
Continuous
Repeats active condition for 15 minutes and inactive
condition for 2 minutes until switch is turned to OFF.
Security Alarm
Setup
ON
ON
Security alarm (hazard, horn or siren) in active condition
OFF
Security alarm in inactive condition
Impact Sensor
Setup
OFF
ON
Workable when Impact Sensor Setup is set to “ON”.
Impact sensor in active condition
OFF
Impact sensor in inactive condition (Always set to
OFF for vehicles not equipped with the sensor.)
Alarm delay
setup
ON
After doors are locked by keyless entry system oper-
ated, the alarm monitor starts in following time.
ON
Delay time is 30 seconds.
OFF
Delay time is 0 seconds.
Lockout
prevention
ON
ON
Lockout prevention in active condition (The function
does not operate if safety knob is locked by hand.)
OFF
Lockout prevention in inactive condition
Impact sensor
OFF
ON
Vehicle is controlled in impact sensor equipped mode.
(Make sure to set to OFF for models without the
impact sensor. When set to “ON”, hazard, the horn or
siren will operate after doors are locked by the keyless
entry system operation (Alarm monitor start).
Set to “ON” when an
optional impact sensor is
installed.
OFF
Vehicle is controlled in impact sensor no-equipped mode.
Answer-back
buzzer setup
ON
ON
Workable when answer-back buzzer setup is set to
“ON”.
When lock/unlock is selected by keyless entry system
operated, answer-back buzzer operates.
OFF
When lock/unlock is selected by keyless entry system
operated, answer-back buzzer does not sound.
Hazard
answer-back
setup
ON
ON
Workable when hazard answer-back setup is set to
“ON”. When lock/unlock is selected by keyless entry
system operated, hazard answer-back buzzer operates.
OFF
When lock/unlock is selected by keyless entry system
operated, hazard answer-back does not operate.
Нет комментариевНе стесняйтесь поделиться с нами вашим ценным мнением.
Текст