Subaru Legacy IV (2008 year). Service manual — part 1045
SB-18
Front Seat Belt
SEAT BELT SYSTEM
5. Front Seat Belt
A: REMOVAL
1. OUTER SEAT BELT ASSEMBLY
CAUTION:
• Do not drop or subject the pretensioner to
any impact.
• Since the pretensioner and bracket are inte-
grated as a unit, do not disassemble them.
1) Fold the backrest all the way forward, and then
move the front seat all the way forward.
2) Turn the ignition switch to OFF, disconnect the
battery ground cable, and wait 20 seconds or more.
3) Remove the center pillar lower trim. <Ref. to EI-
61, REMOVAL, Lower Inner Trim.>
4) Remove the center pillar upper trim. <Ref. to EI-
62, REMOVAL, Upper Inner Trim.>
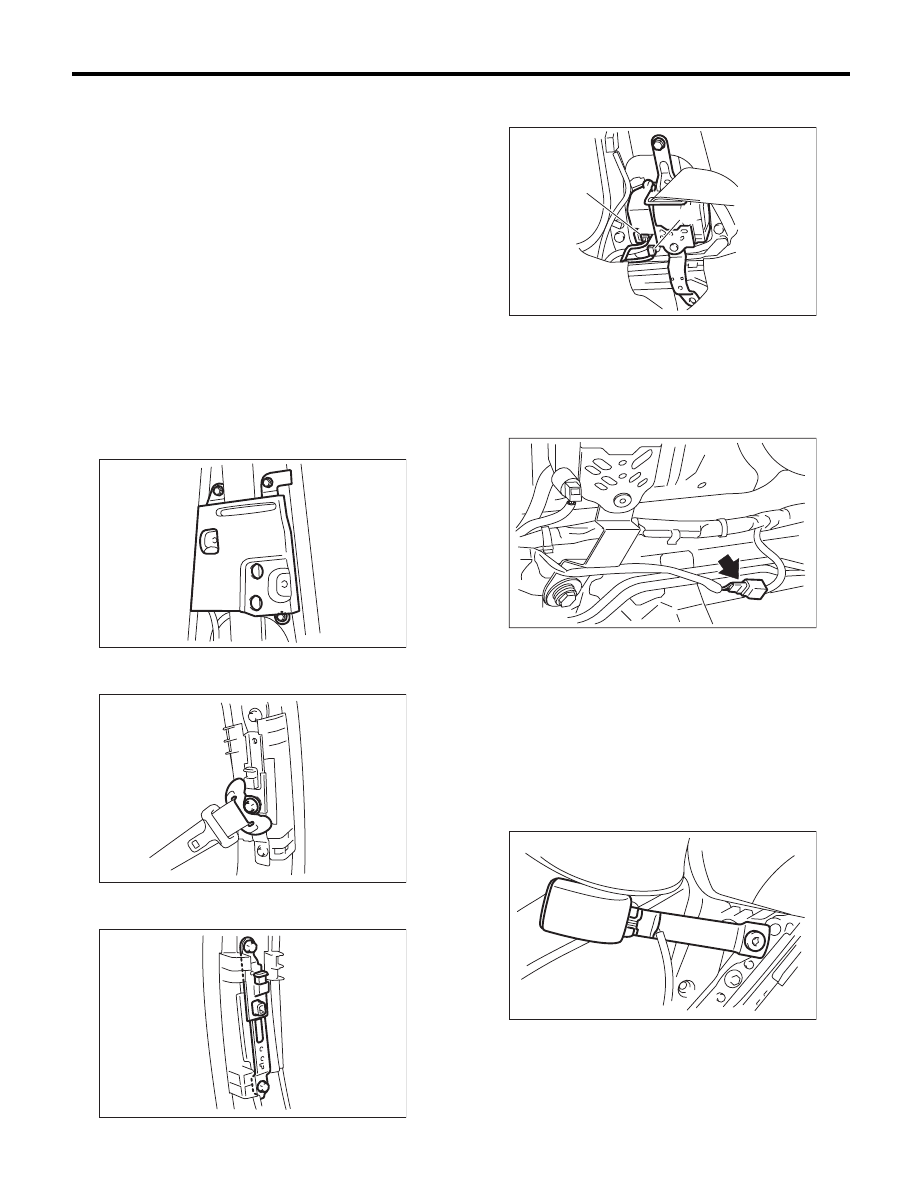
5) Remove the bolt, then remove the center pillar
inner protector lower.
6) Remove the bolt, and then remove the shoulder
anchor.
7) Remove the bolt, and then remove the adjust-
able anchor assembly.
8) Disconnect the pretensioner connector (A), re-
move the bolt, and remove the seat belt retractor.
NOTE:
Disconnect the tension reducer connector (B) for
the seat belt retractor with a tension reducer func-
tion.
9) Disconnect the connector of belt tension sensor
on passenger’s side.
2. INNER SEAT BELT ASSEMBLY
1) Turn the ignition switch to OFF, disconnect the
battery ground cable, and wait 20 seconds or more.
2) Remove the front seats. <Ref. to SE-9, REMOV-
AL, Front Seat.>
3) Disconnect the seat belt warning light connector
under the seat.
4) Remove the harness clips.
5) Remove the TORX
®
bolt, and then remove the
inner seat belt assembly.
SB-00144
SB-00152
SB-00153
SB-00346
(A)
(B)
SB-00326
SE-00332
SB-19
Front Seat Belt
SEAT BELT SYSTEM
B: INSTALLATION
1. OUTER SEAT BELT ASSEMBLY
CAUTION:
• The parts of driver and passenger sides are
not the same. Before installation, make sure
that the correct part is used.
• Be careful not to twist the seat belts during
installation.
Install in the reverse order of removal.
Tightening torque:
<Ref. to SB-2, FRONT SEAT BELT, COMPO-
NENT, General Description.>
2. INNER SEAT BELT ASSEMBLY
CAUTION:
• After the passenger’s inner seat belt assem-
bly installation, check that the seat belt buckle
switch operates normally using the Subaru Se-
lect Monitor in {Status Data} of “Airbag Sys-
tem”. <Ref. to AB(diag)-25, DISPLAY OF
STATUS INFORMATION, OPERATION, Subaru
Select Monitor.>
Improper buckle switch operation may cause
airbag system malfunction.
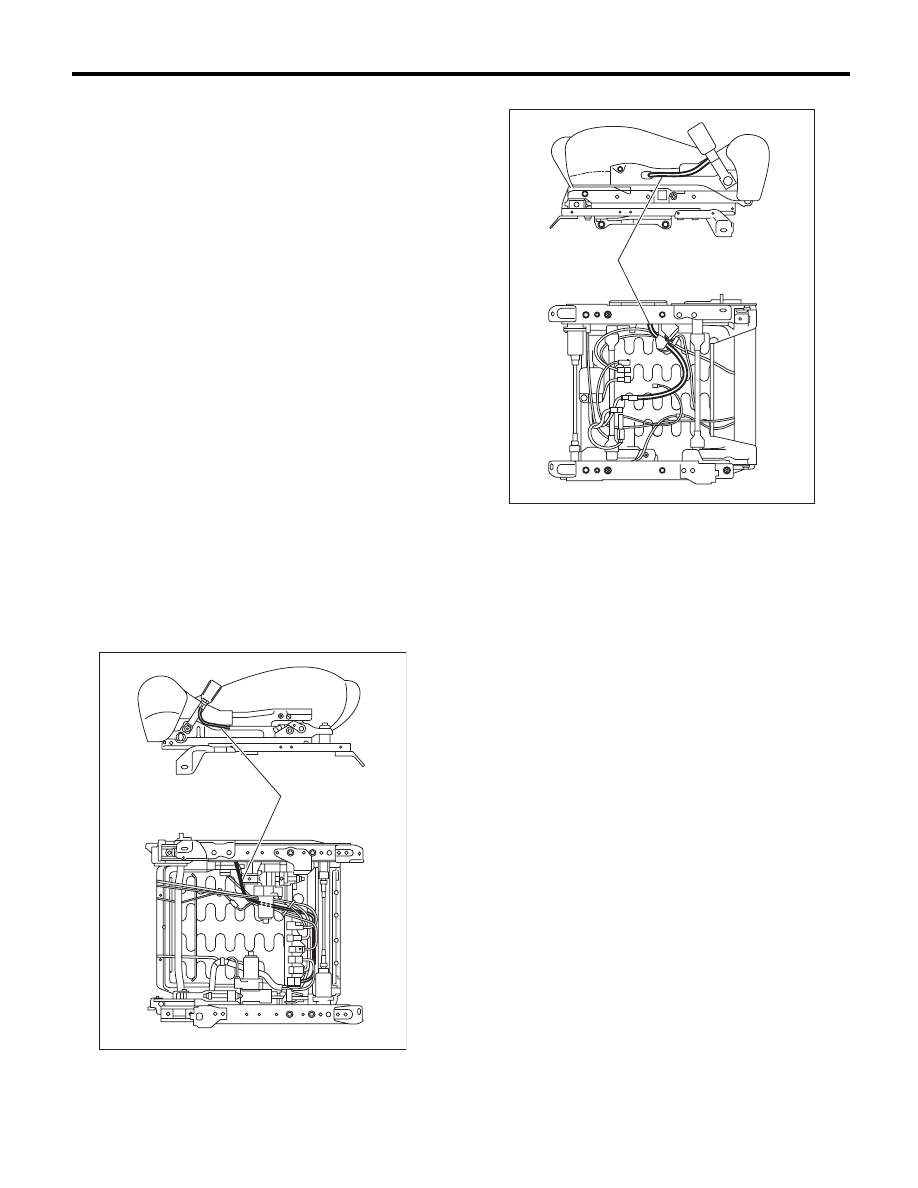
• Inner seat belt assembly harness (1) must be
routed securely as shown in the figure, as it can
affect the performance of the occupant detec-
tion system.
• Driver’s seat
• Passenger’s seat
Install in the reverse order of removal.
Tightening torque:
<Ref. to SB-2, FRONT SEAT BELT, COMPO-
NENT, General Description.>
C: INSPECTION
Check for the following, and replace with new parts
if necessary.
• Pretensioner is cracked or deformed.
• Belt tension sensor is cracked or deformed.
• Seat belt is slackened, bent or worn. Seat belt is
abnormally wound or extended.
• Inner seat belt assembly is deformed or dam-
aged.
• Seat belt buckle cannot be engaged properly.
SB-00347
(1)
SB-00325
(1)
SB-20
Rear Seat Belt
SEAT BELT SYSTEM
6. Rear Seat Belt
A: REMOVAL
1. OUTER SEAT BELT RH ASSEMBLY AND
LH ASSEMBLY (SEDAN MODEL)
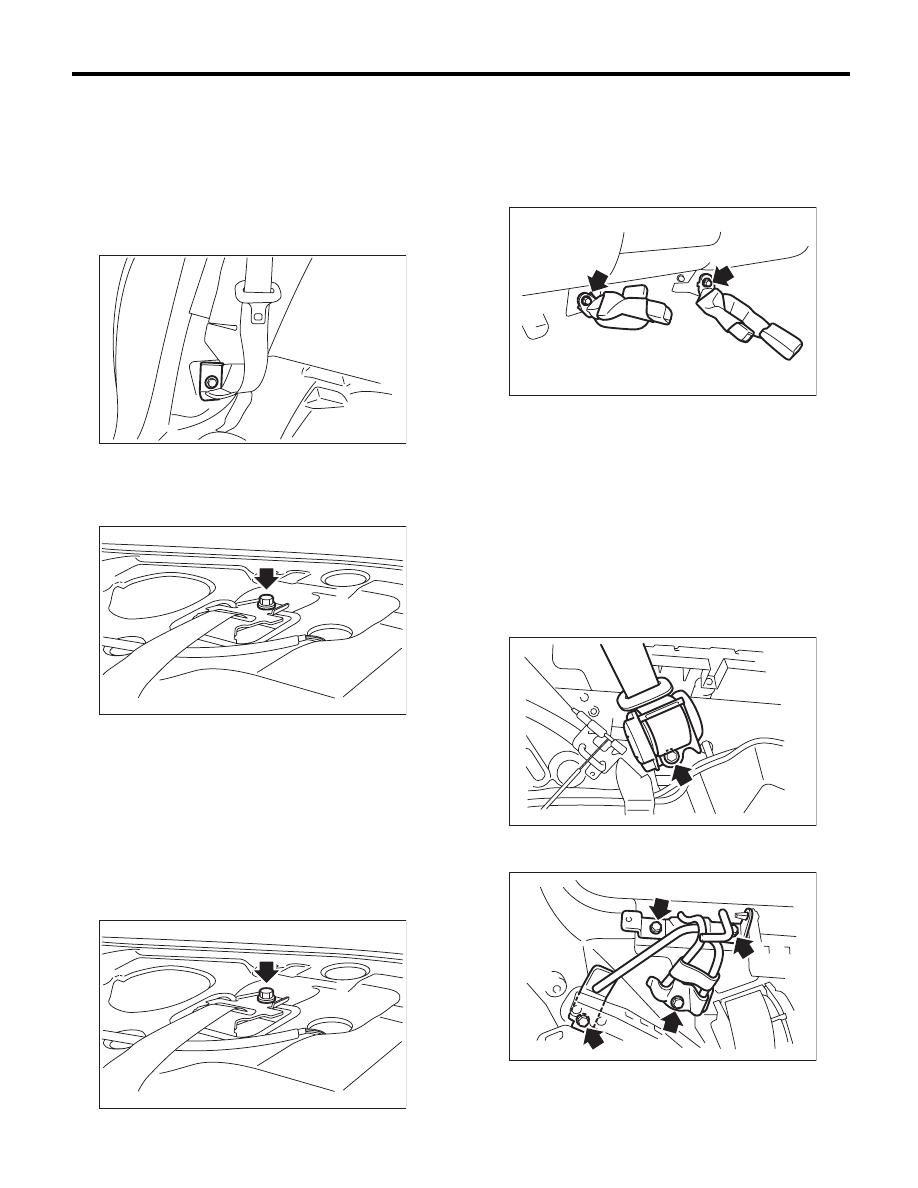
1) Remove the rear seat cushion and backrest
shoulder. <Ref. to SE-18, REMOVAL, Rear Seat.>
2) Remove the seat belt lower anchor bolt.
3) Remove the rear quarter trim. <Ref. to EI-63,
SEDAN MODEL, REMOVAL, Rear Quarter Trim.>
4) Remove the bolts, and then detach the outer
seat belt assembly.
2. SHOULDER SEAT BELT CENTER
ASSEMBLY (SEDAN MODEL)
1) Remove the rear seat cushion and backrest
shoulder. <Ref. to SE-18, REMOVAL, Rear Seat.>
2) Remove the rear quarter trim. <Ref. to EI-63,
REMOVAL, Rear Quarter Trim.>
3) Remove the rear shelf trim. <Ref. to EI-69, RE-
MOVAL, Rear Shelf Trim.>
4) Remove the bolts, then remove the shoulder
seat belt assembly.
3. CENTER SEAT BELT RH ASSEMBLY
AND LH ASSEMBLY (SEDAN MODEL)
1) Remove the rear seat cushion. <Ref. to SE-18,
REMOVAL, Rear Seat.>
2) Remove the bolts, then remove the center seat
belt LH assembly.
4. OUTER SEAT BELT RH ASSEMBLY AND
LH ASSEMBLY (WAGON MODEL)
1) Remove the luggage floor box. <Ref. to EI-73,
REMOVAL, Luggage Floor Box.>
2) Remove the rear seat cushion and backrest
shoulder. <Ref. to SE-18, SEDAN MODEL, RE-
MOVAL, Rear Seat.>
3) Remove the rear quarter lower trim. <Ref. to EI-
63, WAGON MODEL, REMOVAL, Rear Quarter
Trim.>
4) Remove the bolt to remove outer seat belt re-
tractor.
5) Remove the bolt to remove the outer seat belt
guide.
SB-00084
SB-00089
SB-00089
SB-00156
SB-00151
SB-00158
SB-21
Rear Seat Belt
SEAT BELT SYSTEM
5. SHOULDER SEAT BELT CENTER
ASSEMBLY (WAGON MODEL)
1) Remove the quarter rear pillar trim. <Ref. to EI-
63, WAGON MODEL, REMOVAL, Rear Quarter
Trim.>
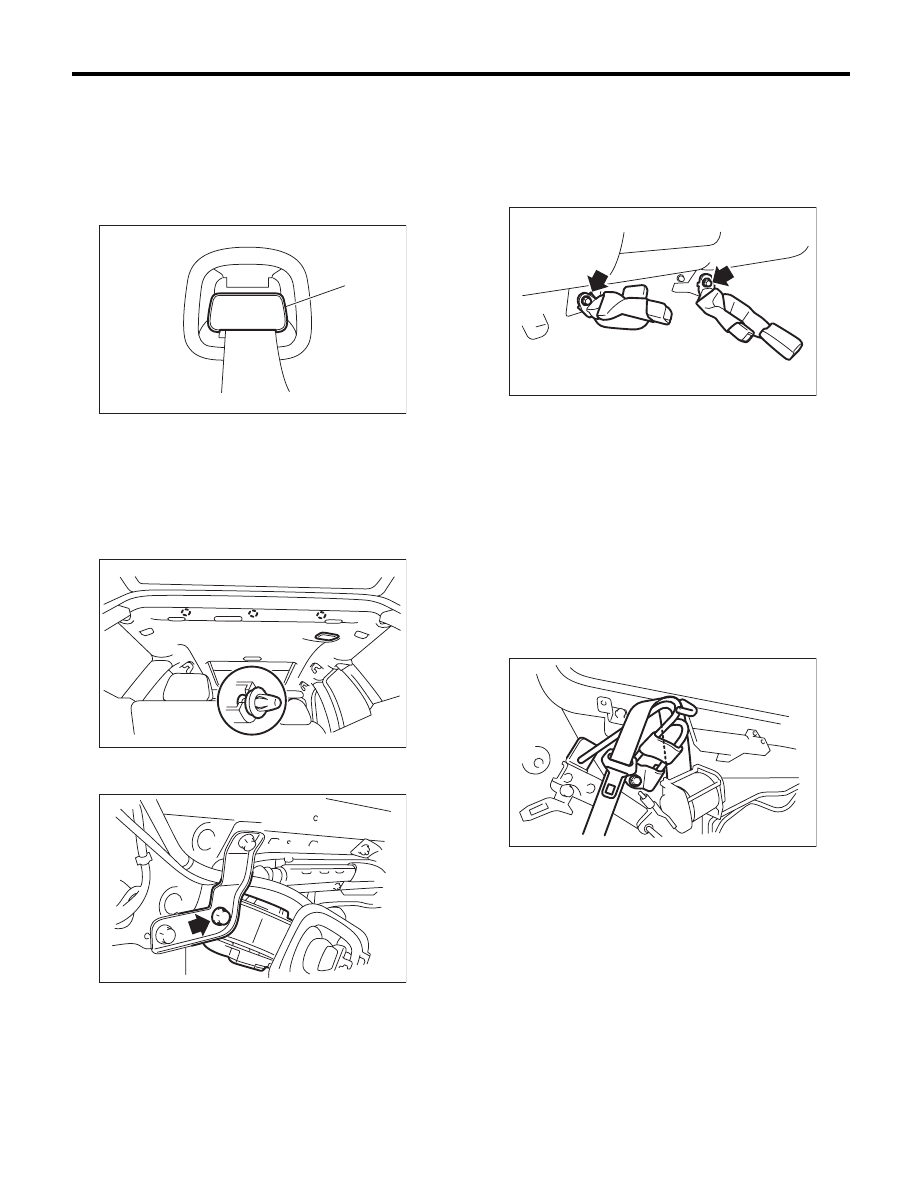
2) Remove the cover (A) from roof trim, and then
insert it to the inside of roof trim.
3) Remove the clips, and then lower the roof trim
end.
CAUTION:
When removing the roof trim clip, do not pull
the roof trim end backward with excessive
force. There is the possibility of the roof trim
being damaged.
4) Remove the bolt to remove the seat belt retrac-
tor.
6. CENTER SEAT BELT RH ASSEMBLY
AND LH ASSEMBLY (WAGON MODEL)
1) Remove the rear seat cushion. <Ref. to SE-18,
SEDAN MODEL, REMOVAL, Rear Seat.>
2) Remove the bolts, then remove the center seat
belt assembly.
B: INSTALLATION
CAUTION:
• During installation, make sure that the seat
belts are not twisted.
• During installation, make sure that the center
seat belt assembly (RH & LH) are properly
pulled out from the slit of seat cushions.
• After installation, make sure that the seat
belts are smoothly extended and wound.
• If the vehicle is equipped with rear outer seat
belts (wagon model), make sure that the seat
belts are wound after installing the seat belt
guide.
Install in the reverse order of removal.
C: INSPECTION
Check for the following, and replace with new parts
if necessary.
• Seat belt is slackened, bent or worn. Seat belt is
abnormally wound or extended.
• Inner seat belt assembly is deformed or dam-
aged.
• Seat belt buckle cannot be engaged properly.
SB-00236
(A)
SB-00155
SB-00160
SB-00156
SB-00157
Нет комментариевНе стесняйтесь поделиться с нами вашим ценным мнением.
Текст