Subaru Legacy III (2000-2003 year). Service manual — part 465

EN(H4DOSTC)-30
ENGINE (DIAGNOSTICS)
SUBARU SELECT MONITOR
NOTE:
For detailed operation procedure, refer to the SUBARU SELECT MONITOR OPERATION MANUAL.
8. READ CURRENT DATA FOR AT.
1) On the «Main Menu» display screen, select the {Each System Check} and press the [YES] key.
2) On the «System Selection Menu» display screen, select the {Transmission Control System} and press the
[YES] key.
3) Press the [YES] key after displayed the information of transmission type.
4) On the «Transmission Diagnosis» display screen, select the {Current Data Display & Save} and press the
[YES] key.
5) On the «Data Display Menu» display screen, select the {Data Display} and press the [YES] key.
6) Using the scroll key, move the display screen up or down until the desired data is shown.
• A list of the support data is shown in the following table.
Camshaft position sensor signal
Camshaft Position Sig.
ON or OFF
When camshaft position sensor signal is
entered.
Power steering switch signal
P/S SW
ON or OFF
When power steering switch is entered.
Rear defogger switch signal
Rear Defogger SW
ON or OFF
When rear defogger switch is turned ON.
Blower fan switch signal
Blower Fan SW
ON or OFF
When blower fan switch is turned ON.
Light switch signal
Light SW
ON or OFF
When small light switch is turned ON.
Contents
Display
Unit of measure
Battery voltage
Battery Voltage
V
Rear vehicle speed sensor signal
Vehicle Speed #1
km/h or MPH
Front vehicle speed sensor signal
Vehicle Speed #2
km/h or MPH
Engine speed signal
Engine Speed
rpm
Automatic transmission fluid temperature signal
ATF Temp.
°
C or
°
F
Throttle position signal
Throttle Sensor Voltage
V
Gear position
Gear Position
—
Line pressure control duty ratio
Line Pressure Duty Ratio
%
Lock up clutch control duty ratio
Lock Up Duty Ratio
%
Transfer clutch control duty ratio
Transfer Duty Ratio
%
Power supply for throttle position sensor
Throttle Sensor Power
V
Torque converter turbine speed signal
AT Turbine Speed
rpm
2-4 brake timing pressure control duty ratio
2-4B Duty Ratio
%
Intake manifold pressure sensor voltage
Mani. Pressure Voltage
V
2 wheel drive switch signal
2WD Switch
ON or OFF
Stop lamp switch signal
Stop Lamp Switch
ON or OFF
Anti lock brake system signal
ABS Signal
ON or OFF
Cruise control system signal
Cruise Control Signal
ON or OFF
Neutral/Parking range signal
N/P Range Signal
ON or OFF
Reverse range signal
R Range Signal
ON or OFF
Drive range signal
D Range Signal
ON or OFF
3rd range signal
3rd Range Signal
ON or OFF
2nd range signal
2nd Range Signal
ON or OFF
1st range signal
1st Range Signal
ON or OFF
Shift control solenoid A
Shift Solenoid #1
ON or OFF
Shift control solenoid B
Shift Solenoid #2
ON or OFF
Torque control output signal #1
Torque Control Signal #1
ON or OFF
Torque control output signal #2
Torque Control Signal #2
ON or OFF
Torque control cut signal
Torque Control Cut Sig.
ON or OFF
2-4 brake timing control solenoid valve
2-4 Brake Timing Sol.
ON or OFF
Low clutch timing control solenoid valve
Low Clutch Timing Sol.
ON or OFF
Contents
Display
Message
LED “ON” requirements

EN(H4DOSTC)-31
ENGINE (DIAGNOSTICS)
SUBARU SELECT MONITOR
NOTE:
For detailed operation procedure, refer to the SUBARU SELECT MONITOR OPERATION MANUAL.
For select monitor display details, refer to the following.
Automatic transmission diagnosis indicator lamp
AT Diagnosis Lamp
ON or OFF
Contents
Display
Unit of measure
EN(H4DOSTC)-32
ENGINE (DIAGNOSTICS)
READ DIAGNOSTIC TROUBLE CODE
10.Read Diagnostic Trouble
Code
A: OPERATION
1. SUBARU SELECT MONITOR (NORMAL
MODE)
1) On the «Main Menu» display screen, select the
{Each System Check} and press [YES] key.
2) On the «System Selection Menu» display
screen, select the {Engine Control System} and
press [YES] key.
3) Press the [YES] key after displayed the informa-
tion of engine type.
4) On the «Engine Diagnosis» display screen, se-
lect the {Diagnostic Code(s) Display} and press
[YES] key.
5) On the «Diagnostic Code(s) Display» display
screen, select the {Current Diagnostic Code(s)} or
{History Diagnostic Code(s)} and press [YES] key.
NOTE:
• For detailed operation procedure, refer to the
SUBARU SELECT MONITOR OPERATION MAN-
UAL.
• For detailed concerning diagnostic trouble
codes, refer to the List of Diagnostic Trouble Code
(DTC). <Ref. to EN(H4DOSTC)-62, List of Diag-
nostic Trouble Code (DTC).>
2. SUBARU SELECT MONITOR (OBD
MODE)
1) On the «Main Menu» display screen, select the
{2. Each System Check} and press [YES] key.
2) On the «System Selection Menu» display
screen, select the {Engine Control System} and
press [YES] key.
3) Press the [YES] key after displayed the informa-
tion of engine type.
4) On the «Engine Diagnosis» display screen, se-
lect the {OBD System} and press [YES] key.
5) On the «OBD Menu» display screen, select the
{Diagnosis Code(s) Display} and press [YES] key.
6) Make sure that a diagnostic trouble code (DTC)
is shown on the display screen.
NOTE:
• For detailed operation procedure, refer to the
SUBARU SELECT MONITOR OPERATION MAN-
UAL.
• For detailed concerning diagnostic trouble
codes, refer to the List of Diagnostic Trouble Code
(DTC). <Ref. to EN(H4DOSTC)-62, List of Diag-
nostic Trouble Code (DTC).>
EN(H4DOSTC)-33
ENGINE (DIAGNOSTICS)
INSPECTION MODE
11.Inspection Mode
A: OPERATION
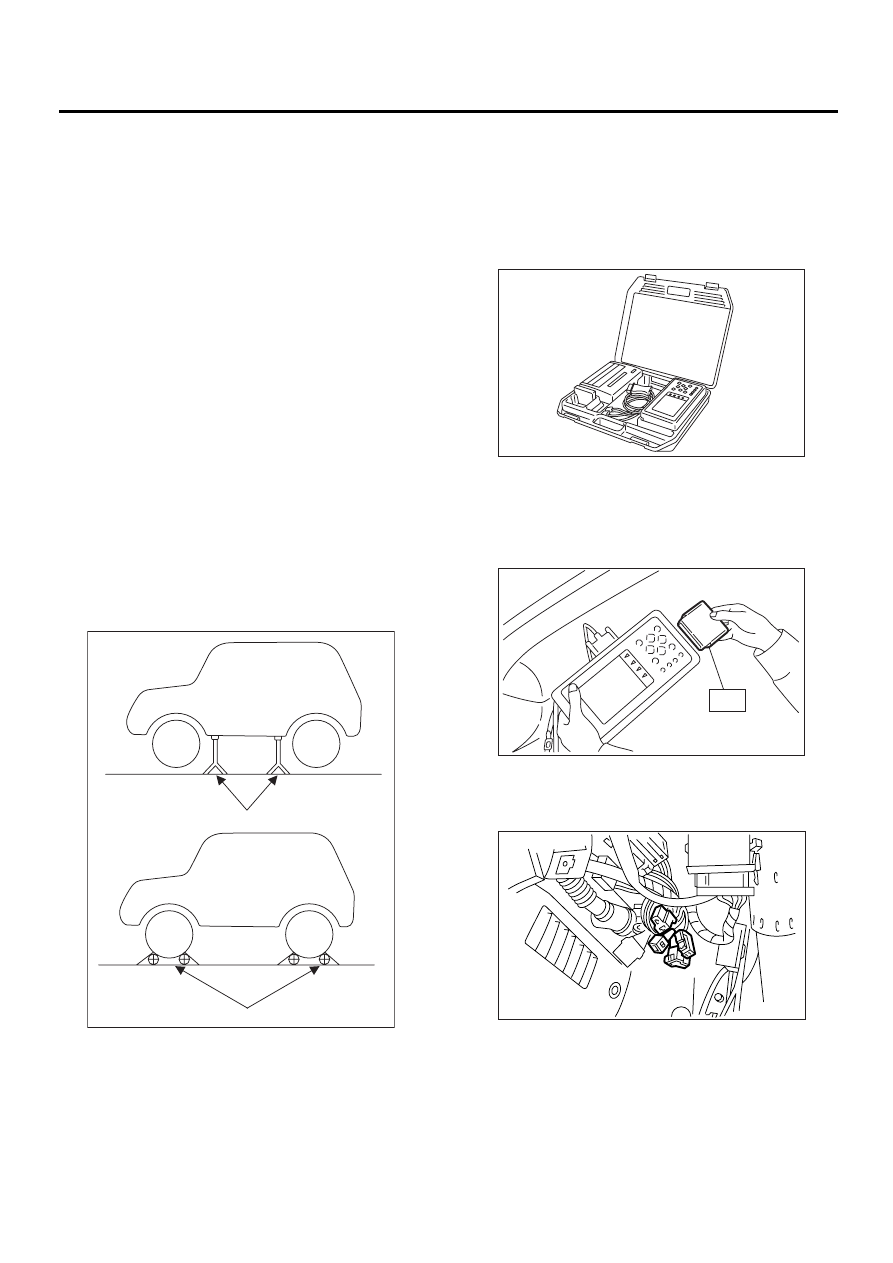
1. PREPARATION FOR THE INSPECTION
MODE
Raise the vehicle using a garage jack and place on
safety stands or drive the vehicle onto free rollers.
WARNING:
• Before raising the vehicle, ensure parking
brakes are applied.
• Do not use a pantograph jack in place of a
safety stand.
• Secure a rope or wire to the front and rear
towing or tie-down hooks to prevent the lateral
runout of front wheels.
• Do not abruptly depress/release clutch pedal
or accelerator pedal during works even when
engine is operating at low speeds since this
may cause vehicle to jump off free rollers.
• In order to prevent the vehicle from slipping
due to vibration, do not place any wooden
blocks or similar items between the safety
stands and the vehicle.
• Since the rear wheels will also rotate, do not
place anything near them. Also, make sure that
nobody goes in front of the vehicle.
2. SUBARU SELECT MONITOR
After performing diagnostics and clearing the mem-
ory, check for any remaining unresolved trouble da-
ta.
1) Prepare the Subaru Select Monitor kit. <Ref. to
EN(H4DOSTC)-8, PREPARATION TOOL, Gener-
al Description.>
2) Connect the diagnosis cable to Subaru Select
Monitor.
3) Insert the cartridge into Subaru Select Monitor.
<Ref. to EN(H4DOSTC)-8, PREPARATION TOOL,
General Description.>
4) Connect the test mode connector at the lower
portion of instrument panel (on the driver's side), to
the side of center console box.
(A) Safety stand
(B) Free rollers
EN-00041
( A )
( B )
EN-00038
ST
EN-00039
EN-01000
Нет комментариевНе стесняйтесь поделиться с нами вашим ценным мнением.
Текст