Subaru Tribeca (2014 year). Manual — part 20
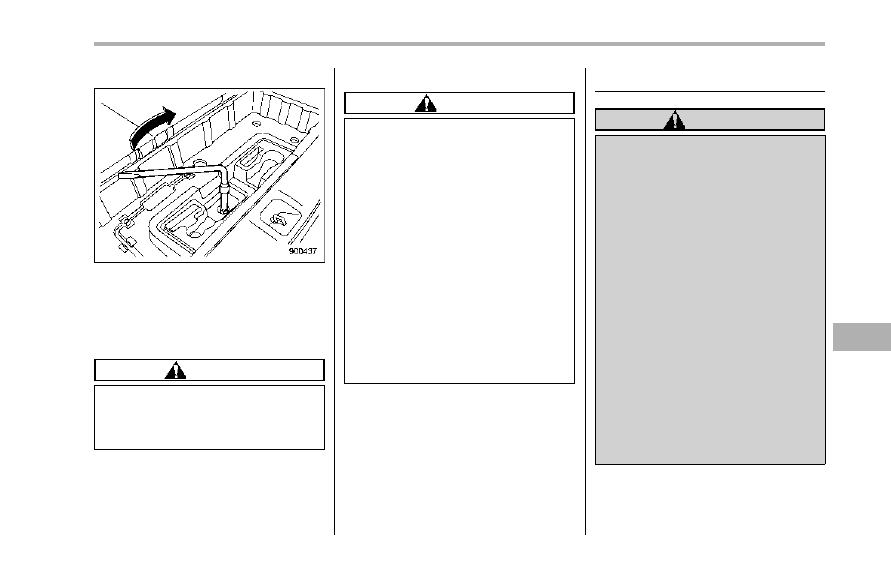
of the tire facing up).
3. Turn the hoist shaft end clockwise with
the wheel nut wrench to wind the cable up
completely until you hear a few clicking
sounds. Confirm that the temporary spare
tire holding cable has been wound up
completely by shaking the temporary tire.
CAUTION
If the temporary spare tire is not
stored securely, it could damage
adjacent areas of the vehicle and
make an abnormal noise.
4. Place the wheel nut wrench and
extension back into the tool bag and store
the jack and tool bag in their storage
locations.
5. Fit the lid of the cargo area.
CAUTION
. When stowing a flat tire in the
spare tire holder, turn the hoist
shaft end only slowly. If it is
turned quickly, the wheel disc of
the flat tire could be damaged.
. A full-size flat tire should be
stowed in the spare tire holder
in an emergency only. After hav-
ing the flat tire repaired, immedi-
ately swap it with the temporary
spare tire.
. Remember that the tread width of
a flat tire is wider than that of the
temporary spare tire. When car-
rying a flat tire stowed in the
spare tire holder, make sure the
tire does not touch any obsta-
cles.
Temporary spare tire
WARNING
. Never tow a trailer when the
temporary spare tire is used.
The temporary spare tire is not
designed to sustain the towing
load. Use of the temporary spare
tire when towing can result in
failure of the spare tire and/or
less stability of the vehicle and
may lead to an accident.
. When a spare tire is mounted or a
wheel rim is replaced without the
original pressure sensor/trans-
mitter being transferred, the low
tire pressure warning light will
illuminate steadily after blinking
for approximately one minute.
This indicates the tire pressure
monitoring system (TPMS) is un-
able to monitor all four road
wheels. Contact your SUBARU
dealer as soon as possible for
tire and sensor replacement and/
or system resetting.
In case of emergency
9-5
– CONTINUED –
9-6
In case of emergency
CAUTION
Never use any temporary spare tire
other than the original. Using other
sizes may result in severe mechan-
ical damage to the drive train of your
vehicle.
The temporary spare tire is smaller and
lighter than a conventional tire and is
designed for emergency use only. Re-
move the temporary spare tire and re-
install the conventional tire as soon as
possible because the spare tire is de-
signed only for temporary use.
Check the inflation pressure of the tem-
porary spare tire periodically to keep the
tire ready for use. The correct pressure is
60 psi (420 kPa, 4.2 kgf/cm
2
).
When using the temporary spare tire, note
the following.
. Do not exceed 50 mph (80 km/h).
. Do not put a tire chain on the temporary
spare tire. Because of the smaller tire size,
a tire chain will not fit properly.
. Do not use two or more temporary
spare tires at the same time.
. Do not drive over obstacles. This tire
has a smaller diameter, so road clearance
is reduced.
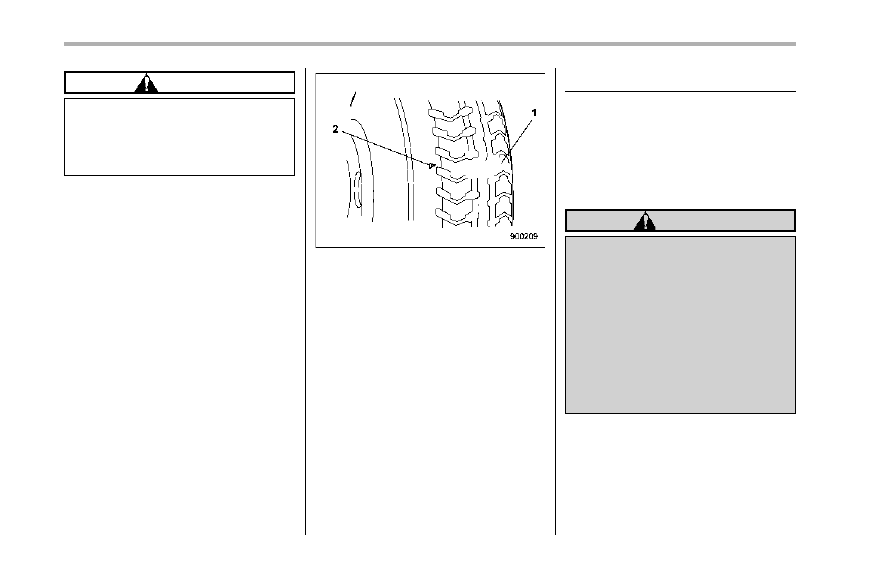
1)
Tread wear indicator bar
2)
Indicator location mark
. When the wear indicator appears on
the tread, replace the tire.
. The temporary spare tire must be used
only on a rear wheel. If a front wheel tire
gets punctured, replace the wheel with a
rear wheel and install the temporary spare
tire in place of the removed rear wheel.
Flat tires
If you have a flat tire while driving, never
brake suddenly; keep driving straight
ahead while gradually reducing speed.
Then slowly pull off the road to a safe
place.
& Changing a flat tire
WARNING
. Do not jack up the vehicle on an
incline or a loose road surface.
The jack can come out of the
jacking point or sink into the
ground and this can result in a
severe accident.
. Use only the jack provided with
your vehicle. The jack supplied
with the vehicle is designed only
for changing a tire. Never get
under the vehicle while support-
ing the vehicle with this jack.
. Always turn off the engine before
raising the flat tire off the ground
using the jack. Never swing or
push the vehicle supported with
the jack. The jack can come out
of the jacking point due to a jolt
and this can result in a severe
accident.
1. Park on a hard, level surface, when-
ever possible, then stop the engine.
2. Set the parking brake securely and
shift in the “P” (Park) position.
3. Turn on the hazard warning flasher
and have everyone get out of the vehicle.
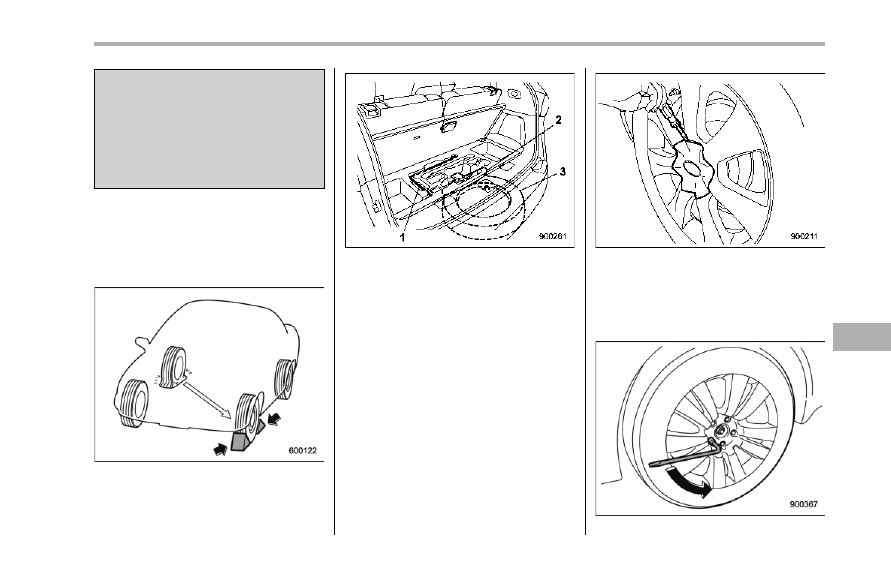
4. Put wheel blocks at the front and rear
of the tire diagonally opposite the flat tire.
1)
Jack handle
2)
Jack
3)
Spare tire
5. Take out the jack and jack handle.
The jack and jack handle are stored under
the floor of the cargo area.
6. Remove the spare tire.
Refer to “Spare tire” F9-2 for its location,
instructions and precautions.
Carefully read “Temporary spare tire” F9-
5 and strictly follow the instructions.
NOTE
Make sure the jack is well lubricated
before using it.
Chrome plated wheels
7. Insert the tip (wrapped in vinyl tape or
a cloth) of a flat-head screwdriver into the
slot between the wheel and cap. Use it to
remove the cap. (Only vehicle equipped
with chrome plated wheels)
In case of emergency
9-7
– CONTINUED –
9-8
In case of emergency
8. Loosen the wheel nuts using the wheel
nut wrench but do not remove the nuts.
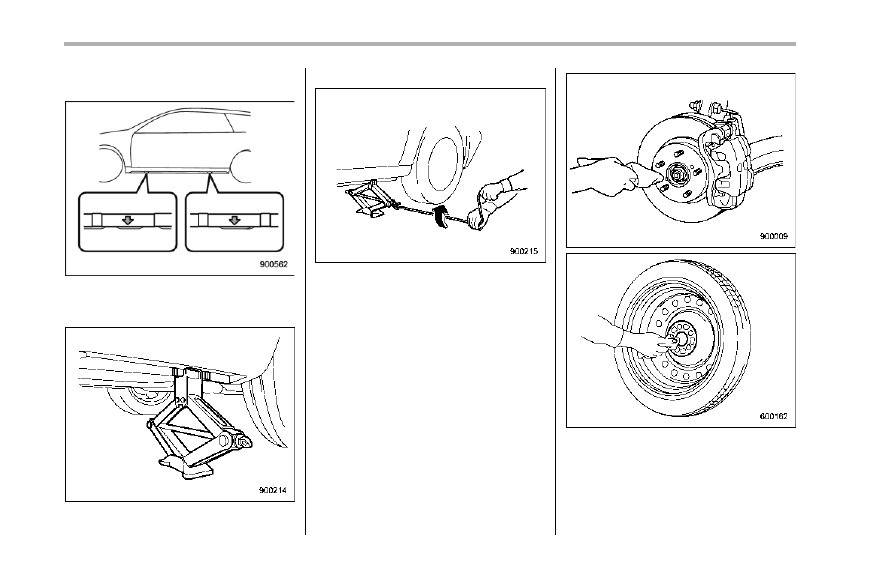
9. Place the jack under the side sill at the
front or rear jack-up point closest to the flat
tire.
Turn the jackscrew by hand until the jack
head engages firmly into the jack-up point.
10. Insert the jack handle into the jack-
screw, and turn the handle until the tire
clears the ground. Do not raise the vehicle
higher than necessary.
11. Remove the wheel nuts and the flat
tire.
12. Remove the tire cover if the temporary
spare tire has a cover.
13. Before putting the spare tire on, clean
the mounting surface of the wheel and hub
with a cloth.
14. Put on the spare tire. Replace the
wheel nuts. Tighten them by hand.
WARNING
Do not use oil or grease on the
wheel studs or nuts when the spare
tire is installed. This could cause the
nuts to become loose and lead to an
accident.
15. Turn the jack handle counterclockwise
to lower the vehicle.
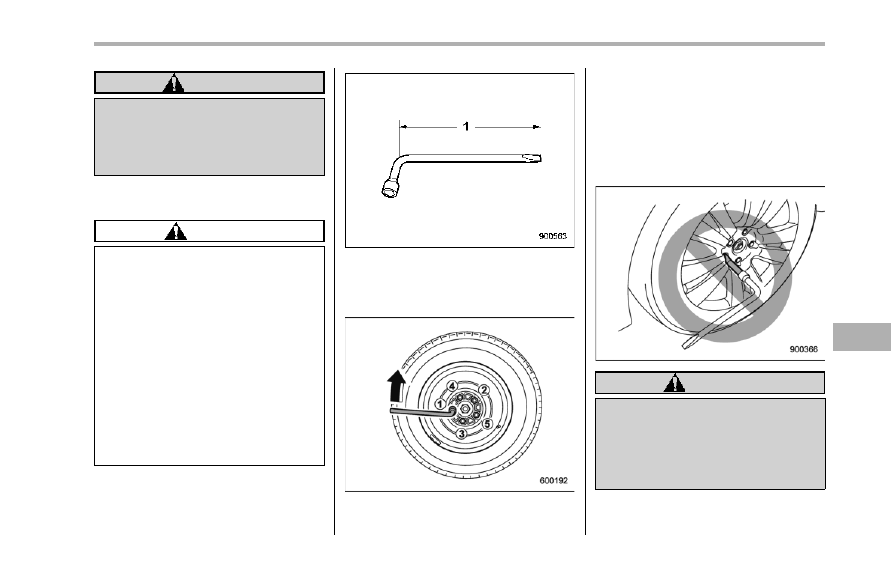
CAUTION
There are 2 types of wheel nut
wrenches that apply to different
lengths.
For models with silver-colored alu-
minum wheels, the 10.8-inch (275
mm) wheel nut wrench is equipped
as a maintenance tool. And for
models with optional chrome-fin-
ished wheels, the 13.2-inch (335
mm) wheel nut wrench is equipped
as well. Confirm the equipped wheel
nut wrench type when you replace a
tire. If the wheel nut wrench is the
different type, it cannot be tightened
to the specified torque.
1)
The length of the wheel nut wrench
16. Confirm the length of the equipped
wheel nut wrench and wheel nut tighten-
ing torque. Refer to “Tires” F12-8.
17. Use the wheel nut wrench to securely
tighten the wheel nuts to the specified
torque, following the tightening order in the
illustration.
Never use your foot on the wheel nut
wrench or a pipe extension on the wrench
because you may exceed the specified
torque. Have the wheel nut torque
checked at the nearest automotive service
facility.
WARNING
Do not use the extension when
turning the wheel nuts. If you did,
you would not be able to achieve
sufficient tightening torque. The
wheel nuts could then come loose,
resulting in a serious accident.
18. Store the flat tire in the spare tire
In case of emergency
9-9
– CONTINUED –
9-10
In case of emergency
holder.
Refer to “Spare tire” F9-2 for its location,
instructions and precautions.
CAUTION
. When stowing a flat tire in the
spare tire holder, turn the hoist
shaft end only slowly. If it is
turned quickly, the wheel disc of
the flat tire could be damaged.
. A full-size flat tire should be
stowed in the spare tire holder
in an emergency only. After hav-
ing the flat tire repaired, immedi-
ately swap it with the temporary
spare tire.
. Remember that the tread width of
a flat tire is wider than that of the
temporary spare tire. When car-
rying a flat tire stowed in the
spare tire holder, make sure the
tire does not touch any obsta-
cles.
WARNING
Never place a tire or tire changing
tools in the passenger compartment
after changing wheels. In a sudden
stop or collisions, loose equipment
could strike occupants and cause
injury. Store the tire and all tools in
the proper place.
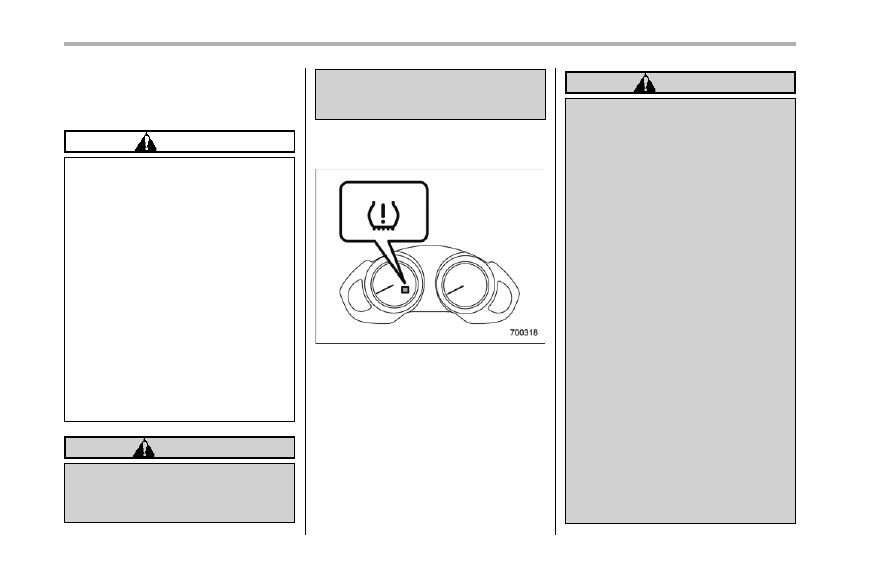
& Tire pressure monitoring
system (TPMS)
The tire pressure monitoring system pro-
vides the driver with the warning message
indicated by sending a signal from a
sensor that is installed in each wheel
when tire pressure is severely low.
The tire pressure monitoring system will
activate only when the vehicle is driven.
Also, this system may not react immedi-
ately to a sudden drop in tire pressure (for
example, a blow-out caused running over
a sharp object).
WARNING
If the low tire pressure warning light
illuminates while driving, never
brake suddenly and keep driving
straight ahead while gradually redu-
cing speed. Then slowly pull off the
road to a safe place. Otherwise an
accident involving serious vehicle
damage and serious personal injury
could occur.
Check the pressure for all four tires
and adjust the pressure to the COLD
tire pressure shown on the vehicle
placard on the door pillar on the
driver’s side. If this light still illumi-
nates while driving after adjusting
the tire pressure, a tire may have
significant damage and a fast leak
that causes the tire to lose air
rapidly. If you have a flat tire, replace
it with a spare tire as soon as
possible.
When a spare tire is mounted or a
wheel rim is replaced without the
original pressure sensor/transmitter
being transferred, the low tire pres-
sure warning light will illuminate
steadily after blinking for approxi-
mately one minute. This indicates
the TPMS is unable to monitor all
four road wheels. Contact your
SUBARU dealer as soon as possible
for tire and sensor replacement and/
or system resetting.
Do not inject any tire liquid or
aerosol tire sealant into the tires,
as this may cause a malfunction of
the tire pressure sensors.
If the light illuminates steadily after
blinking for approximately one min-
ute, promptly contact a SUBARU
dealer to have the system inspected.
Jump starting
WARNING
. Battery fluid is SULFURIC ACID.
Do not let it come in contact with
the eyes, skin, clothing or the
vehicle.
If battery fluid gets on you,
thoroughly flush the exposed
area with water immediately. Get
medical help if the fluid has
entered your eyes.
If battery fluid is accidentally
swallowed, immediately drink a
large amount of milk or water,
and obtain immediate medical
help.
Keep everyone including chil-
dren away from the battery.
. The gas generated by a battery
explodes if a flame or spark is
brought near it. Do not smoke or
light a match while jump starting.
. Never attempt jump starting if the
discharged battery is frozen. It
could cause the battery to burst
or explode.
. Whenever working on or around
a battery, always wear suitable
eye protectors, and remove metal
objects such as rings, bands or
other metal jewelry.
. Be sure the jumper cables and
clamps on them do not have
loose or missing insulation.
Do not jump start unless cables
in suitable condition are avail-
able.
. A running engine can be danger-
ous. Keep your fingers, hands,
clothing, hair and tools away
from the cooling fan, belts and
any other moving engine parts.
Removing rings, watches and
ties is advisable.
. Jump starting is dangerous if it is
done incorrectly. If you are un-
sure about the proper procedure
for jump starting, consult a com-
petent mechanic.
When your vehicle does not start due to a
run down (discharged) battery, the vehicle
may be jump started by connecting your
battery to another battery (called the
booster battery) with jumper cables.
In case of emergency
9-11
– CONTINUED –
9-12
In case of emergency
& How to jump start
1. Make sure the booster battery is 12
volts and the negative terminal is
grounded.
2. If the booster battery is in another
vehicle, do not let the two vehicles touch.
3. Turn off all unnecessary lights and
accessories.
4. Connect the jumper cables exactly in
the sequence illustrated.
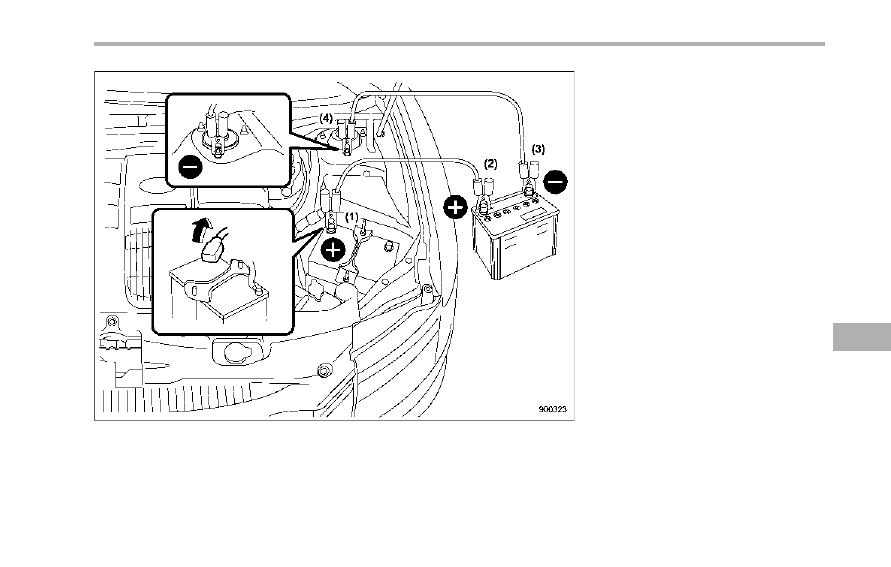
(1) Connect one jumper cable to the
positive (+) terminal on the discharged
battery.
(2) Connect the other end of the
jumper cable to the positive (+) term-
inal of the booster battery.
(3) Connect one end of the other
cable to the negative (−) terminal of
the booster battery.
(4) Connect the other end of the cable
to the strut mounting nut.
Make sure that the cables are not near
any moving parts and that the cable
clamps are not in contact with any other
metal.
5. Start the engine of the vehicle with the
booster battery and run it at moderate
speed. Then start the engine of the vehicle
that has the discharged battery.
6. When finished, carefully disconnect
the cables in exactly the reverse order.
In case of emergency
9-13

9-14
In case of emergency
Engine overheating
WARNING
Never attempt to remove the radia-
tor cap until the engine has been
shut off and has fully cooled down.
When the engine is hot, the coolant
is under pressure. Removing the
cap while the engine is still hot
could release a spray of boiling hot
coolant, which could burn you very
seriously.
If the engine overheats, safely pull off the
road and stop the vehicle in a safe place.
& If steam is coming from the
engine compartment
Turn off the engine and get everyone
away from the vehicle until it cools down.
& If no steam is coming from
the engine compartment
NOTE
For details about how to check the
coolant level or how to add coolant,
refer to “Engine coolant” F11-11.
1. Keep the engine running at idling
speed.
2. Open the hood to ventilate the engine
compartment. Refer to “Engine hood”
F11-4.
Confirm that the cooling fan is turning. If
the fan is not turning, immediately turn off
the engine and contact your authorized
dealer for repair.
3. After the engine coolant temperature
has dropped, turn off the engine.
If the temperature gauge stays at the
overheated zone, turn off the engine.
4. After the engine has fully cooled down,
check the coolant level in the reserve
tank.
If the coolant level is below the “LOW”
mark, add coolant up to the “FULL” mark.
5. If there is no coolant in the reserve
tank, add coolant to the reserve tank.
Then remove the radiator cap and fill the
radiator with coolant.
If you remove the radiator cap from a hot
radiator, first wrap a thick cloth around the
radiator cap, then turn the cap counter-
clockwise slowly without pressing down
until it stops. Release the pressure from
the radiator. After the pressure has been
fully released, remove the cap by pressing
down and turning it.
Towing
WARNING
Never tow AWD models with the
front wheels raised off the ground
while the rear wheels are on the
ground, or with the rear wheels
raised off the ground while the front
wheels are on the ground. This will
cause the vehicle to spin away due
to the operation or deterioration of
the center differential.
If towing is necessary, it is best done by
your SUBARU dealer or a commercial
towing service. Observe the following
procedures for safety.
& Towing and tie-down hooks
The towing hooks should be used only in
an emergency (e.g., to free a stuck vehicle
from mud, sand or snow).
CAUTION
. Use only the specified towing
hooks and tie-down hooks. Never
use suspension parts or other
parts of the body for towing or
tie-down purposes.
. Never use the tie-down hook
closest to the muffler under the
vehicle for towing purposes.
. To prevent deformation to the
bumper and the towing hook, do
not apply excessive lateral load
to the towing hooks.
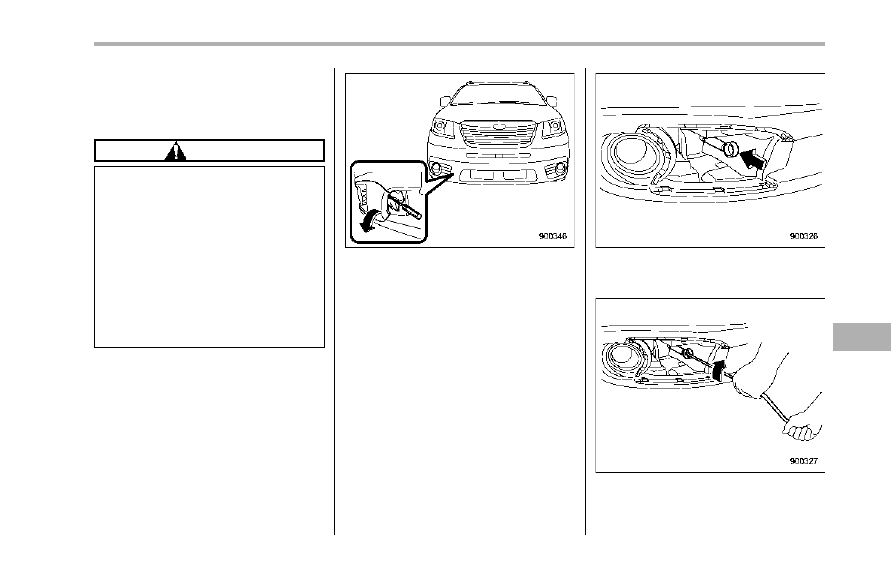
Front towing hook:
1. Take out the towing hook and screw-
driver from the tool bag. Take out the jack
handle from the cargo area.
2. Wrap a flat-head screwdriver in vinyl
tape or cloth, insert it into the gap between
the cover and the front bumper, and use it
to pry the cover open.
NOTE
. The cover is attached to the front
bumper with five lugs.
. Do not remove the cover while
holding the slit.
3. Screw the towing hook into the thread
hole until the threads can no longer be
seen.
4. Tighten the towing hook securely
using a jack handle.
In case of emergency
9-15
– CONTINUED –
9-16
In case of emergency
After towing, remove the towing hook from
the vehicle and stow it in the tool bag.
Fit the towing hook cover on the bumper.
WARNING
. Do not use the towing hook
except when towing your vehicle.
. Be sure to remove the towing
hook after towing. Leaving the
towing hook mounted on the
vehicle could interfere with prop-
er operation of the SRS airbag
system in a frontal collision.
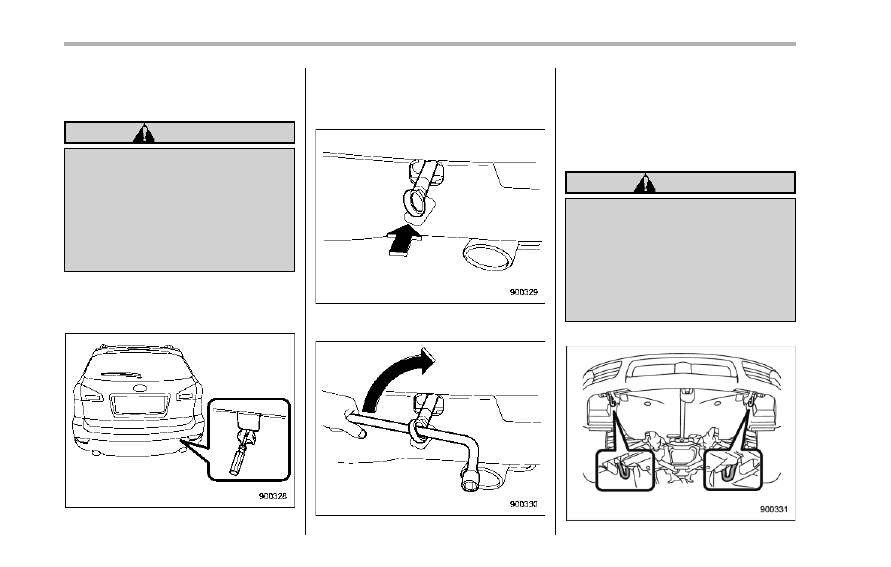
Rear towing hook:
1. Take out the towing hook, screwdriver
and wheel nut wrench from the tool bag.
2. Pry off the cover on the rear bumper
using a screwdriver, and you will find a
threaded hole for attaching the towing
hook.
3. Screw the towing hook into the thread
hole until its thread can no longer be seen.
4. Tighten the towing hook securely
using a wheel nut wrench.
After towing, remove the towing hook from
the vehicle and stow it in the tool bag.
Put the thread hole cover on the rear
bumper.
WARNING
. Do not use the towing hook
except when towing your vehicle.
. Be sure to remove the towing
hook after towing. Leaving the
towing hook mounted on the
vehicle could interfere with prop-
er operation of the SRS airbag
system in a frontal collision.
Front tie-down hooks:
The front tie-down hooks are located
between each of the front tires and the
front bumper.
Rear tie-down hooks:
The rear tie-down hooks are located near
each of the jack-up reinforcements.
WARNING
Use the rear tie-down hooks only for
downward anchoring. If they are
used to anchor the vehicle in any
other direction, cables may slip off
the hooks, possibly causing a dan-
gerous situation.
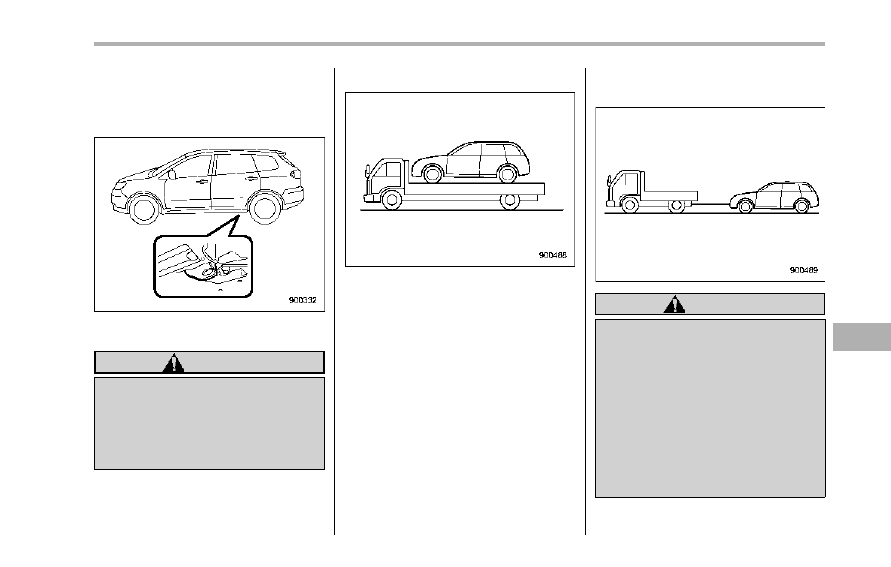
& Using a flat-bed truck
This is the best way to transport your
vehicle. Use the following procedures to
ensure safe transportation.
1. Shift the select lever into the “P”
position.
2. Press the parking brake pedal firmly.
3. Secure the vehicle onto the carrier
properly with safety chains. Each safety
chain should be equally tightened and
care must be taken not to pull the chains
so tightly that the suspension bottoms out.
& Towing with all wheels on the
ground
WARNING
. Never turn the ignition switch to
the “LOCK” position while the
vehicle is being towed because
the steering wheel and the direc-
tion of the wheels will be locked.
. Remember that the brake booster
and power steering do not func-
tion when the engine is not
running. Because the engine is
turned off, it will take greater
effort to operate the brake pedal
and steering wheel.
In case of emergency
9-17
– CONTINUED –
9-18
In case of emergency
CAUTION
. If transmission failure occurs,
transport your vehicle on a flat-
bed truck.
. Do not run the engine while being
towed using this method. Trans-
mission damage could result if
the vehicle is towed with the
engine running.
. The traveling speed must be
limited to less than 20 mph (30
km/h) and the traveling distance
to less than 31 miles (50 km). For
greater speeds and distances,
transport your vehicle on a flat-
bed truck.
1. Release the parking brake and put the
transmission in neutral.
2. The ignition switch should be in the
“Acc” position while the vehicle is being
towed.
3. Take up slack in the towline slowly to
prevent damage to the vehicle.
Rear gate – if the rear gate
cannot be unlocked
In the event that you cannot unlock the
rear gate by operating the power door
locking switches or the remote keyless
entry system, you can unlock it from inside
the cargo area.
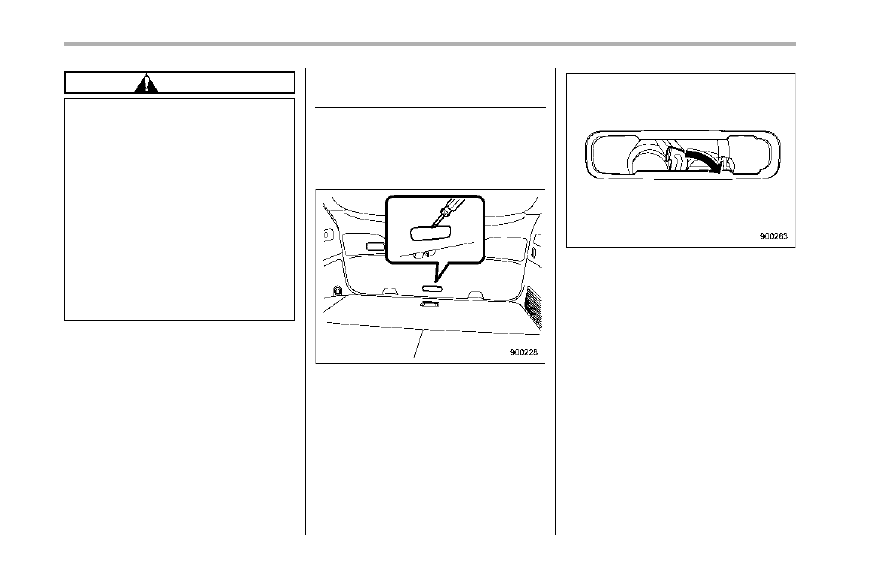
1. Remove the access cover at the
bottom-center of the rear gate trim using
flat-head screwdriver.
2. Locate the rear gate lock release lever
behind the rear gate trim panel.
3. Unlock the rear gate by moving the
lever to the right.
4. Open the rear gate from outside by
raising the rear gate handle.
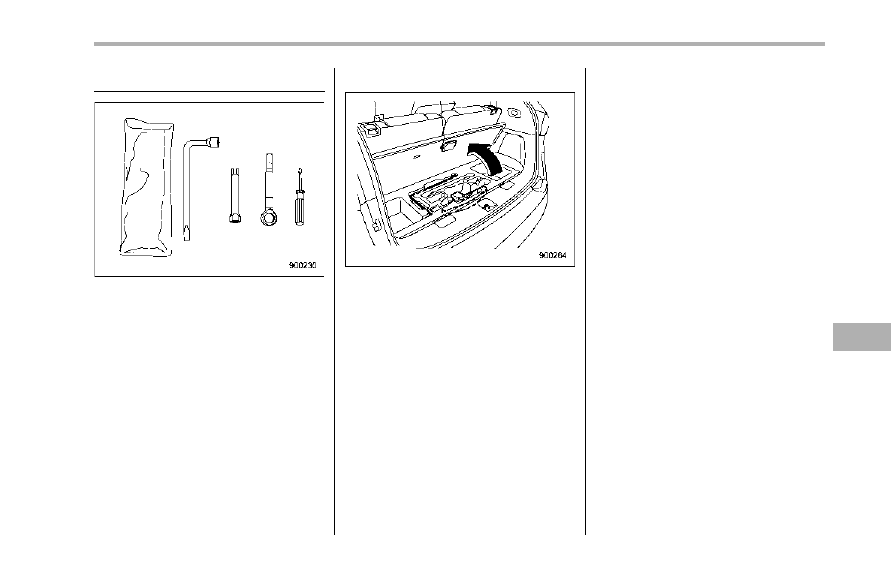
Maintenance tools
Your vehicle is equipped with the following
maintenance tools.
Screwdriver
Towing hook (eye bolt) (if equipped)
Wheel nut wrench
Extension
& Jack and jack handle
The jack and jack handle is stored under
the cargo area.
For how to use the jack, refer to “Flat tires”
F9-6.
In case of emergency
9-19
— — — — — — — — — — — — — — — — — — — — — — — — — — — — — — — — — — — — — — — —
— — — — — — — — — — — — — — — — — — — — — — — — — — — — — — — — — — — — — — — —
— — — — — — — — — — — — — — — — — — — — — — — — — — — — — — — — — — — — — — — —
— — — — — — — — — — — — — — — — — — — — — — — — — — — — — — — — — — — — — — — —
— — — — — — — — — — — — — — — — — — — — — — — — — — — — — — — — — — — — — — — —
— — — — — — — — — — — — — — — — — — — — — — — — — — — — — — — — — — — — — — — —
— — — — — — — — — — — — — — — — — — — — — — — — — — — — — — — — — — — — — — — —
— — — — — — — — — — — — — — — — — — — — — — — — — — — — — — — — — — — — — — — —
— — — — — — — — — — — — — — — — — — — — — — — — — — — — — — — — — — — — — — — —
— — — — — — — — — — — — — — — — — — — — — — — — — — — — — — — — — — — — — — — —
— — — — — — — — — — — — — — — — — — — — — — — — — — — — — — — — — — — — — — — —
— — — — — — — — — — — — — — — — — — — — — — — — — — — — — — — — — — — — — — — —
— — — — — — — — — — — — — — — — — — — — — — — — — — — — — — — — — — — — — — — —
Нет комментариевНе стесняйтесь поделиться с нами вашим ценным мнением.
Текст