Subaru Forester (2019 year). Instruction — part 16
(250,1)
北米Model "A8240BE-B" EDITED: 2018/ 7/ 5
.
Canada-spec. models
HomeLink
®
and the HomeLink
®
house are
registered trademarks of Gentex Corpora-
tion.
WARNING
.
W h e n
p r o g r a m m i n g
t h e
HomeLink
®
Wireless Control Sys-
tem, you may be operating a
garage door opener or other
device. Make sure that people
and objects are out of the way of
the garage door or other device
to prevent potential harm or da-
mage.
.
Do not use the HomeLink
®
Wire-
less Control System with a gar-
age door opener that lacks the
safety stop and reverse feature
as required by applicable safety
standards. A garage door opener
which cannot detect an object,
signaling the door to stop and
reverse, does not meet these
safety standards. Using a garage
door opener without these fea-
tures increases risk of serious
injury or death. For more infor-
mation, consult the HomeLink
®
website at www.homelink.com or
call 1-800-355-3515.
&
Outside mirrors
!
Convex mirror (passenger side)
WARNING
Objects look smaller in a convex
mirror and farther away than when
viewed in a flat mirror. Do not use the
convex mirror to judge the distance
of vehicles behind you when chan-
ging lanes. Use the inside mirror (or
glance backwards) to determine the
actual size and distance of objects
that you view in convex mirror.
Mirrors
248
(251,1)
北米Model "A8240BE-B" EDITED: 2018/ 7/ 5
!
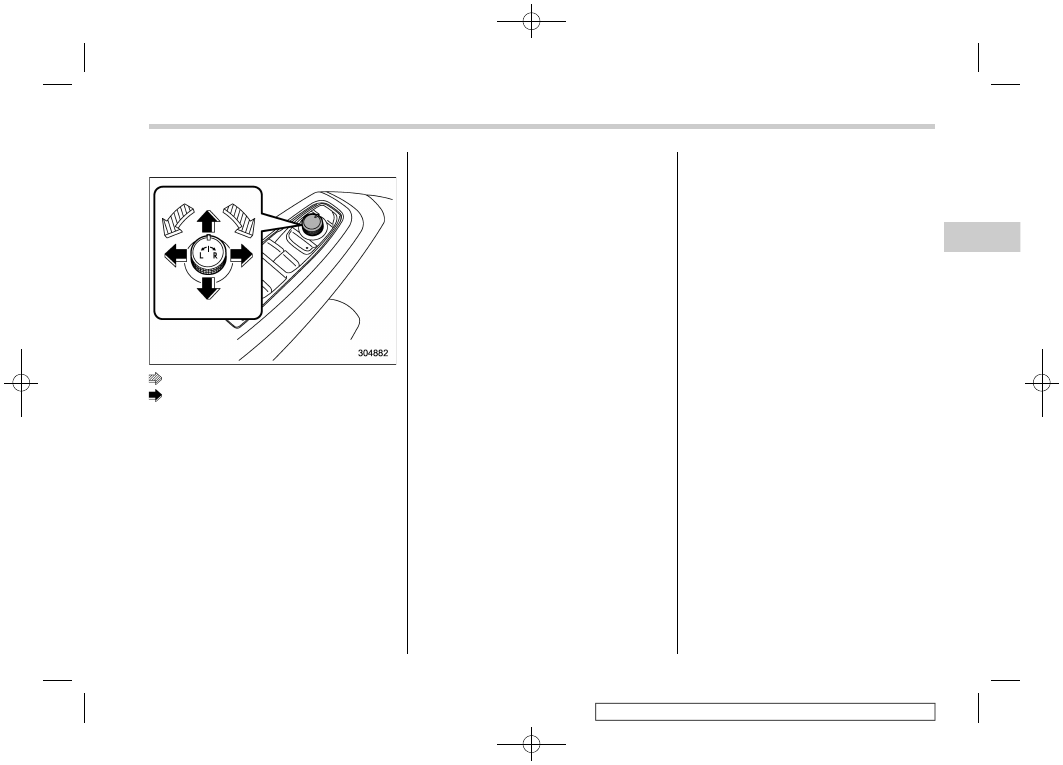
Remote control mirror switch
: Select side to adjust
: Direction control
The remote control mirrors operate only
when the ignition switch is in the “ON” or
“ACC” position.
1. Turn the control switch to the side that
you want to adjust. “L” is for the left mirror,
“R” is for the right mirror.
2. Move the control switch in the direction
you want to move the mirror.
3. Return the control switch to the neutral
position to prevent unintentional opera-
tion.
The mirrors can also be adjusted manu-
ally.
!
Reverse tilt-down feature (if
equipped)
When backing up the vehicle, the front
passenger’s side outside mirrors will turn
downward automatically to provide better
rear visibility.
1. Push the ignition switch to the ON
position.
2. Move the shift lever to the R (Reverse)
position.
3. The outside mirror surface moves
downward.
The outside mirror surface will return to its
original position when the following condi-
tion are met.
.
After approximately 9 seconds from the
shift lever is moved to any position other
than R (Reverse).
.
The ignition switch is turned to the
“OFF” position.
NOTE
.
The operational/non-operational
setting can be changed by operating
the combination meter display (color
LCD). For details, refer to “Vehicle
Setting” FP196.
.
The setting of the right and left side
mirror/right side mirror operation can
be changed by SUBARU dealer. Con-
tact your SUBARU dealer for details.
Mirrors
249
3
Instruments
and
controls
(252,1)
北米Model "A8240BE-B" EDITED: 2018/ 7/ 5
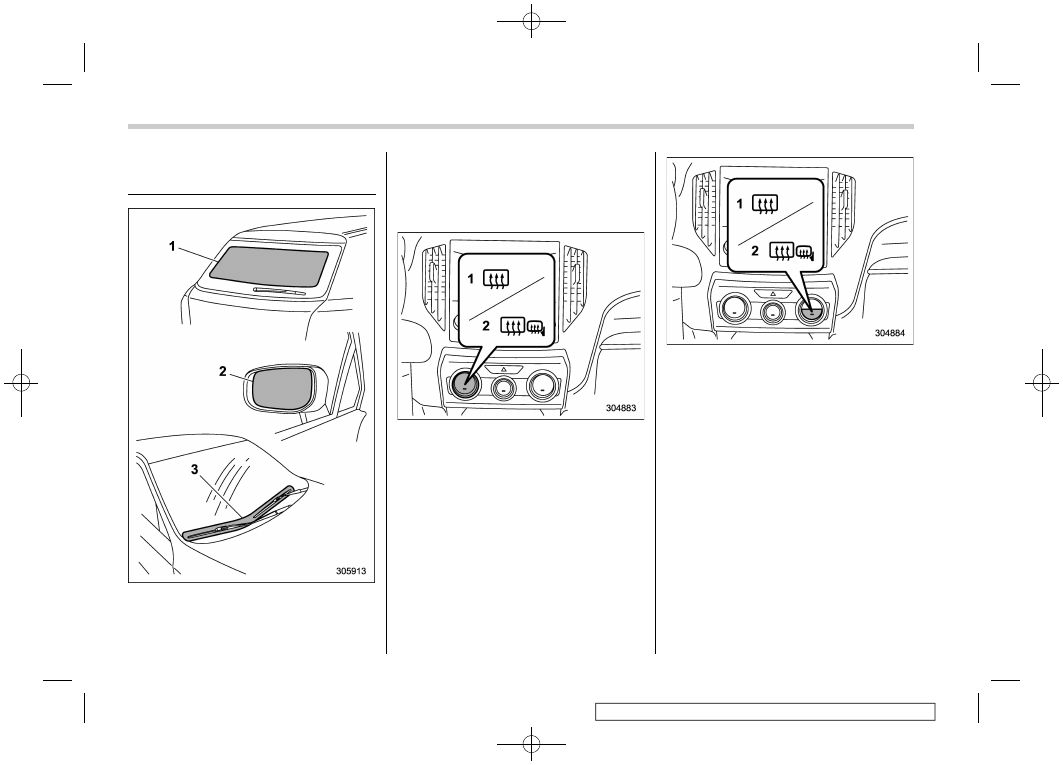
3-18. Defogger and deicer (if
equipped)
1)
Rear window defogger
2)
Outside mirror defogger (if equipped)
3)
Windshield wiper deicer (if equipped)
The vehicle is equipped with the defogger
and the deicer (if equipped) system. The
defogger and deicer system is activated
only when the ignition switch is in the “ON”
position.
Climate control panel type A
1)
Models without outside mirror defogger
2)
Models with outside mirror defogger
Climate control panel type B and C
1)
Models without outside mirror defogger
2)
Models with outside mirror defogger
To activate simultaneously the rear win-
dow defogger, outside mirror defogger (if
equipped) and windshield wiper deicer (if
equipped), press the control switch that is
located on the climate control panel. The
indicator light on the control switch illumi-
nates while the defogger and deicer
system is activated.
To turn them off, press the control switch
again. They also turn off when the ignition
switch is turned to the “ACC” or “LOCK”/
“OFF” position.
The defogger and deicer system will
automatically shut off after approximately
15 minutes. If the rear window and the
Defogger and deicer
250
(253,1)
北米Model "A8240BE-B" EDITED: 2018/ 7/ 5
outside mirrors have been cleared and the
windshield blade rubbers have been
deiced completely before that time, press
the control switch to turn them off.
It is possible for the defogger and deicer
system to be set to continuous operation
mode by a SUBARU dealer. Consult your
SUBARU dealer for details. Also, for
models with a combination meter display
(color LCD), it is possible to set the
defogger and deicer system for the con-
tinuous operation mode. For details, refer
to “Vehicle Setting” FP196.
CAUTION
.
To prevent the battery from being
discharged, do not operate the
defogger and deicer system con-
tinuously for any longer than
necessary.
.
Do not use sharp instruments or
window cleaner containing abra-
sives to clean the inner surface of
the rear window. They may da-
mage the conductors printed on
the window.
NOTE
.
Turn on the defogger and deicer
system if the wipers are frozen to the
windshield.
.
If the windshield is covered with
snow, remove the snow so that the
windshield wiper deicer works effec-
tively.
.
While the defogger and deicer sys-
tem is in the continuous operation
mode:
– If the vehicle speed remains at 9
mph (15 km/h) or lower for 15
minutes, the windshield wiper dei-
cer system automatically stops op-
erating. However, the rear window
defogger system and outside mirror
defogger system maintain continu-
ous operation in this condition.
– If the vehicle battery voltage
drops below the permissible level,
continuous operation of the defog-
ger system and deicer system is
canceled and the system stops
operating.
3-19. Tilt/telescopic steering
wheel
WARNING
.
Do not adjust the steering wheel
tilt/telescopic position while driv-
ing. This may cause loss of
vehicle control and result in per-
sonal injury.
.
If the lever cannot be raised to the
fixed position, adjust the steering
wheel again. It is dangerous to
drive without locking the steering
wheel. This may cause loss of
vehicle control and result in per-
sonal injury.
– CONTINUED –
Tilt/telescopic steering wheel
251
3
Instruments
and
controls
(254,1)
北米Model "A8240BE-B" EDITED: 2018/ 7/ 5
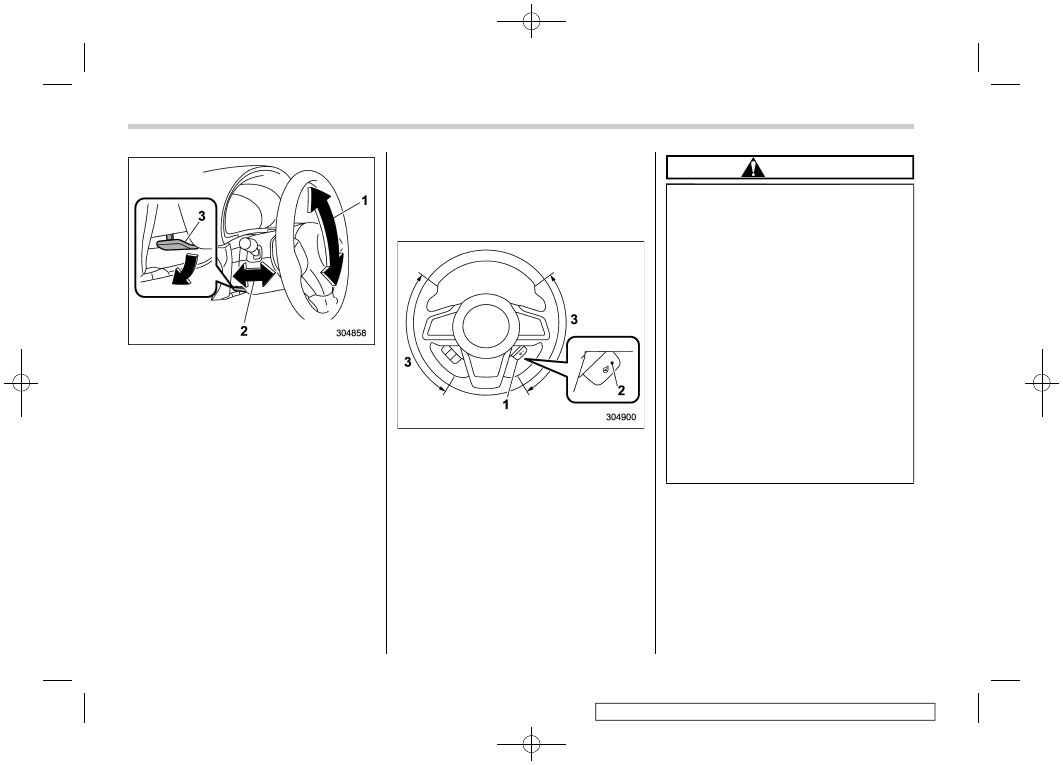
1)
Tilt adjustment
2)
Telescopic adjustment
3)
Tilt/telescopic lock lever
1. Adjust the seat position. Refer to
“Seats” FP32.
2. Pull the tilt/telescopic lock lever down.
3. Move the steering wheel to the desired
level.
4. Pull the lever up to lock the steering
wheel in place.
5. Make sure that the steering wheel is
securely locked by moving it up and down,
and forward and backward.
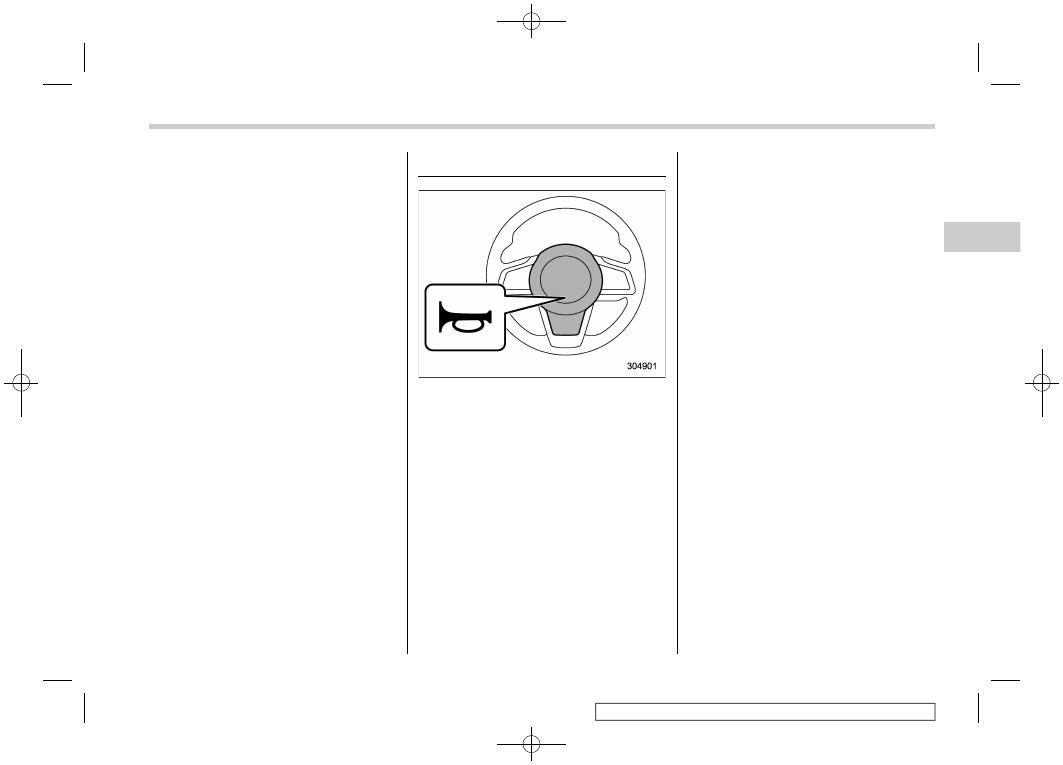
&
Heated Steering Wheel sys-
tem (if equipped)
The Heated Steering Wheel system
warms the steering wheel at a constant
temperature.
1)
Heated Steering Wheel switch
2)
Indicator light
3)
Heated area
To turn on the Heated Steering Wheel
system, pull the Heated Steering Wheel
switch when the ignition switch is in the
“ON” or “ACC” position. Then the steering
wheel will be warmed and the indicator
light on the switch will illuminate. To turn off
the Heated Steering Wheel system, pull
the switch again. Then the indicator light
will turn off.
CAUTION
.
Use the Heated Steering Wheel
system with the engine running.
Otherwise, the battery voltage
may drop below the permissible
level and it may not be possible to
start the engine.
.
There is a possibility that people
with delicate skin may suffer
slight burns even at low tempera-
tures if they use the Heated
Steering Wheel for a long period
of time. When using the Heated
Steering Wheel, always be sure to
warn the persons concerned.
.
Do not cover the Heated Steering
Wheel with an object such as a
steering wheel cover. Doing so
may cause the Heated Steering
Wheel to overheat.
Tilt/telescopic steering wheel
252
(255,1)
北米Model "A8240BE-B" EDITED: 2018/ 7/ 5
NOTE
.
If the surface temperature of the
steering wheel is approximately above
1048F (408C) when the switch is turned
on, the system will not heat the steering
wheel. Then, the indicator light will
continue to illuminate.
.
The Heated Steering Wheel system
will automatically turn off approxi-
mately 30 minutes after the system
has been turned on.
3-20. Horn
To sound the horn, push the horn pad.
Horn
253
3
Instruments
and
controls
(256,1)
北米Model "A8240BE-B" EDITED: 2018/ 7/ 5
— — — — — — — — — — — — — — — — — — — — — — — — — — — — — — — — — — — — — — — —
— — — — — — — — — — — — — — — — — — — — — — — — — — — — — — — — — — — — — — — —
— — — — — — — — — — — — — — — — — — — — — — — — — — — — — — — — — — — — — — — —
— — — — — — — — — — — — — — — — — — — — — — — — — — — — — — — — — — — — — — — —
— — — — — — — — — — — — — — — — — — — — — — — — — — — — — — — — — — — — — — — —
— — — — — — — — — — — — — — — — — — — — — — — — — — — — — — — — — — — — — — — —
— — — — — — — — — — — — — — — — — — — — — — — — — — — — — — — — — — — — — — — —
— — — — — — — — — — — — — — — — — — — — — — — — — — — — — — — — — — — — — — — —
— — — — — — — — — — — — — — — — — — — — — — — — — — — — — — — — — — — — — — — —
— — — — — — — — — — — — — — — — — — — — — — — — — — — — — — — — — — — — — — — —
— — — — — — — — — — — — — — — — — — — — — — — — — — — — — — — — — — — — — — — —
— — — — — — — — — — — — — — — — — — — — — — — — — — — — — — — — — — — — — — — —
— — — — — — — — — — — — — — — — — — — — — — — — — — — — — — — — — — — — — — — —
(257,1)
北米Model "A8240BE-B" EDITED: 2018/ 7/ 5
4-1. Ventilator control . . . . . . . . . . . 256
Center ventilators . . . . . . . . . . . ... 256
Side ventilators . . . . . . . . . . . . .. 256
Rear ventilators . . . . . . . . . . . . .. 256
4-2. Climate control panel . . . . . . . . . . 257
Type A. . . . . . . . . . . . . . . . 258
Type B. . . . . . . . . . . . . . . . 259
Type C. . . . . . . . . . . . . . . . 260
4-3. Automatic climate control operation. . . . 261
Sensors. . . . . . . . . . . . . . . .. 261
Automatic climate control customization. . . . 262
4-4. Instruction climate control operation for front
climate control panel . . . . . . . . . 263
Airflow mode selection . . . . . . . . . ... 263
MAX A/C mode . . . . . . . . . . . . ... 264
Temperature control . . . . . . . . . . ... 264
Fan speed control. . . . . . . . . . . ... 264
Air conditioner control. . . . . . . . . . 264
Air inlet selection . . . . . . . . . . . ... 265
To turn off the climate control system . . . . 265
4-5. Defrosting . . . . . . . . . . . . . . 265
4-6. Operating tips for heater and air
conditioner. . . . . . . . . . . . . .266
Cleaning ventilation grille . . . . . . . . ... 266
Efficient cooling after parking in direct
sunlight . . . . . . . . . . . . . . ... 266
Lubrication oil circulation in the refrigerant
circuit . . . . . . . . . . . . . . . .. 266
Checking air conditioning system before
summer season . . . . . . . . . . . ... 266
Cooling and dehumidifying in high humidity
and low temperature weather conditions . . .. 267
Air conditioner compressor shut-off when
engine is heavily loaded. . . . . . . . ... 267
Refrigerant for your climate control system . . 267
4-7. Air filtration system. . . . . . . . . . .267
Replacing a cabin air filter. . . . . . . . .. 268
Climate control
4
(258,1)
北米Model "A8240BE-B" EDITED: 2018/ 7/ 5
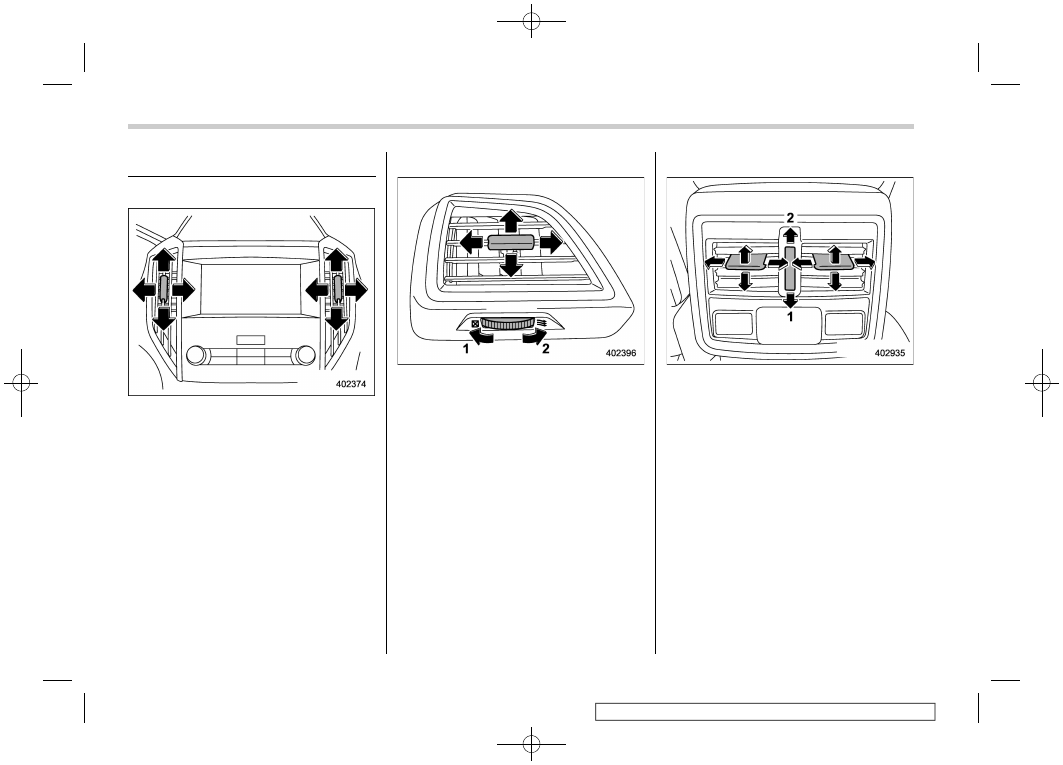
4-1. Ventilator control
&
Center ventilators
Center ventilators
To adjust the airflow direction, move the
tab. To close the ventilator, move the tab all
the way down.
&
Side ventilators
Side ventilators
1)
Close
2)
Open
To adjust the flow direction, move the tab.
&
Rear ventilators
Rear ventilators
1)
Close
2)
Open
To adjust the flow direction, move the tab.
Ventilator control
256
(259,1)
北米Model "A8240BE-B" EDITED: 2018/ 7/ 5
4-2. Climate control panel
WARNING
.
The cooling function operates
only when the engine is running.
.
Do not leave children or adults
who would normally require the
support of others alone in your
vehicle. Pets should not be left
alone either. On hot, sunny days,
temperatures in a closed vehicle
could quickly become high en-
ough to cause severe or possibly
fatal injuries to people or ani-
mals.
– CONTINUED –
Climate control panel
257
4
Climate
control

(260,1)
北米Model "A8240BE-B" EDITED: 2018/ 7/ 5
&
Type A
1)
Airflow mode selection dial (Refer to
“Airflow mode selection” FP263.)
2)
Fan speed control dial (Refer to “Fan
speed control” FP264.)
3)
Temperature control dial (Refer to “Tem-
perature control” FP264.)
4)
Air conditioner button (Refer to “Air
conditioner control” FP264.)
5)
Air inlet selection button (Refer to “Air
inlet selection” FP265.)
6)
Rear window defogger button and out-
side mirror defogger button (if equipped)
(Refer to “Defogger and deicer” FP250.)
NOTE
The controllable temperature range
may vary depending on the regional
specifications of the vehicle.
Climate control panel
258
(261,1)
北米Model "A8240BE-B" EDITED: 2018/ 7/ 5
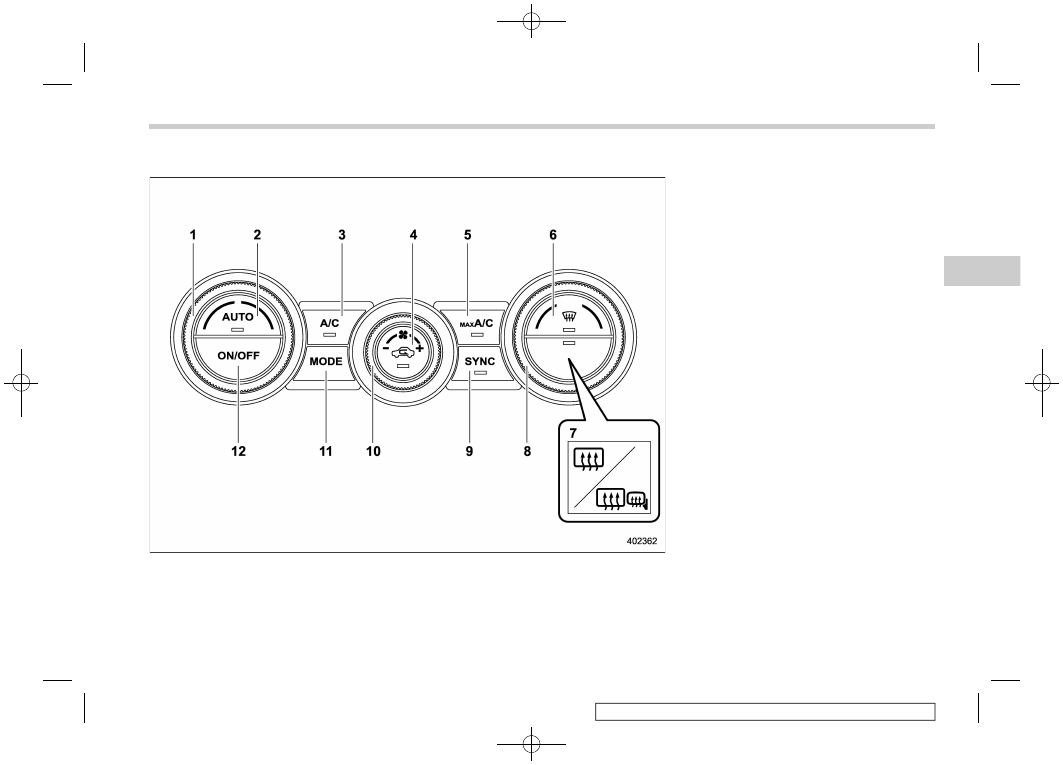
&
Type B
1)
Driver’s side temperature control dial
(Refer to “Automatic climate control
operation” FP261 and/or “Temperature
control” FP264.)
2)
AUTO button (Refer to “Automatic cli-
mate control operation” FP261.)
3)
Air conditioner button (Refer to “Air
conditioner control” FP264.)
4)
Air inlet selection button (Refer to “Air
inlet selection” FP265.)
5)
MAX A/C button (Refer to “MAX A/C
mode” FP264.)
6)
Defroster button (Refer to “Defrosting”
FP265.)
7)
Rear window defogger button and out-
side mirror defogger button (if equipped)
(Refer to “Defogger and deicer” FP250.)
8)
Passenger’s side temperature control
dial (Refer to “Temperature control”
FP264.)
9)
SYNC button (Refer to “SYNC mode”
FP264.)
10) Fan speed control dial (Refer to “Fan
11) Airflow mode selection button (Refer to
“Airflow mode selection” FP263.)
12) ON/OFF button (Refer to “Automatic
climate control operation” FP261.)
NOTE
The climate control screen is displayed
on the multi-function display (color
LCD). Refer to “Climate control screen”
FP206.
– CONTINUED –
Climate control panel
259
4
Climate
control
(262,1)
北米Model "A8240BE-B" EDITED: 2018/ 7/ 6
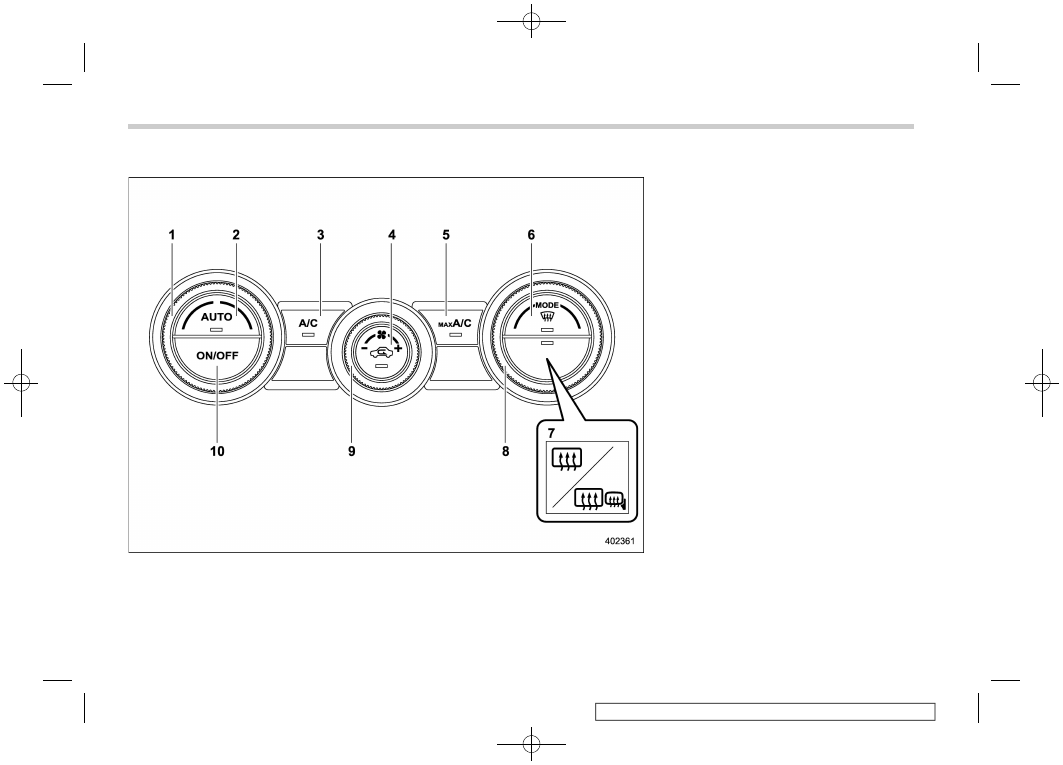
&
Type C
1)
Temperature control dial (Refer to “Auto-
matic climate control operation” FP261
and/or “Temperature control” FP264.)
2)
AUTO button (Refer to “Automatic cli-
mate control operation” FP261.)
3)
Air conditioner button (Refer to “Air
conditioner control” FP264.)
4)
Air inlet selection button (Refer to “Air
inlet selection” FP265.)
5)
MAX A/C button (Refer to “MAX A/C
mode” FP264.)
6)
Defroster button (Refer to “Defrosting”
FP265.)
7)
Rear window defogger button and out-
side mirror defogger button (if equipped)
(Refer to “Defogger and deicer” FP250.)
8)
Airflow mode selection dial (Refer to
“Airflow mode selection” FP263.)
9)
Fan speed control dial (Refer to “Fan
speed control” FP264.)
10) ON/OFF button (Refer to “Automatic
climate control operation” FP261.)
NOTE
The climate control screen is displayed
on the multi-function display (color
LCD). Refer to “Climate control screen”
FP206.
Climate control panel
260
(263,1)
北米Model "A8240BE-B" EDITED: 2018/ 7/ 5
4-3. Automatic climate con-
trol operation
When this mode is selected, the fan speed,
airflow distribution, air-inlet control, and air
conditioner compressor operation are
automatically controlled. To activate this
mode, perform the following.
1. Press the AUTO button. The indicator
light “FULL AUTO” on the climate control
display illuminates.
2. Set the preferred temperature using
the temperature control dial.
NOTE
.
Operate the automatic climate con-
trol system when the engine is running.
.
Even when cooling is not necessary,
the air conditioner compressor will
automatically turn on if the temperature
is set much lower than the current
outlet air temperature. Even in this
case, the “A/C” indicator light on the
control panel illuminates.
.
The controllable temperature range
may vary depending on the regional
specifications of the vehicle.
.
If you operate any of the buttons on
the control panel other than the ON/
OFF button, rear window defogger
button, SYNC button and temperature
control dial(s) during FULL AUTO mode
operation, the “FULL” indicator light on
the multi-function display (color LCD)
will turn off and the “AUTO” indicator
light will remain illuminated. You can
then instructionly control the system as
desired using the button you operated.
To change the system back to the FULL
AUTO mode, press the AUTO button.
To turn off the climate control system,
press the ON/OFF button. Then the air
inlet selection will be set to the following.
.
When the air inlet selection is set to
auto mode: Outside air circulation
.
When the air inlet selection is set to
instruction mode: No change
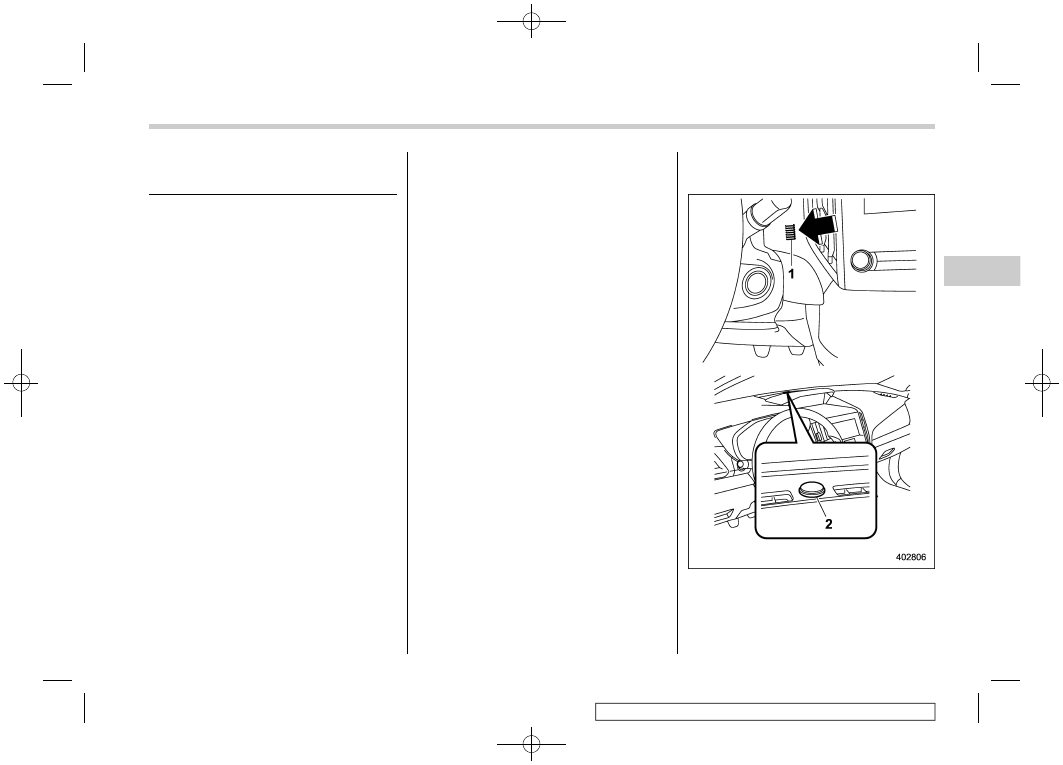
&
Sensors
The sensors are located as follows.
1)
Interior air temperature sensor
2)
Solar sensor
The automatic climate control system
employs several sensors. These sensors
– CONTINUED –
Automatic climate control operation
261
4
Climate
control
(264,1)
北米Model "A8240BE-B" EDITED: 2018/ 7/ 5
are delicate. If they are not treated properly
and become damaged, the system may
not be able to control the interior tempera-
ture correctly. To avoid damaging the
sensors, observe the following precau-
tions.
.
Do not subject the sensors to impact.
.
Keep water away from the sensors.
.
Do not cover the sensors.
&
Automatic climate control
customization
The automatic climate control can be
customized on the multi-function display.
Refer to “Setting screen” FP212 for
setting methods.
!
Mode setting
The climate control can be set in the
following mode.
!
Normal mode
Use this mode for normal climate control.
!
Mild mode
Use this mode for the mild airflow mode.
!
Power mode
Use this mode when climate control needs
to be operate to increase the comfort
quickly. This will reduce the operation
range of the Auto Start Stop function.
!
ECO mode
Use this mode when fuel efficiency is
prioritized over comfort. This increases
the range of the Auto Start Stop operation.
!
Occupant detection
This mode switches the climate control
operation according to the number of
passengers.
!
Front occupant detection
This mode detects passenger by the
occupant detection system sensor to set
the front passenger setting temperature
OFF when there is no front passenger in
the seat. The setting temperature will be
changed to the driver’s setting tempera-
ture automatically.
NOTE
The occupant detection system sensor
may not detect passengers because of
their posture, physical size or weight.
The front occupant detection function
may not operate properly.
!
Rear occupant detection
This function judges if there are any
passenger in the rear seat by the opening
and closing record of rear doors. If there
are no passenger in the rear seat, the
airflow of the climate control is reduced
and priority is on the front seat passenger.
NOTE
If the system cannot judge correctly if
there are passengers or not in the rear
seat by the opening and closing of the
rear door, such as when the doors are
opened to place some cargo in the
vehicle, the rear occupant detection
may not operate properly.
Automatic climate control operation
262
(265,1)
北米Model "A8240BE-B" EDITED: 2018/ 7/ 5
4-4. Instruction climate control
operation for front climate
control panel
&
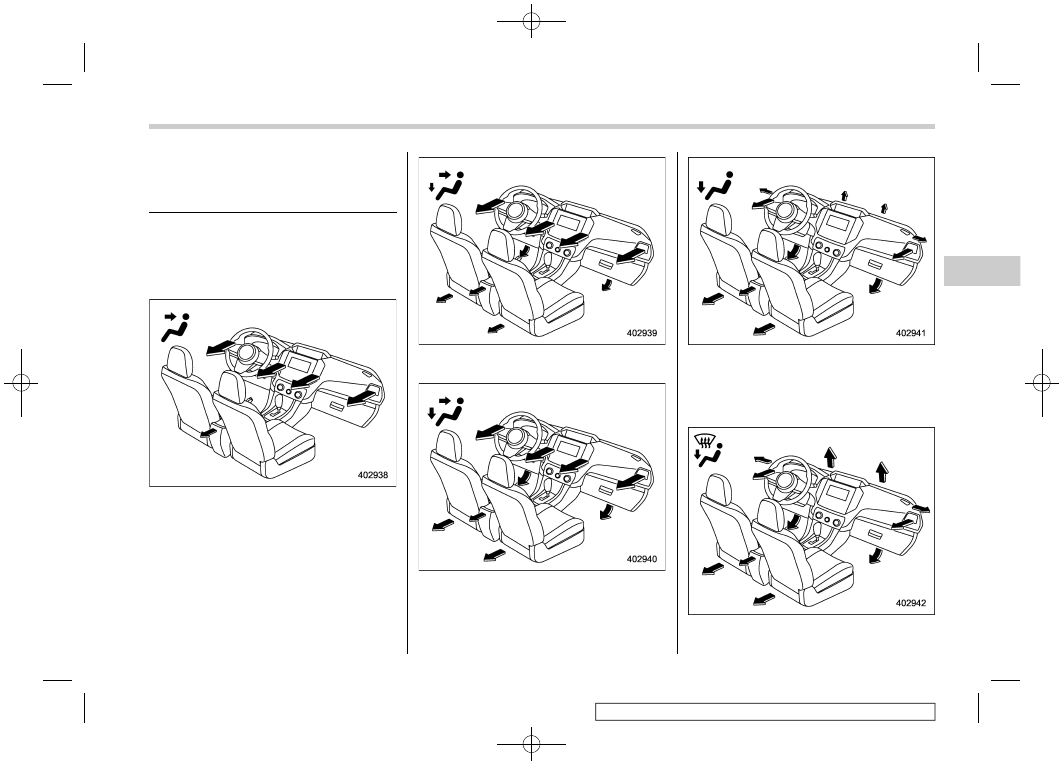
Airflow mode selection
Select the airflow mode using the airflow
mode selection button.
Airflow modes are as follows.
Ventilation: Instrument panel outlets
Ventilation 2: Instrument panel outlets
and foot outlets
Bi-level: Instrument panel outlets and foot
outlets
Heat: Foot outlets, both side outlets of the
instrument panel and some through wind-
shield defroster outlets (A small amount of
air flows to the windshield and both side
windows to prevent fogging.)
Heat-def: Windshield defroster outlets,
– CONTINUED –
Instruction climate control operation for front climate control panel
263
4
Climate
control
Нет комментариевНе стесняйтесь поделиться с нами вашим ценным мнением.
Текст