Subaru Forester (2019 year). Instruction — part 14
(218,1)
北米Model "A8240BE-B" EDITED: 2018/ 7/ 5
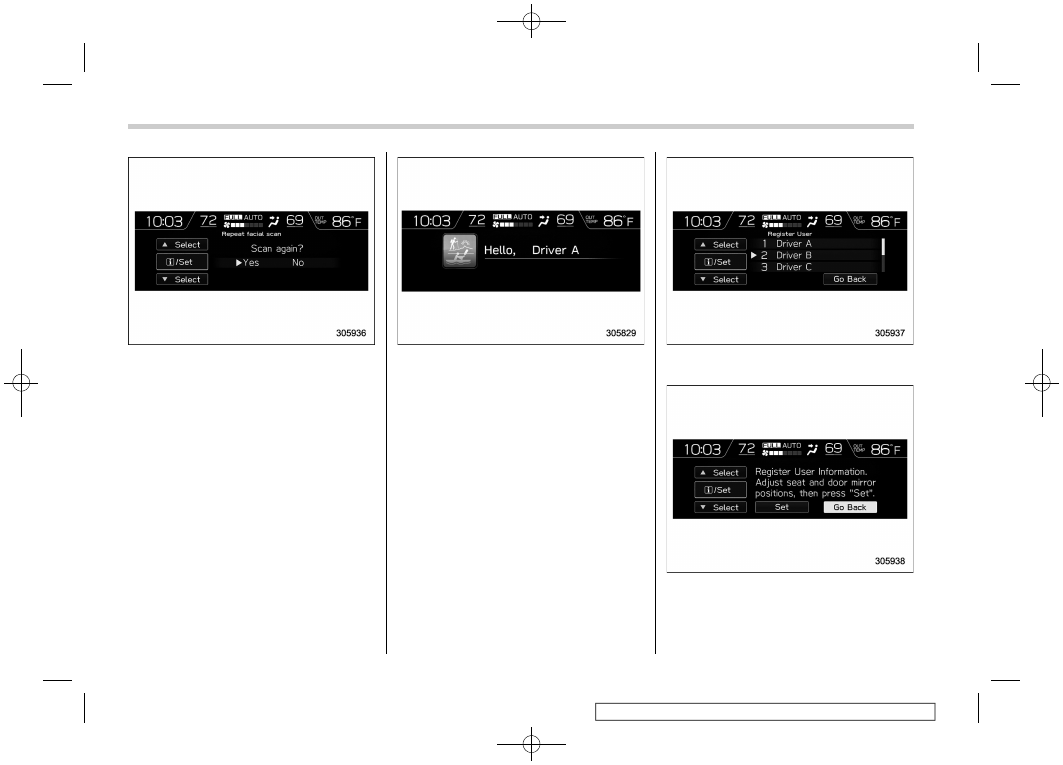
2. Select “Yes” to start the repeat facial
scan. Select “No” to return to the previous
screen.
3. While seated in the driver’s seat, face
straight forward and wait for a few mo-
ments.
When user recognition is completed, the
Hello screen appears and the screen then
switches to the basic screen associated
with the user information.
!
Register User
1. Adjust the seat position, outside mirror
angle, and reverse tilt-down outside mirror
angle so that you are seated in the correct
driving posture.
2. Select the “Register User” from the 2nd
menu in the settings screen. Refer to
“Setting screen” FP212.
3. Select from the list the number that you
want to register.
4. Select “Set” to start the registration
facial scan. Select “Go Back” to return to
the previous screen.
5. While seated in the driver’s seat, face
Multi-function display (color LCD)
216
(219,1)
北米Model "A8240BE-B" EDITED: 2018/ 7/ 5
straight forward and wait for a few mo-
ments.
When the screen changes, the registration
facial scan is completed.
NOTE
.
If the screen does not change, turn-
ing your face to look alternately at the
Multi Function Display and forward
from the driver’s seat will make recog-
nition easier.
.
If “Unable to register” appears, re-
peat the procedure beginning from step
4.
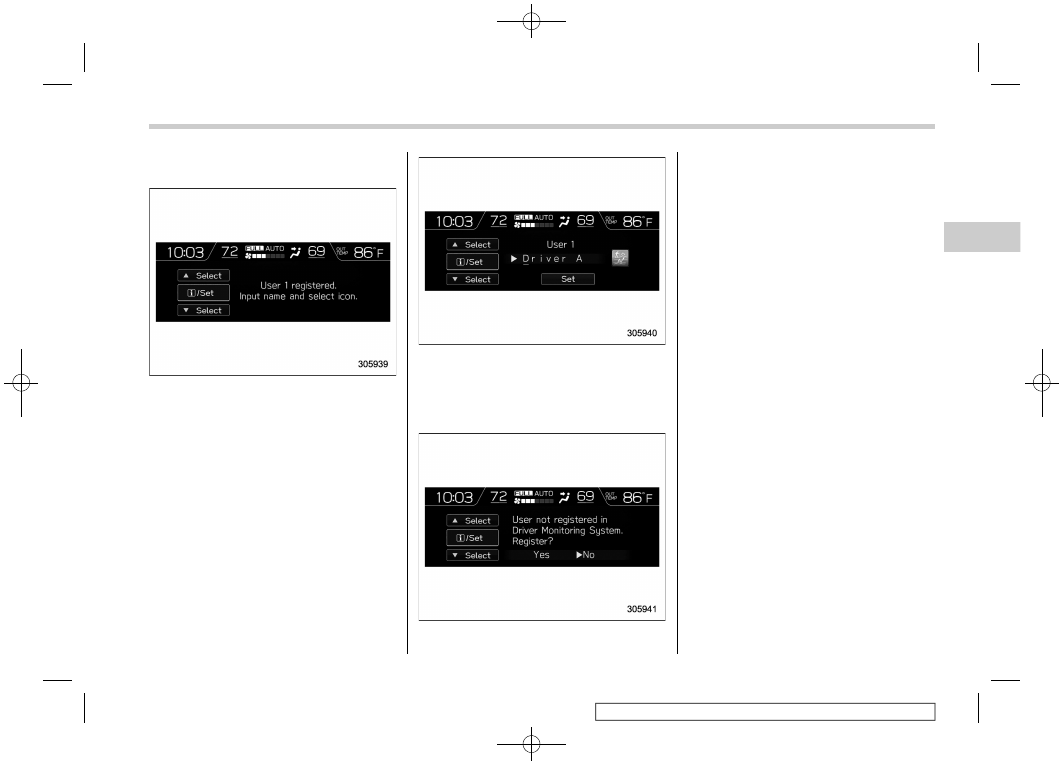
6. Enter the text using the control
switches.
7. Set the desired icons using the control
switches.
8. Select “Set” to exit the settings screen.
NOTE
.
A screen recommending user regis-
tration appears at the following times.
– When the driver has not com-
pleted user registration
– When there are 4 or fewer regis-
tered users
Operate the control switch and
select “Yes” to display the screen
in step 3. Then follow the registra-
tion procedure to complete user
registration.
.
An existing user can be overwritten
by selecting a registered number. When
a user is registered by overwriting, the
individual fuel economy data is reset.
.
When “User Recognition” is set to
OFF, user registration cannot be se-
lected.
– CONTINUED –
Multi-function display (color LCD)
217
3
Instruments
and
controls
(220,1)
北米Model "A8240BE-B" EDITED: 2018/ 7/ 5
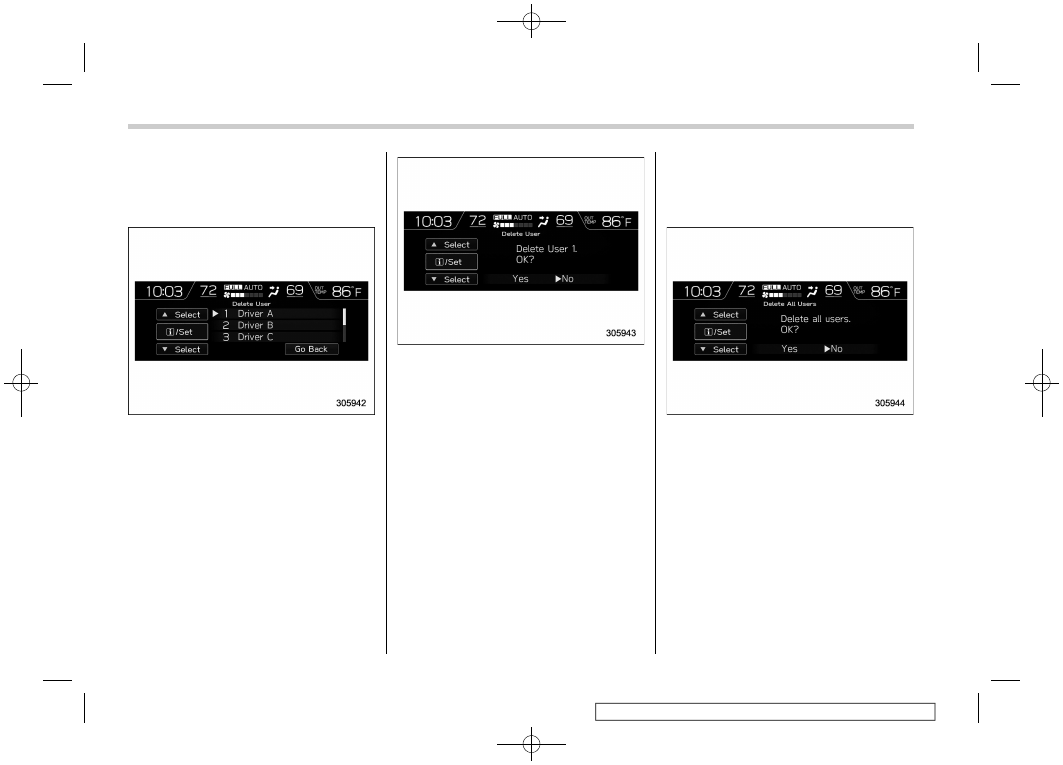
!
Delete User
1. Select “Delete User” from the 2nd
menu in the settings screen. Refer to
“Setting screen” FP212.
2. Select from the list the number that you
want to register.
3. Select “Yes” to delete the number.
Select “No” to return to the previous
screen.
!
Delete All User
1. Select “Delete All Users” from the 2nd
menu in the settings screen. Refer to
“Setting screen” FP212.
2. Select “Yes” to delete all the users.
Select “No” to return to the previous
screen.
Multi-function display (color LCD)
218
(221,1)
北米Model "A8240BE-B" EDITED: 2018/ 7/ 5
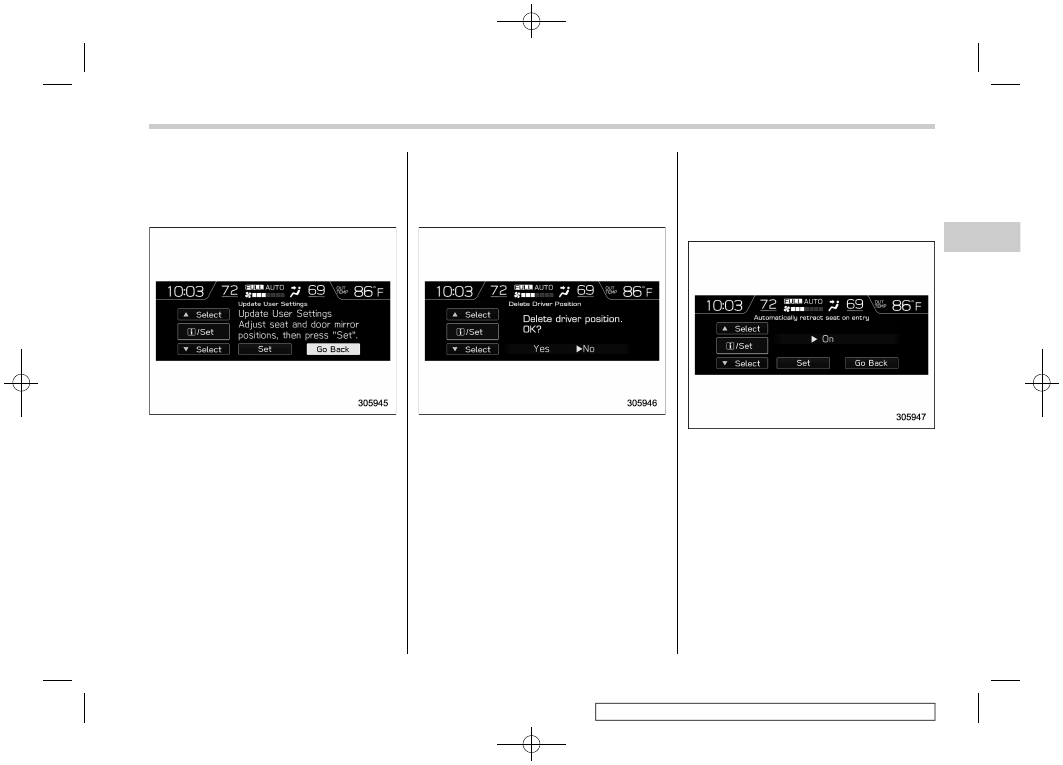
!
Update User Settings
1. Select “Update User Settings” from the
2nd menu in the settings screen. Refer to
“Setting screen” FP212.
2. Select “Set” to re-register the driver
position. Select “Go Back” to return to the
previous screen.
!
Delete Driver Position
1. Select “Delete Driver Position” from the
2nd menu in the settings screen. Refer to
“Setting screen” FP212.
2. Select “Yes” to delete the driver posi-
tion. Select “No” to return to the previous
screen.
!
Automatically retract seat on
entry setting
1. Select “Automatically retract seat on
entry” from the 2nd menu in the settings
screen. Refer to “Setting screen” FP212.
2. Select “On” or “Off” to turn the auto
entry/exit function on or off by using the
control switches.
3. Select “Set” to exit settings. Select “Go
Back” to return to the previous screen.
– CONTINUED –
Multi-function display (color LCD)
219
3
Instruments
and
controls
(222,1)
北米Model "A8240BE-B" EDITED: 2018/ 7/ 5
!
User Recognition settings
1. Select “User Recognition” from the 2nd
menu in the settings screen. Refer to
“Setting screen” FP212.
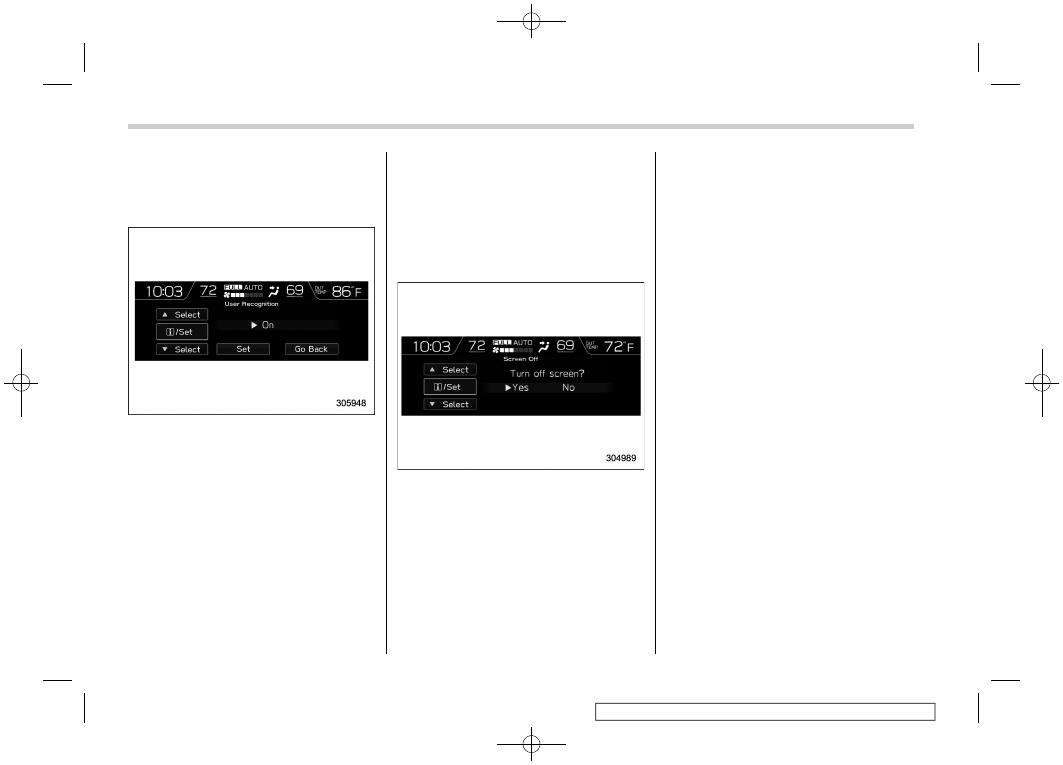
2. Select “On” or “Off” to turn the User
Recognition settings on or off by using the
control switches.
3. Select “Set” to exit settings. Select “Go
Back” to return to the previous screen.
!
Display/Beep settings
You can set the display settings and
volume settings.
!
Screen OFF setting
1. Select “Screen Off” from the 2nd menu
in setting screen. Refer to “Setting screen”
FP212.
2. Select “Yes” to turn off the screen.
Select “No” to return to the previous
screen.
Restoring the screen
When the INFO button is operated after
the ignition switch is turned to the “ON” or
“ACC” position, the screen will be restored.
The screen will be restored with the basic
screen that was displayed when the
screen was turned off.
NOTE
While the screen is off, the screen
switches to the climate control screen
only when the climate control system is
operated.
Multi-function display (color LCD)
220
(223,1)
北米Model "A8240BE-B" EDITED: 2018/ 7/ 5
!
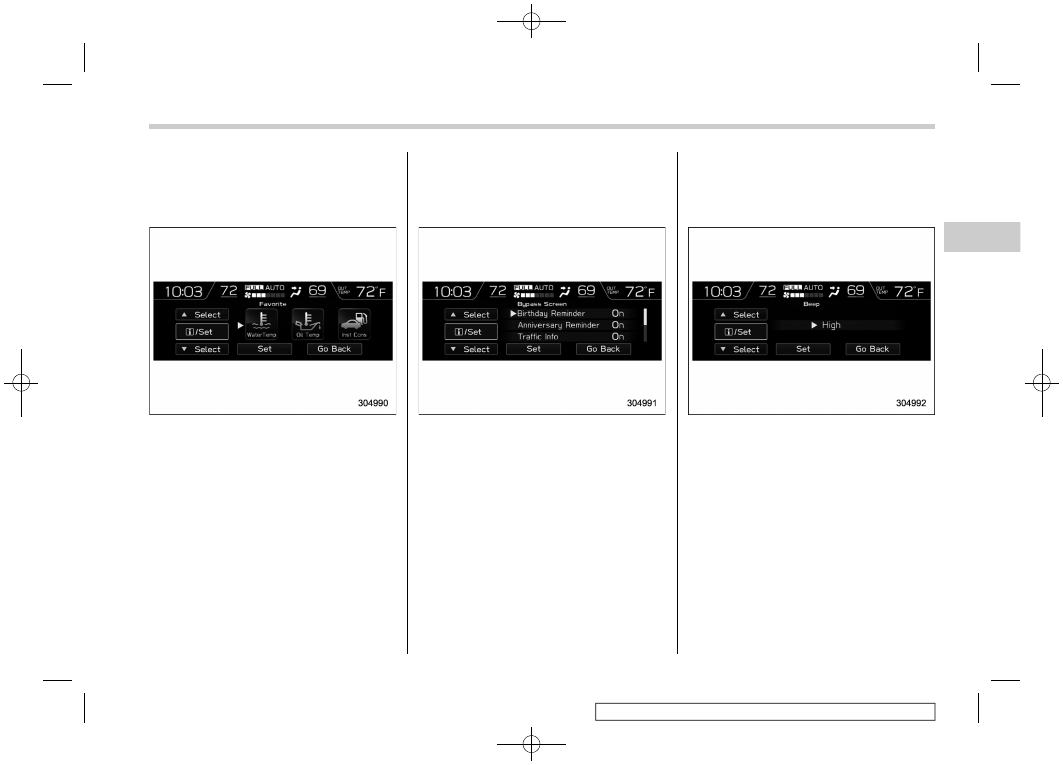
Favorite setting
1. Select the “Favorite” from the 2nd
menu in setting screen. Refer to “Setting
screen” FP212.
2. Set the desired items by using the
control switches. For details about items,
refer to “Favorite screen” FP209.
3. Select “Set” to exit settings. Select “Go
Back” to return to the previous screen
without applying the setting changes.
NOTE
.
You can display a maximum of the 3
items.
.
The same item cannot be selected
for the left, center or right location.
.
Weather information for 3 hours
later or 6 hours later can be displayed.
!
Bypass screen setting
1. Select “Bypass Screen” from the 2nd
menu in the setting screen. Refer to
“Setting screen” FP212.
2. Select “On” or “Off” to turn the display
of items on or off by using the control
switches.
3. Select “Set” to exit settings. Select “Go
Back” to return to the previous screen
without applying the setting changes.
NOTE
Traffic information setting is only dis-
played for the audio unit with SiriusXM
satellite radio.
!
Beep setting
1. Select “Beep” from the 2nd menu in the
setting screen. Refer to “Setting screen”
FP212.
2. Set the beep volume by using the
control switches.
3. Select “Set” to exit settings. Select “Go
Back” to return to the previous screen
without applying the setting changes.
– CONTINUED –
Multi-function display (color LCD)
221
3
Instruments
and
controls
(224,1)
北米Model "A8240BE-B" EDITED: 2018/ 7/ 5
!
Climate Control settings
You can set the climate control settings.
!
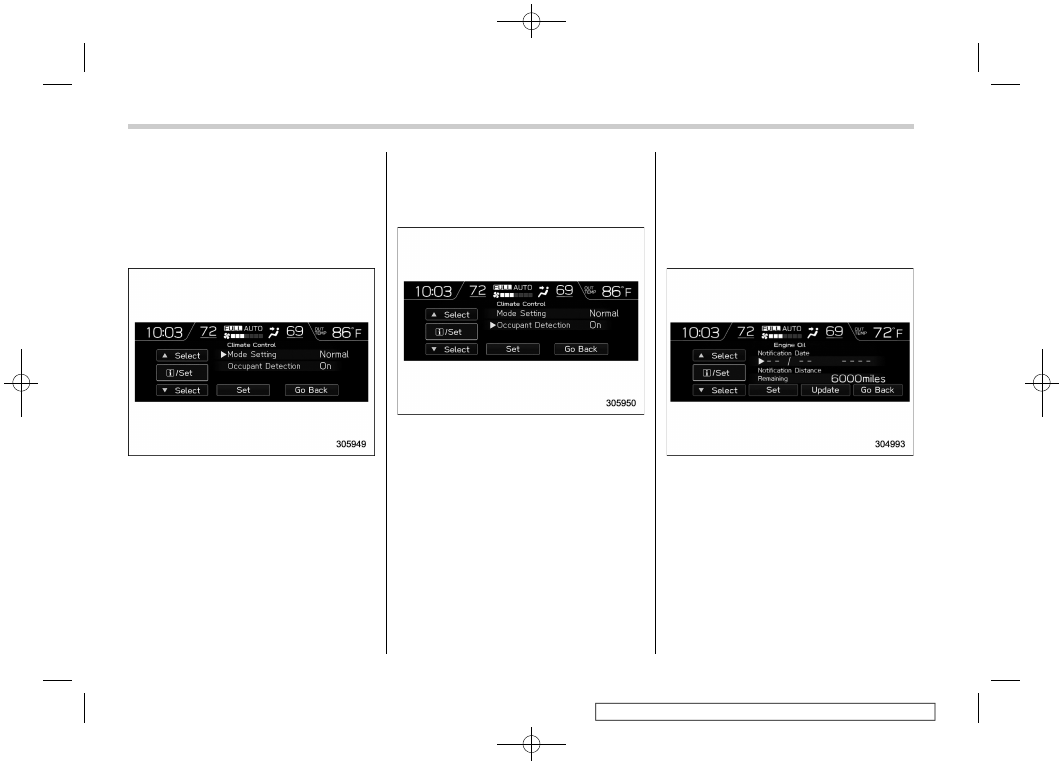
Mode setting
1. Select “Mode Setting” from the 2nd
menu in the setting screen. Refer to
“Setting screen” FP212.
2. Select “Normal”, “Mild”, “Power” or
“ECO” by using the control switches. For
details about “Mode setting”, refer to
“Automatic climate control customization”
FP262.
3. Select “Set” to exit settings. Select “Go
Back” to return to the previous screen
without applying the setting changes.
!
Occupant detection settings
1. Select “Occupant Detection” from the
2nd menu in the setting screen. Refer to
“Setting screen” FP212.
2. Select on or off to turn the occupant
detection on or off by using the control
switches.
3. Select “Set” to exit settings. Select “Go
Back” to return to the previous screen
without applying the setting changes.
!
Maintenance settings
You can set maintenance reminders.
!
Engine oil setting
1. Select “Engine Oil” from the 2nd menu
in the setting screen. Refer to “Setting
screen” FP212.
2. Set the date and distance of the
reminder by using the control switches.
3. Select “Set” to exit settings. Select
“Update” to change the notification dis-
tance to the default value. Select “Go
Back” to return to the previous screen
without applying the setting changes.
Multi-function display (color LCD)
222
(225,1)
北米Model "A8240BE-B" EDITED: 2018/ 7/ 5
NOTE
.
The reminder will be displayed by
either date or distance in accordance
with the setting.
.
Even when either “Day” or “Dis-
tance” are displayed as “_ _” a pop-up
screen will appear.
.
The reminder will be displayed until
either of the following conditions is
satisfied.
– The period of time passed after
the registered notification date is 15
days or more.
– The total distance driven after the
registered notification distance is
approximately 311 miles (500 km) or
more.
!
Oil filter setting
The setting procedure is the same as
“Engine oil setting” FP222, but select the
“Oil Filter” item in step 1.
!
Tires setting
The setting procedure is the same as
“Engine oil setting” FP222, but select the
“Tires” item in step 1.
!
Maintenance schedule setting
The setting procedure is the same as
“Engine oil setting” FP222, but select the
“Maintenance Schedule” item in step 1.
!
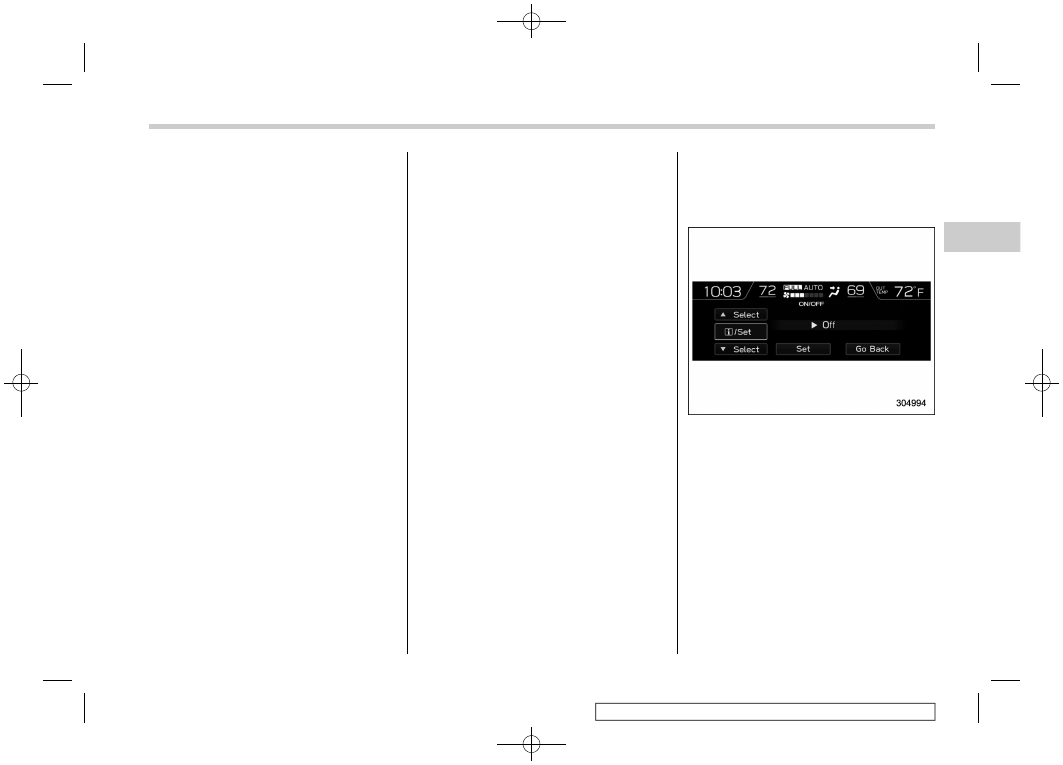
On/Off setting
1. Select “On/Off” from the 2nd menu on
the setting screen. Refer to “Setting
screen” FP212.
2. Select “On” or “Off” to turn the opening
screen on or off by using the control
switches.
3. Select “Set” to exit settings. Select “Go
Back” to return to the previous screen
without applying the setting changes.
– CONTINUED –
Multi-function display (color LCD)
223
3
Instruments
and
controls
(226,1)
北米Model "A8240BE-B" EDITED: 2018/ 7/ 5
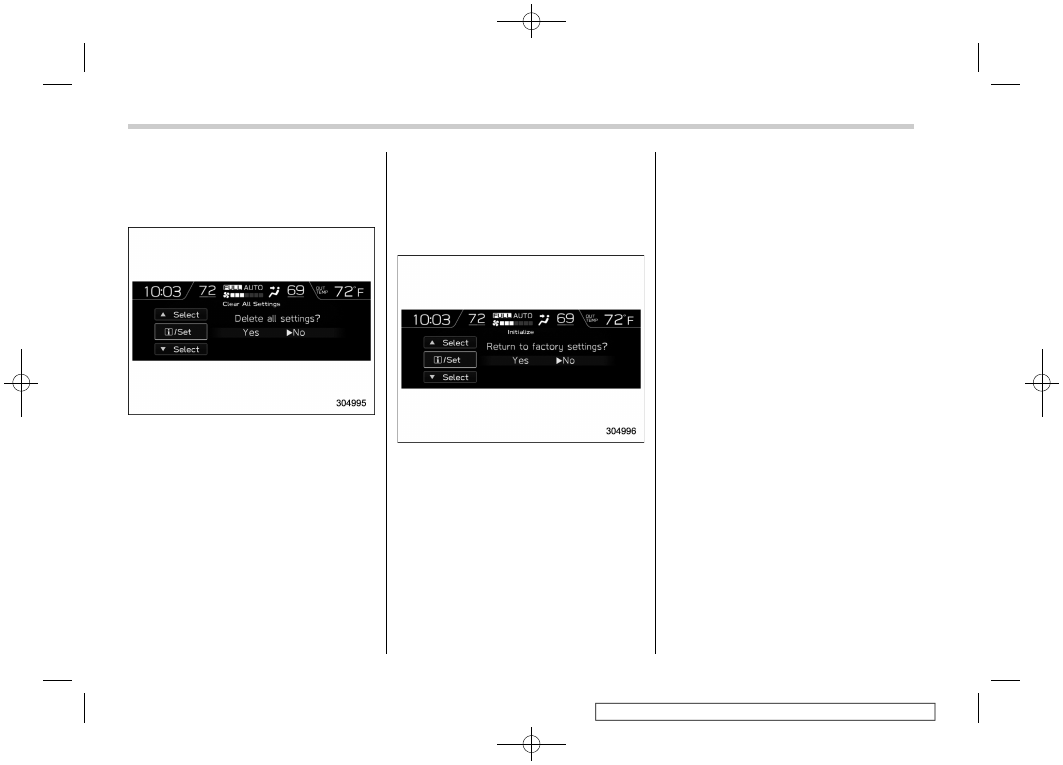
!
Clear setting
1. Select “Clear All Settings” from the 2nd
menu on the setting screen. Refer to
“Setting screen” FP212.
2. Select “Yes” or “No” by using the
control switches.
!
Initialize
You can initialize the items that have been
set to your preference.
1. Select “Initialize” from the 2nd menu on
the setting screen. Refer to “Setting
screen” FP212.
2. Select “Yes” or “No” by using the
control switches.
NOTE
You cannot initialize the items if the
Driver Monitoring System is not oper-
ated.
&
How to get the source code
using the open source
Free/Open Source Software Information
This product contains Free/Open Source
Software (FOSS).
The license information and/or the source
code of such FOSS can be found at the
following URL.
http://www.globaldenso.com/en/open-
source/ivi/subaru/
Multi-function display (color LCD)
224
(227,1)
北米Model "A8240BE-B" EDITED: 2018/ 7/ 5
3-10. Clock
For models with a SUBARU genuine
navigation and/or audio system, the clock
can be adjusted using either auto mode or
instruction mode.
.
Auto mode: automatic clock adjustment
.
Instruction mode: instruction clock adjust-
ment
&
Setting the clock instructionly
!
Type A multi-function display (black
and white)
1. Turn the ignition switch to “ON”.
2. Press the
button.
3. Select “Settings”.
4. Select “Vehicle”.
5. Select “Clock adjustment” and then
select “Instruction”.
6. Press the “+” button or the “−” button
beside the clock.
!
Setting 12-hour or 24-hour dis-
play
The clock can be set to 12-hour or 24-hour
display. Perform the following procedure to
switch the display format.
1. Turn the ignition switch in the “LOCK”/
“OFF” position.
2. Press and hold the “−” button located
near the clock display for approximately 5
seconds. The clock display will then start
to flash.
3. While the clock display is flashing,
press and hold the “+” button for approxi-
mately 2 seconds. The clock format will
then change.
4. The clock display will continue to flash
for approximately 3 seconds to indicate
that the clock display has been changed.
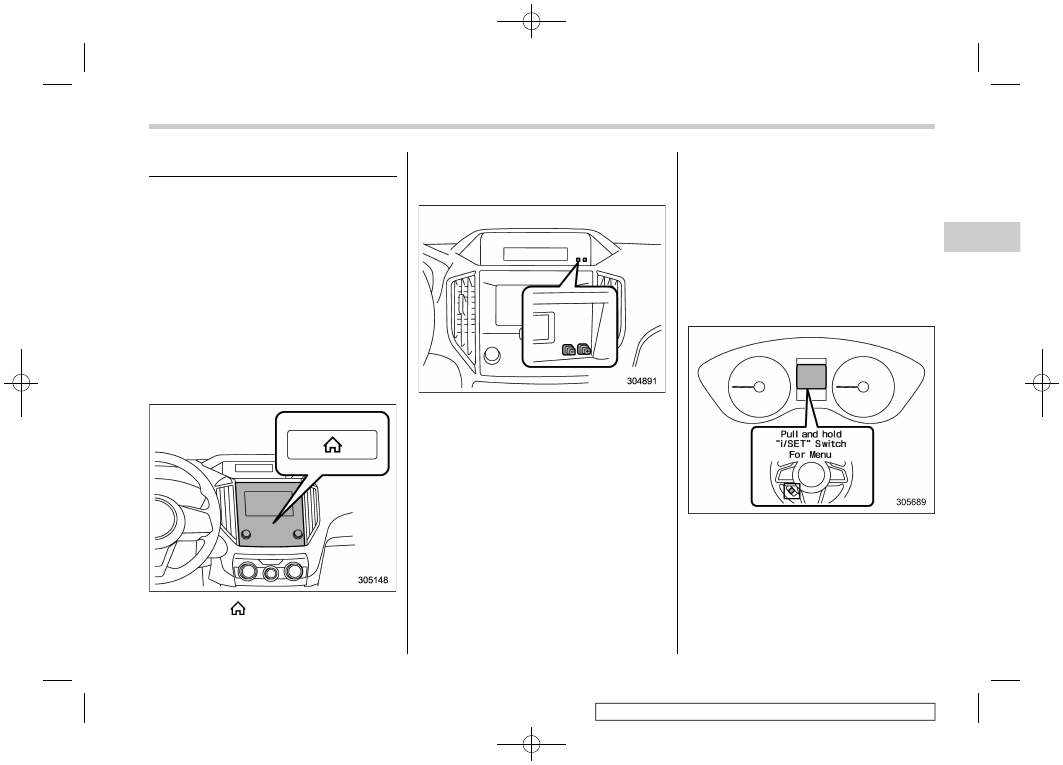
!
Type B multi-function display (color
LCD)
NOTE
When the combination meter display
(color LCD) is displaying the menu
screen entering screen, the system will
not move to the selection screen even if
the “INFO” button is pressed and held.
Before adjusting the clock, be sure to
change the combination meter display
– CONTINUED –
Clock
225
3
Instruments
and
controls
(228,1)
北米Model "A8240BE-B" EDITED: 2018/ 7/ 5
(color LCD) to a screen other than the
menu screen entering screen.
1. Turn the ignition switch to “ON”.
2. Press the
button.
3. Select “Settings”.
4. Select “Vehicle”.
5. Select “Clock adjustment” and then
select “Instruction”.
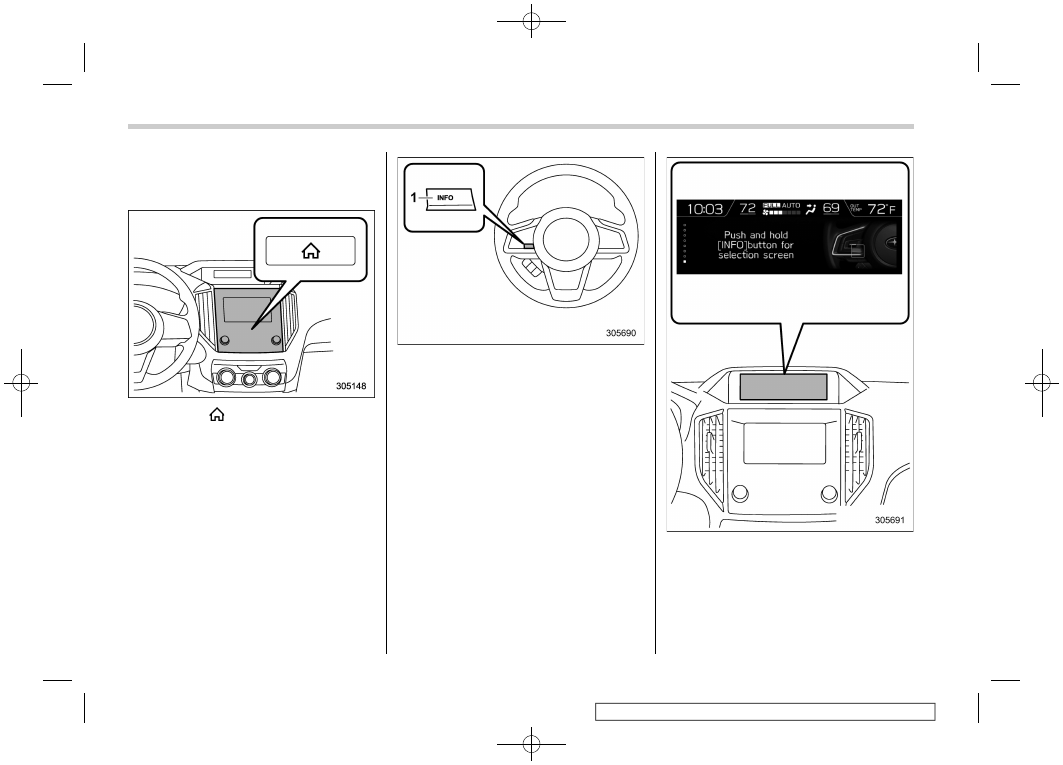
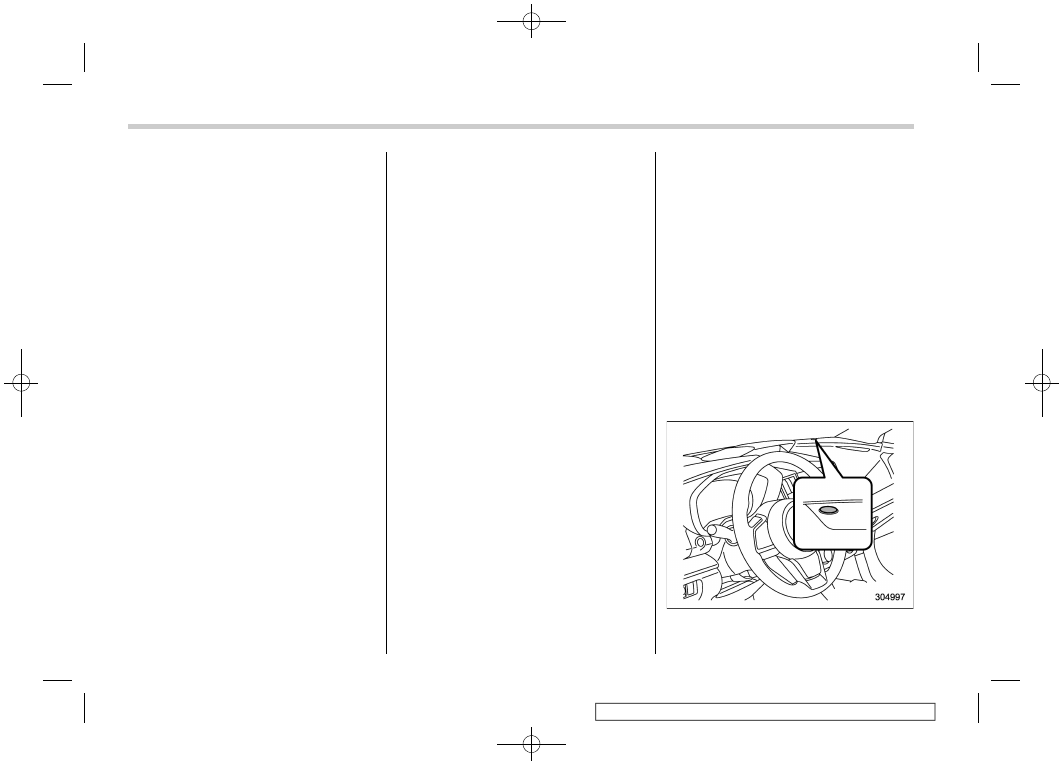
1)
“INFO” button
6. Press the “INFO” button on the steer-
ing wheel to display the guidance screen.
7. While displaying the guidance screen,
press and hold the “INFO” button on the
steering wheel. The screen goes to the
selection screen.
Clock
226
(229,1)
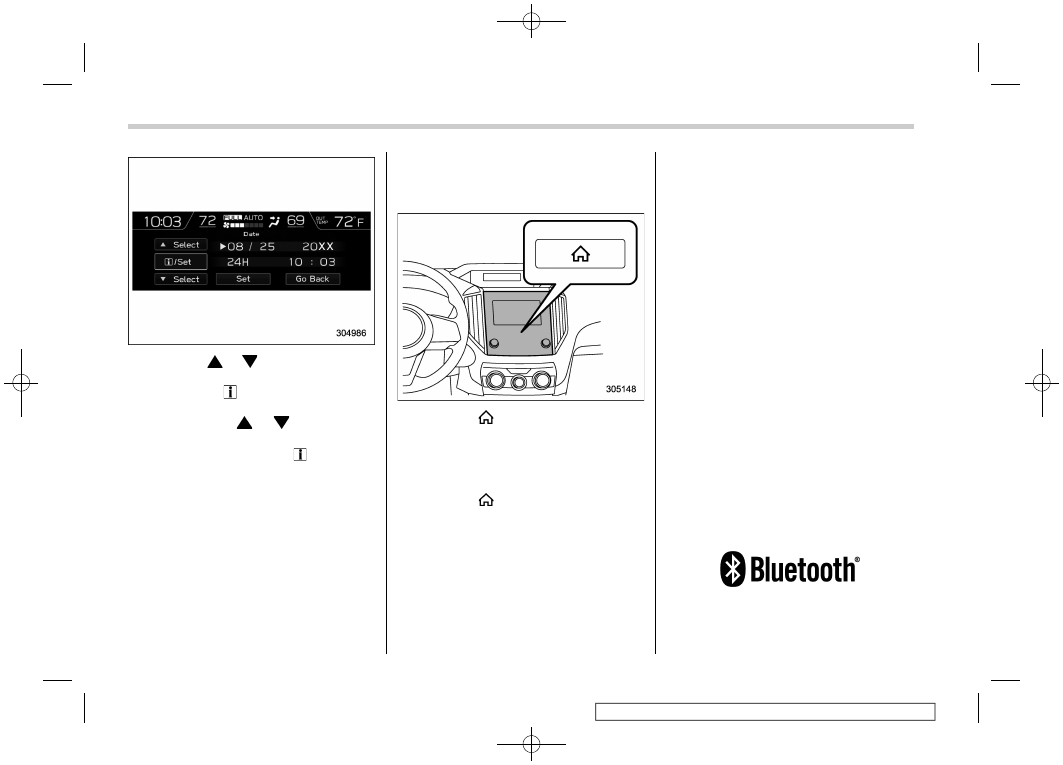
北米Model "A8240BE-B" EDITED: 2018/ 7/ 5
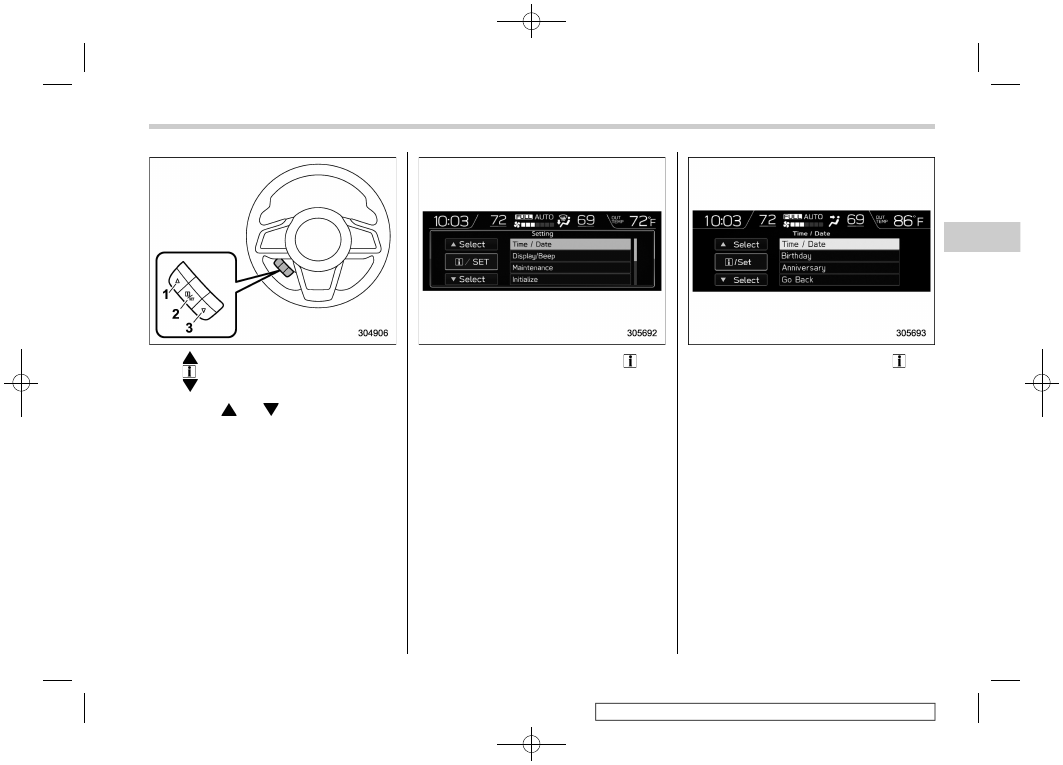
1)
2)
/SET
3)
8. Pull the “
” or “
” switch to select the
item.
9. Select “Time/Date” and pull the
/SET
switch.
10. Select “Time/Date” and pull the
/SET
switch.
NOTE
If “Clock adjustment” is not in instruction
mode, “Time/Date” cannot be selected.
Be sure to perform steps 2 through 5.
– CONTINUED –
Clock
227
3
Instruments
and
controls
(230,1)
北米Model "A8240BE-B" EDITED: 2018/ 7/ 5
11. Pull the “
”, “
” switches to scroll
through to the items you can set.
(1) Use the
/ SET switch to choose
the item you would like to change.
(2) Pull the “
”, “
” switches to
adjust the items.
12. Select “Set” and pull the
/SET switch
to complete the clock setting.
Select “Go Back” to return to the previous
screen without saving settings.
NOTE
The Birthday/Anniversary and mainte-
nance reminder system function are
based on the time and date on the
multifunction display (color LCD).
&
Setting the clock automati-
cally
1. Turn the ignition switch to “ON”.
2. Press the
button.
3. Select “Settings”.
4. Select “Vehicle”.
5. Select “Clock adjustment” and then
select “Auto”.
6. Press the
button again to complete
the setting.
!
Models with navigation system
The clock will be set automatically where a
GPS signal is available.
!
Models without navigation system
The clock will be set and adjusted auto-
matically when a smartphone is connected
via Bluetooth
®
for transferring phonebook
data.
1. Register the smartphone to the audio
system. For details, refer to “Bluetooth
SETTINGS” in the supplemental Owner’s
Instruction for the audio/navigation system.
2. Transfer phonebook data to the sys-
tem. For details, refer to “Bluetooth SET-
TINGS” in the supplemental Owner’s
Instruction for the audio/navigation system.
The clock will be adjusted automatically.
NOTE
Depending on the model of smart-
phone, the settings of the connected
smartphone may need to be changed.
(ex: For iOS or other models, notifica-
tion settings may need to be activated.)
For details, check the instructions on
connecting smartphones.
&
Regulatory information
The Bluetooth
®
word mark and logos are
registered trademarks owned by Bluetooth
SIG, Inc.
Clock
228
(231,1)
北米Model "A8240BE-B" EDITED: 2018/ 7/ 5
3-11. Light control switch
&
Precautions and tips
CAUTION
.
Use of any lights for a long period
of time while the engine is not
running can cause the battery to
discharge.
.
Before leaving the vehicle, make
sure that the lights are turned off.
If the vehicle is left unattended
for a long time with the lights
illuminated, the battery may be
discharged.
NOTE
.
Even if the key is removed from the
ignition switch, the lights can be illumi-
nated by operating the light control
switch from the “ ” (off) position to the
“
” or “
” position.
.
If the driver’s door is opened while
the lights are illuminated and the key is
removed from the ignition switch, the
chirp sound will inform the driver that
the lights are illuminated.
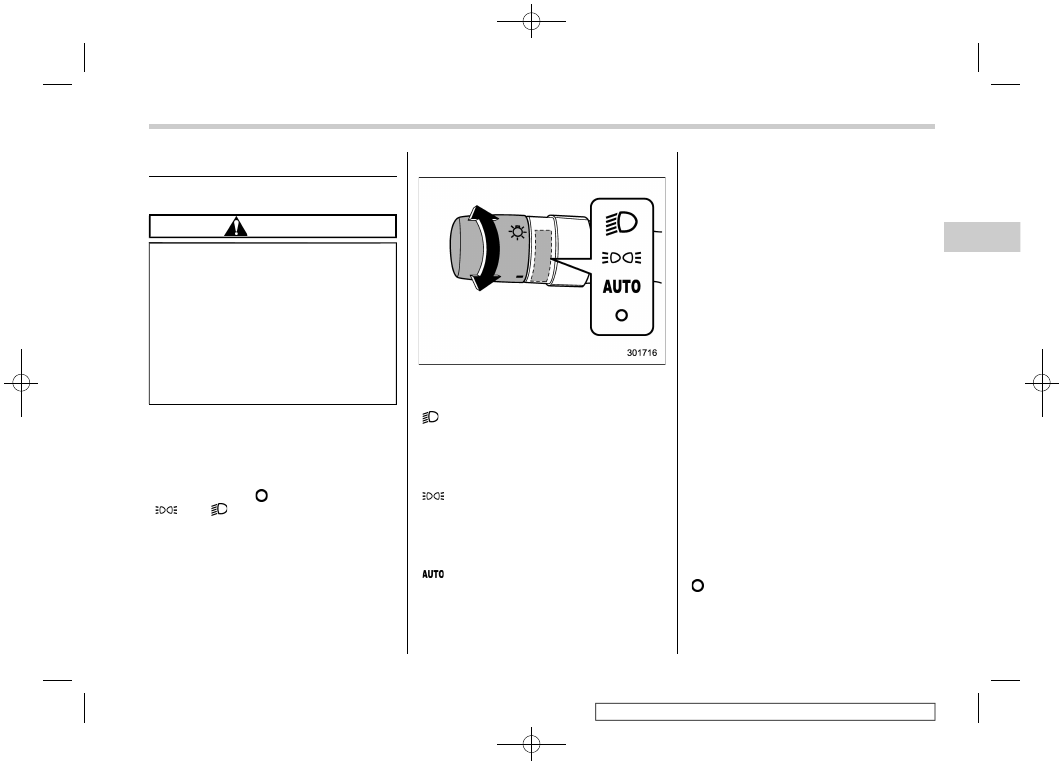
&
Headlights
To turn on the headlights, turn the knob on
the end of the turn signal lever.
“
” position:
Instrument panel illumination, headlights,
parking lights, front side marker lights, rear
side marker lights, tail lights and license
plate lights are on.
“
” position:
Instrument panel illumination, parking
lights, front side marker lights, rear side
marker lights, tail lights and license plate
lights are on.
“
” position:
.
Auto on/off headlights
When the ignition switch is in the “ON”
position, the instrument panel illumination,
headlights, parking lights, front side mar-
ker lights, rear side marker lights, tail lights
and license plate lights are automatically
on or off depending on the level of the
ambient light.
NOTE
The sensitivity of the auto on/off head-
lights can be changed by a SUBARU
dealer. Consult your SUBARU dealer
for details. Also, for models with a
combination meter display (color
LCD), the setting can be changed using
the display. For details, refer to “Vehicle
Setting” FP196.
.
Auto-on/off wiper-linked headlights
While the light control switch is in the
“AUTO” position, the headlights will auto-
matically turn on when the windshield
wipers operate several times. The head-
lights will automatically turn off when the
wipers stop.
NOTE
The ON/OFF setting of this function can
be changed by a SUBARU dealer.
Consult your SUBARU dealer for de-
tails.
“ ” position:
The headlights are all off.
Only when the following conditions are
fulfilled, instrument panel illumination,
– CONTINUED –
Light control switch
229
3
Instruments
and
controls
(232,1)
北米Model "A8240BE-B" EDITED: 2018/ 7/ 5
headlights, parking lights, front side mar-
ker lights, rear side marker lights, tail lights
and license plate lights are automatically
on or off depending on the level of the
ambient light.
– The engine is running.
– The parking brake is fully released.
– The select lever is in a position other
than “P” position.
!
Welcome lighting function
The welcome lighting function turns on the
low beam headlight for smooth approach-
ing to or exiting from the vehicle at night or
in a dark place.
The function is activated while all of the
following conditions are met.
.
The light control switch is in the “AUTO”
position.
.
It is dark enough to turn on the auto on/
off headlights.
When approaching:
While the welcome lighting function is
activated, the low beam headlights, instru-
ment panel illumination, parking lights,
front side marker lights, rear side marker
lights, tail lights and license plate lights will
automatically illuminate when unlocking
the doors and the rear gate by using the
remote keyless entry system.
The low beam headlights will remain
illuminated for 30 seconds
*1
and then turn
off. However, if any of the following
operations is done, the low beam head-
lights will turn off.
.
The doors are locked.
.
The light control switch is turned to a
position other than “AUTO”.
.
The ignition switch is turned to the “ON”
position.
When exiting:
While the welcome lighting function is
activated, the low beam headlights, instru-
ment panel illumination, parking lights,
front side marker lights, rear side marker
lights, tail lights and license plate lights will
remain illuminated even when either of the
following operation is done.
.
The push-button ignition switch is
turned to the “OFF” status (models with
“keyless access with push-button start
system”).
.
The key is pulled out from the ignition
switch (models without “keyless access
with push-button start system”).
The low beam headlights will turn off under
any of the following conditions.
.
3 minutes have passed since the low
beam headlights were illuminated by the
welcome lighting function.
.
30 seconds have passed since the door
is opened and closed.*
1
.
The light control switch is turned to a
position other than “AUTO”.
.
The locking procedure is performed
twice. When performing the unlocking
procedure after performing the locking
procedure, perform the locking procedure
twice again.
*1: The setting for the period of time in which the
low beam headlights remain on by the welcome
lighting function can be changed by a SUBARU
dealer. Contact your SUBARU dealer for de-
tails.
!
Sensor for the auto on/off head-
lights
The sensor is as shown in the illustration.
Light control switch
230
(233,1)
北米Model "A8240BE-B" EDITED: 2018/ 7/ 5
CAUTION
If any object is placed on or near the
sensor, the sensor may not detect
the level of the ambient light cor-
rectly and the auto on/off headlights
may not operate properly.
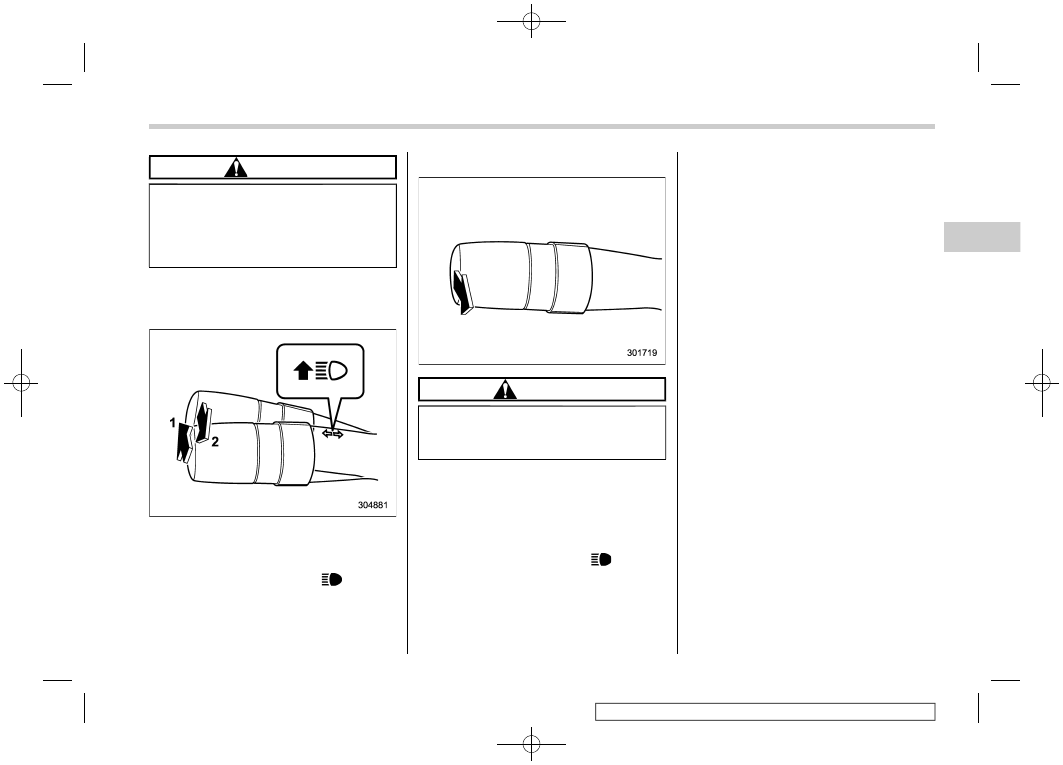
&
High/low beam change (dim-
mer)
1)
High beam
2)
Low beam
When the headlights are on high beam, the
high beam indicator light “
” on the
combination meter is also on.
&
Headlight flasher
CAUTION
Do not hold the lever in the flashing
position for more than just a few
seconds.
To flash the headlights, pull the lever
toward you and then release it. The high
beam will stay on for as long as you hold
the lever.
When the headlights are on high beam, the
high beam indicator light “
” on the
combination meter also illuminates.
&
High beam assist function (if
equipped)
NOTE
.
The high beam assist function uti-
lizes the stereo camera installed at the
position of the front map lights.
.
For details on how to handle the
stereo camera, refer to the Owner’s
Manual supplement for the EyeSight
system.
The high beam assist function automati-
cally changes the headlight from high
beam to low beam (or vice versa).
When all of the following conditions are
met, the headlight will change to high
beam.
.
When the vehicle speed increases to or
above 20 mph (32 km/h).
.
There is no preceding or oncoming
vehicle.
.
The forward area of the vehicle is dark.
.
The road does not have a sharp curve.
When any of the following conditions are
met, the headlight will change to low beam.
.
When the vehicle speed decreases to
or below 10 mph (16 km/h).
.
When the forward area of the vehicle is
bright.
.
When there is a preceding or oncoming
– CONTINUED –
Light control switch
231
3
Instruments
and
controls
Нет комментариевНе стесняйтесь поделиться с нами вашим ценным мнением.
Текст