Subaru Tribeca (2014 year). Instruction — part 19
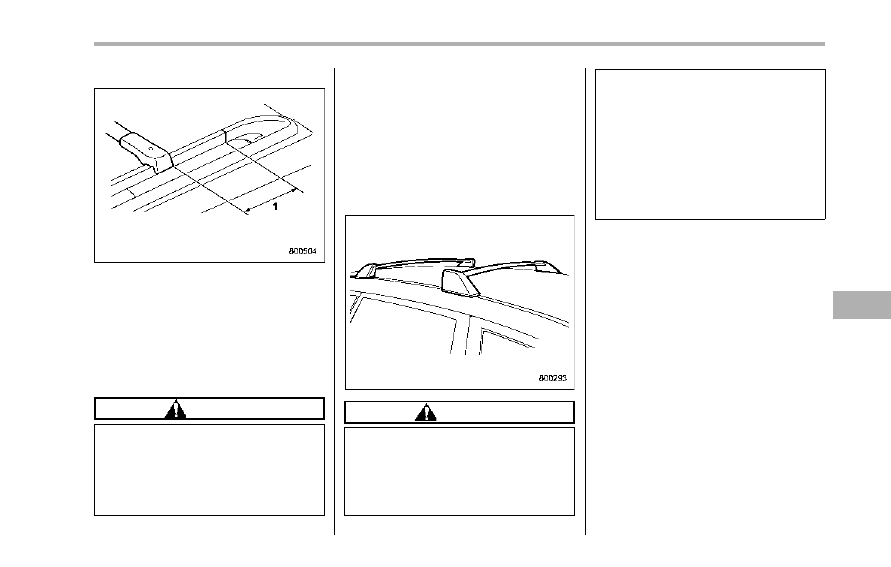
Rear crossbar:
1)
8 in (200 mm)
Install the rear crossbar so that the cross-
bar end supports are located approxi-
mately 8 in (200 mm) forward from the
joints between the roof rails and the rear
roof rail supports.
Install the rear crossbar in the same
manner as the front crossbar.
CAUTION
Do not carry cargo on the roof when
the crossbars are removed. Lug-
gage on the roof will be thrown
forward or backward in sudden
stops or rapid accelerations, result-
ing in a dangerous road hazard.
NOTE
Before each use of the roof crossbar,
make sure the four T-30 crossbar
clamp screws have been checked,
and retightened if necessary to 35 lbf·in
(4.0 N·m, 0.41 kgf·m), as outlined in
Step #5 above.
& Roof molding and crossbar
(if equipped)
CAUTION
. For cargo carrying purposes, the
roof molding must be used to-
gether with a roof crossbar kit
and the appropriate carrying at-
tachment. Otherwise, damage to
the roof or paint or a dangerous
road hazard due to loss of cargo
could result.
. When using the roof crossbar kit,
make sure that the total weight of
the crossbars, carrying attach-
ments and cargo does not ex-
ceed the maximum load limit.
Overloading may cause damage
to the vehicle and create a safety
hazard.
Cargo can be carried after securing the
roof crossbar kit to the roof molding and
installing the appropriate carrying attach-
ments. When installing the roof crossbar
kit, follow the manufacturer’s instructions.
When you carry cargo on the roof using
the roof crossbar kit and a carrying
attachments, never exceed the maximum
load limit as explained below. You should
also be careful that your vehicle does not
exceed the Gross Vehicle Weight Rating
(GVWR) and front and rear Gross Axle
Weight Rating (GAWR). Refer to the
“Loading your vehicle” section in this
chapter for information on loading cargo
into or onto your vehicle. The maximum
load limit of the cargo, crossbars and
carrying attachments must not exceed
150 lbs (68 kg). Place the heaviest load
at the bottom, nearest the roof, and evenly
distribute the cargo. Always properly
Driving tips
8-17
– CONTINUED –
8-18
Driving tips
secure all cargo.
! Installing carrying attachments on
the crossbars
When installing any carrying attachments
such as a bike carrier, ski carrier, kayak
carrier, cargo basket, etc. on the cross-
bars, follow the manufacturer’s instruc-
tions and make sure that the attachments
are securely fixed to the crossbars. Use
only attachments designed specifically for
the crossbars. The maximum load limit of
the cargo, crossbars and carrying attach-
ments must not exceed 150 lbs (68 kg).
Before operating the vehicle, make sure
that the cargo is properly secured on the
attachments.
NOTE
Remember that the vehicle’s center of
gravity is altered with the weight of the
load on the roof, thus affecting the
driving characteristics.
Drive carefully. Avoid rapid starts, hard
cornering and abrupt stops. Crosswind
effects will be increased.
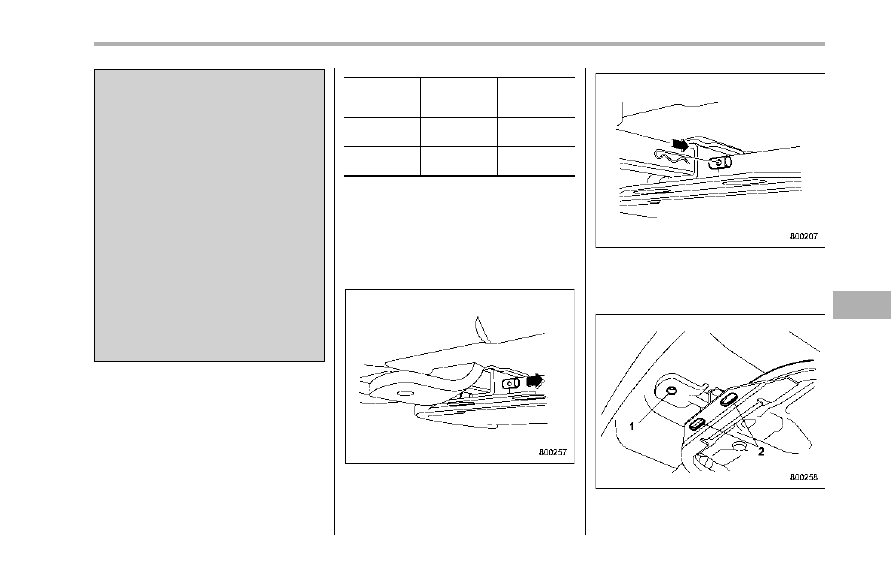
! Removal and installation of the
crossbars
Each of the two roof moldings has two
mounting points for crossbars. Each
mounting point is fitted with a cover. Use
a screwdriver to remove the covers. When
installing the crossbars on the roof mold-
ing, follow the manufacturer’s instructions.
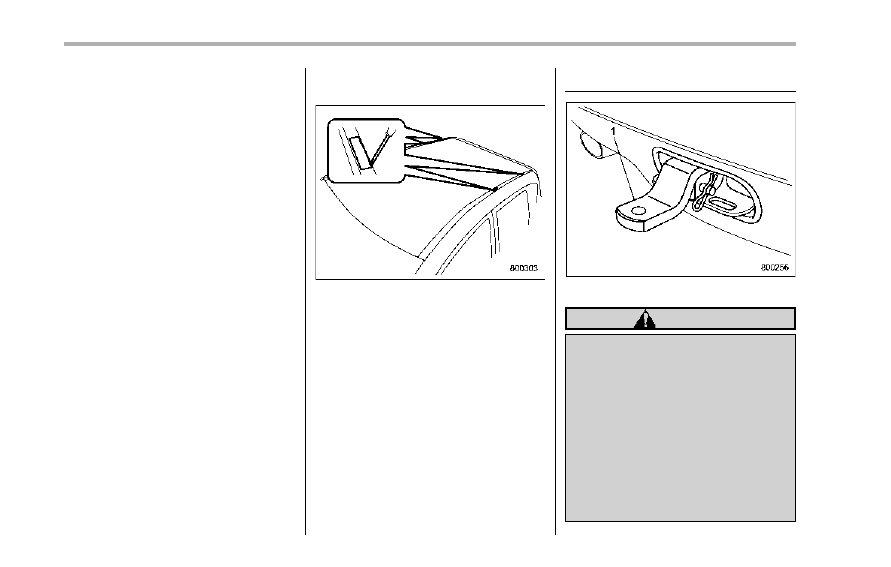
Trailer hitch (if equipped)
1)
Trailer hitch
WARNING
. Never exceed the maximum
weight specified for the trailer
hitch. Exceeding the maximum
weight could cause an accident
resulting in serious personal in-
juries. Permissible trailer weight
changes depending on the situa-
tion. For possible recommenda-
tions and limitations, refer to
“Trailer towing” F8-21.
. Trailer brakes are required when
the towing load exceeds 1,000
lbs (453 kg). Be sure your trailer
has safety chains and that each
chain will hold the trailer’s max-
imum gross weight. Towing trai-
lers without safety chains could
create a traffic safety hazard if
the trailer separates from the
hitch due to coupling damage or
hitch ball damage.
. Be sure to check the hitch pin
and safety pin for positive lock-
ing placement before towing a
trailer. If the ball mount comes off
the hitch receiver, the trailer
could get loose and create a
traffic safety hazard.
. Use only the ball mount supplied
with this hitch. Use the hitch only
as a weight carrying hitch. Do not
use with any type of weight
distributing hitch.
The maximum gross trailer weight and
maximum gross tongue weight are indi-
cated in the following table.
Maximum
gross trailer
weight
Maximum
gross tongue
weight
Vehicle with-
out cooling kit
2,000 lbs
(906 kg)
200 lbs
(90 kg)
Vehicle with
cooling kit
3,500 lbs
(1,587 kg)
350 lbs
(158 kg)
When you tow a trailer, follow the instruc-
tions in “Trailer towing” F8-21.
& Connecting a trailer
1. Remove the receiver cover from the
hitch receiver tube. Then insert the ball
mount into the hitch receiver tube.
2. Insert the hitch pin into the hole on the
hitch receiver tube so that the pin passes
through the ball mount.
3. Insert the safety pin into the hitch pin
securely.
4. Pull the ball mount to make sure it
does not come off the hitch receiver.
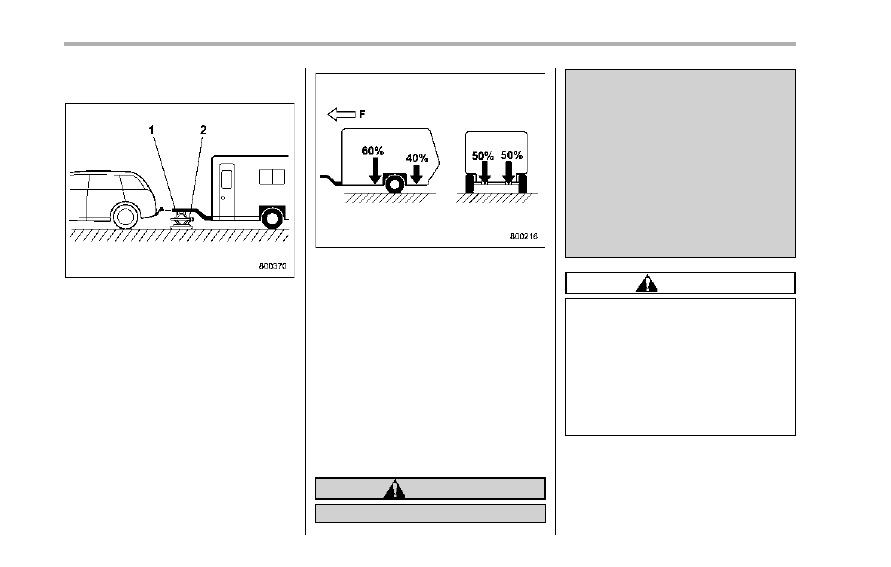
1)
Hitch ball installation point
2)
Hooks for safety chains
Driving tips
8-19
– CONTINUED –
8-20
Driving tips
5. Use only a hitch ball that is appropriate
for the ball mount and your trailer. The
hitch ball must be securely installed on the
ball mount.
6. Connect your trailer to the hitch ball.
7. Connect the trailer and the hitch with
safety chains that will hold the trailer’s
maximum gross weight. The chains
should cross under the trailer tongue to
prevent the tongue from dropping onto the
ground in case it should disconnect from
the hitch ball. Allow sufficient slack in the
chains taking tight turn situations into
account; however, be careful not to let
them drag on the ground.
WARNING
Do not connect safety chains to part
of the vehicle other than the safety
chain hooks.
Hitch harness connector
8. Connect the hitch wire harness’ black
four-pin wire connector to the towing
trailer’s wire harness.
9. Confirm proper function of the hitch
wire harness by individually activating the
brake, right turn signal, left turn signal,
stop, and parking lights on the trailer.
NOTE
Always disconnect the trailer wire har-
ness before launching or retrieving a
watercraft.
& When you do not tow a trailer
. Remove the ball mount from the hitch
receiver tube and insert the receiver cover
onto the hitch receiver tube.
. Place the dust cap over the four-pin
connector of the hitch wire harness to
protect against possible damage.
. Occasionally lubricate terminals of the
four-pin connector using the terminal
grease.
Trailer towing
Your vehicle is designed and intended to
be used primarily as a passenger-carrying
vehicle. Towing a trailer puts additional
loads on your vehicle’s engine, drivetrain,
brakes, tires and suspension and has an
adverse effect on fuel economy.
If you do decide to tow a trailer, your safety
and satisfaction depend upon proper use
of correct equipment and cautious opera-
tion of your vehicle. Seek the advice of
your SUBARU dealer to assist you in
purchasing a hitch and other necessary
towing equipment appropriate for your
vehicle. In addition, be sure to follow the
instructions on correct installation and use
provided by the trailer and other towing
equipment manufacturers.
SUBARU assumes no responsibility for
injuries or vehicle damage that result from
trailer towing equipment, or from any
errors or omissions in the instructions
accompanying such equipment or for your
failure to follow the proper instructions.
& Warranties and maintenance
SUBARU warranties do not apply to
vehicle damage or malfunction caused
by trailer towing. If you use your vehicle to
tow a trailer, more frequent maintenance
will be required due to the additional load.
(Refer to “Maintenance schedule under
severe driving conditions” in the “Warranty
and Maintenance Booklet”.)
Under no circumstances should a trailer
be towed with a new vehicle or a vehicle
with any new powertrain component (en-
gine, transmission, differential, wheel
bearings, etc.) for the first 1,000 miles
(1,600 km) of driving.
& Maximum load limits
WARNING
Never exceed the maximum load
limits explained in the following.
Exceeding the maximum load limits
could cause personal injury and/or
vehicle damage.
CAUTION
. Adequate size trailer brakes are
required when the trailer and its
cargo exceed 1,000 lbs (453 kg)
total weight.
. Before towing a trailer, check the
trailer total weight, GVW, GAWs
and tongue load. Make sure the
load and its distribution in your
vehicle and trailer are accepta-
ble.
! Total trailer weight
Total trailer weight
The total trailer weight (trailer weight plus
its cargo load) must never exceed the
maximum weight shown in the following
table.
Driving tips
8-21
– CONTINUED –
8-22
Driving tips
Vehicle without cooling kit
Conditions
Maximum total trailer weight
When towing a trailer without brakes.
1,000 lbs (453 kg)
When towing a trailer with brakes.
2,000 lbs (906 kg)
When towing a trailer on a long uphill grade
continuously for over 5 miles (8 km) with an
outside temperature of 1048F (408C) or above.
1,000 lbs (453 kg)
Vehicle with cooling kit
Conditions
Maximum total trailer weight
When towing a trailer without brakes.
1,000 lbs (453 kg)
When towing a trailer with brakes.
3,500 lbs (1,587 kg)
When towing a trailer on a long uphill grade
continuously for over 5 miles (8 km) with an
outside temperature of 1048F (408C) or above.
1,750 lbs (794 kg)
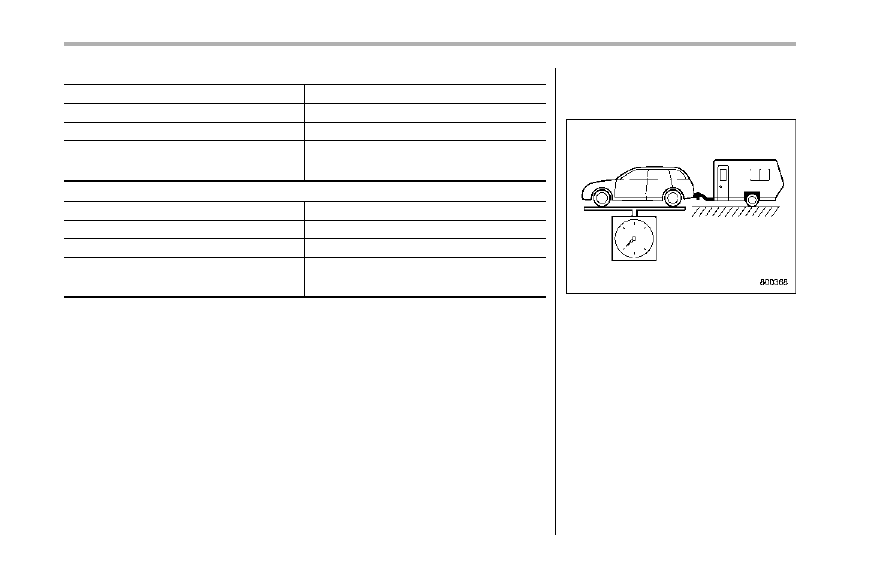
! Gross Vehicle Weight (GVW) and
Gross Vehicle Weight Rating
(GVWR)
Gross Vehicle Weight
The Gross Vehicle Weight (GVW) must
never exceed the Gross Vehicle Weight
Rating (GVWR).
Gross Vehicle Weight (GVW) is the
combined total of the weight of the vehicle,
driver, passengers, luggage, trailer hitch,
trailer tongue load and any other optional
equipment installed on your vehicle.
Therefore, the GVW changes depending
on the situation. Determine the GVW each
time before going on a trip by putting your
vehicle and trailer on a vehicle scale.
GVWR is shown on the certification label
located on the driver’s door of your
vehicle.

Certification label
! Gross Axle Weight (GAW) and
Gross Axle Weight Rating (GAWR)
Gross Axle Weight
The total weight applied to each axle
(GAW) must never exceed the Gross Axle
Weight Rating (GAWR). The front and rear
GAWs can be adjusted by relocating
passengers and luggage inside the vehi-
cle. The front and rear GAWR are also
shown on the certification label.
Certification label
To check both GVWR and GAWR and to
confirm that the total weight and weight
distribution are within safe driving limits,
you should have your vehicle and trailer
weighed at a commercial weighing station.
Be sure that all cargo is firmly secured to
prevent a change in weight distribution
while driving.
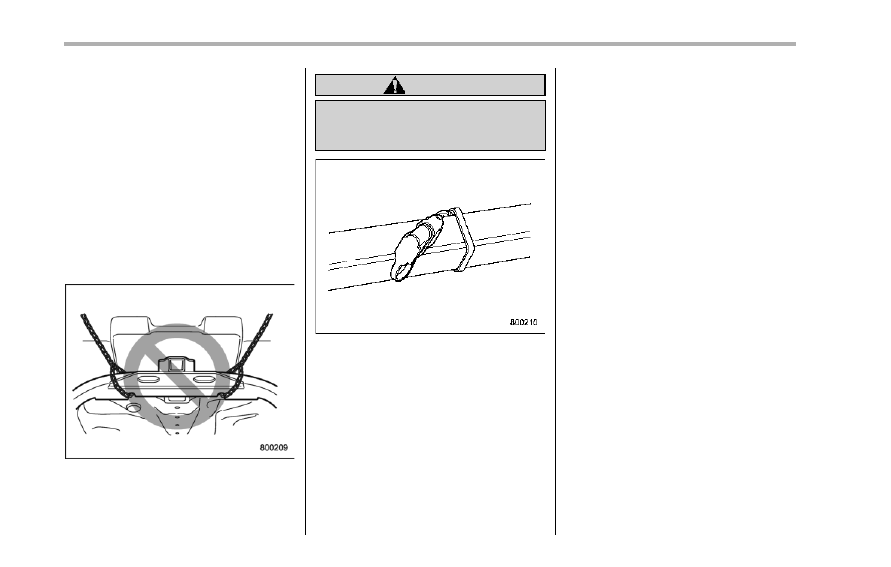
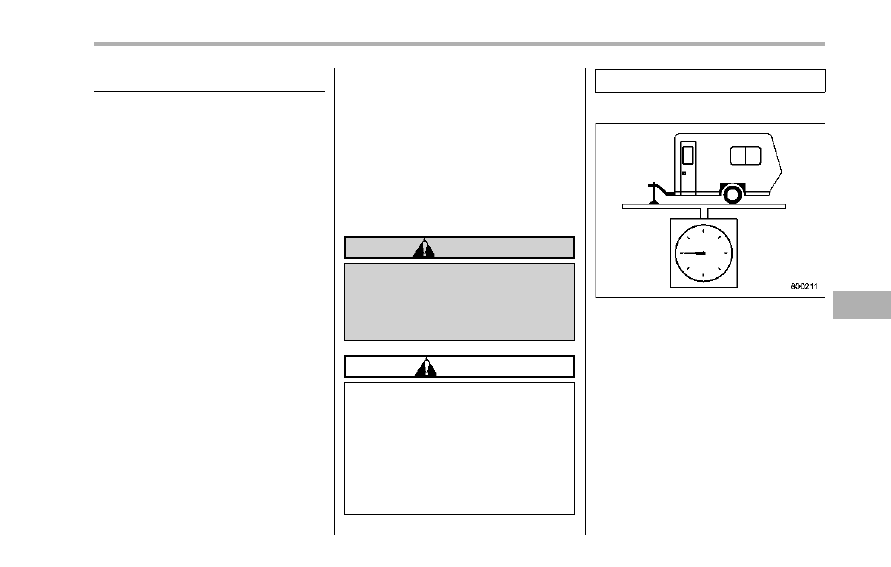
! Tongue load
Tongue load
WARNING
If the trailer is loaded with more
weight in the back of trailer’s axle
than in the front, the load is taken off
the rear axle of the towing vehicle.
This may cause the rear wheels to
skid, especially during braking or
when vehicle speed is reduced dur-
ing cornering, resulting in over-
steer, spin out and/or jackknifing.
Ensure that the trailer tongue load is from
8 to 11 percent of the total trailer weight
and does not exceed the appropriate one
of the following maximum values.
Driving tips
8-23
– CONTINUED –
8-24
Driving tips
Vehicle without cooling kit: 200 lbs (90 kg)
Vehicle with cooling kit: 350 lbs (158 kg)
1)
Jack
2)
Bathroom scale
The tongue load can be weighed with a
bathroom scale as shown in the illustration
above. When weighing the tongue load,
be sure to position the towing coupler at
the height at which it would be during
actual towing, using a jack as shown.
F:
Front
The tongue load can be adjusted by
proper distribution of the load in the trailer.
Never load the trailer with more weight in
the back than in the front; approximately
60 percent of the trailer load should be in
the front and approximately 40 percent in
the rear. Also, distribute the load as evenly
as possible on both the left and right
sides.
Be sure that all cargo is firmly secured to
prevent a change in weight distribution
while driving.
& Trailer hitches
WARNING
Never drill the frame or under-body
of your vehicle to install a commer-
cial trailer hitch. If you do, danger-
ous exhaust gas, water or mud may
enter the passenger compartment
through the drilled hole. Exhaust
gas contains carbon monoxide, a
colorless and odorless gas which is
dangerous, or even lethal, if inhaled.
Also, drilling the frame or under-
body of your vehicle could cause
deterioration of strength of your
vehicle and cause corrosion around
the drilled hole.
CAUTION
. Do not modify the vehicle ex-
haust system, brake system, or
other systems when installing a
hitch or other trailer towing
equipment.
. Do not use axle-mounted hitches
as they can cause damage to the
axle housing, wheel bearings,
wheels or tires.
Choose a proper hitch for your vehicle and
trailer.
The use of a genuine SUBARU trailer
hitch is recommended. A genuine
SUBARU hitch is available from your
SUBARU dealer.
If use of a non-genuine hitch is unavoid-
able, be sure the hitch is suited to your
vehicle and trailer. Consult with a profes-
sional hitch supplier to assist you in
choosing an appropriate hitch for your
vehicle. Be sure to follow all of the hitch
manufacturer’s instructions for installation
and use.
Never use a hitch that mounts only to the
rear bumper. The bumper is not designed
to handle that type of load.
For all types of hitches, regularly check
that the hitch mounting bolts and nuts are
tight.
& Connecting a trailer
! Trailer brakes
WARNING
. Adequate size trailer brakes are
required when the trailer and its
cargo exceed 1,000 lbs (453 kg)
total weight.
. Do not directly connect your
trailer’s hydraulic brake system
to the hydraulic brake system in
your vehicle. Direct connection
would cause the vehicle’s brake
performance to deteriorate and
could lead to an accident.
If your trailer’s total weight (trailer weight
plus its cargo weight) exceeds 1,000 lbs
(453 kg), the trailer is required to be
equipped with its own brake system.
Electric brakes or surge brakes are
recommended, and must be installed
properly. Check that your trailer’s brakes
conform with Federal, state/province and/
or other applicable regulations. Your
SUBARU’s brake system is not designed
to be tapped into the trailer’s hydraulic
brake system. Please ask your SUBARU
dealer and professional trailer supplier for
more information about the trailer’s brake
system.
! Trailer safety chains
WARNING
Always use safety chains between
your vehicle and the trailer. Towing
trailer without safety chains could
create a traffic safety hazard if the
trailer separates from the hitch due
to coupling damage or hitch ball
damage.
In case the trailer hitch connector or hitch
ball should break or become discon-
nected, the trailer could get loose and
create a traffic safety hazard.
For safety, always connect the towing
vehicle and trailer with trailer safety
chains. Pass the chains crossing each
other under the trailer tongue to prevent
the trailer from dropping onto the ground
in case the trailer tongue should discon-
nect from the hitch ball. Allow sufficient
slack in the chains taking tight turn
situations into account; however, be care-
ful not to let them drag on the ground.
For more information about the safety
chain connection, refer to the instructions
for your hitch and trailer.
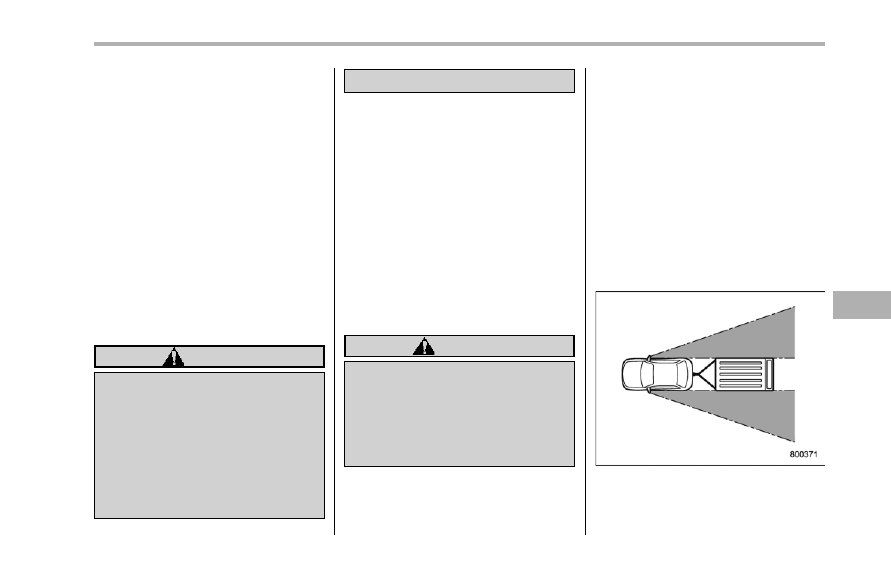
! Side mirrors
After hitching a trailer to your vehicle,
check that the standard side mirrors
provide a good rearward field of view
without significant blind spots. If significant
Driving tips
8-25
– CONTINUED –
8-26
Driving tips
blind spots occur with the vehicle’s stan-
dard side mirrors, use towing mirrors that
conform with Federal, state/province and/
or other applicable regulations.
! Trailer lights
CAUTION
Direct splicing or other improper
connection of trailer lights may
damage your vehicle’s electrical
system and cause a malfunction of
your vehicle’s lighting system.
Connection of trailer lights to your vehi-
cle’s electrical system requires modifica-
tions to the vehicle’s lighting circuit to
increase its capacity and accommodate
wiring changes. To ensure the trailer lights
are connected properly, please consult
your SUBARU dealer. Check for proper
operation of the turn signals, stop lights
and parking lights each time you hitch up.
! Tires
WARNING
Never tow a trailer when the tem-
porary spare tire is used. The tem-
porary spare tire is not designed to
sustain the towing load. Use of the
temporary spare tire when towing
can result in failure of the spare tire
and/or less stability of the vehicle.
Make sure that all the tires on your vehicle
are properly inflated. Refer to “Tires” F12-
8.
Trailer tire condition, size, load rating and
proper inflation pressure should be in
accordance with the trailer manufacturer’s
specifications.
In the event your vehicle gets a flat tire
when towing a trailer, ask a commercial
road service to repair the flat tire.
If you carry a regular size spare tire in your
vehicle or trailer as a precaution against
getting a flat tire, be sure that the spare
tire is firmly secured.
& Trailer towing tips
CAUTION
. Never exceed 45 mph (72 km/h)
when towing a trailer in hilly
country on hot days.
. When towing a trailer, steering,
stability, stopping distance and
braking performance will be dif-
ferent from normal operation. For
safety’s sake, you should employ
extra caution when towing a
trailer and you should never
speed. You should also keep the
following tips in mind:
! Before starting out on a trip
. Check that the vehicle and vehicle-to-
hitch mounting are in good condition. If
any problems are apparent, do not tow the
trailer.
. Check that the vehicle sits horizontally
with the trailer attached. If the vehicle is
tipped sharply up at the front and down at
the rear, check the total trailer weight,
GVW, GAWs and tongue load again, then
confirm that the load and its distribution
are acceptable.
. Check that the tire pressures are
correct.
. Check that the vehicle and trailer are
connected properly. Confirm that
– the trailer tongue is connected
properly to the hitch ball.
– the trailer lights connector is con-
nected properly and trailer’s stop lights
illuminate when the vehicle’s brake
pedal is pressed, and that the trailer’s
turn signal lights flash when the
vehicle’s turn signal lever is operated.
– the safety chains are connected
properly.
– all cargo in the trailer is secured
safely in position.
– the side mirrors provide a good
rearward field of view without a sig-
nificant blind spot.
. Sufficient time should be taken to learn
the “feel” of the vehicle/trailer combination
before starting out on a trip. In an area free
of traffic, practice turning, stopping and
backing up.
! Driving with a trailer
. You should allow for considerably more
stopping distance when towing a trailer.
Avoid sudden braking because it may
result in skidding or jackknifing and loss of
control.
. Avoid uneven steering, sharp turns and
rapid lane changes.
. Slow down before turning. Make a
longer than normal turning radius because
the trailer wheels will be closer than the
vehicle wheels to the inside of the turn. In
a tight turn, the trailer could hit your
vehicle.
. Crosswinds will adversely affect the
handling of your vehicle and trailer, caus-
ing sway. Crosswinds can be due to
weather conditions or the passing of large
trucks or buses. If swaying occurs, firmly
grip the steering wheel and slow down
immediately but gradually.
. When passing other vehicles, consid-
erable distance is required because of the
added weight and length caused by
attaching the trailer to your vehicle.
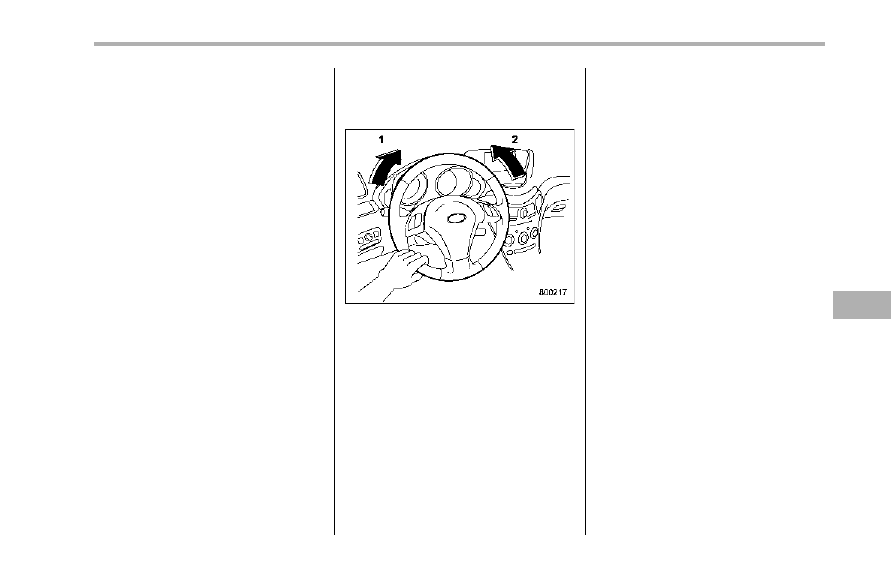
1)
Left turn
2)
Right turn
. Backing up with a trailer is difficult and
takes practice. When backing up with a
trailer, never accelerate or steer rapidly.
When turning back, grip the bottom of the
steering wheel with one hand and turn it to
the left for a left turn, and turn it to the right
for a right turn.
. If the ABS warning light illuminates
while the vehicle is in motion, stop towing
the trailer and have repairs performed
immediately by the nearest SUBARU
dealer.
! Driving on grades
. Before going down a steep hill, slow
down and shift into lower gear (if neces-
sary, use 1st gear) in order to utilize the
engine braking effect and prevent over-
heating of your vehicle’s brakes. Do not
make sudden downshifts.
. When driving uphill in hot weather, the
air conditioner may turn off automatically
to protect the engine from overheating.
. When driving uphill in hot weather, pay
attention to the water temperature gauge
pointer and AT OIL TEMP warning light
because the engine and transmission are
relatively prone to overheating under
these conditions. If the water temperature
gauge pointer approaches the OVER-
HEAT zone or the AT OIL TEMP warning
light illuminates, immediately turn off the
air conditioner and stop the vehicle in the
nearest safe location. For further instruc-
tions and additional information, refer to
the following sections.
– “If you park your vehicle in an
emergency” F9-2
– “Engine overheating” F9-14
– “Temperature gauge” F3-8
– “AT OIL TEMP warning light” F3-13
NOTE
The temperature of engine coolant is
less likely to rise to the OVERHEAT
Driving tips
8-27
– CONTINUED –
8-28
Driving tips
zone in the “D” position than in the
manual mode position.
. Avoid using the accelerator pedal to
stay stationary on an uphill slope instead
of using the parking brake or foot brake.
That may cause the transmission fluid to
overheat.
! Parking on a grade
Always block the wheels under both
vehicle and trailer when parking. Apply
the parking brake firmly. You should not
park on a hill or slope. But if parking on a
hill or slope cannot be avoided, you
should take the following steps.
1. Apply the brakes and hold the pedal
down.
2. Have someone place wheel blocks
under both the vehicle and trailer wheels.
3. When the wheel blocks are in place,
release the regular brakes slowly until the
blocks absorb the load.
4. Apply the regular brakes and then
apply the parking brake; slowly release
the regular brakes.
5. Shift into “P” and shut off the engine.
If you park your vehicle in an emergency. . .
9-2
Spare tire . . . . . . . . . . . . . . . .
9-2
Removing the spare tire . . . . . . . . . ..
9-3
Re-storage of spare tire . . . . . . . . . ...
9-4
Temporary spare tire. . . . . . . . . . ...
9-5
Flat tires. . . . . . . . . . . . . . . ...
9-6
Changing a flat tire. . . . . . . . . . . ..
9-6
Tire pressure monitoring system (TPMS) . . . 9-10
Jump starting . . . . . . . . . . . . . . 9-11
How to jump start. . . . . . . . . . . ... 9-12
Engine overheating . . . . . . . . . . ...
9-14
If steam is coming from the engine
compartment . . . . . . . . . . . . ...
9-14
If no steam is coming from the engine
compartment . . . . . . . . . . . . ...
9-14
Towing . . . . . . . . . . . . . . . .
9-14
Towing and tie-down hooks. . . . . . . .
9-15
Using a flat-bed truck. . . . . . . . . . .
9-17
Towing with all wheels on the ground. . . . .
9-17
Rear gate – if the rear gate cannot be
unlocked. . . . . . . . . . . . . . ..
9-18
Maintenance tools . . . . . . . . . . . .
9-19
Jack and jack handle . . . . . . . . . . .
9-19
In case of emergency
9
9-2
In case of emergency
If you park your vehicle in an
emergency
The hazard warning flasher should be
used in day or night to warn other drivers
when you have to park your vehicle under
emergency conditions.
Avoid stopping on the road. It is best to
safely pull off the road if a problem occurs.
The hazard warning flasher can be acti-
vated regardless of the ignition switch
position.
Turn on the hazard warning by pushing
the hazard warning flasher switch. Turn it
off by pushing the switch again.
NOTE
When the hazard warning flasher is on,
the turn signals do not work.
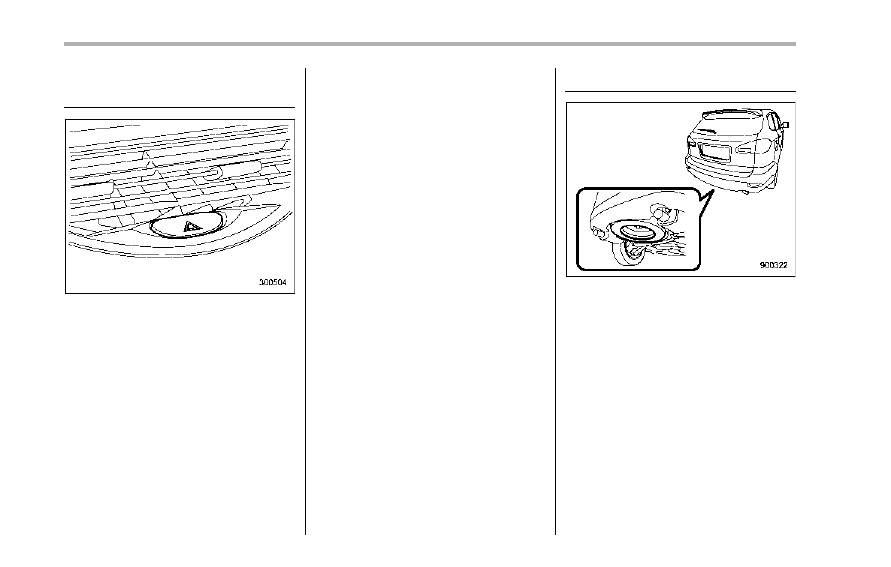
Spare tire
The spare tire is stored in the spare tire
holder located under the cargo area.
The spare tire holder has a hoist mechan-
ism that can lower and raise the spare tire
easily.
The spare tire holder is designed to carry
only the following kinds of tires.
. the temporary spare tire that came with
your vehicle
. a full-size flat tire
A full size flat tire should be stowed in the
spare tire holder in an emergency only.
After having the full-size flat tire repaired,
immediately swap it with the temporary
spare tire.
Before using the temporary spare tire,
carefully read “Temporary spare tire” F9-5
for instructions and precautions.
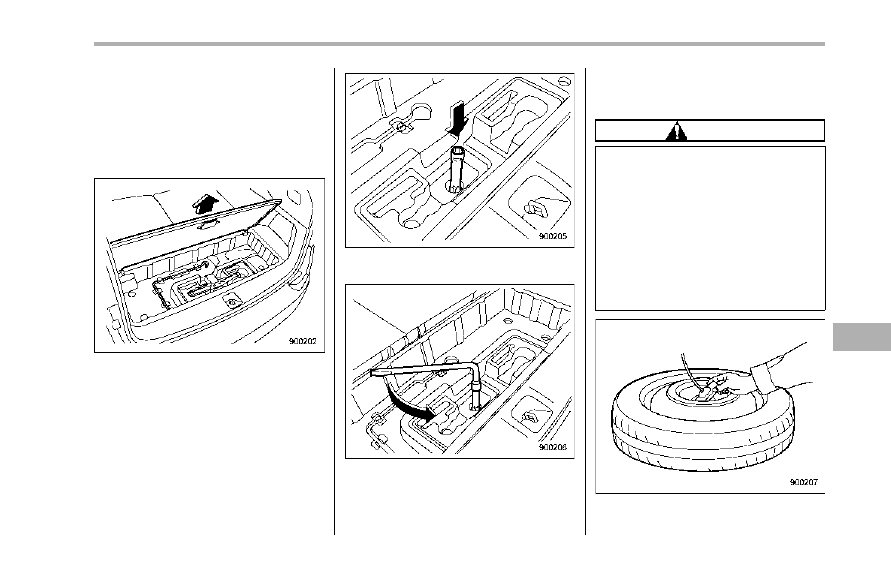
& Removing the spare tire
1. Take the wheel nut wrench and exten-
sion out of the tool bag. Refer to “Main-
tenance tools” F9-19.
2. Remove the subfloor storage lid in the
cargo area.
3. Take out the jack.
4. Locate the hex-head hoist shaft end
inside the hole.
5. Fit the extension onto the hex-head
hoist shaft end.
6. Fit the wheel nut wrench onto the
extension.
7. Turn the hoist shaft end counterclock-
wise with the wheel nut wrench until the
temporary spare tire is on the ground with
enough cable slack to allow you to pull it
out from under the vehicle.
CAUTION
. Be sure to remove (not simply
keep it open) the subfloor sto-
rage lid before turning the wheel
nut wrench, otherwise the lid
may be damaged.
. Do not put your fingers into the
center hole of the temporary
spare tire while you pulling it
out, because they might be
pinched in between the wheel
and the retainer.
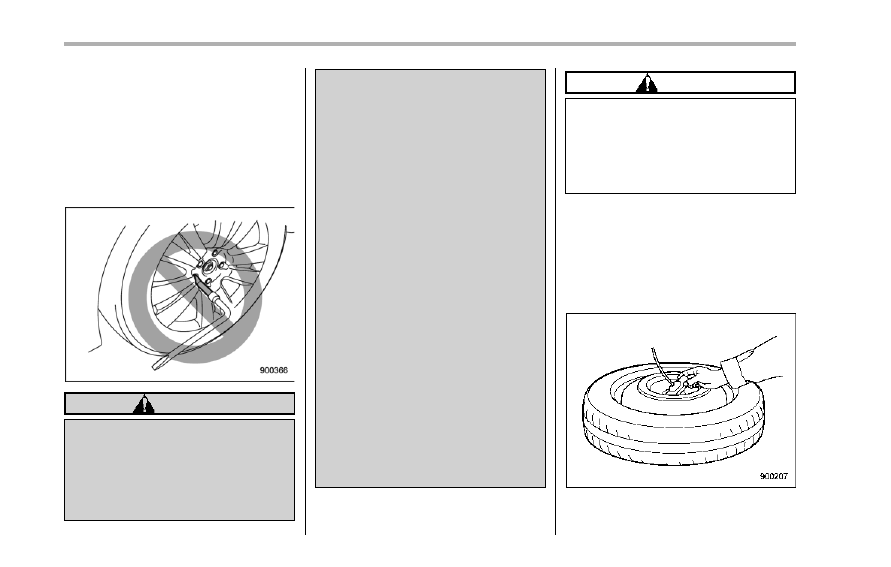
8. Tilt the retainer at the end of the cable
In case of emergency
9-3
– CONTINUED –
9-4
In case of emergency
and pull it through the center of the
temporary spare tire.
9. After the temporary spare tire is
removed from the cable, the cable must
be wound up completely by turning the
hoist nut shaft clockwise until you hear a
clicking sound. Also visually inspect the
cable to make certain that there is no
longer any slack present.
WARNING
. Do not use the extension when
turning the wheel nuts. If you did,
you would not be able to achieve
sufficient tightening torque. The
wheel nuts could then come
loose, resulting in a serious
accident.
. When using the spare tire hoist:
After the temporary spare tire is
removed from the cable, wind the
cable up completely until the
retainer at end of the cable sits
against the underside of the
vehicle. Driving with the cable
not retracted fully could result in
damage to the adjacent under
floor parts and lead to a serious
accident.
. The spare tire holder is designed
to carry only the following kinds
of tires.
– the temporary spare tire that
came with your vehicle
– a full-size flat tire
A full size flat tire should be
stowed in the spare tire holder
in an emergency only. After hav-
ing the full-size flat tire repaired,
immediately swap it with the
temporary spare tire.
Never stow a full-size tire that is
not flat in the spare tire holder.
Doing so can result in damage to
adjacent under floor parts and
can lead to a serious accident.
CAUTION
When using the spare tire hoist:
Do not use air tools or power tools
to turn the spare tire hoist shaft end.
If you do, it could result in severe
mechanical damage to the spare tire
hoist.
& Re-storage of spare tire
1. Turn the spare tire hoist shaft end
counterclockwise with the wheel nut
wrench to loosen the cable sufficiently
enough to allow the cable end retainer go
through center hole of the temporary
spare tire.
2. Insert the retainer through the center
hole of the temporary tire (with the outside
Нет комментариевНе стесняйтесь поделиться с нами вашим ценным мнением.
Текст