Subaru XV Crosstrek (2016 year). Manual — part 21
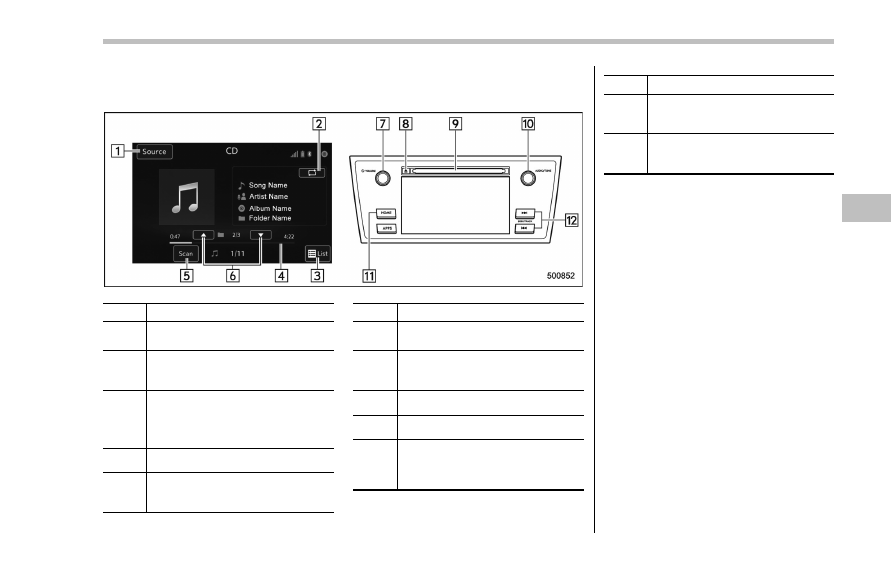
& CD
! Control screen and audio panel
No.
Function
&
1
Select to display the audio source
selection screen.
&
2
Select to display the play mode
currently selected. Refer to
“Select
play mode
” F5-54.
&
3
Audio CD:
Select to display a track list.
MP3/WMA/AAC disc:
Select to display a folder list.
&
4
Shows progress.
&
5
The tracks in the disc are played
back for 10 seconds each from the
beginning of the track.
No.
Function
&
6
MP3/WMA/AAC disc:
Select to choose a folder.
&
7
Turn to adjust volume.
Press to turn the audio system on/
off.
&
8
Press to eject a disc.
&
9
Disc slot
&
10
Turn to select a track/file.
Press to select an audio source.
Refer to
“Selecting an audio source”
F5-18.
No.
Function
&
11
Press to display the sound setting
screen. Refer to
“Unit settings” F5-
19.
&
12
Press to select a track/file.
Press and hold to fast forward/re-
wind.
NOTE
. Depending on the compression data
format of the inserted CD, some keys
may not be displayed on the screen.
. If a disc contains CD-DA files and
MP3/WMA/AAC files, only the CD-DA
files can be played back.
. If a CD-TEXT disc is inserted, the
title of the disc and track will be
displayed. Up to 32 characters can be
displayed.
. If the disc contains no CD-TEXT,
only the track number would be dis-
played on the screen.
Audio/Audio set
– CONTINUED –
5-53
Audio/Audio set
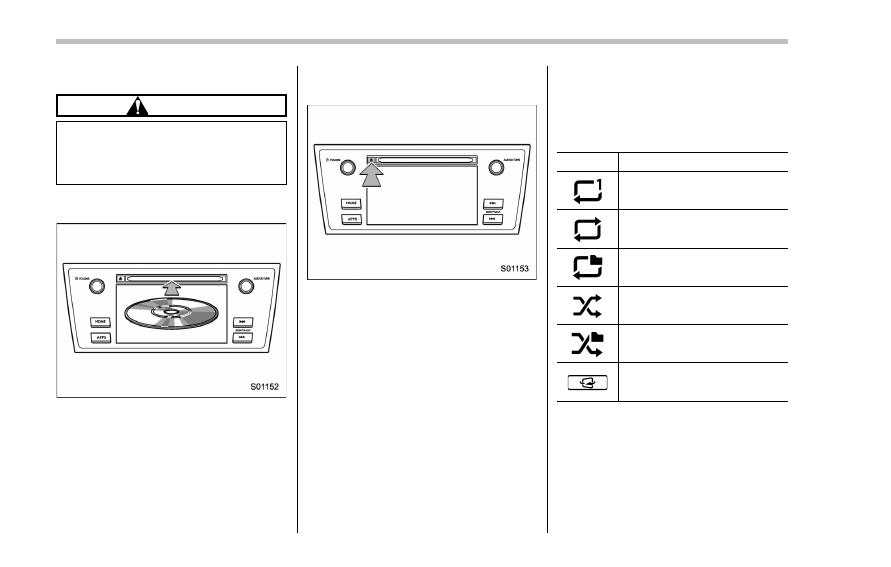
! Loading a disc
CAUTION
Never try to disassemble the audio
kit or lubricate any part of the CD
player. Do not insert anything other
than a disc into the slot.
Insert a disc into the disc slot. After
insertion, the disc is automatically loaded.
NOTE
When inserting a disc, gently insert it
with the label facing up.
! Unloading a disc
Press the eject button to remove the disc.
! How to change the source
The CD operation screen can be reached
by the following methods:
. Insert a disc. Refer to “Loading a disc”
F5-54.
. Select the “DISC” key on the source
select screen. Refer to
“Selecting an audio
source
” F5-18.
! Select play mode
The play mode settings display will appear
when play mode key is touched. Select
the preferred play mode from the following
items.
Icon
Function
Touch to start 1 track repeat.
Touch to start repeat all.
Touch to start folder repeat.
Touch to start shuffle all.
Touch to start shuffle folder.
Return to the control screen.
NOTE
Depending on the compression data
formant of the inserted CD, the dis-
played play mode may differ from the
illustration shown here.
5-54
& USB memory
Audio files on the USB memory can be
played.
WARNING
Do not operate the player
’s controls
or connect the USB memory while
driving. Doing so may result in
losing control of your vehicle and
cause an accident or serious injury.
CAUTION
. Do not leave your USB memory
in the car. In particular, high
temperatures inside the vehicle
may damage the USB memory.
. Do not push down on or apply
unnecessary pressure to the
USB memory while it is con-
nected as this may damage the
USB memory or its terminal.
. Do not insert foreign objects into
the port as this may damage the
USB memory or its terminal.
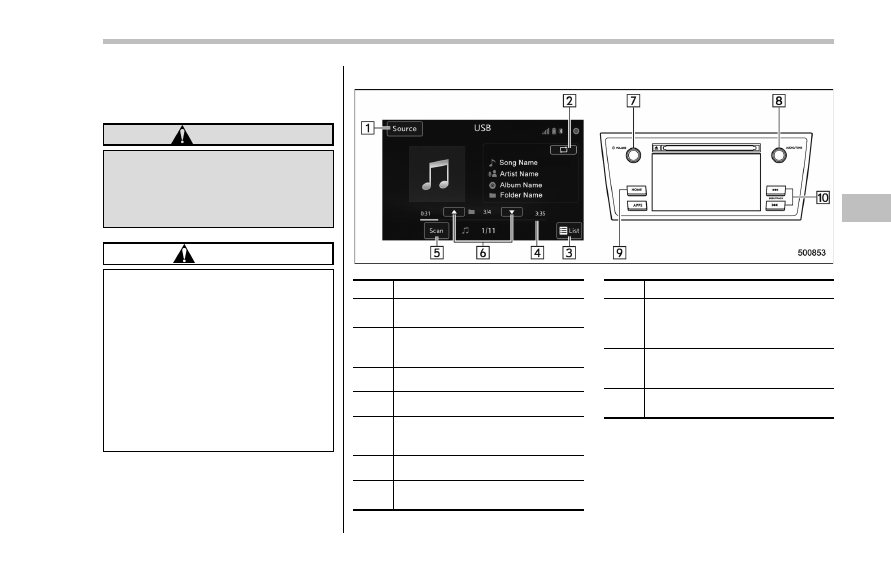
! Control screen and audio panel
No.
Function
&
1
Select to display the audio source
selection screen.
&
2
Select to display the play mode
currently selected. Refer to
“Select
play mode
” F5-56.
&
3
Select to display folder list.
&
4
Shows progress.
&
5
The tracks in the folder are played
back 10 seconds each from the
beginning of the track.
&
6
Select to choose a folder.
&
7
Turn to adjust volume.
Press to turn the audio system on/off.
No.
Function
&
8
Turn to select a file/track.
Press to select an audio source.
Refer to
“Selecting an audio source”
F5-18.
&
9
Press to display the sound setting
screen. Refer to
“Unit settings” F5-
19.
&
10
Press to select a file/track.
Press and hold to fast forward/rewind.
Audio/Audio set
– CONTINUED –
5-55
Audio/Audio set
! Connecting a USB device
You can connect a USB device to the
vehicle USB port. Refer to
“Connecting
and disconnecting a USB memory/porta-
ble device
” F5-17.
! How to change the source
The USB Audio playback screen can be
reached by the following methods:
. Connect a USB memory. Refer to
“Connecting and disconnecting a USB
memory/portable device
” F5-17.
. Select the “USB/iPod” key on the
source select screen. Refer to
“Selecting
an audio source
” F5-18.
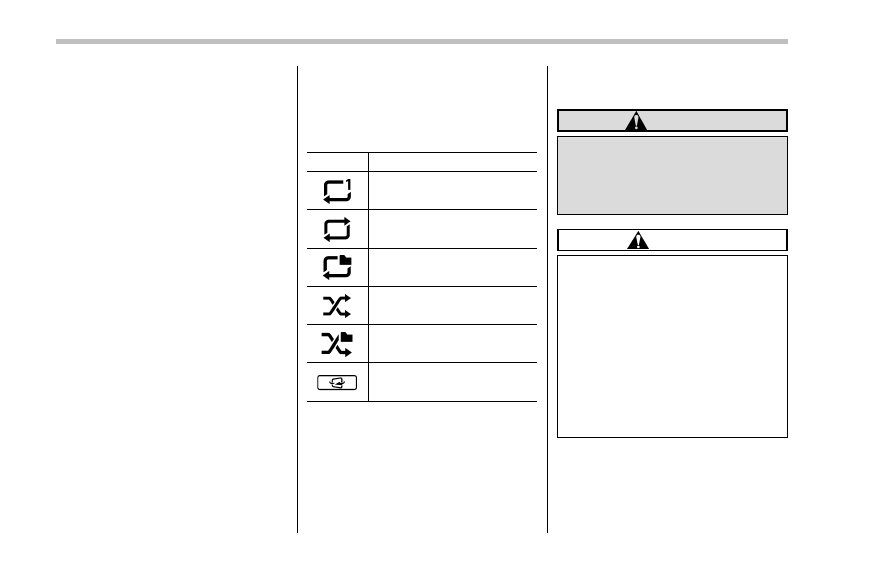
! Select play mode
The play mode settings display will appear
when play mode key is touched. Select
the preferred play mode from the following
items.
Icon
Function
Touch to start 1 track repeat.
Touch to start repeat all.
Touch to start folder repeat.
Touch to start shuffle all.
Touch to start shuffle folder.
Return to the control screen.
& iPod
Audio files on the iPod can be played.
WARNING
Do not operate the player
’s controls
or connect the iPod while driving.
Doing so may result in loss of
control of your vehicle and cause
an accident or serious injury.
CAUTION
. Do not leave your portable player
in the car. In particular, high
temperatures inside the vehicle
may damage the portable player.
. Do not push down on or apply
unnecessary pressure to the por-
table player while it is connected
as this may damage the portable
player or its terminal.
. Do not insert foreign objects into
the port as this may damage the
portable player or its terminal.
5-56
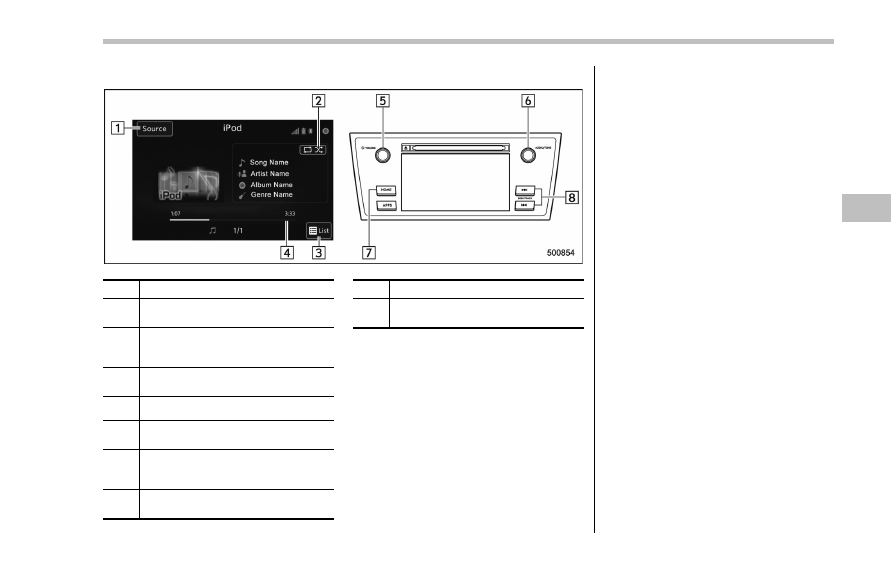
! Control screen and audio panel
No.
Function
&
1
Select to display the audio source
selection screen.
&
2
Select to display the play mode
currently selected. Refer to
“Select
play mode
” F5-58.
&
3
Select to display iPod List. Refer to
“iPod settings” F5-58.
&
4
Shows progress.
&
5
Turn to adjust volume.
Press to turn the audio system on/off.
&
6
Turn to select a track/file.
Press to select an audio source. Refer
to
“Selecting an audio source” F5-18.
&
7
Press to display the sound setting
screen. Refer to
“Unit settings” F5-19.
No.
Function
&
8
Press to select a track/file.
Press and hold to fast forward/rewind.
NOTE
. When an iPod is connected using a
genuine USB cable, the iPod starts
charging its battery.
. When an iPod is connected and the
audio source is changed to iPod mode,
the iPod will resume playing from the
same point it was last used.
. Depending on the iPod that is con-
nected to the system, certain functions
may not be available.
. Files/tracks selected by operating a
connected iPod may not be recognized
or displayed properly.
! Connecting the iPod
You can connect an iPod to the vehicle
USB port using the USB cable. Refer to
“Connecting and disconnecting a USB
memory/portable device
” F5-17.
Audio/Audio set
– CONTINUED –
5-57
Audio/Audio set
! How to change the source
The iPod operation screen can be
reached by the following methods:
. Connect an iPod. Refer to “Connecting
and disconnecting a USB memory/porta-
ble device
” F5-17.
. Select the “USB/iPod” key on the
source select screen. Refer to
“Selecting
an audio source
” F5-18.
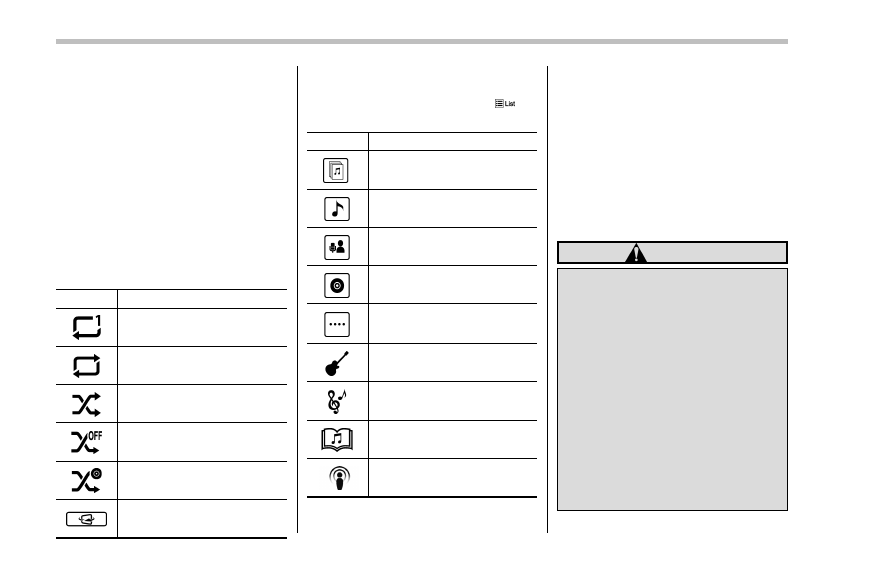
! Select play mode
The play mode settings display will appear
when play mode key is touched. Select
the preferred play mode from the following
items.
Icon
Function
Touch to start 1 track repeat.
Touch to start repeat all.
Touch to start shuffle all.
Touch to turn off shuffle.
Touch to start shuffle album.
Return to the control screen.
! iPod settings
You can choose the following items from
the list screen after touching the
tab
on the screen.
Icon
Function
Select to display the play list.
Select to display tracks list.
Select to display artists list.
Select to display albums list.
Select to open other list (
“Gen-
res
”, “Composers”, “Audiobooks”
and
“Podcast”).
Select to open
“Genres” list.
Select to open
“Composers” list.
Select to open
“Audiobooks” list.
Select to open
“Podcasts” list.
& Bluetooth audio
The Bluetooth audio system enables
users to enjoy listening to music that is
played on a portable player on the vehicle
speakers via wireless communication.
This audio system supports Bluetooth, a
wireless data system capable of playing
portable audio music without cables. If
your device does not support Bluetooth,
the Bluetooth audio system will not func-
tion.
WARNING
. Do not operate the player’s con-
trols or connect to the Bluetooth
audio system while driving.
Doing so may result in loss of
control of your vehicle and cause
an accident or serious injury.
. Your audio unit is fitted with
Bluetooth antennas. People with
implantable cardiac pacemakers,
cardiac resynchronization ther-
apy-pacemakers or implantable
cardioverter defibrillators should
maintain a reasonable distance
between themselves and the
Bluetooth antennas. The radio
waves may affect the operation
of such devices.
5-58
. Before using Bluetooth devices,
users of any electrical medical
device other than implantable
cardiac pacemakers, cardiac re-
synchronization therapy-pace-
makers or implantable cardiover-
ter defibrillators should consult
the manufacturer of the device
for information about its opera-
tion under the influence of radio
waves. Radio waves could have
unexpected effects on the opera-
tion of such medical devices.
CAUTION
Do not leave your portable player in
the vehicle. In particular, high tem-
peratures inside the vehicle may
damage the portable player.
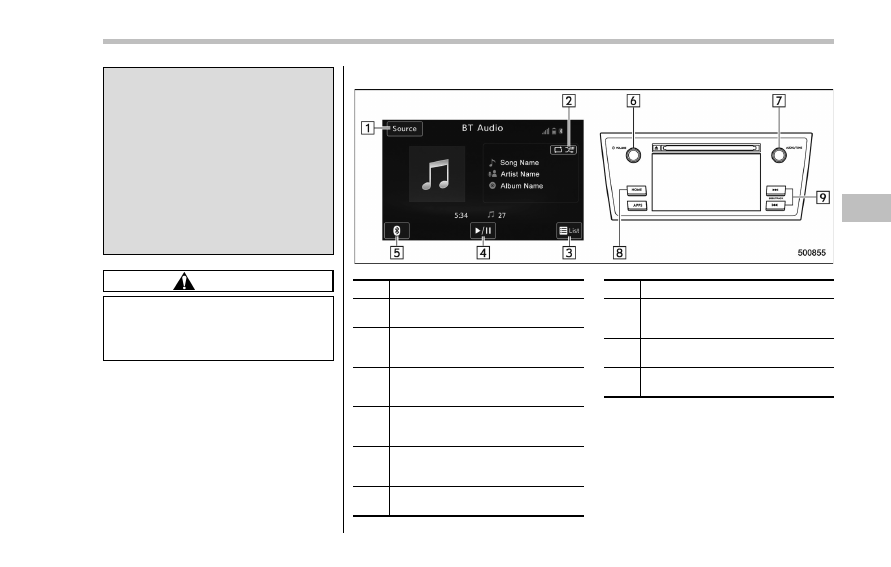
! Control screen and audio panel
No.
Function
&
1
Select to display the audio source
selection screen.
&
2
Select to display the play mode
currently selected. Refer to
“Select
play mode
” F5-60.
&
3
Select to display as a list (for the
models with AVRCP Ver. 1.4 or high-
er).
&
4
The track pauses when touched dur-
ing playback and plays when touched
during pause.
&
5
Select to open Bluetooth Settings.
Refer to
“Setting Bluetooth details”
F5-69.
&
6
Turn to adjust volume.
Press to turn the audio system on/off.
No.
Function
&
7
Turn to select a track.
Press to select an audio source. Refer
to
“Selecting an audio source” F5-18.
&
8
Select to display the sound setting
screen. Refer to
“Unit settings” F5-19.
&
9
Press to select a track.
Press and hold to fast forward/rewind.
Audio/Audio set
– CONTINUED –
5-59
Audio/Audio set
NOTE
. Depending on the Bluetooth device
that is connected to the system, the
music may start playing when selecting
the
key while it is paused. Con-
versely, the music may pause when
selecting the
key while it is playing.
. In the following conditions, the sys-
tem may not function:
– The Bluetooth device is turned
off.
– The Bluetooth device is not con-
nected.
– The Bluetooth device has a low
battery.
. It may take time to connect the
phone when Bluetooth audio is being
played.
. For operating the portable player,
see the instruction manual that comes
with it.
. If the Bluetooth device is discon-
nected due to poor reception from the
Bluetooth network when the ignition
switch is in the
“ACC” or “ON” posi-
tion, the system will automatically
reconnect to the portable player.
. If the Bluetooth device is discon-
nected on purpose, such as it was
turned off, this does not happen.
Reconnect the portable player manu-
ally.
. Bluetooth device information is re-
gistered when the Bluetooth device is
connected to the Bluetooth audio sys-
tem. When selling or disposing of the
vehicle, remove the Bluetooth audio
information from the system. Refer to
“Bluetooth
®
settings
” F5-66.
! Connecting a Bluetooth device
To use the Bluetooth audio system, it is
necessary to register a Bluetooth device
with the system.
. Registering an additional device
1. Select the
“Add” key on the Bluetooth
devices connection screen.
2. For more information: Refer to
“Regis-
tering/connecting Bluetooth
®
device
” F5-
66.
. Selecting a registered device
1. Select the
“Select” key on the Blue-
tooth devices connection screen.
2. For more information: Refer to
“BT
Devices Connection screen
” F5-69.
! How to change the source
Select the
“BT Audio” key on the source
select screen. Refer to
“Selecting an audio
source
” F5-18.
NOTE
Depending on the type of portable
player connected, some functions
may not be available and/or the screen
may look differently than shown in this
manual.
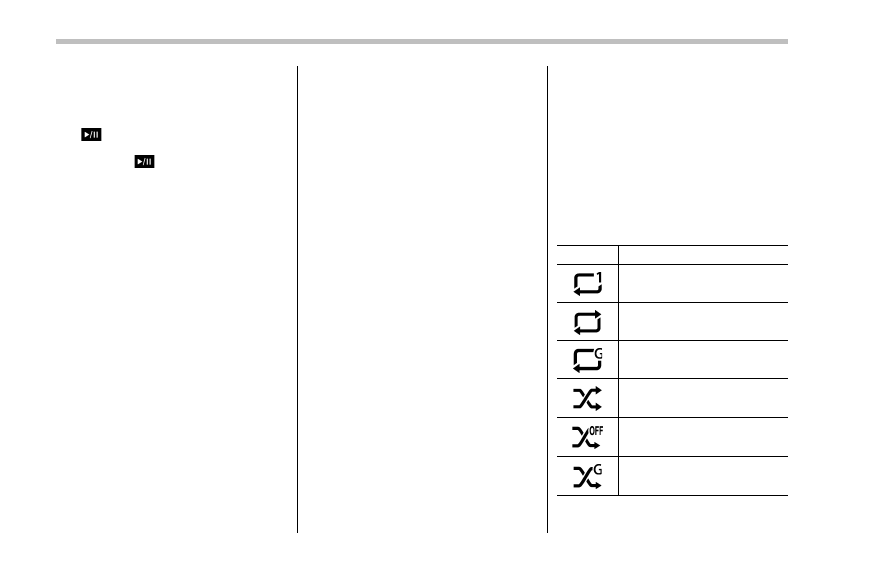
! Select play mode
The play mode settings display will appear
when play mode key is touched. Select
the preferred play mode from the following
items.
Icon
Function
Touch to start 1 track repeat.
Touch to start repeat all.
Touch to repeat the tracks in the
group.
Touch to start shuffle all.
Touch to play tracks in the order
in which they are registered in
the audio device.
Touch to start shuffle group.
5-60
Icon
Function
Return to the control screen.
NOTE
If the connected device does not sup-
port the group repeat mode, the group
functions are not available.
& AUX
WARNING
Do not operate the player
’s controls
or connect the portable audio device
while driving. Doing so may result in
loss of control of your vehicle and
cause an accident or serious injury.
CAUTION
. Do not leave portable audio de-
vice in the vehicle. The tempera-
ture inside the vehicle may be-
come high, resulting in damage
to the player.
. Do not push down on or apply
unnecessary pressure to the por-
table audio device while it is
connected as this may damage
the portable audio device or its
terminal.
. Do not insert foreign objects into
the port as this may damage the
portable audio device or its term-
inal.
Audio/Audio set
– CONTINUED –
5-61
Audio/Audio set
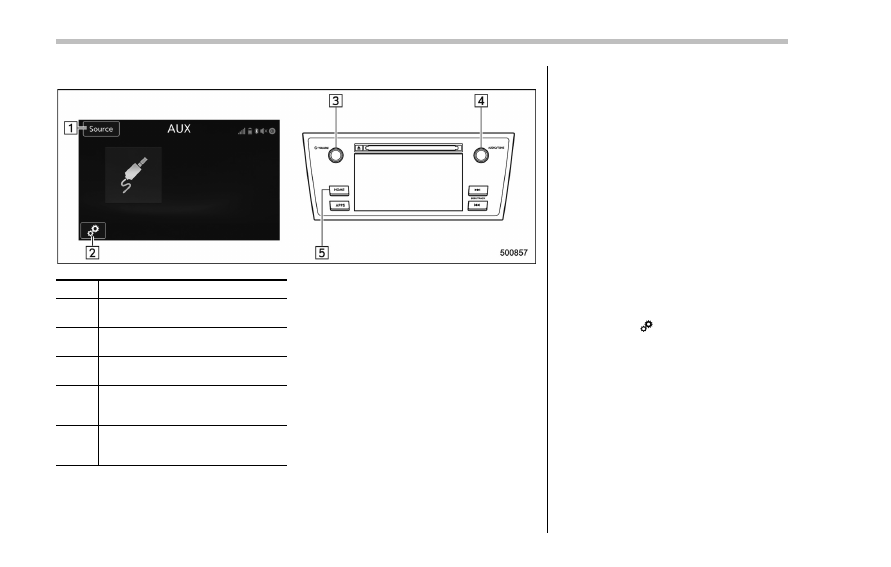
! Control screen and audio panel
No.
Function
&
1
Select to display the audio source
selection screen.
&
2
Select to adjust the audio gain level.
Refer to
“Audio level settings” F5-62.
&
3
Turn to adjust volume.
Press to turn the audio system on/off.
&
4
Press to select an audio source.
Refer to
“Selecting an audio source”
F5-18.
&
5
Press to display the sound setting
screen. Refer to
“Unit settings” F5-
19.
! Connecting a portable audio device
You can connect a portable audio device
to the vehicle AUX jack. Refer to
“Con-
necting and disconnecting a USB mem-
ory/portable device
” F5-17.
! How to change the source
The AUX operation screen can be
reached by the following methods:
. Connect a portable audio device. Refer
to
“Connecting and disconnecting a USB
memory/portable device
” F5-17.
. Select the “AUX” key on the source
select screen. Refer to
“Selecting an audio
source
” F5-18.
! Audio level settings
You can set the audio gain level.
1. Select the
tab on the screen, and
then touch the right side key of the
“Audio
Level
” key.
2. Select the audio level from the follow-
ing items.
. Low
. Mid
. High
5-62
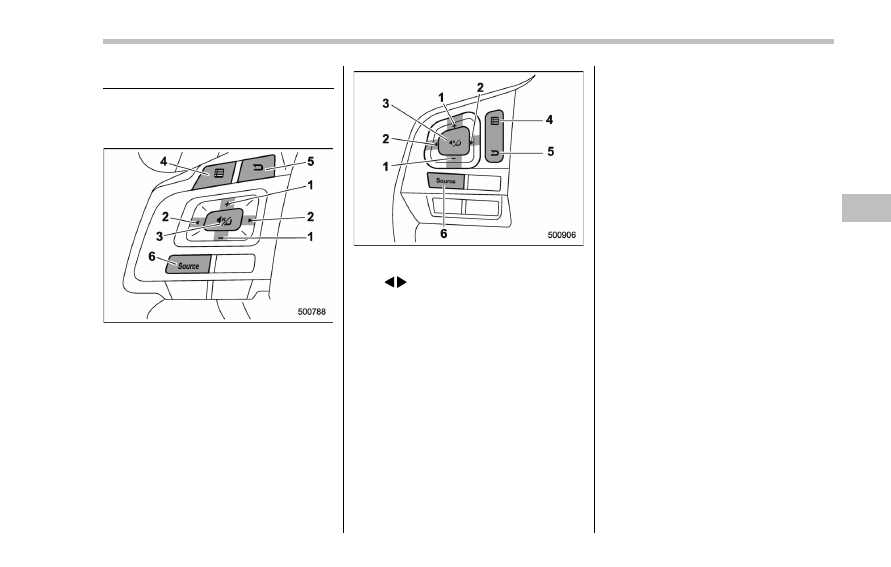
Steering switches for audio
Some parts of the audio/visual system can
be adjusted using the switches on the
steering wheel.
Except Crosstrek models
Crosstrek models
1)
+
− switch
2)
/
switch
3)
Mute/Enter switch
4)
List switch
5)
Back switch
6)
Source switch
Audio/Steering switches for audio
– CONTINUED –
5-63
Audio/Steering switches for audio
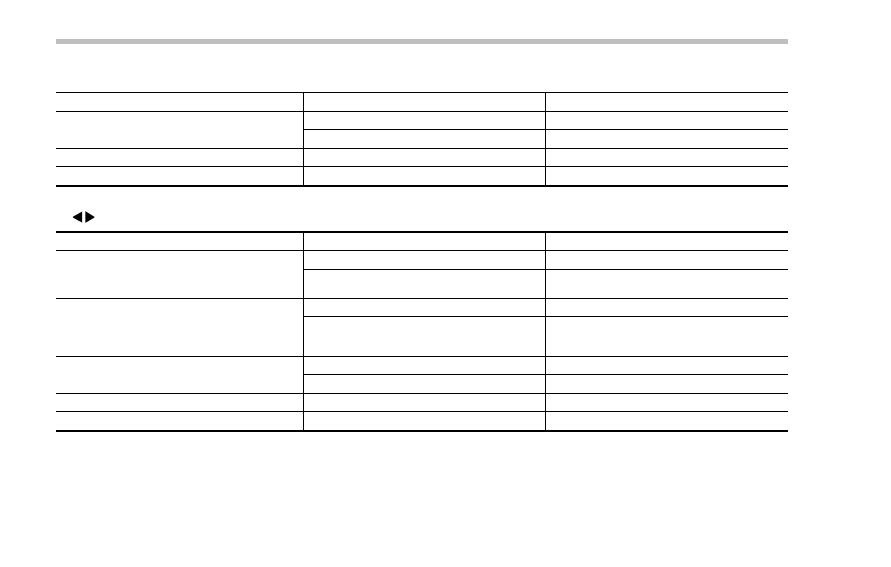
. +/− switch
Mode
Operation
Function
Except list screen
Press
Volume up/down
Press and hold
Volume up/down continuously
List screen
Press
Move cursor up/down
Pandora main screen (if equipped)
Press and hold
“+” switch is thumb up/“−” switch is thumb down
.
/
switch
Mode
Operation
Function
AM/FM Radio, SiriusXM (if equipped)
Press
Preset channel up/down
Press and hold
Seek up/down continuously while the switch is
being pressed
aha
Press
Content up/down
Press and hold
Reverse the current content item for 15 sec-
onds/Fast forward the current content item for
30 seconds
Audio CD, MP3/WMA/AAC disc, USB, iPod, BT
audio
Press
Select a track/file
Press and hold
Fast forward/rewind
Pandora (if equipped)
Press and hold
Thumbs up
List screen
Press
Move cursor left/right
5-64

. Mute/Enter switch
Mode
Operation
Function
List screen
Press
Select cursor entry
CD, USB, iPod, BT audio, Pandora (if equipped), aha Press
Pause or play back
AM/FM radio, AUX, SiriusXM (if equipped)
Press
Mute or cancel mute
. Back switch
Mode
Operation
Function
All (except for SUBARU STARLINK)
Press
Return to the previous screen
All
Press and hold
Return to the HOME screen
. List switch
Mode
Operation
Function
All (except for SUBARU STARLINK)
Press
Show list screen
. Source switch
Mode
Operation
Function
All
Press
Change audio modes
NOTE
In the aha, Pandora (if equipped) and SUBARU STARLINK (if equipped) mode, some operation may be done on the screen
depend on the selected APPS.
Audio/Steering switches for audio
5-65
Audio/Bluetooth
®
settings
Bluetooth
®
settings
WARNING
Be sure to park the vehicle in a safe
location before connecting or oper-
ating a Bluetooth phone or audio
device. Failure to do so may result
in loss of control of your vehicle and
cause an accident or serious injury.
& Regulatory information
The Bluetooth
®
word mark and logos are
registered trademarks owned by Bluetooth
SIG, Inc.
& Registering/connecting
Bluetooth
®
device
You can register up to five devices,
regardless of whether they are Bluetooth
phones or audio devices.
NOTE
. Once the phone has been regis-
tered, it is possible to use the hands-
free system or Bluetooth audio.
. Devices cannot be registered during
driving.
! Registering a Bluetooth phone for
the first time
To use the hands-free system, it is
necessary to register a Bluetooth phone
with the system.
For details about registering a Bluetooth
device: Refer to
“Registering a Bluetooth
Audio device for the first time
” F5-67.
1. Turn the Bluetooth connection setting
of your cell phone on.
. This function is not available when
Bluetooth connection setting of your
cell phone is set to off.
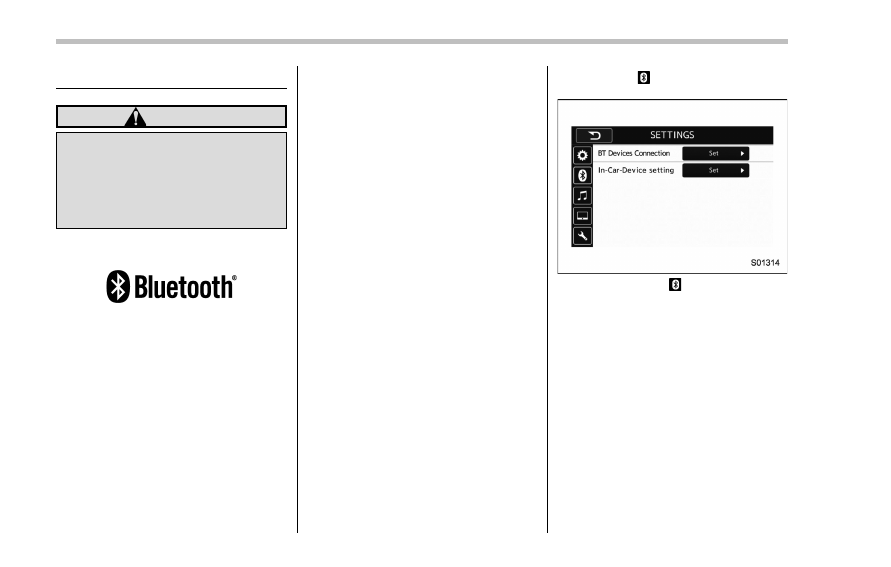
2. Press the HOME button and select the
“SETTINGS” key.
3. Touch the
tab and then the
“SET-
TINGS
” screen will appear.
Settings (When the
tab is selected)
. Operations up to this point can also
be performed by pressing the off hook
switch on the steering wheel.
4. To register a device, touch the
“Set”
key on
“BT Devices Connection”.
5-66
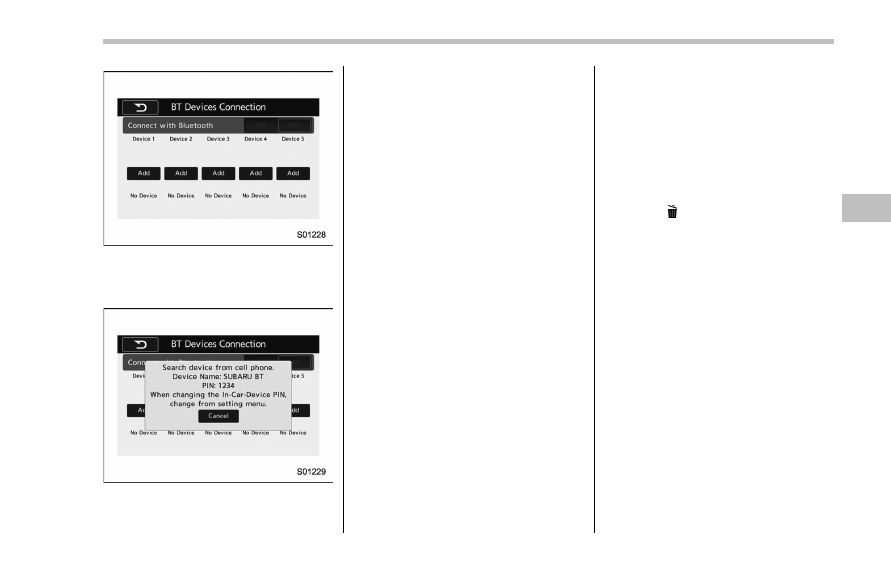
“BT Devices Connection” screen (At the
initial startup and when no device is
registered).
5. Touch the
“Add” key.
When the
“Add” key is selected (Waiting
for the connection request from a device).
. For details about operating the Blue-
tooth device, see the manual that
comes with it.
. To cancel the registration, touch the
“Cancel” key.
6. Register the Bluetooth device using
your Bluetooth device.
. A PIN-code is not required for SSP
(Secure Simple Pairing) compatible
Bluetooth devices. Depending on the
type of Bluetooth device being con-
nected, a message confirming regis-
tration may be displayed on the Blue-
tooth device
’s screen. Respond and
operate the Bluetooth device accord-
ing to the confirmation message.
7. Check that the screen is displayed
when registration is complete.
. The system waits for connection
requests coming from the registered
device.
. At this stage, the Bluetooth func-
tions are not yet available.
! Registering a Bluetooth Audio de-
vice for the first time
To use the Bluetooth Audio, it is necessary
to register an audio device with the
system.
The device registration procedure is the
same for both the hands-free system and
Bluetooth audio.
1. Display the
“BT Devices Connection”
screen. Refer to
“Registering a Bluetooth
phone for the first time
” F5-66.
2. Select the
“Add” key.
The
“Add” key is not displayed when five
devices are already registered.
To add another device, you need to delete
one of the registered devices.
Press the
key for the device to be
deleted, and then select the
“OK” key.
3. Register the Bluetooth device using
your Bluetooth device.
. A PIN-code is not required for SSP
(Secure Simple Pairing) compatible
Bluetooth devices. Depending on the
type of Bluetooth device being con-
nected, a message confirming regis-
tration may be displayed on the Blue-
tooth device
’s screen. Respond and
operate the Bluetooth device accord-
ing to the confirmation message.
4. Check that the screen is displayed
when registration is complete.
. The system waits for connection
requests coming from the registered
device.
. At this stage, the Bluetooth func-
tions are not yet available.
Audio/Bluetooth
®
settings
– CONTINUED –
5-67

Audio/Bluetooth
®
settings
! Profiles
This system supports the following services.
Bluetooth Device
Spec.
Function
Requirements
Recommendations
Bluetooth Phone/Bluetooth
Audio Device
Bluetooth Specification
Registering a Bluetooth de-
vice
Ver. 1.1
Ver. 2.1 + EDR
Bluetooth Device
Profile
Function
Requirements
Recommendations
Bluetooth Phone
HFP (Hands-Free Profile)
Hands-free system
Ver. 1.0
Ver. 1.5
OPP (Object Push Profile)
Transferring the contacts
Ver. 1.1
Ver. 1.1
PBAP (Phone Book Access
profile)
Ver. 1.0
Ver. 1.0
MAP (Message Access
Profile)
Bluetooth phone message
—
Ver. 1.0
SPP (Serial Port Profile)
Connecting a Bluetooth
phone
—
Ver. 1.1
Bluetooth Audio Device
A2DP (Advanced Audio
Distribution Profile)
Bluetooth audio system
Ver. 1.0
Ver. 1.2
AVRCP (Audio/Video Re-
mote Control Profile)
Ver. 1.0
Ver. 1.4
NOTE
. If your cell phone does not support HFP, registering the Bluetooth phone or using OPP, PBAP, MAP or SPP profiles
individually will not be possible.
. If the connected Bluetooth device version is older than recommended or incompatible, the Bluetooth device function may
not work properly.
. For USA customers, please visit www.subaru.com for details. Outside of the USA customers, contact your local dealer to
arrange a demonstration in order to confirm whether or not the device can be paired with the vehicle.
5-68
Нет комментариевНе стесняйтесь поделиться с нами вашим ценным мнением.
Текст