Subaru XV Crosstrek (2016 year). Manual — part 19
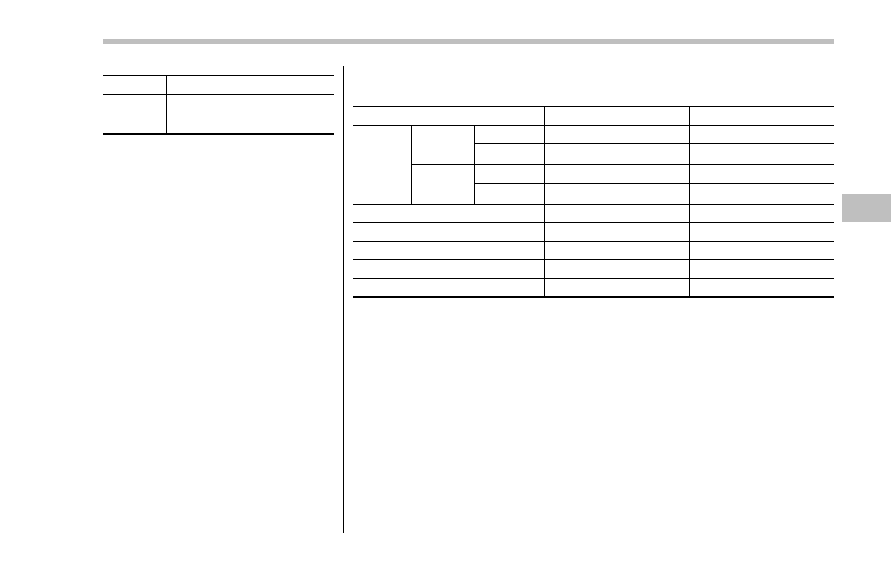
Item
Function
Vocal Im-
age Con-
trol
Select to pick-up vocal sound
signal from the sound data, and
adjust it to right/left or front/rear.
Refer to the following table for the adjustment range of each audio setting item and
default value.
Item
Step
Default
Balance/
Fader
Volume
Balance
Control
Balance
L9-R9
0 (Center)
Fader
F9-R9
0 (Center)
Vocal
Image
Control
Balance
L9-R9
R3
Fader
F9-R9
0 (Center)
Speed Volume Control
OFF, Low, High
Low
Graphic Equalizer
−6-+6
0 (Flat)
Sound Restorer
ON, OFF
ON
Volume Smoother
OFF, Low, Mid, High
Mid
Virtual Bass
OFF, Low, Mid, High
Mid
Audio/Audio set
– CONTINUED –
5-21
Audio/Audio set
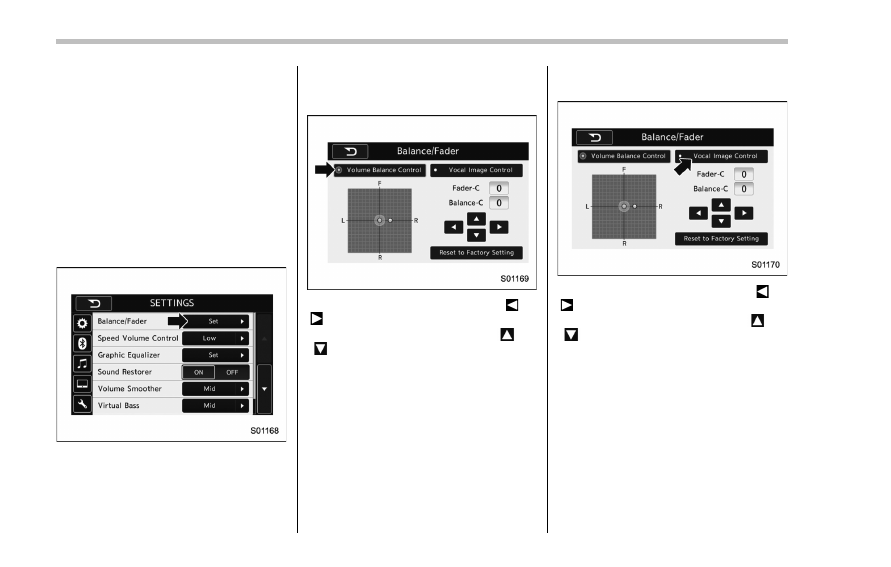
! “Balance/Fader”
A good balance of the left and right stereo
channels and of the front and rear sound
levels is important for good quality audio
program listening.
Keep in mind that when listening to a
stereo recording or broadcast, changing
the right/left balance will increase the
volume of 1 group of sounds while
decreasing the volume of another.
Touch the
“Set” key of the “Balance/Fader”
key. The
“Balance/Fader” screen will
appear.
. Volume Balance setting
1. Select the
“Volume Balance Control”
key.
2. Adjust the balance by pressing
“ ” or
“ ” key.
3. Adjust the fader by pressing
“
” or
“
” key.
. Vocal image setting
1. Select the
“Vocal Image Control” key.
2. Adjust the balance by pressing
“ ” or
“ ” key.
3. Adjust the fader by pressing
“
” or
“
” key.
5-22
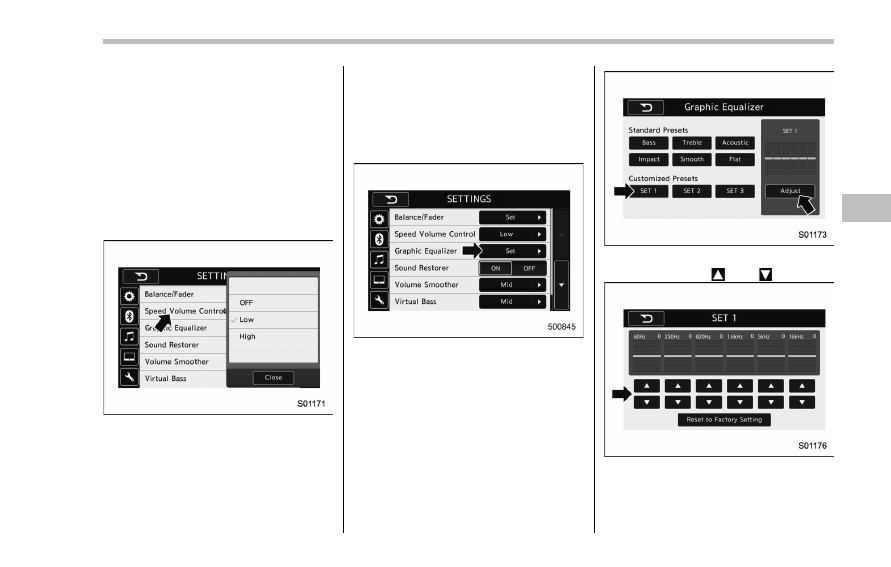
! “Speed Volume Control”
The system adjusts to the optimum
volume and tone quality according to
vehicle speed to compensate for in-
creased vehicle noise.
1. Touch the right side key of the
“Speed
Volume Control
” key.
2. Select the desired item. The
“High”
key comes to have a bigger effect. When
the
“OFF” key is selected, speed volume
control function is cancelled.
! “Graphic Equalizer”
You can adjust the sound quality by
increasing/decreasing the gain for each
frequency range.
1. Touch the
“Set” key of the “Graphic
Equalizer
” key.
2. In this mode, 6 preset equalizer
patterns (the
“Bass”, “Treble”, “Acoustic”,
“Impact”, “Smooth” and “Flat” key) and 3
customized patterns (the
“SET 1” - “SET
3
” key) are available.
3. When customizing the equalizer pat-
tern, touch among
“SET 1”, “SET 2” or
“SET 3” and then touch the “Adjust” key.
4. Adjust the level of each frequency
band by touching
“
” or “
” key.
Audio/Audio set
– CONTINUED –
5-23
Audio/Audio set
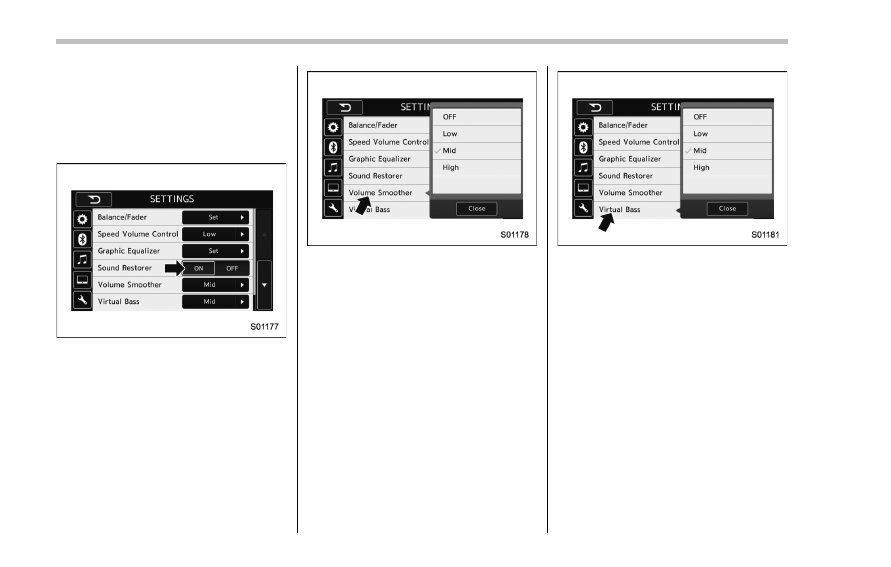
! “Sound Restorer”
You can play compressed audio data with
a sound quality that is close to the original
sound.
Select the
“ON” or “OFF” key by the right
side key of the
“Sound Restorer” key.
! “Volume Smoother”
This function reduces the difference in
volume among the sound sources to be
played.
1. Touch the right side key of the
“Volume
Smoother
” key.
2. Select the
“OFF”, “Low”, “Mid” or
“High” key. The “High” key comes to have
a bigger effect. When the
“OFF” key is
selected, the volume smoother function is
cancelled.
! “Virtual Bass”
This function enables you to adjust the
bass tone.
1. Touch the right side key of the
“Virtual
Bass
” key.
2. Select the
“OFF”, “Low”, “Mid” or
“High” key. The “High” key comes to have
a bigger effect. When the
“OFF” key is
selected, the virtual bass function is
cancelled.
! “Vocal Image Control”
Refer to
““Balance/Fader”” F5-22.
5-24
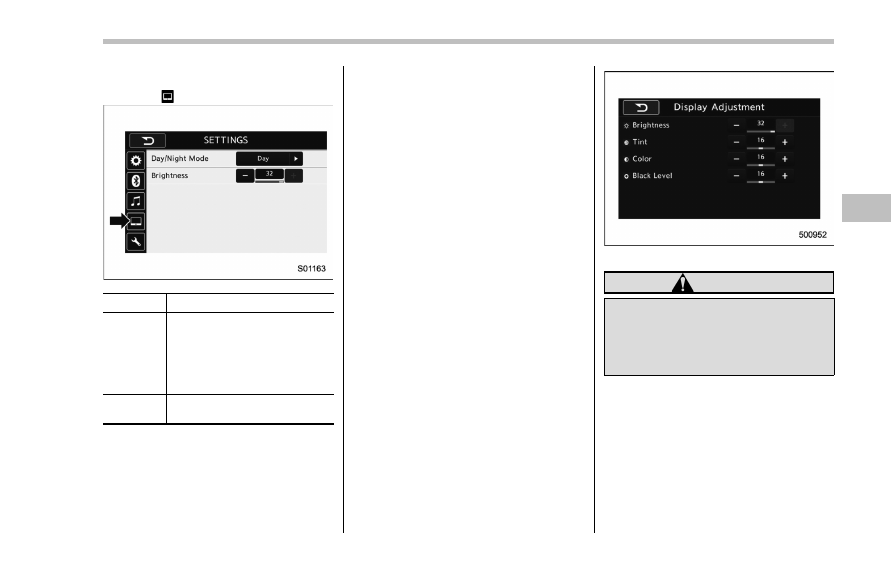
! Display settings
Touch the
tab to set display.
Item
Function
Day/Night
Mode
The
“Auto”, “Day” or “Night” key
can be selected on the pop-up
screen.
When the
“Auto” key is selected,
the screen changes to day or
night mode depending on the
position of the headlight switch.
Brightness
Touch
“+” or “−” to adjust the
brightness.
NOTE
. When the screen is viewed through
polarized sunglasses, a rainbow pat-
tern may appear on the screen due to
optical characteristics of the screen. If
this is disruptive, please operate the
screen without polarized sunglasses.
. If the screen is set to “Day” mode
with the headlight switch turned on,
this condition is memorized even with
the engine turned off.
! How to adjust the rear view
image
In the camera display, the brightness, tint,
color and black level of the screen can be
adjusted.
1. Depress the brake pedal fully and stop
the vehicle.
2. While the vehicle is stopped, set the
shift lever (MT models) or select lever
(CVT models) in the
“R” position, and then
touch the display.
3. Touch the
“Display Adjustment” key.
4. Touch the items to adjust the rear
camera screen.
Camera display
WARNING
When adjusting camera display
screen, make sure to depress the
brake pedal fully to avoid the vehicle
from moving. Failure to do so may
lead to a serious accident.
NOTE
The camera display can be accessed
when the rear camera monitor is dis-
played.
Audio/Audio set
– CONTINUED –
5-25
Audio/Audio set
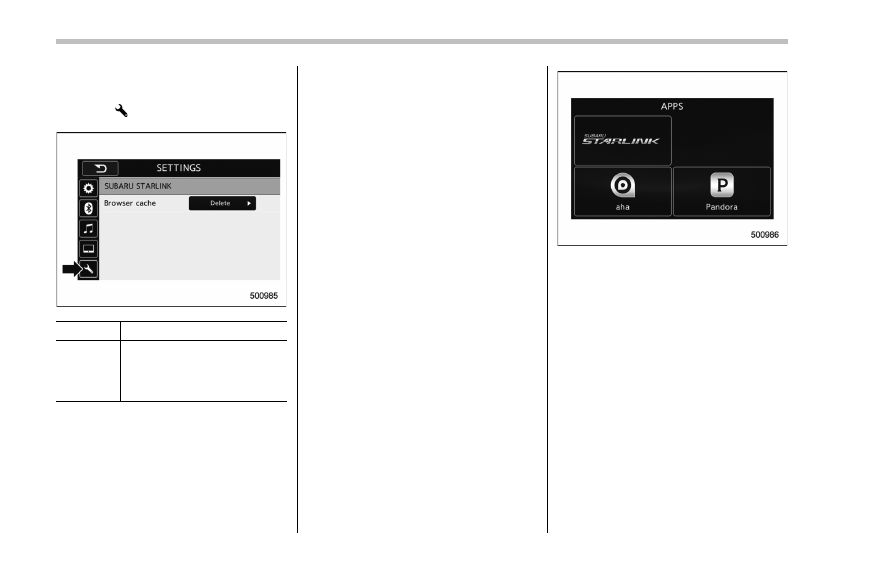
! SUBARU STARLINK settings (if
equipped)
Touch the
tab to change the SUBARU
STARLINK settings.
Item
Function
Browser
cache
Select to initialize cache files
that the browser stores. If the
confirmation screen appears
and the
“OK” key is selected, the
cache files will be deleted.
& SUBARU STARLINK (if
equipped)
The SUBARU STARLINK function allows
the system to link with a smartphone using
Bluetooth.
! How to use SUBARU STARLINK
1. Connect to the audio system. Use a
USB port for an iPhone or iPod touch and
Bluetooth for Android devices.
. For details about connecting an
iPhone/iPod touch: Refer to
“Connect-
ing and disconnecting a USB memory/
portable device
” F5-17.
. For details about registering or con-
necting an Android device: Refer to
“Registering/connecting Bluetooth
®
device
” F5-66.
2. Press the HOME button, and then
touch the
“APPS” key, or press the APPS
button on the audio panel. The APPS
screen is displayed.
3. Touch the
“SUBARU STARLINK” key
on the APPS screen. The disclaimer
screen or the error screen is displayed.
4. Touch the
“Check” key on the disclai-
mer screen and then the APPS main
screen will appear. If you touch the
“Cancel” key, the disclaimer screen dis-
appears and the previous screen will be
displayed again.
NOTE
. The SUBARU STARLINK connection
error screen will be displayed due to
one of the following possible reasons.
– Your smartphone and the system
has not been connected via USB
(for iPhone) or Bluetooth (for An-
droid).
– SUBARU STARLINK APPS has
5-26
not been activated.
. You can also switch to aha or
Pandora (if equipped) from the APPS
screen.
! APPS main screen
No.
Function
&
1
Select to go to the Music APPS
screen.
&
2
Select to go to the News APPS
screen.
&
3
Select to go to the Calender APPS
screen.
&
4
Select to go to the iHeartRadio
APPS screen.
&
5
Select to go to the Weather APPS
screen.
NOTE
. The error screen will be displayed
while using SUBARU STARLINK due to
one of the following possible reasons.
– When your smartphone has no
service or the Bluetooth communi-
cation is not possible.
– When your smartphone is turned
off.
– When the SUBARU STARLINK
APPS is quit.
– When connection to the SUBARU
STARLINK server is not possible.
– When a problem occurs other
than a server error.
. When using the SUBARU STARLINK
function, a disclaimer screen will be
displayed. Be sure to fully read the
contents before using the function.
. Supported devices
– iPhone: iPhone 4/iPhone 4s/
iPhone 5 (iOS Ver. 5.1 or later)/
iPhone 5c/iPhone 5s
– Android: (OS Ver. 4.0 or later)
Audio/Audio set
– CONTINUED –
5-27
Audio/Audio set
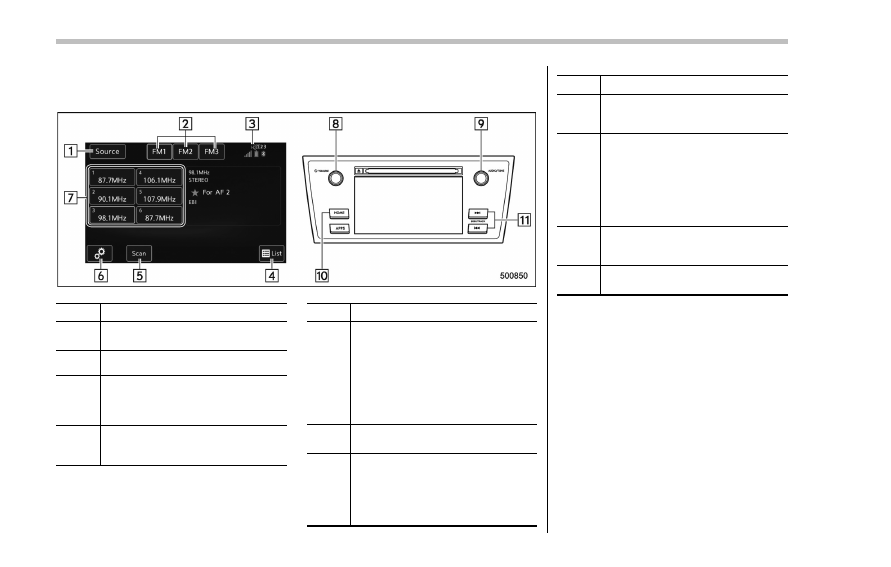
& AM/FM radio
! Control screen and audio panel
No.
Function
&
1
Select to display the audio source
selection screen.
&
2
Select to change the band.
&
3
The HD Radio indicator on the top
right of the screen changes accord-
ing to the reception condition of HD
Radio (if equipped).
&
4
Select to display a station list (if
equipped). Refer to
“Selecting a
station from the list
” F5-29.
No.
Function
&
5
Select to scan radio channels.
This function enables searching for
receivable stations automatically,
and tunes in to a frequency for 5
seconds if a station is found. When
the 5-second period has elapsed, the
system searches for the next recei-
vable station again, and tunes in to
the frequency for 5 seconds.
&
6
Select to open the
“Option” screen.
Refer to
“Radio settings” F5-30.
&
7
When you touch a key, the system
tunes to the stored frequency.
When you touch and hold a key, the
system stores the frequency to the
selected preset channel. Refer to
“Presetting a station” F5-29.
No.
Function
&
8
Turn to adjust volume.
Press to turn the audio system on/
off.
&
9
Turn to step up/down frequencies.
Turn to move up/down the list. Also,
the knob can be used to enter
selections on the list screens by
pressing.
Press to select an audio mode. For
details, refer to
“Selecting an audio
source
” F5-18.
&
10
Press to display the sound setting
screen. Refer to
“Unit settings” F5-
19.
&
11
Press to seek for a station/channel.
Press and hold for continuous seek.
NOTE
. Although FM is normally static free,
reception can be affected by the sur-
rounding area, atmospheric conditions,
station strength and transmitter dis-
tance. Buildings or other obstructions
may cause momentary static, flutter or
station interference. If reception con-
tinues to be unsatisfactory, switch to a
stronger station.
. The radio automatically changes to
stereo reception when a stereo broad-
cast is received.
5-28
. The radio automatically blends to an
HD Radio signal (if equipped) in AM or
FM where available.
! How to change the source
Select the
“AM” or “FM” key on the source
select screen. Refer to
“Selecting an audio
source
” F5-18.
! Presetting a station
In total 18 stations can be set for the FM
band (6 each for FM1, FM2 and FM3) and
12 stations can be set for the AM band (6
each for AM1 and AM2).
1. Tune in the desired station.
2. If you touch and hold a key, the system
stores the frequency to the selected
preset channel.
! Selecting a station from the list (if
equipped)
A station list can be displayed.
1. Touch the
tab.
2. Touch the
tab and the station list will
appear.
3. Select the desired station.
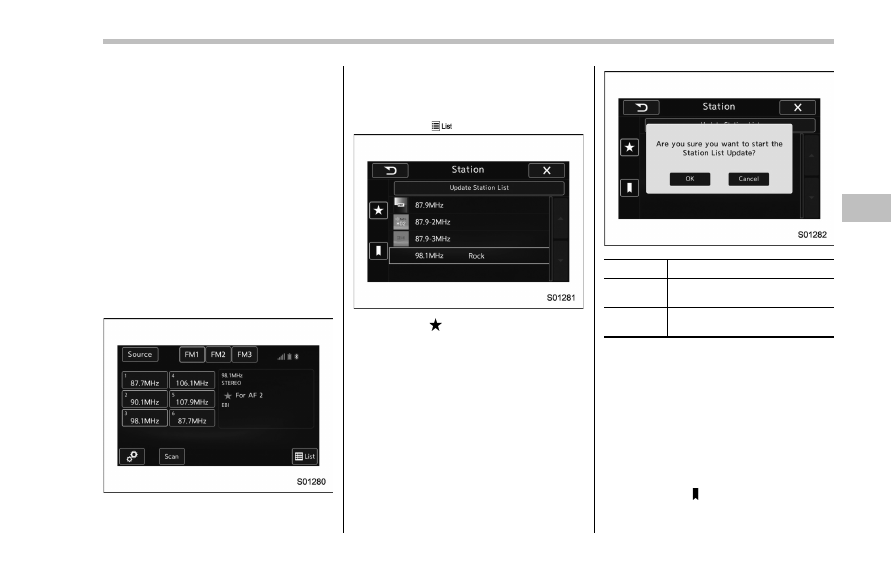
! Update the station list
Touch the
“Update Station List” key on the
station list screen and the following screen
will be displayed.
Item
Function
OK
Select to execute the manual
update.
Cancel
Select to cancel the manual
update.
NOTE
. The audio system sound is muted
during refresh operation.
. In some situations, it may take some
time to update the station list.
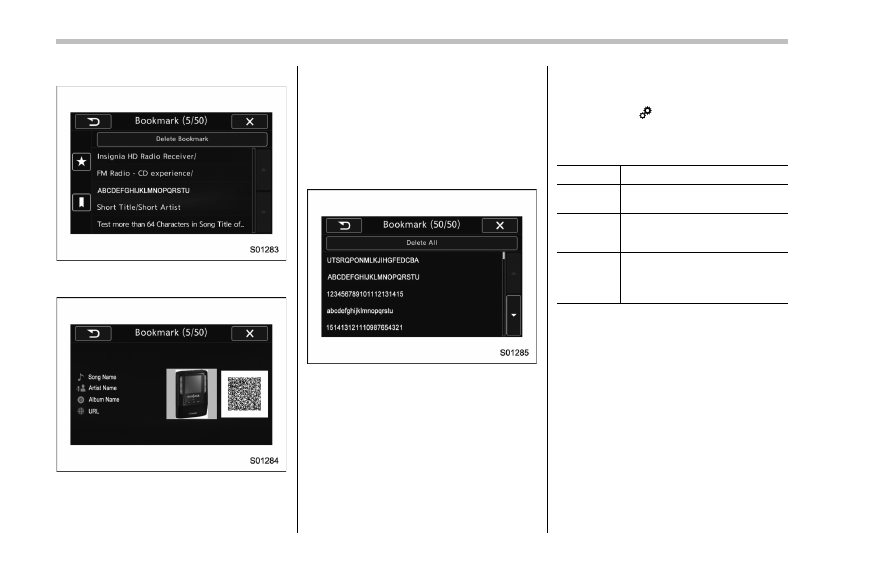
! Bookmark the list
You can store and call up the received
data (images, song titles, artist names,
etc.). The stored data is displayed as a list.
1. Touch the
tab on the station list
screen and the following screen will be
Audio/Audio set
– CONTINUED –
5-29
Audio/Audio set
displayed.
2. Select an item from the bookmark list,
the following image will be displayed.
3. When you call up bookmark informa-
tion, a QR code converted from the
bookmark information will be displayed
on the screen. You can access a URL by
reading the QR code using a smartphone,
etc.
! Delete bookmark from the list
1. Touch the
“Delete Bookmark” key on
the station list screen and the following
screen will be displayed.
2. If you select an item from the book-
mark list, the item will be deleted from the
bookmark list.
3. Touch the
“Delete All” key. If the
confirmation screen appears and the
“OK” key is selected, all bookmark items
in the list will be deleted.
! Radio settings
You can perform various radio settings.
1. Touch the
tab.
2. Select the desired item from the
following table.
Item
Function
HD (if
equipped)
Select to turn HD radio on/off.
PTY Select
(if
equipped)
Select to set the PTY group.
Auto Store
Select to detect 6 radio stations
with strong frequencies automa-
tically and to store them in the
order of frequency.
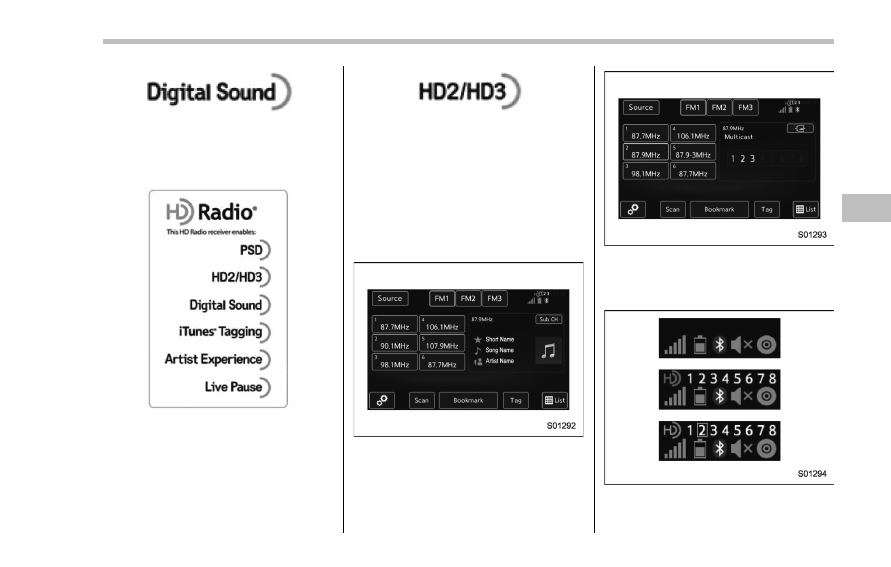
! About HD Radio
TM
technology (if
equipped)
HD Radio
TM
Technology is the digital
evolution of analog AM/FM radio. Your
radio product has a special receiver which
allows it to receive digital broadcasts
(where available) in addition to the analog
broadcasts it already receives. Digital
broadcasts have better sound quality than
analog broadcasts as digital broadcasts
provide free, crystal clear audio with no
static or distortion. For more information,
and a guide to available radio stations and
programming, refer to www.hdradio.com.
5-30
AM and FM broadcast sound quality is
now crystal clear, with AM sound quality
that virtually matches FM quality of the
past, and FM broadcasts that have near
CD-level sound quality.
HD Radio Technology manufactured un-
der license from iBiquity Digital Corpora-
tion. Foreign Patents. HD Radio
TM
and the
HD, HD Radio, and
“Arc” logos are
proprietary trademarks of iBiquity Digital
Corp.
FM stations can provide additional digital-
only audio programming on HD2/HD3
Channels.
! Available HD Radio
TM
technology (if
equipped)
! Multicast
On the FM radio frequency most digital
stations have
“multiple” or supplemental
programs on one FM station.
1. Touch the
“Sub CH” key on the control
screen and the following screen will be
displayed.
2. The indication that shows whether the
current broadcast is digital or analog is
displayed on the top right of the control
screen.
3. Select the desired channel.
Turning the AUDIO/TUNE knob can also
Audio/Audio set
– CONTINUED –
5-31
Audio/Audio set
select the desired multicast channel.
NOTE
. HD Radio
TM
stations can be preset.
. An orange
will be displayed on
the screen when in digital. The
will
first appear in a gray color indicating
the station is indeed (an analog and) a
digital station. Once the digital signal is
acquired, the logo will change to a
bright orange color.
. The song title and artist name will
appear on the screen when available by
the radio station. The radio station can
send album pictures when available.
. As a user works through the analog
radio stations, (where applicable) the
radio receiver will automatically tune
from an analog signal to a digital signal
within 5 seconds.
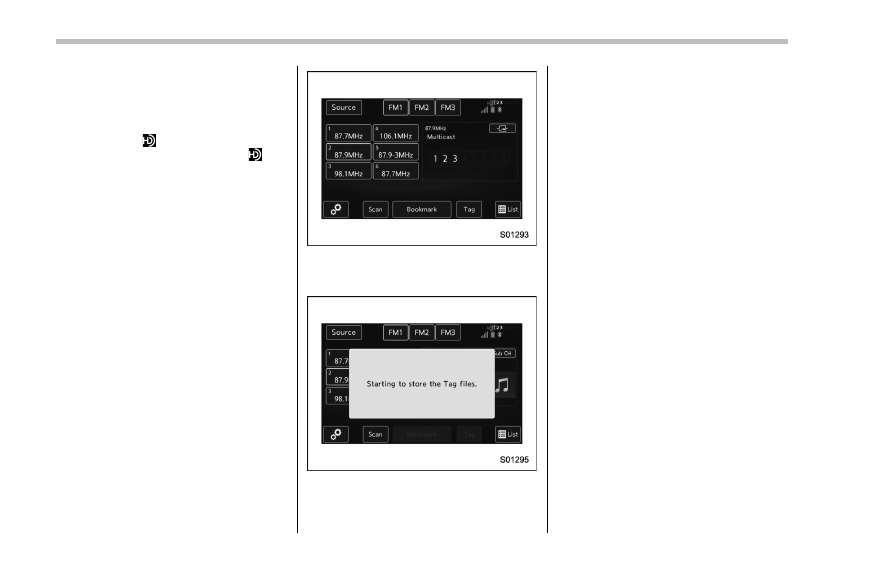
! Preserving a music information
Tag information in the music broadcasting
is preserved in the system and transmits
to an iPod.
1. Touch the
“Tag” key in the control
screen while receiving HD Radio, the tag
setting screen will be displayed.
2. Connect an iPod. Refer to
“Connecting
and disconnecting a USB memory/porta-
ble device
” F5-17.
. Turn on the power of the iPod if it is
not turned on.
. Once an iPod is connected, the
music tag moves from the radio into
the iPod.
. When the iPod is connected to
iTunes, the tagged information of the
songs which were tagged while listen-
ing to the radio can be viewed. Then a
user may decide to purchase the song
or CD/Album which had been listened
to on their radio.
5-32
In addition, the following messages appear.
Display Message
Contents
“Tag storage full”
If there is not enough memory in the digital
audio
“Already Stored”
If the same information is stored in the digital
audio
“Storing Failed”
If the store process in the digital audio failed
“iPod full Tags cannot be stored”
If there is not enough memory in the iPod
“Starting to transfer the Tag files.”
If the system starts to transmit music informa-
tion to an iPod
“Transferring Failed”
If the transmitting process of music information
to an iPod failed
“X Tag(s) Sent” (X = number of transmitted
information) will be displayed.
If the transmitting process of music information
to an iPod is successful
NOTE
. The tag information can not be
preserved while scanning or caching
the radio station.
. If tagging the music information
fails,
“Saving the HD Radio tag was
unsuccessful. (Saving the HD Radio
tag was unsuccessful.)
” will be dis-
played on the screen. If this occurs, tag
the information again.
. Program Service Data: Presents song
name, artist, station IDs, and other rele-
vant data streams.
. iTunes Tagging provides you the op-
portunity to discover a wide range of
content and the means to
“tag” that
content for later review and purchase from
the iTunes Store. Also refer to the Apple
Automotive specifications for implement-
ing iTunes Tagging.
Audio/Audio set
– CONTINUED –
5-33

Audio/Audio set
. Visual information related to content
being played on your HD Radio receiver,
such as Album Art, historical photographs,
still art from live broadcasts, among other
related content.
5-34

! Troubleshooting guide
Experience
Cause
Action
Mismatch of time alignment - a user may hear
a short period of programming replayed or an
echo, stutter or skip.
The radio stations analog and digital volume is
not properly aligned or the station is in ballgame
mode.
None, radio broadcast issue. A user can contact
the radio station.
Sound fades, blending in and out.
Radio is shifting between analog and digital
audio.
Reception issue. May clear-up as the vehicle
continues to be driven. Turning the indicator of the
HD Radio
TM
off will change the radio mode to
analog audio.
Audio mute condition when an HD2/HD3
multicast channel had been playing.
The radio does not have access to digital
signals at the moment.
This is normal behavior, wait until the digital signal
returns. If out of the coverage area, seek a new
station.
Audio mute delay when selecting an HD2/
HD3 multicast channel preset.
The digital multicast content is not available until
HD Radio
TM
broadcast can be decoded and
make the audio available. This takes up to 7
seconds.
This is normal behavior, wait for the audio to
become available.
Text information does not match the present
song audio.
Data service issue by the radio broadcaster.
Broadcaster should be notified. Complete the form;
www.ibiquity.com/automotive/report_radio
_station_experiences.
No text information shown for the present
selected frequency.
Data service issue by the radio broadcaster.
Broadcaster should be notified. Complete the form;
www.ibiquity.com/automotive/report_radio
_station_experiences.
The
“Acquiring” caution message appears
when the system attempts to acquire digital
transmission.
When acquiring digital data while receiving a
digital broadcast and SPS station.
. When the reception in digital of the SPS station
is confirmed.
. When the system determined that the SPS
station could not be received.
. When the SPS broadcast is ended (stopped) by
the radio station while receiving SPS.
Audio/Audio set
– CONTINUED –
5-35

Audio/Audio set
Experience
Cause
Action
The
“HD Channel is unavailable” caution
message appears when digital reception is not
possible.
. When the system determined that the SPS
station could not be received while receiving
a digital broadcast and SPS station.
. When the SPS broadcast is ended
(stopped) by the radio station while receiv-
ing SPS.
. When the status is changed to acquiring digital
data because the reception condition of SPS
station has improved.
. When the received station is changed.
5-36
Нет комментариевНе стесняйтесь поделиться с нами вашим ценным мнением.
Текст