Subaru XV Crosstrek (2016 year). Manual — part 23

! Casual speech recognization
Due to natural language speech recogni-
tion technology, this system enables re-
cognition of a command when spoken
naturally. However, the system cannot
recognize every variation of each com-
mand. In some situations, it is possible to
omit the command for the procedure and
directly state the desired operation. Not all
voice commands are displayed in the
function menu.
NOTE
If the command cannot be recognized
completely, the command input screen
will be displayed. (Search results will
be shown based on the part of the
command that was recognized.)
! Expression examples for each
function
Command
Expression examples
“Dial <phone num-
ber>
”
Phone <phone num-
ber>.
& Command list
Recognizable voice commands and their
actions are shown below.
NOTE
. Some voice commands may not be
available depending on the market,
vehicle specifications or the device
connection status.
. Frequently used commands are
listed in the following tables.
. For devices that are not installed in
the vehicle, the related commands will
not be displayed on the screen. Also,
according to conditions, other com-
mands may not be displayed on the
screen.
. The functions available may vary
according to the system installed.
. Voice recognition language can be
changed. Refer to
“Unit settings” F5-
19.
. The notations used in the com-
mands are as follows.
– <
>: Numbers, titles or
names to be spoken
– (
): There is no need to
speak the command, the voice
command system will recognize
the content.
! Basic command
Voice command
Function
Back
Go back one hierar-
chy or cancel the
voice recognition
(voice command top
screen)
Help
Ask for help with the
current task
Cancel, Close
Cancel the current
task
Yes
No
Display OFF
Turns the display off
Audio ON
Turns the audio sys-
tem on
Audio OFF
Turns the audio sys-
tem off
STARLINK
Switch to APPS mode
Audio/Voice command system
– CONTINUED –
5-85

Audio/Voice command system
! Commands for changing the audio
mode
Voice command
Function
Change to AM
Switch to AM mode
Change to AM1
Switch to AM mode
band 1
Change to AM2
Switch to AM mode
band 2
Change to FM
Switch to FM mode
Change to FM1
Switch to FM mode
band 1
Change to FM2
Switch to FM mode
band 2
Change to FM3
Switch to FM mode
band 3
Change to SiriusXM
Switch to XM mode
Change to BT Audio
Switch to Bluetooth
Audio mode
Change to CD
Switch to CD mode
Change to USB
Switch to USB mode
Change to iPod
Switch to iPod mode
Change to aha
Switch to aha radio
mode
Change to Pandora
Switch to Pandora
mode
Change to AUX
Switch to AUX mode
! Commands for hands-free phone
Voice command
Function
Dial Number
? <0-9,
+, *, #>
? Change
number, Dial
Places a call to the
said phone number
Dial <0-9, +, *, #>
?
Change number, Dial
Contacts, Phonebook
? <Name> ? <1-5>
? Dial
Make a call by using
the phonebook
Call <Name>
?
<1-5>
? Dial
Call History
? In-
coming call, Outgoing
call
? Next (page),
Previous (page)
?
<1-5>
? Dial
Make a call by using
the call history
Incoming Calls
Display the call his-
tory screen
Outgoing Calls
Display the call his-
tory screen
Redial
Places a call to the
phone number of the
latest outgoing call
Callback
Places a call to the
phone number of the
latest incoming call
Select Phone
?
<1-5>
Display the phone
select screen
Phone Menu
Display the hands
free top screen
! Commands for Pandora
Voice command
Function
Like
Mark
“Like” flag
Dislike
Mark
“Dislike” flag
Skip, Next
Skip to the next song
! Commands for aha
Voice command
Function
Thumbs Up, Heart,
Like
Mark
“Like” flag
Thumbs Down, Ban,
Dislike
Mark
“Dislike” flag
Refresh, update
Refresh the selected
station to get the lat-
est information
Content Up
Playback next Con-
tent
Content Down
Playback previous
Content
5-86

! Commands for AM/FM control
Voice command
Function
Seek Up
Tunes in the higher
frequency direction
Seek Down
Tunes in the lower
frequency direction
Scan
Switch to the scan
mode
Tune to <Frequency>
Designate the fre-
quency to switch to a
specific radio station
Preset <preset num-
ber>
Designate the preset
channel to switch to
specific radio station
Tag
iTunes Tagging for
HD Radio
! Commands for SiriusXM radio con-
trol
Voice command
Function
Preset <preset num-
ber>
Designate the preset
channel to switch to
specific radio station
Scan
Switch to the scan
mode
Channel <Channel
number>
Designate the chan-
nel to switch to spe-
cific radio station
Voice command
Function
Category
? Next
(page), Previous
(page), <1-5>
? Next
(page), Previous
(page), <1-5>
Displays the category
list screen
! Commands for CD control
Voice command
Function
Track Up
Select the next track
Track Down
Select the current
track
Scan
Switch to the scan
mode
Repeat
? 1 Track
Repeat, Repeat All
Select a repeat mode
1 Track Repeat
Repeat single track
Repeat All
Repeat all tracks
Shuffle
Plays randomly
! Commands for MP3/WMA/AAC,
USB control
Voice command
Function
Track Up
Select the next track
Track Down
Select the current
track
Voice command
Function
Folder Up
Plays from the start of
the next folder
Folder Down
Plays from the start of
the previous folder
Scan
Switch to the scan
mode
Repeat
? 1 Track
Repeat, Repeat
Folder, Repeat All
Select a repeat mode
1 Track Repeat
Repeat single track
Repeat Folder
Repeat of the folder
Repeat All
Repeat all tracks
Shuffle
? Shuffle
Folder, Shuffle All
Select a random play
mode
Shuffle Folder
Plays randomly of the
folder
Shuffle All
Plays randomly
! Commands for iPod Control
Voice command
Function
Track Up
Select the next track
Track Down
Select the current
track
Repeat
? Repeat
One, Repeat All
Select a repeat mode
Repeat One
Repeat single track
Audio/Voice command system
– CONTINUED –
5-87

Audio/Voice command system
Voice command
Function
Repeat All
Repeat all tracks
Shuffle
? Shuffle
Track, Shuffle Album,
Shuffle OFF
Select a random play
mode
Shuffle Track
Shuffle all tracks
Shuffle Album
Shuffle all tracks
Shuffle OFF
Turn off shuffle
! Commands for Bluetooth audio
control
Voice command
Function
Pause
Pause play
Track Up
Select the next track
Track Down
Select the current
track
Repeat
? 1 track
Repeat, Repeat All,
Group Repeat
Select a repeat mode
1 Track Repeat
Repeat single track
Repeat All
Repeat all tracks
Group Repeat
Repeat tracks on
group
Shuffle
? Shuffle All,
Group Shuffle, Shuf-
fle OFF
Select a random play
mode
Shuffle All
Shuffle all tracks
Group Shuffle
Shuffle tracks on
group
Shuffle OFF
Turn off shuffle
5-88

What to do if...
& Troubleshooting
If there is a problem with the hands-free system or a Bluetooth device, first check the table below.
When using the hands-free system with a Bluetooth device
Symptom
Likely cause
Solution
Page
Cell
phone
This
system
The hands-free system or Bluetooth
device does not work.
The connected device may not be a
compatible Bluetooth cell phone.
For USA customers, please visit
www.subaru.com for details. Outside of the
USA customers, contact your local dealer to
arrange a demonstration in order to confirm
whether or not the device can be paired with
the vehicle.
*
—
The Bluetooth version of the connected
cell phone may be older than the
specified version.
Use a cell phone with Bluetooth version 1.1 or
higher (recommended: Ver. 2.1 + EDR or
higher).
*
5-68
*: For details, refer to the owner
’s manual that came with the cell phone.
Audio/What to do if...
– CONTINUED –
5-89

Audio/What to do if...
When registering/connecting a cell phone
Symptom
Likely cause
Solution
Page
Cell
phone
This
system
A cell phone cannot be registered.
An incorrect passcode was entered
on the cell phone.
Enter the correct passcode on the cell phone.
*
—
The registration operation has not
been completed on the cell phone
side.
Complete the registration operation on the cell
phone (approve registration on the phone).
*
—
Old registration information remains
on either this system or the cell
phone.
Delete the existing registration information from
both this system and the cell phone, then register
the cell phone you wish to connect to this system.
*
5-69
A Bluetooth connection cannot be
made.
Another Bluetooth device is already
connected.
Manually connect the cell phone you wish to use to
this system.
—
5-69
Bluetooth function is not enabled on
the cell phone.
Enable the Bluetooth function on the cell phone.
*
—
Automatic Bluetooth connection on
this system is set to off.
Set automatic Bluetooth connection on this system
to on when the ignition switch is turned to the
“ACC”
or
“ON” position.
—
5-69
*: For details, refer to the owner
’s manual that came with the cell phone.
5-90

When using the phonebook
Symptom
Likely cause
Solution
Page
Cell
phone
This
system
Phonebook data cannot be trans-
ferred manually.
The profile version of the connected cell
phone may not be compatible with
transferring phonebook data.
For USA customers, please visit
www.subaru.com for details. Outside of the
USA customers, contact your local dealer to
arrange a demonstration in order to confirm
whether or not the device can be paired with
the vehicle.
*
—
Transfer operation on the cell phone has
not completed.
Complete transfer operation on the cell phone
(approve transfer operation on the phone).
*
—
Phonebook data cannot be edited.
Editing function is not available on this
system.
—
—
5-79
*: For details, refer to the owner
’s manual that came with the cell phone.
Audio/What to do if...
– CONTINUED –
5-91

Audio/What to do if...
In other situations
Symptom
Likely cause
Solution
Page
Cell
phone
This
system
Even though all conceivable mea-
sures have been taken, the symptom
status does not change.
The cell phone is not close enough to
this system.
Bring the cell phone closer to this system.
—
—
The cell phone is the most likely cause
of the symptom.
Turn the cell phone off, remove and reinstall
the battery pack, and then restart the cell
phone.
*
—
Enable the cell phone
’s Bluetooth connection.
*
—
Stop the cell phone
’s security software and
close all applications.
*
—
Before using an application installed on the
cell phone, carefully check its source and how
its operation might affect this system.
*
—
*: For details, refer to the owner
’s manual that came with the cell phone.
5-92
Appendix
& Certification
. Bluetooth
The Bluetooth word mark and logo are
registered trademarks of Bluetooth SIG,
Inc. and any use of such marks by Clarion
Co., Ltd. is under license.
. SiriusXM Satellite Radio (if
equipped)
SiriusXM
TM
and all related marks and
logos are trademarks of SiriusXM Radio
Inc. All rights reserved.
. Pandora (if equipped)
Pandora, the Pandora logo, and other
Pandora marks are trademarks or regis-
tered trademarks of Pandora Media, Inc.,
or its subsidiaries worldwide.
If you have any issues with the Pandora
application on your mobile phone, please
direct them to
pandora-support@pandora.com.
. iPod
“Made for iPod” and “Made for iPhone”
mean that an electronic accessory has
been designed to connect specifically to
iPod or iPhone respectively, and has been
certified by the developer to meet Apple
performance standards. Apple is not
responsible for the operation of this device
or its compliance with safety and regula-
tory standards. Please note that the use of
this accessory with iPod or iPhone may
affect wireless performance.
iPhone, iPod, iPod classic, iPod nano,
iPod touch, and iTunes are trademarks of
Apple Inc., registered in the U.S. and other
countries.
. How to get the source code using
the open source
This system implements software using
the open source. For customers who
would like to get the source code of the
software, it is available by downloading it
from the web site of Clarion Co., Ltd.
For details, refer to the following web site.
http://www.clarion.com/us/en/support/in-
dex.html
& Certification for the Hands-
free system
This device complies with Part 15 of FCC
Rules and Industry Canada licence-ex-
empt RSS standard(s). Operation is sub-
ject to the following two conditions: (1)
This device may not cause harmful inter-
ference, and (2) this device must accept
any interference received, including inter-
ference that may cause undesired opera-
tion.
Le présent appareil est conforme à la
partie 15 des règles de la FCC et CNR
d
’Industrie Canada applicables aux appa-
reils radio exempts de licence. L
’exploita-
tion est autorisée aux deux conditions
suivantes : (1) l
’appareil ne doit pas
produire de brouillage, et (2) l
’utilisateur
de l
’appareil doit accepter tout brouillage
radioélectrique subi, même si le brouillage
est susceptible d
’en compromettre le
fonctionnement.
This equipment complies with FCC/IC
radiation exposure limits set forth for an
uncontrolled environment and meets the
FCC radio frequency (RF) Exposure
Guidelines in Supplement C to OET65
and RSS-102 of the IC radio frequency
Audio/Appendix
– CONTINUED –
5-93
Audio/Appendix
(RF) Exposure rules. This equipment has
very low levels of RF energy that it
deemed to comply without maximum
permissive exposure evaluation (MPE).
Cet équipement est conforme aux limites
d
’exposition aux rayonnements énoncées
pour un environnement non contrôlé et
respecte les lignes directrices d
’exposition
aux fréquences radioélectriques de la
FCC dans le Supplément C à OET65 et
d
’exposition aux fréquences radioélectri-
ques (RF) CNR-102 de l
’IC. Cet équipe-
ment émet une énergie RF très faible qui
est considérée conforme sans évaluation
de l
’exposition maximale autorisée.
FCC CAUTION
Changes or modifications not expressly
approved by the party responsible for
compliance could void the user
’s authority
to operate the equipment.
This transmitter must not be co-located or
operated in conjunction with any other
antenna or transmitter.
& Certification for Mexico mod-
els
. IFETEL RCPCLPF14-250
Clarion PF-3547
. IFETEL RCPCLPF14-253
Clarion PF-3688
5-94

Interior lights . . . . . . . . . . . . . ...
6-2
Dome light . . . . . . . . . . . . . . ..
6-2
Cargo area light (5-door models) . . . . . . .
6-2
Map lights . . . . . . . . . . . . . . ...
6-3
OFF delay timer . . . . . . . . . . . . ..
6-3
Sun visors . . . . . . . . . . . . . . ...
6-4
Sun visor extension plate (models with the
EyeSight system) . . . . . . . . . . . ..
6-4
Vanity mirror . . . . . . . . . . . . . ...
6-5
Storage compartment . . . . . . . . . . .
6-5
Glove box . . . . . . . . . . . . . . ...
6-6
Center console. . . . . . . . . . . . .
6-6
Cup holders . . . . . . . . . . . . . . .
6-7
Bottle holders . . . . . . . . . . . . . ..
6-7
Accessory power outlets . . . . . . . . .
6-8
Use with a cigarette lighter (dealer option) . . ...
6-9
Ashtray (dealer option) . . . . . . . . . ..
6-10
Floor mat (if equipped). . . . . . . . . ..
6-11
Coat hook. . . . . . . . . . . . . . ...
6-11
Shopping bag hook (5-door). . . . . . . .
6-12
Cargo area cover (5-door
– if equipped). . .. 6-12
Using the cover . . . . . . . . . . . . .
6-12
To remove the cover housing . . . . . . . .
6-13
Stowage of the cargo area cover . . . . . .
6-13
To install the cover housing . . . . . . . ...
6-14
Cargo tie-down hooks (5-door
– if
equipped) . . . . . . . . . . . . . .
6-14
Under-floor storage compartment (if
equipped) . . . . . . . . . . . . . .
6-15
Rear view camera . . . . . . . . . . . ..
6-15
How to use the rear view camera . . . . . ...
6-17
Viewing range on the screen . . . . . . . ..
6-17
Help line . . . . . . . . . . . . . . .
6-18
Interior equipment
6
Interior equipment/Interior lights
Interior lights
CAUTION
When leaving your vehicle, make
sure the lights are turned off to
avoid battery discharge.
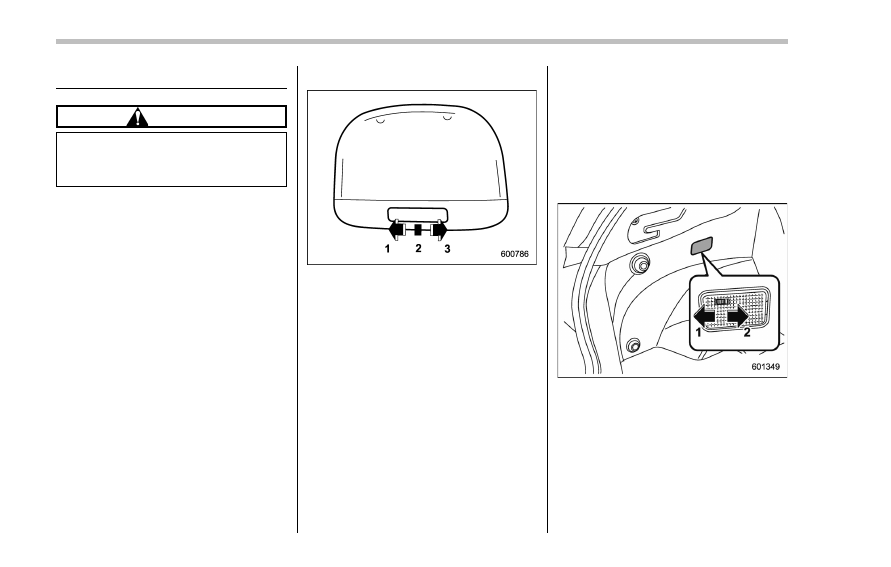
& Dome light
1)
ON
2)
DOOR
3)
OFF
The dome light switch has the following
positions.
ON: The light remains on continuously.
OFF: The light remains off.
DOOR: The dome light illuminates auto-
matically in the following cases.
. Any of the doors or the rear gate (5-
door) is opened.
. The doors or the rear gate (5-door) are
unlocked using the keyless access func-
tion (if equipped). Refer to
“Locking and
unlocking with
“keyless access” entry
function
” F2-13.
. The doors or the rear gate (5-door) are
unlocked using the remote keyless entry
transmitter.
. The ignition switch is turned from the
“ACC” position to the “LOCK”/“OFF” posi-
tion.
& Cargo area light (5-door
models)
1)
DOOR
2)
OFF
DOOR: The light illuminates when the rear
gate is opened. The light remains illumi-
nated for several seconds and gradually
turns off after the rear gate is closed.
OFF: The light remains off.
6-2
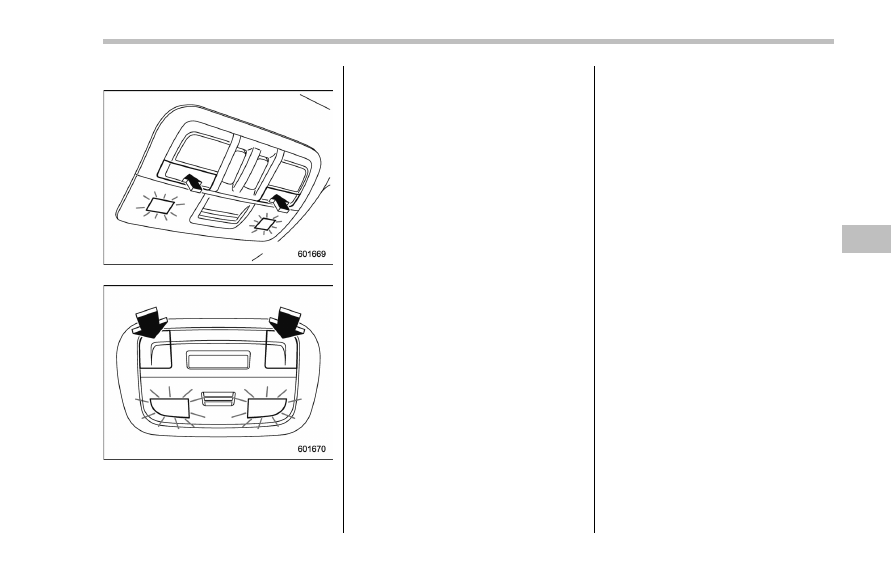
& Map lights
Type A
Type B
To turn on the map light, push the switch.
To turn it off, push the switch again.
NOTE
For the type A map lights, although the
light switches are in the ON position,
the lights are automatically turned off
after approximately 30 seconds of
illumination to prevent the vehicle
battery from discharging. For details,
refer to
“Battery drainage prevention
function
” F2-7.
! Automatic illumination (models
with moonroof)
The map lights illuminate automatically in
the following cases.
. Any of the doors other than the rear
gate is opened. (The map lights do not
illuminate when only the rear gate is
opened.)
. The doors are unlocked using the
keyless access function (if equipped).
Refer to
“Locking and unlocking with
“keyless access” entry function” F2-13.
. The doors are unlocked using the
remote keyless entry system. Refer to
“Remote keyless entry system” F2-23.
. The ignition switch is turned from the
“ACC” position to the “LOCK”/“OFF” posi-
tion.
& OFF delay timer
The following lights have an automatic
illumination function.
. dome light
. map light (type A)
. cargo area light (5-door)
After being illuminated automatically,
these lights remain on for several seconds
and then gradually turn off under the
following conditions.
. after all doors and the rear gate (5-
door) are closed (dome light)
. after all doors are closed (type A map
light)
. after the rear gate is closed (cargo area
light)
While the lights are illuminated, if any of
the following operations are performed,
the lights turn off immediately.
. The ignition switch is turned from the
“LOCK”/“OFF” position to the “ACC” or
“ON” position.
. All doors and the rear gate (5-door) are
locked using the keyless access function
(if equipped).
. All doors and the rear gate (5-door) are
locked using the remote keyless entry
system.
The setting for the period of time in which
Interior equipment/Interior lights
– CONTINUED –
6-3
Interior equipment/Sun visors
the lights remain on (OFF delay timer) can
be changed by a SUBARU dealer. Con-
tact your SUBARU dealer for details. For
models with multi function display, the
setting can be changed by operating the
multi function display. For details, refer to
“Interior light off delay timer setting” F3-
82.
Sun visors
To block out glare, swing down the visors.
To use the sun visor at a side window,
swing it down and move it sideways.
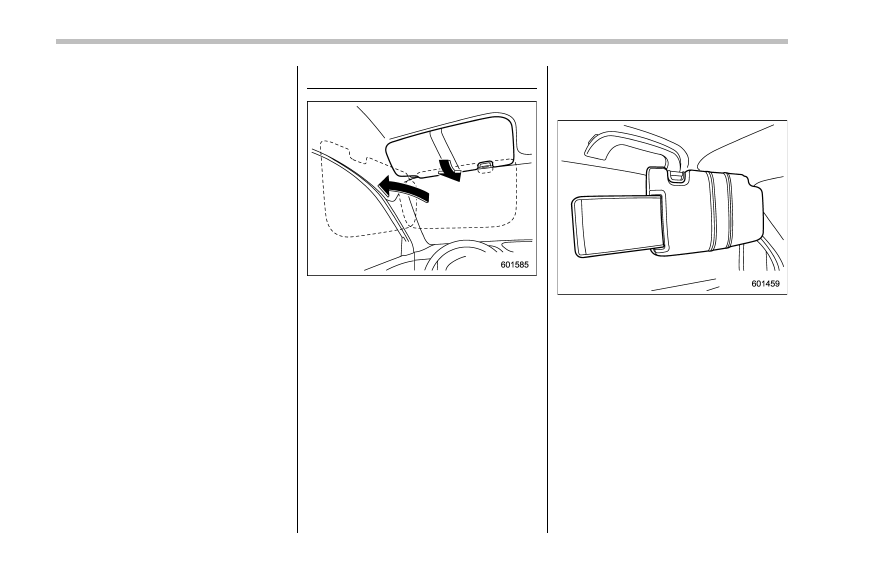
& Sun visor extension plate
(models with the EyeSight
system)
With the sun visor positioned over the side
window, you can use the sun visor
extension plate to prevent glare through
the gap between the sun visor and center
pillar. To use the extension plate, pull it
toward the rear of the vehicle. When you
have finished using it, stow it by pushing it
toward the front of the vehicle.
6-4
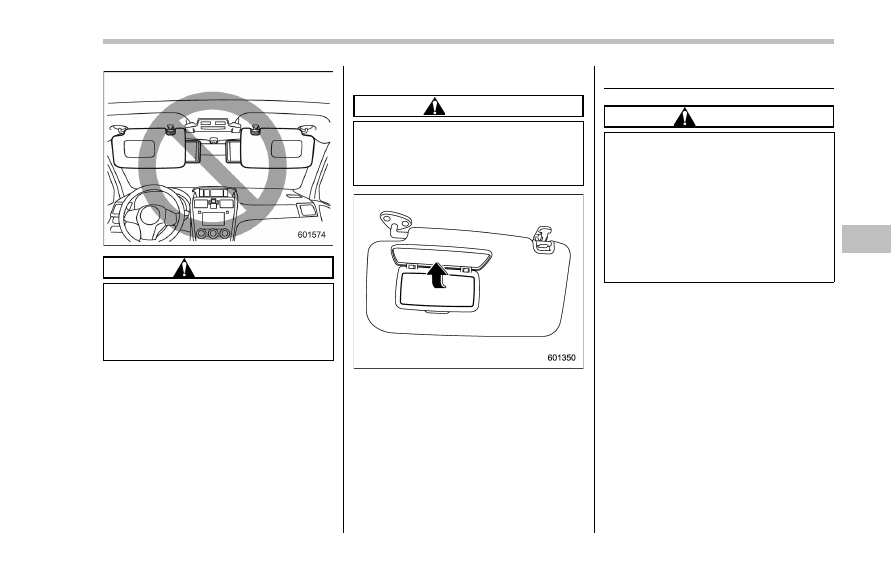
CAUTION
Do not pull out the extension plate
with the sun visor positioned over
the windshield. The extension plate
would obstruct your view of the
rearview mirror.
& Vanity mirror
CAUTION
Keep the vanity mirror cover closed
while the car is being driven to avoid
being temporarily blinded by the
glare of bright light.
To use the vanity mirror, swing down the
sun visor and open the vanity mirror cover.
Storage compartment
CAUTION
. Always keep the storage com-
partment closed while driving to
reduce the risk of injury in the
event of a sudden stop or an
accident.
. Do not store spray cans, contain-
ers with flammable or corrosive
liquids or any other dangerous
items in the storage compart-
ment.
Interior equipment/Storage compartment
– CONTINUED –
6-5
Interior equipment/Storage compartment
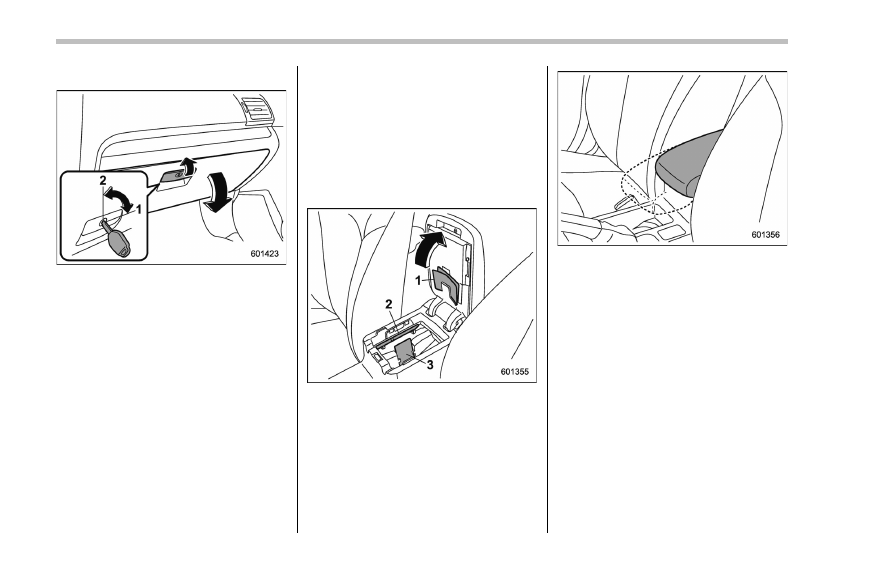
& Glove box
1)
Lock
2)
Unlock
To open the glove box, pull the handle. To
close it, push the lid firmly upward.
To lock the glove box, insert the key and
turn it clockwise. To unlock the glove box,
insert the key and turn it counterclockwise.
For models with
“keyless access with
push-button start system
”, use the me-
chanical key to lock or unlock the glove
box.
NOTE
The mechanical key is directional. If the
key cannot be inserted, change the
direction that the grooved side is
facing and insert it again.
& Center console
The center console box provides a sto-
rage space.
1)
Paper holder
2)
Pen holder
3)
Card holder
The top of the console can be used as an
armrest.
For some models, the armrest is adjus-
table. Slide the armrest to the desired
position.
6-6
Нет комментариевНе стесняйтесь поделиться с нами вашим ценным мнением.
Текст