Subaru XV Crosstrek (2016 year). Manual — part 34
following precautions.
. Do not replace any headlight
bulbs (both low beam and high
beam) by yourself.
. Do not remove/restore the head-
light assemblies by yourself.
. Do not remove any headlight-
assembly components by your-
self.
For replacement, contact your
SUBARU dealer.
& Headlights (models without
HID headlights)
CAUTION
Halogen headlight bulbs become
very hot while in use. If you touch
the bulb surface with bare hands or
greasy gloves, fingerprints or
grease on the bulb surface will
develop into hot spots, causing the
bulb to break. If there are finger
prints or grease on the bulb surface,
wipe them away with a soft cloth
moistened with alcohol.
NOTE
. If headlight aiming is required, con-
sult your SUBARU dealer for proper
adjustment of the headlight aim.
. It may be difficult to replace the
bulbs. Have the bulbs replaced by your
SUBARU dealer if necessary.
Perform the following steps to replace the
bulbs.
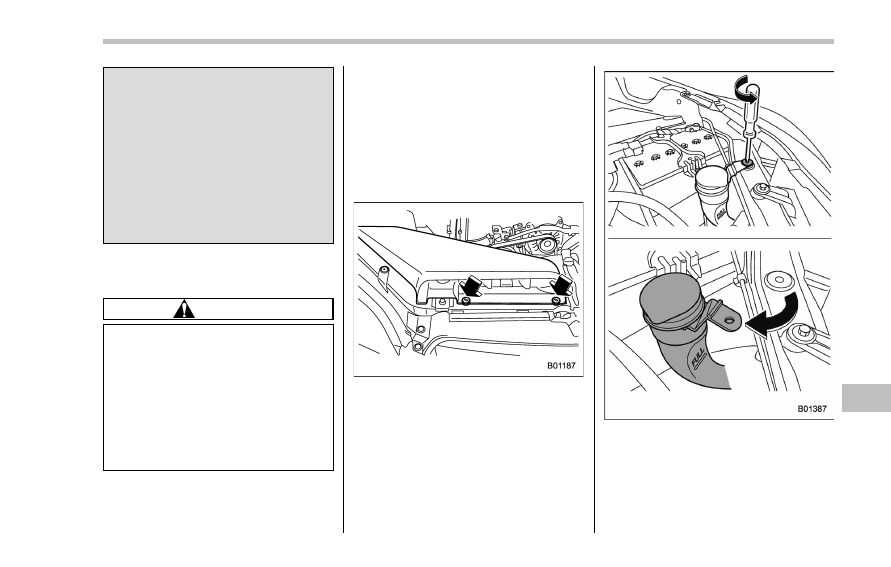
Right-hand side
1. Use a screwdriver to undo the clips on
the air intake duct, then remove the air
intake duct (right-hand side).
Left-hand side
2. Use a screwdriver to remove the
secured clip of the washer tank. To make
it easy to access the bulb, turn the neck of
the washer fluid filler pipe as illustrated
(left-hand side).
Maintenance and service/Replacing bulbs
– CONTINUED –
11-37
Maintenance and service/Replacing bulbs
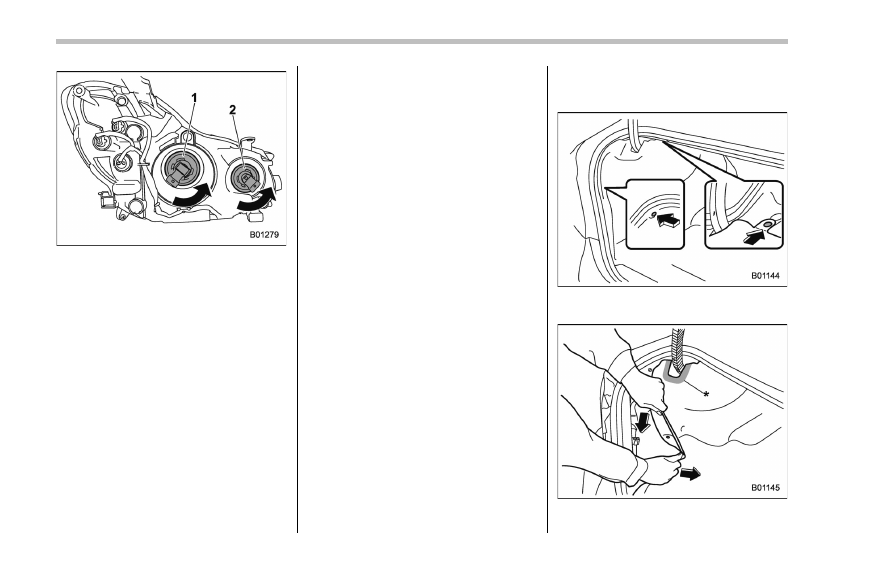
1)
Low beam bulb
2)
High beam bulb
3. Disconnect the electrical connector
from the bulb and remove the bulb from
the headlight assembly by turning it
counterclockwise.
4. Replace the bulb with new one. At this
time, use care not to touch the bulb
surface.
5. To install the bulb to the headlight
assembly, turn it clockwise until it clicks.
6. Reconnect the electrical connector.
7. Install the air intake duct with clips
(right-hand side).
8. Set the washer fluid filler pipe to the
original place and secure it by clip (left-
hand side).
& Front turn signal light
It may be difficult to replace the bulbs.
Have the bulbs replaced by your SUBARU
dealer if necessary.
& Parking light
It may be difficult to replace the bulbs.
Have the bulbs replaced by your SUBARU
dealer if necessary.
& Front fog light (if equipped)
It may be difficult to replace the bulbs.
Have the bulbs replaced by your SUBARU
dealer if necessary.
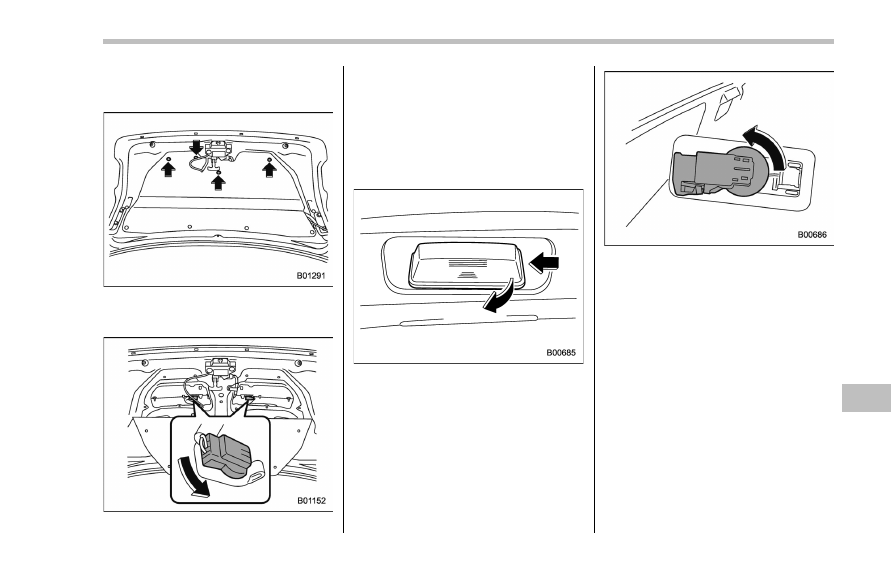
& Rear combination lights
! 4-door models
1. Remove the clips from the trunk trim
with a flat-head screwdriver.
2. Open the rear portion of the trunk trim
11-38
panel as illustrated.
NOTE
Make sure that the
“
*
” part of the trunk
trim in the illustration does not contact
the trunk lid stay. If the
“
*
” part is bent,
the trunk trim may be torn.
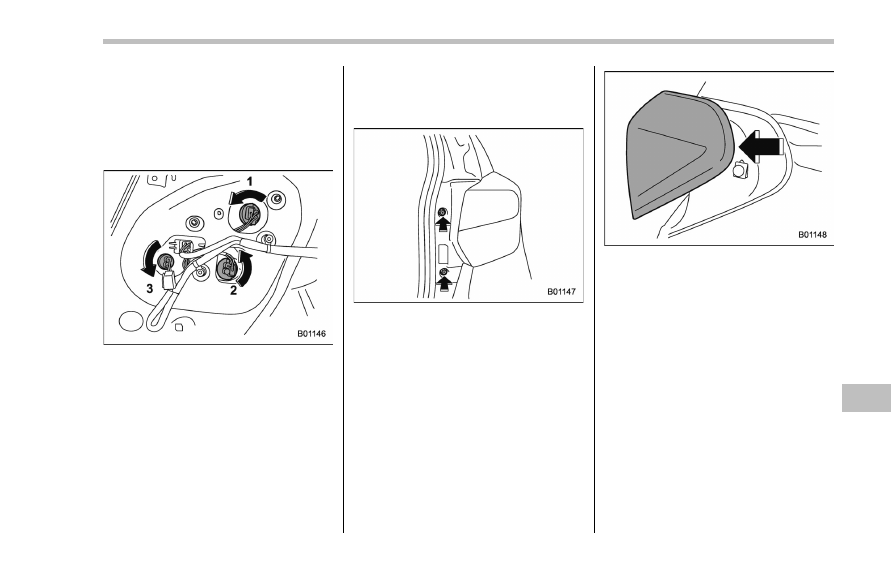
1)
Stop light/Tail and rear side marker light
2)
Rear turn signal light
3)
Backup light
3. Remove the bulb socket from the rear
combination light assembly by turning it
counterclockwise.
4. Pull the bulb out of the bulb socket and
replace it with a new one.
5. Set the bulb socket into the rear
combination light assembly and turn it
clockwise until it locks.
6. Secure the rear trunk trim panel with
the clips.
! 5-door models
1. Using a Phillips screwdriver, remove
the upper and lower screws that secure
the rear combination light assembly.
2. Slide the rear combination light as-
sembly rearward and remove it from the
vehicle.
Maintenance and service/Replacing bulbs
– CONTINUED –
11-39
Maintenance and service/Replacing bulbs
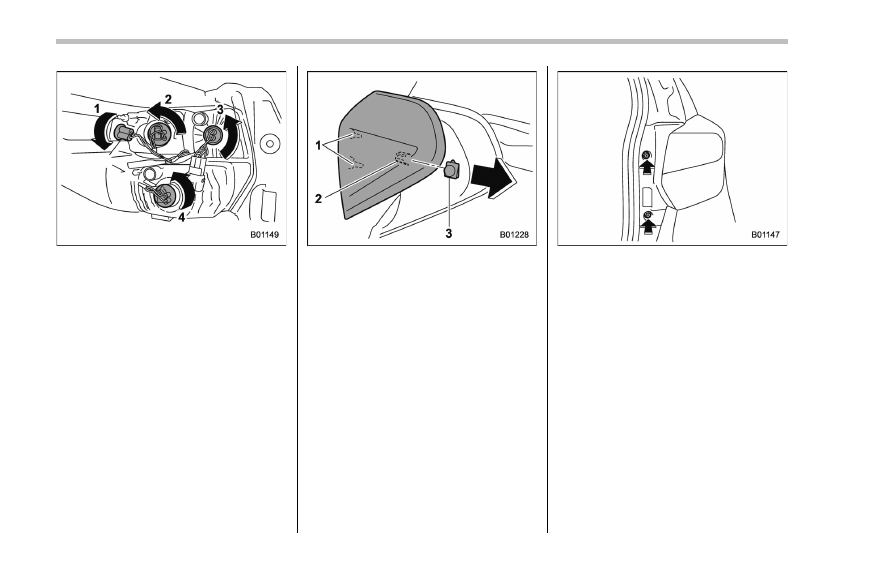
1)
Rear side marker light
2)
Rear turn signal light
3)
Backup light
4)
Stop light/Tail light
3. Remove the bulb socket from the rear
combination light assembly by turning it
counterclockwise.
4. Pull the bulb out of the bulb socket and
replace it with a new one.
5. Set the bulb socket into the rear
combination light assembly and turn it
clockwise until it locks.
1)
Guide pins
2)
Catch
3)
Clip
6. Put the rear combination light assem-
bly into place while aligning the 2 guide
pins and a catch with the guide holes and
a clip on the vehicle.
7. Tighten the upper and lower screws.
11-40
& License plate light
! 4-door models
1. Open the trunk and remove the clips
from the trunk lid trim with a flat-head
screwdriver.
2. Turn the bulb socket counterclockwise
and pull out the socket.
3. Pull the bulb out of the socket.
4. Install a new bulb.
5. Reinstall the bulb socket and the trunk
lid trim.
! 5-door models
1. Insert a finger into the right side of the
license plate light cover, then press once
to the left and pull out to remove the cover.
2. Turn the bulb socket counterclockwise
and pull out the socket.
3. Pull the bulb out of the socket.
4. Install a new bulb.
5. Reinstall the bulb socket and the
license plate light cover.
Maintenance and service/Replacing bulbs
– CONTINUED –
11-41
Maintenance and service/Replacing bulbs
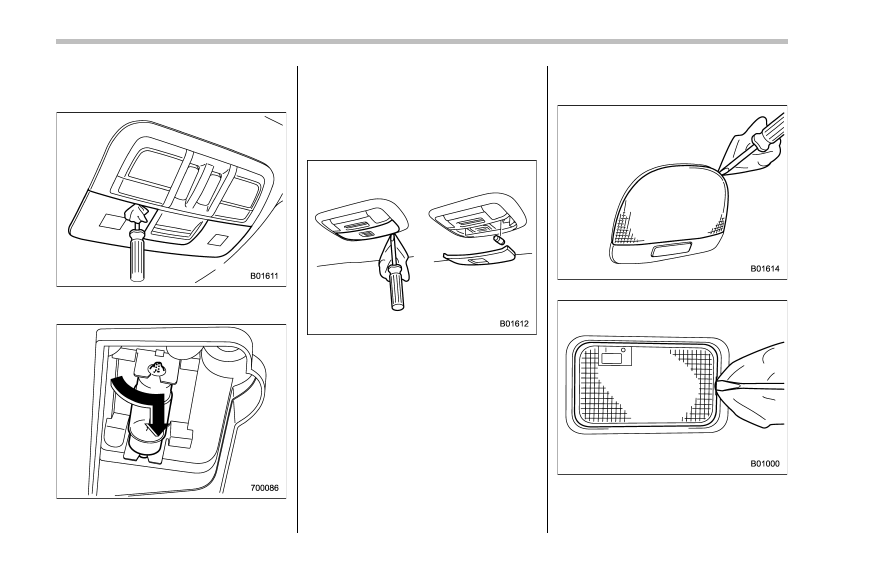
& Map light
! Type A
1. Remove the lens by prying the edge of
the lens with a flat-head screwdriver.
2. Turn the bulb until the flat surfaces at
its ends are aligned vertically. Pull the bulb
straight downward to remove it.
3. Install a new bulb.
4. Reinstall the lens.
! Type B
1. Remove the lens by prying the edge of
the lens with a flat-head screwdriver.
2. Pull the bulb out of the socket.
3. Install a new bulb.
4. Reinstall the lens.
& Dome light and cargo area
light
Dome light
Cargo area light
1. Remove the lens by prying the edge of
11-42

the lens with a flat-head screwdriver.
2. Pull the bulb out of the socket.
3. Install a new bulb.
4. Reinstall the lens.
& Trunk light
1. Remove the cover by squeezing its
sides and pulling it.
2. Pull the bulb out of the socket.
3. Install a new bulb.
4. Reinstall the cover.
& Other bulbs
It may be difficult to replace the bulbs.
Have the bulbs replaced by your
SUBARU dealer if necessary.
Replacing key battery
The access key / transmitter battery may
be discharged under the following condi-
tions.
. The operation of the keyless access
function is unstable
. The operating distance of the remote
keyless entry system is unstable
. The transmitter does not operate prop-
erly when used within the standard dis-
tance
Replace the battery with a new one.
& Safety precautions
CAUTION
. Do not let dust, oil or water get on
or in the access key/transmitter
when replacing battery.
. Be careful not to touch or da-
mage the printed circuit board in
the access key/transmitter when
replacing the battery.
. Be careful not to allow children to
touch the battery and any re-
moved parts; children could
swallow them.
. There is a danger of an explosion
if the battery is incorrectly re-
placed. Replace only with the
same or equivalent type of the
battery.
. Batteries should not be exposed
to excessive heat such as bright
sunlight, fire or the like.
NOTE
. Replace only with the same or
equivalent type of battery recom-
mended by the manufacturer.
. Dispose of used batteries according
to local laws.
. Mount the battery in the correct
orientation to prevent fluid leakage.
Be careful not to bend the terminals. It
may result in a malfunction.
. It is recommended that the battery
be replaced by a SUBARU dealer.
. Use a new battery.
. After replacing the battery, confirm
that the transmitter functions properly.
Maintenance and service/Replacing key battery
– CONTINUED –
11-43
Maintenance and service/Replacing key battery
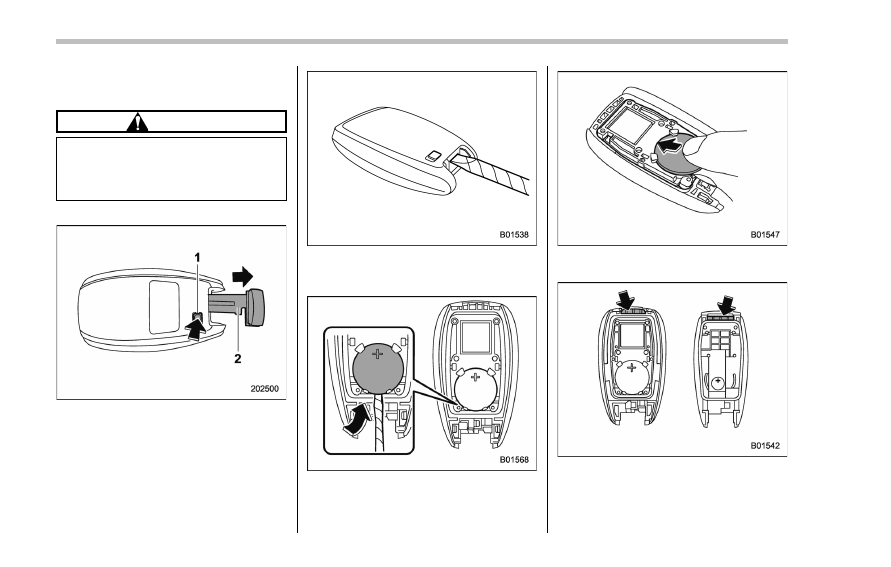
& Replacing battery of access
key
CAUTION
When removing or reinstalling the
access key cover, make sure that
the plastic part does not come off or
become misaligned.
Battery: Button battery CR2032
1)
Release button
2)
Mechanical key
1. Take out the mechanical key.
2. Wrap a flat-head screwdriver with vinyl
tape or a cloth, and insert it in the gap to
remove the cover.
3. Take out the battery using a flat-head
screwdriver with vinyl tape or a cloth.
4. Insert a new battery with its positive (+)
side facing upward as shown in the figure.
5. Attach the cover to the access key by
fitting the projections and recesses to-
gether.
11-44
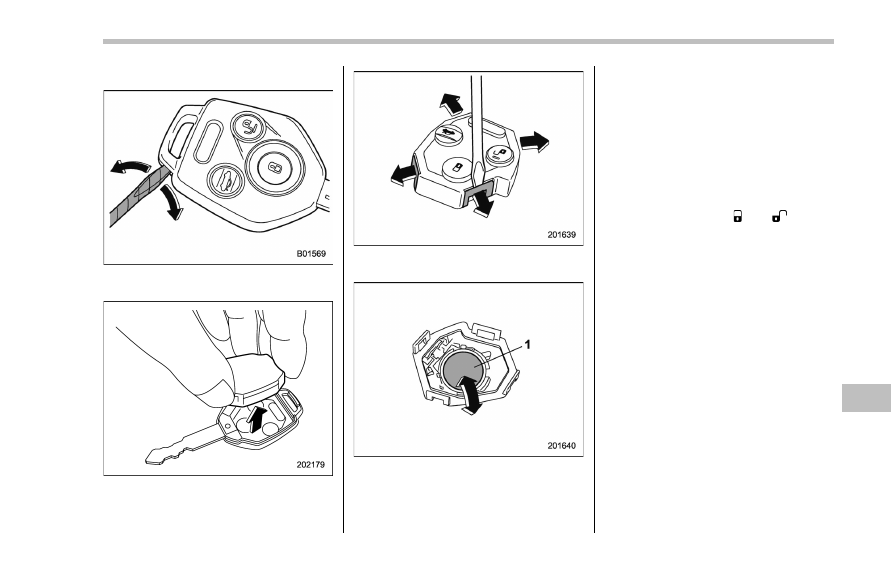
& Replacing transmitter battery
1. Open the key head using a flat-head
screwdriver.
2. Remove the transmitter case from the
key head.
3. Open the transmitter case by releasing
the hooks.
1)
Negative (
−) side facing up
4. Replace the old battery with a new
battery (type CR1620 or equivalent) mak-
ing sure to install the new battery with the
negative (
−) side facing up.
5. Put together the transmitter case by
fitting the hooks on the case.
6. Reinstall the transmitter case in the
key head.
7. Refit the removed half of the key head.
After the battery is replaced, the trans-
mitter must be synchronized with the
remote keyless entry system
’s control
unit. Press either the
“ ” or “ ” button
six times to synchronize the unit.
Maintenance and service/Replacing key battery
11-45

Specifications . . . . . . . . . . . . . .
12-2
Dimensions. . . . . . . . . . . . . .
12-2
Engine . . . . . . . . . . . . . . . ...
12-3
Fuel . . . . . . . . . . . . . . . . ...
12-3
Engine oil . . . . . . . . . . . . . . ..
12-4
Manual transmission, front differential and rear
differential gear oil . . . . . . . . . . ...
12-6
Fluids . . . . . . . . . . . . . . . .
12-7
Engine coolant . . . . . . . . . . . . ...
12-7
Electrical system. . . . . . . . . . . .
12-7
Tires . . . . . . . . . . . . . . . . ..
12-8
Brake disc . . . . . . . . . . . . . . .
12-9
Fuses and circuits . . . . . . . . . . ...
12-10
Fuse panel located in the passenger
compartment . . . . . . . . . . . . .
12-10
Fuse panel located in the engine
compartment . . . . . . . . . . . . .
12-12
Bulb chart. . . . . . . . . . . . . . .
12-14
Safety precautions . . . . . . . . . . ...
12-14
Bulb chart . . . . . . . . . . . . . ...
12-15
Vehicle identification . . . . . . . . . ...
12-17
Specifications
12
Specifications/Specifications
Specifications
These specifications are subject to change without notice.
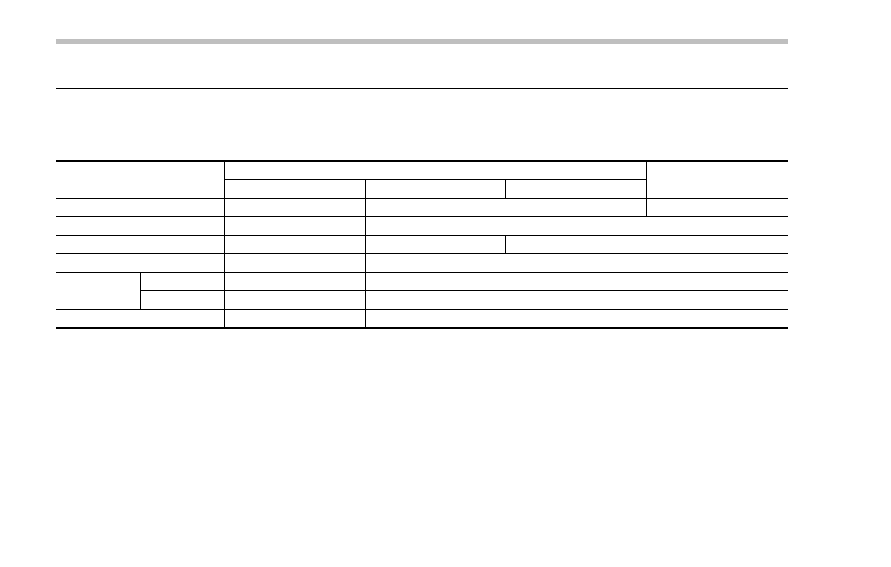
& Dimensions
in (mm)
Item
5-door models
4-door models
Crosstrek models
SPORT models
Other models
Overall length
175.2 (4,450)
174.0 (4,420)
180.5 (4,585)
Overall width
70.1 (1,780)
68.5 (1,740)
Overall height
63.6 (1,615)
59.4 (1,510)
57.7 (1,465)
Wheel base
103.7 (2,635)
104.1 (2,645)
Tread
Front
60.0 (1,525)
59.4 (1,510)
Rear
60.0 (1,525)
59.6 (1,515)
Ground clearance*
8.7 (220)
5.7 (145)
*: Measured with vehicle empty
12-2
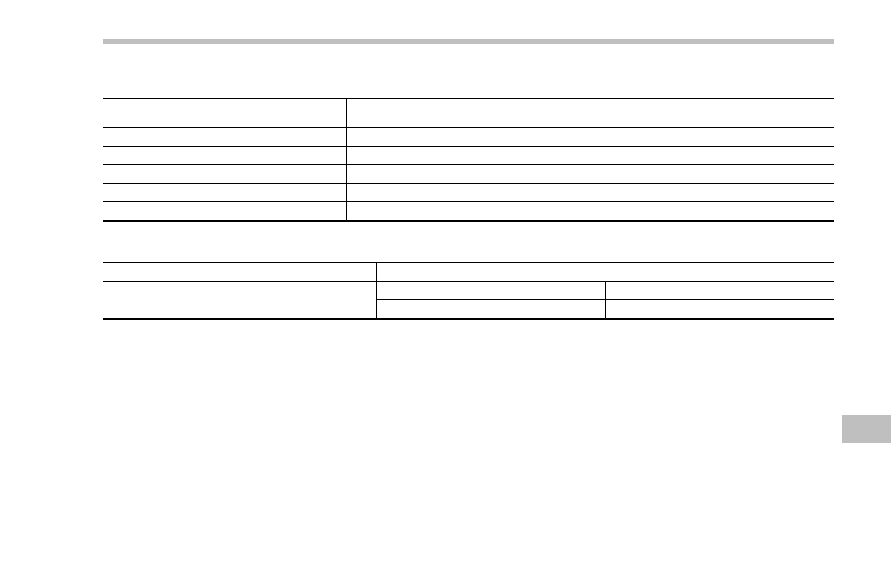
& Engine
Engine model
FB20
(2.0 L, DOHC, non-turbo)
Engine type
Horizontally opposed, liquid cooled 4 cylinder, 4-stroke gasoline engine
Displacement cu-in (cc)
121.7 (1,995)
Bore
6 Stroke in (mm)
3.31
6 3.54 (84.0 6 90.0)
Compression ratio
10.5 : 1
Firing order
1
– 3 – 2 – 4
& Fuel
Fuel requirement
Fuel tank capacity
Unleaded gasoline with 87 AKI (90 RON) or higher
Except Crosstrek models
14.5 US gal (55 liters, 12.1 Imp gal)
Crosstrek models
15.9 US gal (60 liters, 13.2 Imp gal)
For more details, refer to
“Fuel” F7-3.
Specifications/Specifications
– CONTINUED –
12-3
Specifications/Specifications
& Engine oil
For the checking, adding and replacing procedure or other details, refer to
“Engine oil” F11-8.
NOTE
The procedure for changing the engine oil and oil filter should be performed by a properly-trained expert. It is recommended
that you have this service performed by your SUBARU dealer.
! Approved engine oil
Always use the SUBARU approved engine oil. For further details, please contact your SUBARU dealer.
If the approved engine oil is unavailable, use the alternative engine oil described on the next page.
12-4
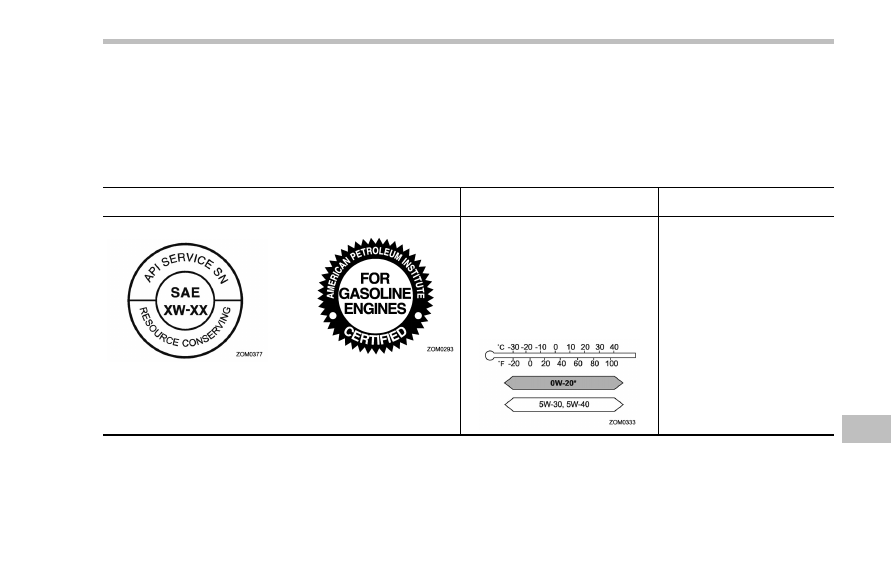
! Alternative engine oil
If the SUBARU approved oil is unavailable, the following alternative oil can be used.
NOTE
Each quantity indicated here is only a guideline. The necessary quantity for replacement may differ slightly depending on the
temperature and other factors.
Oil grade
SAE viscosity No. and
applicable temperature
Engine oil capacity
API (American Petroleum Insti-
tute) classification SN with the
words
“RESOURCE CONSER-
VING
”
or
ILSAC (International Lubricant
Specification Advisory Commit-
tee) GF-5, which can be identi-
fied with the ILSAC certification
mark (Starburst mark)
0W-20 synthetic oil is the required oil
for optimum engine performance and
protection. Conventional oil may be
used if synthetic oil is unavailable.
*: If 0W-20 synthetic oil is not available,
5W-30 or 5W-40 conventional oil may
be used if replenishment is needed but
should be changed to 0W-20 synthetic
oil at the next oil change.
– Adding the oil from low level to
full level:
1.1 US qt (1.0 liter, 0.9 Imp qt)
– Changing the oil and oil filter:
5.1 US qt (4.8 liters, 4.2 Imp qt)
Specifications/Specifications
– CONTINUED –
12-5
Specifications/Specifications
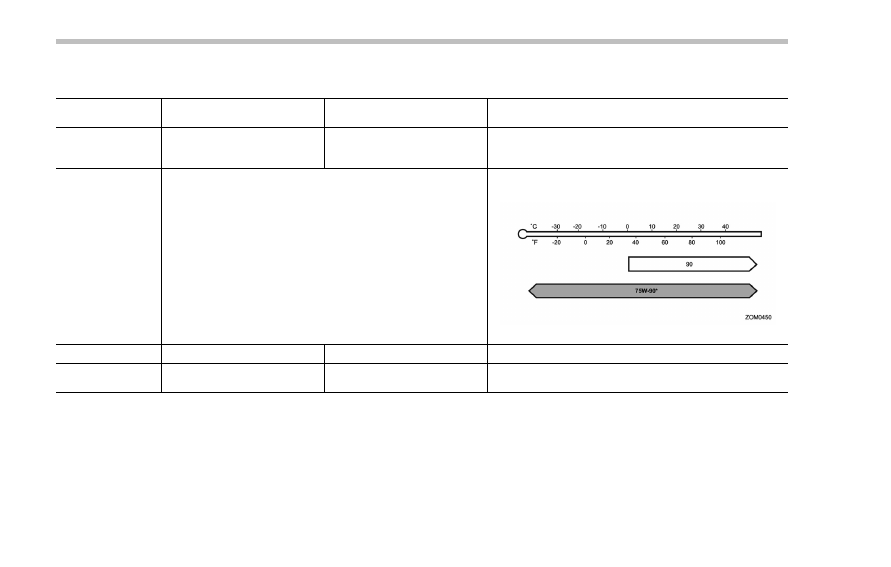
& Manual transmission, front differential and rear differential gear oil
Oil
Manual transmission oil
Front differential gear oil (CVT
models)
Rear differential gear oil
Oil grade
. SUBARU Extra MT*
3
. API classification GL-5
(75W-90)*
4
. SUBARU Extra MT*
3
. API classification GL-5
(75W-90)
API classification GL-5
SAE viscosity No.
and applicable tem-
perature
—
. 75W-90*
. 90
*: Recommended
Oil capacity*
1
3.7 US qt (3.5 liters, 3.1 Imp qt) 1.3 US qt (1.2 liters, 1.1 Imp qt)
0.8 US qt (0.8 liters, 0.7 Imp qt)
Remarks*
2
“Manual transmission oil” F11-
14
“Front differential gear oil (CVT
models)
” F11-15
“Rear differential gear oil” F11-15
*1: The indicated oil quantity is only a guideline. The necessary quantity for replacement may differ slightly depending on the temperature and other
factors. After refilling the gearbox with oil, the oil level should be checked.
*2: For more details about maintenance and service, refer to the indicated section.
*3: The vehicle is filled at the factory with this type of oil.
*4: You may use this type of manual transmission oil. However, using this type of oil will detract from driveability and fuel efficiency.
12-6
& Fluids
Fluid
Fluid type*
1
Fluid capacity*
2
Remarks*
3
Continuously variable transmission
fluid (CVT models)
Consult your SUBARU dealer.
12.6 US qt (11.9 liters, 10.5 Imp qt) “
Continuously variable trans-
mission fluid
” F11-15
Brake fluid
FMVSS No. 116, fresh DOT 3 or DOT 4
brake fluid
–
“Brake fluid” F11-16
Clutch fluid (MT models)
FMVSS No. 116, fresh DOT 3 or DOT 4
brake fluid
–
“Clutch fluid (MT models)” F11-
17
*1: Use one of the indicated types of fluid.
*2: The indicated fluid quantity is only a guideline. The necessary quantity for replacement may differ slightly depending on the temperature and other
factors.
*3: For more details about maintenance and service, refer to the indicated section.
& Engine coolant
Vehicle model
Coolant capacity
Coolant type
MT models
8.5 US qt (8.0 liters, 7.0 Imp qt)
SUBARU Super Coolant
CVT models
8.9 US qt (8.4 liters, 7.4 Imp qt)
The indicated coolant quantity is only a guideline. The necessary quantity for replacement may differ slightly depending on the temperature and other
factors. For more details about maintenance and service, refer to
“Cooling system” F11-10.
& Electrical system
Battery type
55D23L
Alternator
12V-130A
Spark plugs
SILZKAR7B11 (NGK)
Specifications/Specifications
– CONTINUED –
12-7
Нет комментариевНе стесняйтесь поделиться с нами вашим ценным мнением.
Текст