Volkswagen Golf SportWagen (2015 year). Instruction — part 4
Driving checklists and warnings
Introduction
In this section you’ll find information about:
Getting ready and driving safely
Driving in other countries
Driving through water on roads
More information:
Sitting properly and safely
Transporting
Starting and stopping the engine
Saving fuel and helping the environment
Consumer information
WARNING
Driving under the influence of alcohol, illegal drugs, narcotics and some medications may
cause collisions and other accidents, severe personal injuries and even death.
Alcohol, illegal drugs, narcotics and some medications may severely affect perception,
reaction times and safe driving, which may result in the loss of vehicle control.
Getting ready and driving safely
Please first read and note the introductory information and heed the WARNINGS
Checklist
Observe the following points before and during every drive for your own safety, the safety of all pas-
sengers and others
⇒ :
Check proper function of lights and turn signals.
Check tire pressure (
⇒ Tires and wheels) and fuel level (⇒ Refueling).
Make sure that all windows are clean.
Make sure that the engine is not covered by blankets or other materials and that the engine air
intake is free of obstacles.
Store items and all luggage safely in the storage compartments, in the luggage compartment and,
where applicable, on the roof
⇒ Transporting.
Always make sure that nothing keeps the pedals from moving freely.
Make sure that children are properly secured by a restraint system appropriate for their size and
weight
⇒ Child safety and child restraints.
Properly adjust front seats, all head restraints and mirrors to the correct height
⇒ Adjusting the
seating position.
Wear shoes that give your feet a good grip and that give you a feel for the pedals.
Make sure that the floormat on the driver side is properly fastened and cannot interfere with the
pedals.
Assume a proper seating position before the vehicle starts to move and keep this position while
driving. Make sure that all passengers do the same
⇒ Adjusting the seating position.
Properly fasten your safety belt before driving the vehicle and wear your safety belt properly at all
times while driving. Make sure that all passengers do the same
⇒ Safety belts.
Only transport as many passengers as there are seats and safety belts available.
Never drive if your driving ability has been impaired, for example, by medication, alcohol, or illegal
drugs.
Never let passengers or phone calls distract you while driving and never take your attention off the
road while using vehicle software or adjusting vehicle equipment or accessories.
Always adapt your speed and driving style to visibility, weather, road, and traffic conditions.
Always obey traffic laws and speed limits.
On long trips make frequent rest stops – at least once every 2 hours.
Secure animals in the vehicle with a system that corresponds to their weight and size.
WARNING
Always observe traffic rules and posted speed limits and use common sense. Your good
judgment can mean the difference between arriving safely at your destination and being seri-
ously injured in a crash or other kind of accident.
Regular service and maintenance of your vehicle is important both for operational and driving
safety and to help prolong your vehicle's service life. Always follow the scheduled maintenance inter-
vals in the
⇒ Booklet
Warranty and Maintenance, especially for changing the brake fluid. Hard use,
frequent stop-and-go driving, driving in very dusty areas, trailer towing, and other factors may make it
necessary to have the vehicle serviced more frequently. Ask an authorized Volkswagen dealer or an
authorized Volkswagen Service Facility for more information.
Driving in other countries
Please first read and note the introductory information and heed the WARNINGS
Checklist
Some countries have special safety standards and emissions requirements that your vehicle may not
meet. Before taking your vehicle to another country, Volkswagen therefore recommends that you ask
your authorized Volkswagen dealer or authorized Volkswagen Service Facility about the following
issues with regard to the country to which you would like to travel:
Should the vehicle be technically prepared for the trip abroad, such as masking or adjusting head-
lights?
Are maintenance, repair facilities, necessary tools and testing equipment as well as spare parts
readily available for your vehicle?
Are there authorized Volkswagen dealers and authorized Volkswagen Service Facilities in the
countries where you will be driving?
For gasoline engines: Is unleaded fuel with the right octane rating readily available?
For diesel engines: Is ultra low-sulfur diesel fuel
⇒ Fuel readily available?
Are engine oil (
⇒ Engine oil) and other operating fluids that meet Volkswagen quality and perfor-
mance requirements available where you will be driving? For more information, please see
⇒ Booklet
Warranty and Maintenance.
Does the factory-installed navigation system work in the countries where you will be driving, and is
navigation data available?
Are special or heavy-duty tires necessary for the kind of driving expected?
NOTICE
Volkswagen is not responsible for mechanical damage that may result from substandard fuel
or service or the unavailability of Genuine Volkswagen parts.
Driving through water on roads
Please first read and note the introductory information and heed the WARNINGS
Note the following to help prevent vehicle damage when driving through water, for example on flooded
roads:
Check the depth of the water before driving through it. The water must not be any higher than
the bottom of the vehicle body
⇒ .
Do not drive faster than walking speed.
Never stop the vehicle, and do not drive in reverse or switch the engine off when driving through
water.
Oncoming vehicles may create waves that raise the water level and make it too deep for your
vehicle to drive through safely.
WARNING
After driving through water, mud, sludge, etc., the brakes react slower and need longer stop-
ping distances.
Always dry the brakes and clean off any ice coatings with a few careful applications of the
brake. Make sure not to endanger other motorists or cyclists or disobey legal requirements.
Avoid abrupt or sudden braking maneuvers immediately after driving through water.
NOTICE
Vehicle components such as the engine, transmission, suspension or electrical system may
be severely damaged by driving through water.
Never drive through salt water. Salt causes vehicle corrosion. Thoroughly rinse with fresh
water all vehicle parts that were exposed to salt water.
Technical data
Introduction
In this section you’ll find information about:
Important vehicle labels
Engine data
Dimensions
Your vehicle's engine type is shown on the vehicle identification label.
The specifications in this Manual refer to the base model. The stated values may vary, depending
upon different equipment or models, as well as with respect to special vehicles and vehicles exported
to different countries.
More information:
Transporting
Tires and wheels
Saving fuel and helping the environment
Fuel
Engine oil
Engine coolant
Consumer information
WARNING
Disregarding or exceeding stated values for weights, loads, dimensions and maximum speed
may result in accidents and serious personal injuries.
Important vehicle labels
Fig. 16 Vehicle identification label: Shown in the example with engine identification code CBFA 3.
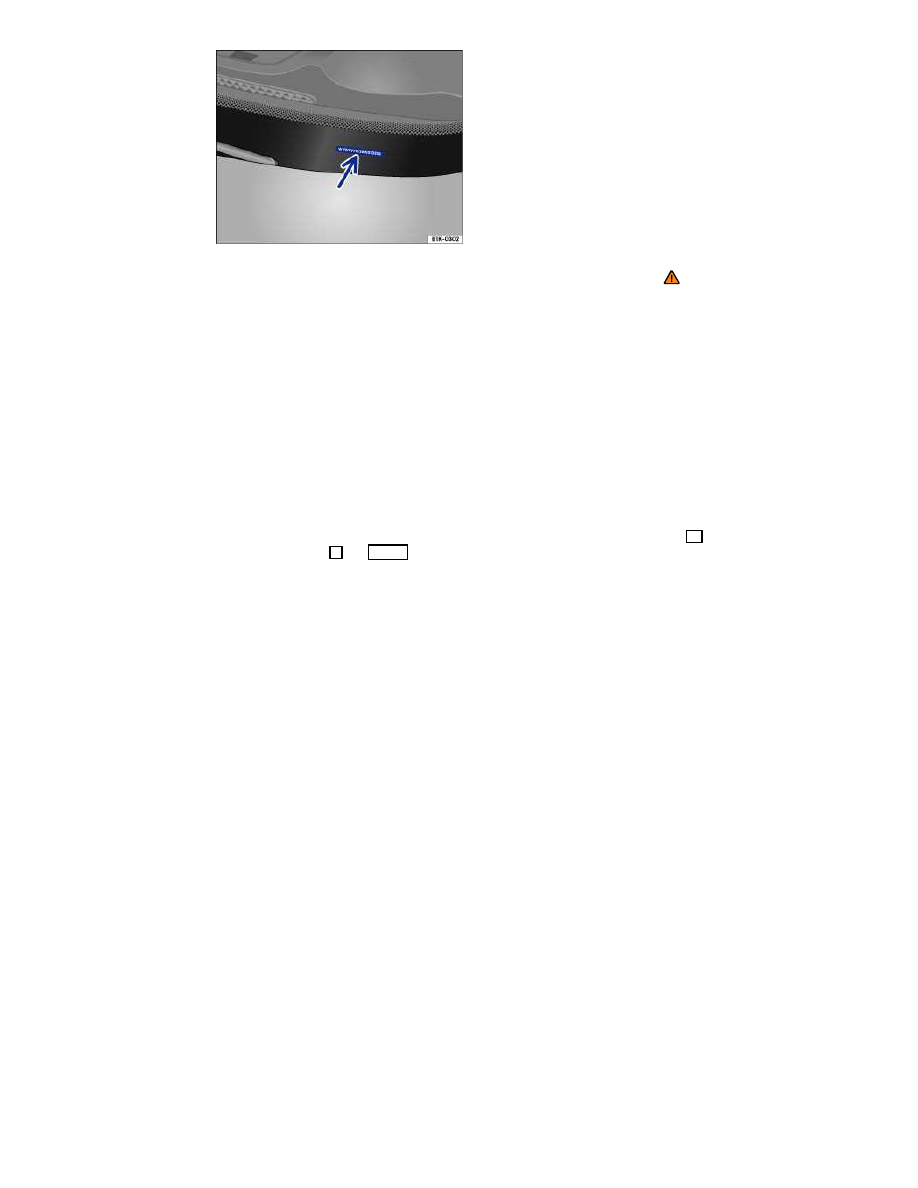
Fig. 17 Vehicle identification number (VIN).
Please first read and note the introductory information and heed the WARNINGS
Factory-installed safety certificates, stickers, and signs containing important information regarding
vehicle operation can be found in the engine compartment and on certain vehicle components, such
as inside the fuel filler flap, on the passenger sun visor, in the driver door jamb, or on the luggage
compartment floor.
Do not remove, alter, or render unusable or illegible any safety certificates, stickers, and labels.
If vehicle components bearing safety certificates, stickers, or labels are replaced, make certain that
the firm doing the work attaches new conforming certificates, stickers, or labels to the same part of the
new components.
Vehicle identification number (VIN)
The vehicle identification number is on a plate on top of the instrument panel on the driver side, and is
visible from the outside through the windshield
⇒
fig. 17
(arrow). The view window is on the side at the
bottom of the windshield. The vehicle identification number is also stamped into the top of the right drip
channel in the engine compartment. The drip channel is between the spring strut tower and the right
fender. Open the engine hood to read the vehicle identification number
⇒ Working in the engine
compartment.
The vehicle identification number can be displayed in the Infotainment system by pressing the
button followed by the
and Service function keys
⇒ Menu and system settings (SETUP).
Vehicle identification label
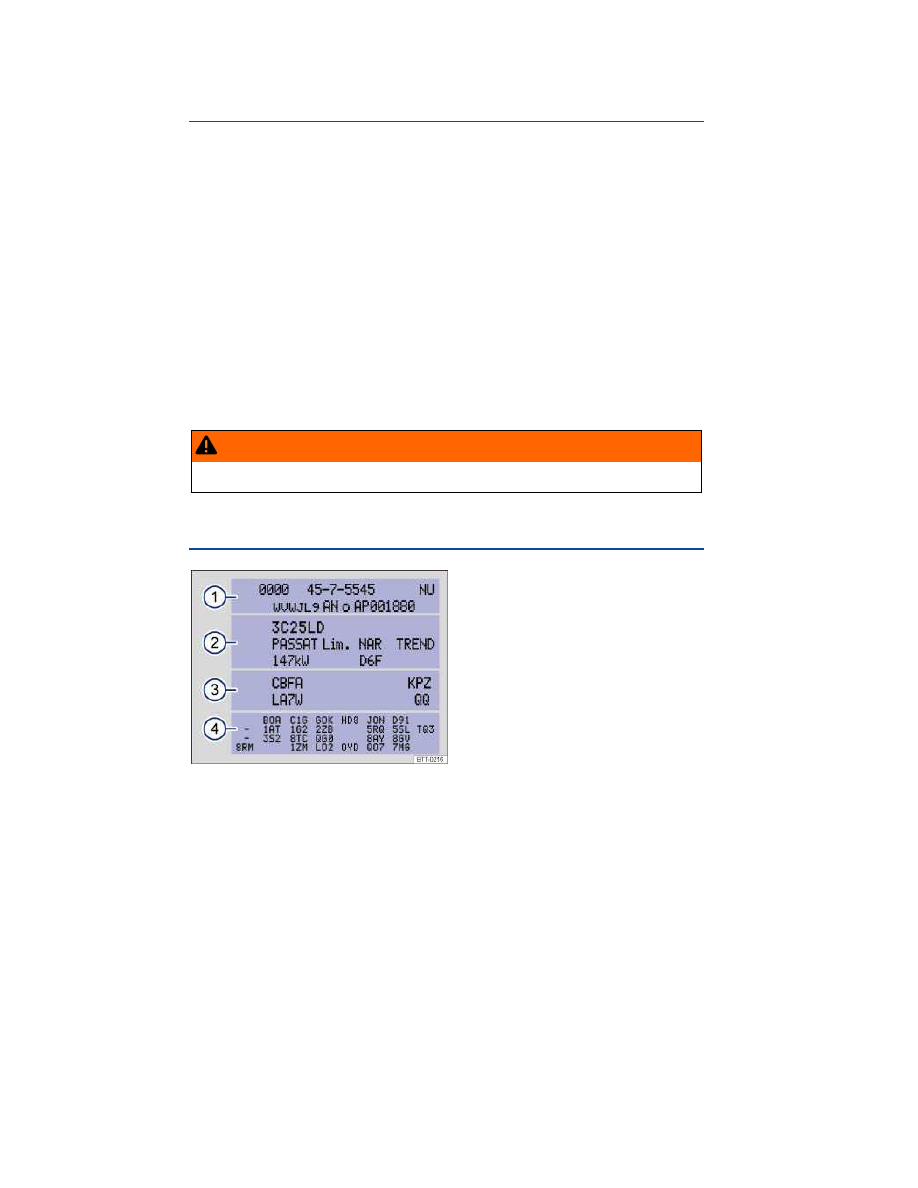
The vehicle identification label
⇒
fig. 16
is affixed to the area of the spare wheel well underneath the
luggage compartment floor panel and contains the following information:
(1)
Vehicle identification number (VIN)
(2)
Vehicle type, engine output, and transmission
(3)
Engine and transmission identification codes, paint number, and interior type. In the example,
the engine identification code is “CBFA”
⇒
fig. 16
.
(4)
Optional equipment and part numbers
Safety Compliance Certification Label
A safety certificate affixed to the door jamb in the driver door confirms that at time of production all
necessary safety standards and requirements of the traffic safety agency of the respective country
were met. The month and year of production as well as the vehicle identification number may be listed
as well.

Radiator fan and high voltage warning sticker
A warning sticker about the radiator fan and the high voltage of the electrical system is located in the
engine compartment next to the engine hood release. The vehicle ignition system complies with the
Canadian standard ICES-002.
Tire inflation pressure label
A tire inflation pressure label is on the driver door jamb
⇒ Tires and wheels.
Fuel grade sticker
An information sticker listing the correct fuel grade for your vehicle
⇒ Refueling.
Engine data
Please first read and note the introductory information and heed the WARNINGS
Gasoline engines
Maximum
power output
Injection
technology
Engine
ID
code
Maximum
torque
No. of cylin-
ders
Displacement
170 hp at
4800 – 6200
rpm
(125 kW at
4800 – 6200
rpm)
TSI
®
CXBA,
CXBB
1.8L
184 lb-ft at
1500 –
4700 rpm
(250 Nm at
1500 –
4700 rpm)
4 cylinders
110 CID
(1798 ccm)
Diesel engines
Maximum
power output
Injection
technology
Engine
ID
code
Maximum
torque
No. of cylin-
ders
Displacement
150 hp at
3500 rpm
(110 kW at
3500 rpm)
TDI
®
with
DPF
CRUA
2.0L
236 lb-ft at
1750 –
3500 rpm
(320 Nm at
1750 –
3500 rpm)
4 cylinders
120 CID
(1968 ccm)

Dimensions
Please first read and note the introductory information and heed the WARNINGS
Length
179.6–180.3 inches (4562–4579 mm)
Width
70.8 inches (1799 mm)
Height (unloaded)
58.2–58.3 inches (1479–1481 mm)
Wheelbase
103.5–103.7 inches (2630–2635 mm)
Minimum turning circle diame-
ter (wall to wall)
3
about 35.8 feet (10.9 m)
Track
3
, front
60.3–70.0 inches (1533–1549 mm)
Track
3
, rear
59.1–59.8 inches (1502–1520 mm)
Ground clearance (unloaded)
3
about 5.5 inches (140–141 mm)
NOTICE
Please be careful when parking your vehicle in areas with parking barriers or curbs. These
vary in height and could damage your bumper and related parts if the front of your vehicle hits
a barrier or curb that is too high while you are getting into or out of a parking spot.
Always be careful when you enter a driveway or drive up or down steep ramps or over
curbs or other obstacles. Parts of the vehicle close to the ground may be damaged (such as
bumper covers, spoilers, and parts of the engine, suspension, and exhaust systems).
3
Slight differences to these figures are possible, depending on wheel and tire size fitted, tire inflation pres-
sure, equipment level, driving situation, and other factors.

Technical data
Introduction
In this section you’ll find information about:
Important vehicle labels
Engine data
Dimensions
Your vehicle's engine type is shown on the vehicle identification label.
The specifications in this Manual refer to the base model. The stated values may vary, depending
upon different equipment or models, as well as with respect to special vehicles and vehicles exported
to different countries.
More information:
Transporting
Tires and wheels
Saving fuel and helping the environment
Fuel
Engine oil
Engine coolant
Consumer information
WARNING
Disregarding or exceeding stated values for weights, loads, dimensions and maximum speed
may result in accidents and serious personal injuries.
Important vehicle labels
Fig. 16 Vehicle identification label: Shown in the example with engine identification code CBFA 3.

Fig. 17 Vehicle identification number (VIN).
Please first read and note the introductory information and heed the WARNINGS
Factory-installed safety certificates, stickers, and signs containing important information regarding
vehicle operation can be found in the engine compartment and on certain vehicle components, such
as inside the fuel filler flap, on the passenger sun visor, in the driver door jamb, or on the luggage
compartment floor.
Do not remove, alter, or render unusable or illegible any safety certificates, stickers, and labels.
If vehicle components bearing safety certificates, stickers, or labels are replaced, make certain that
the firm doing the work attaches new conforming certificates, stickers, or labels to the same part of the
new components.
Vehicle identification number (VIN)
The vehicle identification number is on a plate on top of the instrument panel on the driver side, and is
visible from the outside through the windshield
⇒
fig. 17
(arrow). The view window is on the side at the
bottom of the windshield. The vehicle identification number is also stamped into the top of the right drip
channel in the engine compartment. The drip channel is between the spring strut tower and the right
fender. Open the engine hood to read the vehicle identification number
⇒ Working in the engine
compartment.
The vehicle identification number can be displayed in the Infotainment system by pressing the
button followed by the
and Service function keys
⇒ Menu and system settings (SETUP).
Vehicle identification label
The vehicle identification label
⇒
fig. 16
is affixed to the area of the spare wheel well underneath the
luggage compartment floor panel and contains the following information:
(1)
Vehicle identification number (VIN)
(2)
Vehicle type, engine output, and transmission
(3)
Engine and transmission identification codes, paint number, and interior type. In the example,
the engine identification code is “CBFA”
⇒
fig. 16
.
(4)
Optional equipment and part numbers
Safety Compliance Certification Label
A safety certificate affixed to the door jamb in the driver door confirms that at time of production all
necessary safety standards and requirements of the traffic safety agency of the respective country
were met. The month and year of production as well as the vehicle identification number may be listed
as well.

Radiator fan and high voltage warning sticker
A warning sticker about the radiator fan and the high voltage of the electrical system is located in the
engine compartment next to the engine hood release. The vehicle ignition system complies with the
Canadian standard ICES-002.
Tire inflation pressure label
A tire inflation pressure label is on the driver door jamb
⇒ Tires and wheels.
Fuel grade sticker
An information sticker listing the correct fuel grade for your vehicle
⇒ Refueling.
Engine data
Please first read and note the introductory information and heed the WARNINGS
Gasoline engines
Maximum
power output
Injection
technology
Engine
ID
code
Maximum
torque
No. of cylin-
ders
Displacement
170 hp at
4800 – 6200
rpm
(125 kW at
4800 – 6200
rpm)
TSI
®
CXBA,
CXBB
1.8L
184 lb-ft at
1500 –
4700 rpm
(250 Nm at
1500 –
4700 rpm)
4 cylinders
110 CID
(1798 ccm)
Diesel engines
Maximum
power output
Injection
technology
Engine
ID
code
Maximum
torque
No. of cylin-
ders
Displacement
150 hp at
3500 rpm
(110 kW at
3500 rpm)
TDI
®
with
DPF
CRUA
2.0L
236 lb-ft at
1750 –
3500 rpm
(320 Nm at
1750 –
3500 rpm)
4 cylinders
120 CID
(1968 ccm)
Dimensions
Please first read and note the introductory information and heed the WARNINGS
Length
179.6–180.3 inches (4562–4579 mm)
Width
70.8 inches (1799 mm)
Height (unloaded)
58.2–58.3 inches (1479–1481 mm)
Wheelbase
103.5–103.7 inches (2630–2635 mm)
Minimum turning circle diame-
ter (wall to wall)
3
about 35.8 feet (10.9 m)
Track
3
, front
60.3–70.0 inches (1533–1549 mm)
Track
3
, rear
59.1–59.8 inches (1502–1520 mm)
Ground clearance (unloaded)
3
about 5.5 inches (140–141 mm)
NOTICE
Please be careful when parking your vehicle in areas with parking barriers or curbs. These
vary in height and could damage your bumper and related parts if the front of your vehicle hits
a barrier or curb that is too high while you are getting into or out of a parking spot.
Always be careful when you enter a driveway or drive up or down steep ramps or over
curbs or other obstacles. Parts of the vehicle close to the ground may be damaged (such as
bumper covers, spoilers, and parts of the engine, suspension, and exhaust systems).
3
Slight differences to these figures are possible, depending on wheel and tire size fitted, tire inflation pres-
sure, equipment level, driving situation, and other factors.
Vehicle key set
Introduction
In this section you’ll find information about:
Remote control vehicle keys
Indicator light in the remote control vehicle key
Replacing the remote control vehicle key battery
Synchronizing the remote control vehicle key
More information:
Volkswagen Information System
Power locking system
Starting and stopping the engine
Consumer information
Emergency closing and opening
DANGER
20 mm button cells and other lithium batteries will cause serious personal injury and even
death within a short time if swallowed.
Always keep remote control vehicle key fobs with batteries, spare batteries, as well as
dead button cell and larger 20 mm batteries out of the reach of children.
Get medical attention immediately if you suspect that a battery has been swallowed.
WARNING
Improper use of vehicle keys can result in serious personal injury.
Always take the key with you when you leave the vehicle. It can be used to start the engine
and operate vehicle systems such as the power windows, leading to serious personal injury.
Children or other unauthorized persons could also lock the doors and the luggage compart-
ment.
Never leave children, disabled persons, or anyone who cannot help themselves in the
vehicle. The doors can be locked with the remote control vehicle key. This could leave people
trapped in the vehicle in an emergency. Depending on the time of year, people trapped in the
vehicle can be exposed to very high or very low temperatures.
A closed vehicle can become very hot or very cold, depending on the season. Particularly
in the summer, heat buildup in the passenger and luggage compartment of a parked vehicle
can result in temperatures in the vehicle that are much higher than the outside temperatures.
Temperatures can quickly reach levels that can cause unconsciousness and death, particu-
larly to small children.
Never remove the key from the ignition switch or turn off the ignition with the starter but-
ton while the vehicle is moving or rolling to a stop. The electronic steering column could
suddenly lock, you would not be able to steer, and you could lose control of the vehicle,
crash, and seriously injure yourself and others.
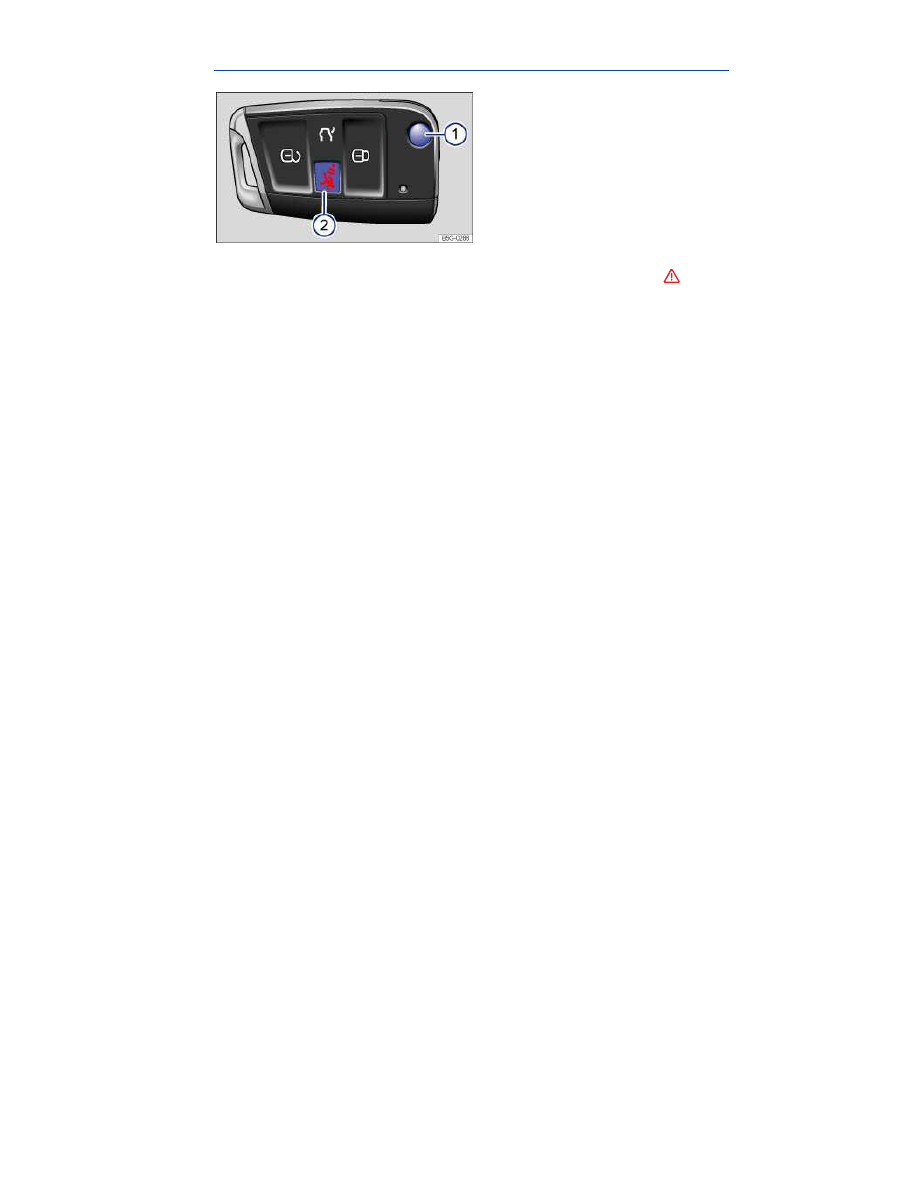
Remote control vehicle keys
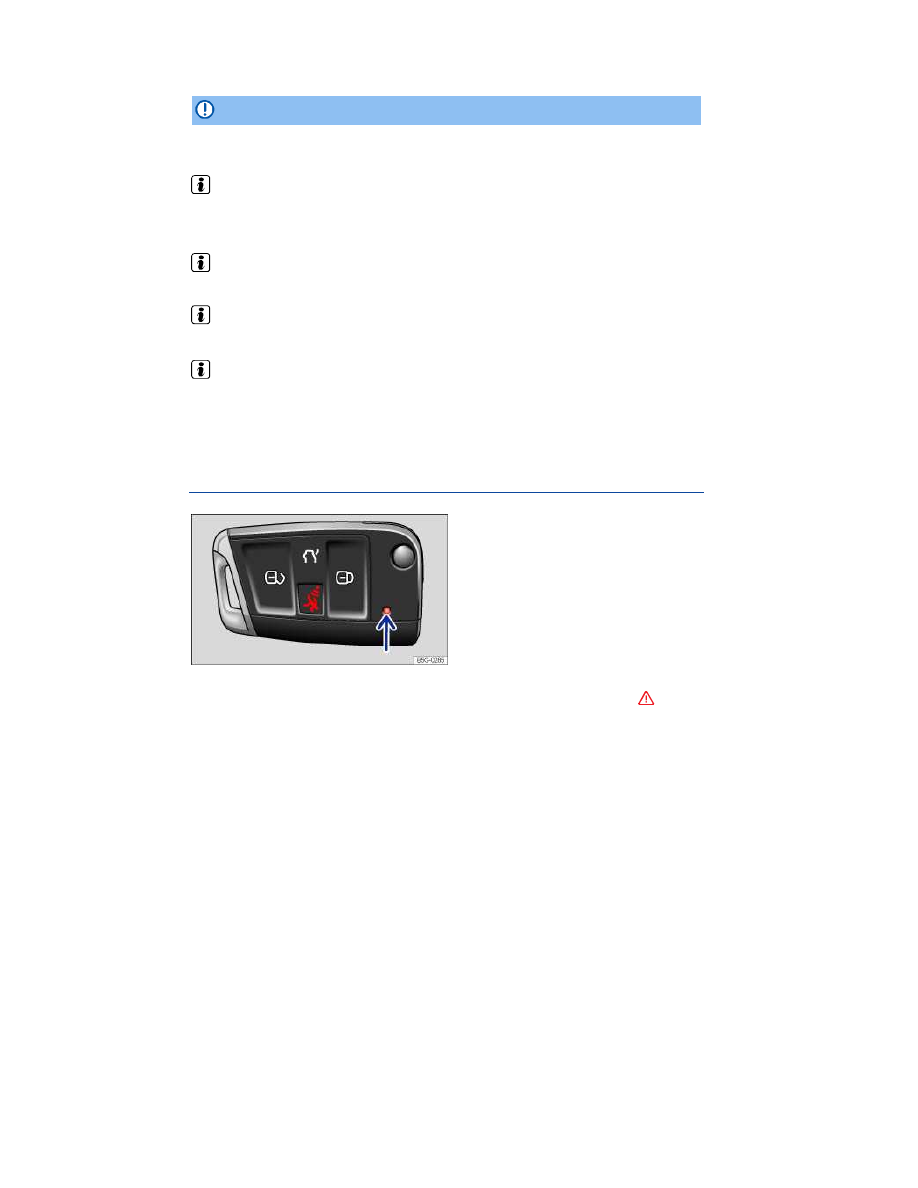
Fig. 18 Remote control vehicle key with panic button.
Please first read and note the introductory information and heed the WARNINGS
Remote control vehicle key
The remote control vehicle key can unlock and lock the vehicle from a distance
⇒ Power locking
system.
The remote transmitter and battery are inside the remote control vehicle key. The receiver is inside the
passenger compartment. The operating range of the remote control vehicle key for a fresh battery is
several yards (meters) around the vehicle.
If the remote control vehicle key will not lock or unlock your vehicle, you probably need to replace the
battery in the remote control vehicle key
⇒ Replacing the remote control vehicle key battery. If this is
not the problem, the key should be resynchronized by an authorized Volkswagen dealer, an author-
ized Volkswagen Service Facility, or another qualified workshop. See also
⇒ Synchronizing the re-
mote control vehicle key.
Folding the key bit in or out
Pressing button
⇒
fig. 18
(1)
releases the key bit and folds it out.
To fold the key bit in press button
(1)
while pressing the key bit back until it clicks.
Panic button
Press the panic button
(2)
only in emergencies! After pushing the panic button, the horn will sound and
the turn signals will flash. Press the panic button again to switch off the panic feature.
Replacement vehicle keys
The vehicle identification number is required to get a replacement key or an additional remote control
vehicle key.
Each new vehicle key contains a microchip and must be coded with the data from the vehicle's elec-
tronic immobilizer. A vehicle key will not work if it does not contain a microchip or contains a chip that
is not coded, even if the key bit was cut correctly.
You can obtain additional or duplicate remote control vehicle keys from authorized Volkswagen deal-
ers, authorized Volkswagen Service Facilities, and from certain independent repair facilities and lock-
smiths which are qualified to make remote control vehicle keys.
Each vehicle key must be programmed by an authorized Volkswagen dealer or an authorized
Volkswagen Service Facility in order for it to work with your vehicle.
To find the nearest qualified independent repair facility, locksmith, or Volkswagen dealer which can cut
and code replacement vehicle keys, call the VW Customer Care Hotline at 1-800-822-8987 or visit
http://www.vw.com and search for “replacement keys.”
Canadian customers can contact an authorized Volkswagen dealer or Volkswagen Service Facility or
call the Volkswagen Canada Customer CARE Center at 1-800-822-8987.
NOTICE
The remote control vehicle keys contain electrical components. Protect them from damage,
moisture and rough handling.
Do not press the buttons on the remote control vehicle key unless you actually want to use the
function in question. Since terrain and conditions vary, pressing a button on the remote control vehicle
key when it is not necessary may unlock the vehicle or set off the panic alarm, even if you think you
are out of range.
Remote control vehicle key functions can be temporarily disrupted by interference from transmit-
ters near the vehicle that use the same frequency range (such as radio equipment or mobile phones).
Things between the remote control vehicle key and vehicle, bad weather, as well as a weak
battery can reduce the operating range.
If the remote control vehicle key buttons
⇒ Unlocking or locking the vehicle from the outside or
the power locking buttons
⇒ Unlocking or locking the vehicle from the inside are pushed repeatedly in
quick succession, the power locking system is switched off for a brief period to help keep it from being
overloaded. The vehicle is then unlocked for about 30 seconds. Unless a door or the rear hatch is
opened in this span of time, the vehicle is automatically locked afterwards.
Indicator light in the remote control vehicle key
Fig. 19 Indicator light in the remote control vehicle key.
Please first read and note the introductory information and heed the WARNINGS
If a button on the remote control vehicle key is pressed briefly, the indicator light
⇒
fig. 19
(arrow) will
flash once briefly. If you push and hold a button, it flashes repeatedly.
If the indicator light in the remote control vehicle key does not light up when the button is pressed, the
battery inside the key must be replaced
⇒ Replacing the remote control vehicle key battery.
A Declaration of Compliance with United States FCC and Industry Canada regulations is found in the
Consumer information section of this Manual
⇒ Consumer information.
Replacing the remote control vehicle key battery
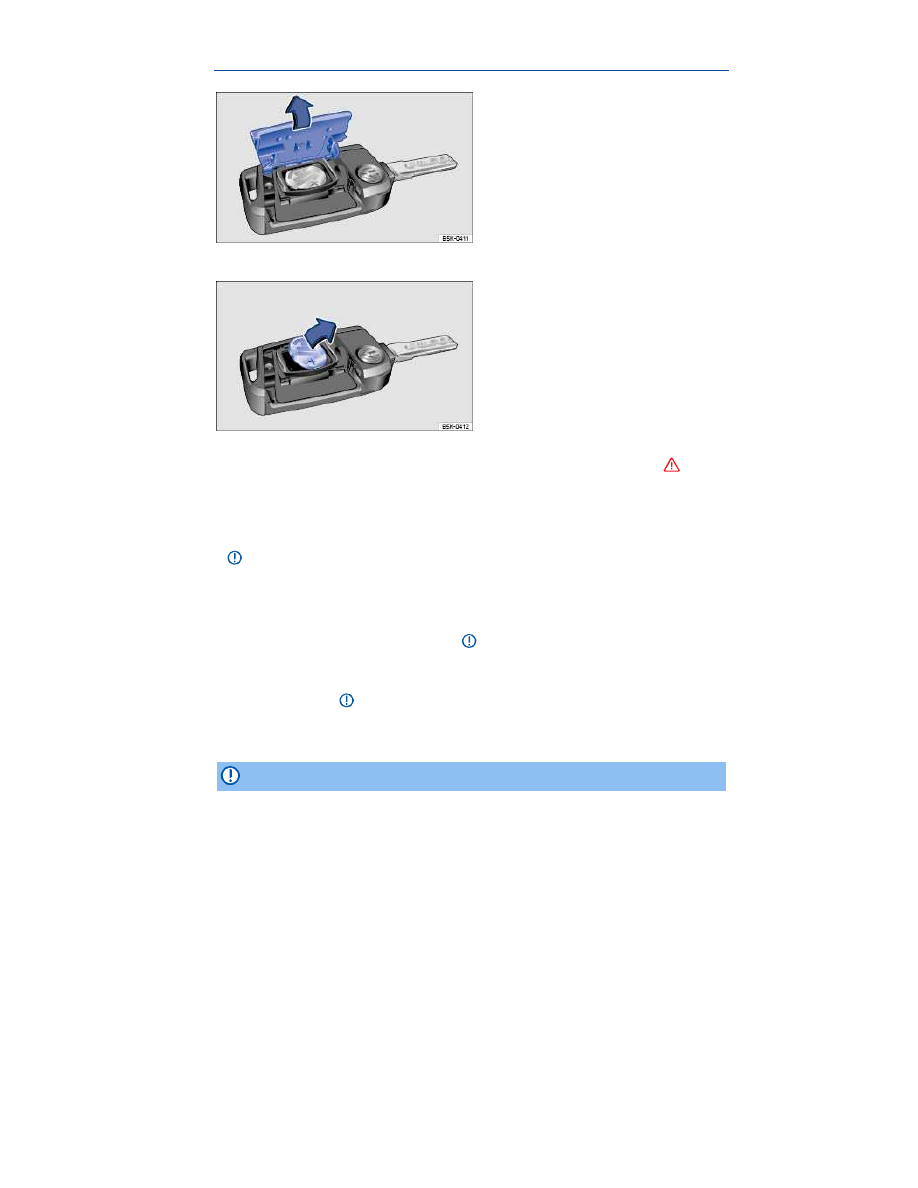
Fig. 20 Remote control vehicle key: Open battery compartment cover.
Fig. 21 Remote control vehicle key: Remove old battery.
Please first read and note the introductory information and heed the WARNINGS
Volkswagen recommends having the battery in the remote control vehicle key changed by an author-
ized Volkswagen dealer or an authorized Volkswagen Service Facility.
The battery is on the back of the remote control vehicle key under a cover
⇒
fig. 20
.
When changing the battery, pay attention to the correct polarity and use the same type of battery
⇒ .
Replacing the battery
Unfold the key bit on the remote control vehicle key
⇒ Remote control vehicle keys.
Remove the cover on the back of the remote control vehicle key in the direction of the arrow
⇒
fig. 20
using a suitable object such as a coin
⇒ .
Use a thin object to pry the battery out of the battery compartment
⇒
fig. 21
.
Position the new battery in as shown
⇒
fig. 21
and press it into the battery compartment (opposite
direction of the arrow)
⇒ .
Position the cover as shown
⇒
fig. 20
and press it down (opposite direction of the arrow) until you
hear it click into place.
NOTICE
Changing the battery improperly can damage the remote control vehicle key.

Using the wrong battery can damage the remote control vehicle key. Replace a dead battery
with a new one that has the same voltage, size, and specifications.
Make sure the plus and minus poles of the battery are correctly positioned.
Dispose of old batteries in an environmentally responsible manner and keep them out of the
reach of children.
Batteries of the type used in your remote control vehicle key may contain Perchlorate Material.
Special handling may apply – see http://www.dtsc.ca.gov/hazardouswaste/perchlorate. Obey all legal
requirements regarding handling and disposal of these batteries. Authorized Volkswagen dealers and
authorized Volkswagen Service Facilities are familiar with the requirements, and we recommend that
you have them perform this service for you.
Synchronizing the remote control vehicle key
Please first read and note the introductory information and heed the WARNINGS
If the button is pressed often while outside the operating range, it is possible that the vehicle cannot
be locked or unlocked anymore with the remote control vehicle key. Synchronize the vehicle key as
follows:
Unfold the key bit on the remote control vehicle key
⇒ Remote control vehicle keys.
Remove the cap from the outside door handle on the driver door
⇒ Emergency closing and open-
ing.
Press the button on the remote control vehicle key. Stand immediately next to vehicle while
doing so.
Manually unlock the vehicle using the key bit within 1 minute. The synchronization is complete.
Reinstall the cap on the driver door handle.
Нет комментариевНе стесняйтесь поделиться с нами вашим ценным мнением.
Текст