Volkswagen Golf SportWagen (2015 year). Instruction — part 13
WARNING
Incorrect tire pressure can cause a sudden tire failure or blowout, loss of control, collision,
serious personal injury, and even death.
Always inflate tires to the recommended and correct cold tire pressure before driving off.
Low tire pressure can cause tires to get too hot, resulting in tread separation, sudden loss
of pressure, and blowouts. Tires with excessively low pressure flex (bend) more, which can
cause the tire to overheat and fail suddenly without warning.
Excessive speed and/or overloading can cause heat buildup, sudden tire failure including
a blowout and sudden deflation and loss of control.
If the tire pressure is too low or too high, the tires will wear prematurely and the vehicle
will not handle well.
Regularly check tire inflation pressure, at least once a month, and also especially before a
long trip.
Check the pressure in all 4 tires when the tires are still cold. Never reduce air pressure in
warm tires to match cold tire inflation pressure.
NOTICE
Make sure not to jam the tire pressure gauge into the valve stem. Otherwise you can dam-
age the tire valves.
Driving without valve caps, with the wrong valve caps, or with valve caps that are not
properly screwed on can damage the tire valves. To help prevent damage, always use valve
stem caps like those originally installed at the factory. The caps must be screwed on tightly. Do
not use metal valve caps or “comfort” valve stem caps.
Underinflation increases fuel consumption.
When the TPMS warns that the pressure in at least one tire is too low, check the tire pressure in
all 4 tires with an accurate tire pressure gauge. Low tire pressure usually cannot be spotted by looking
at the tire. This is especially true for low-profile tires. When checking the tire pressures, refer to
⇒ Tire
Pressure Monitoring System (TPMS).
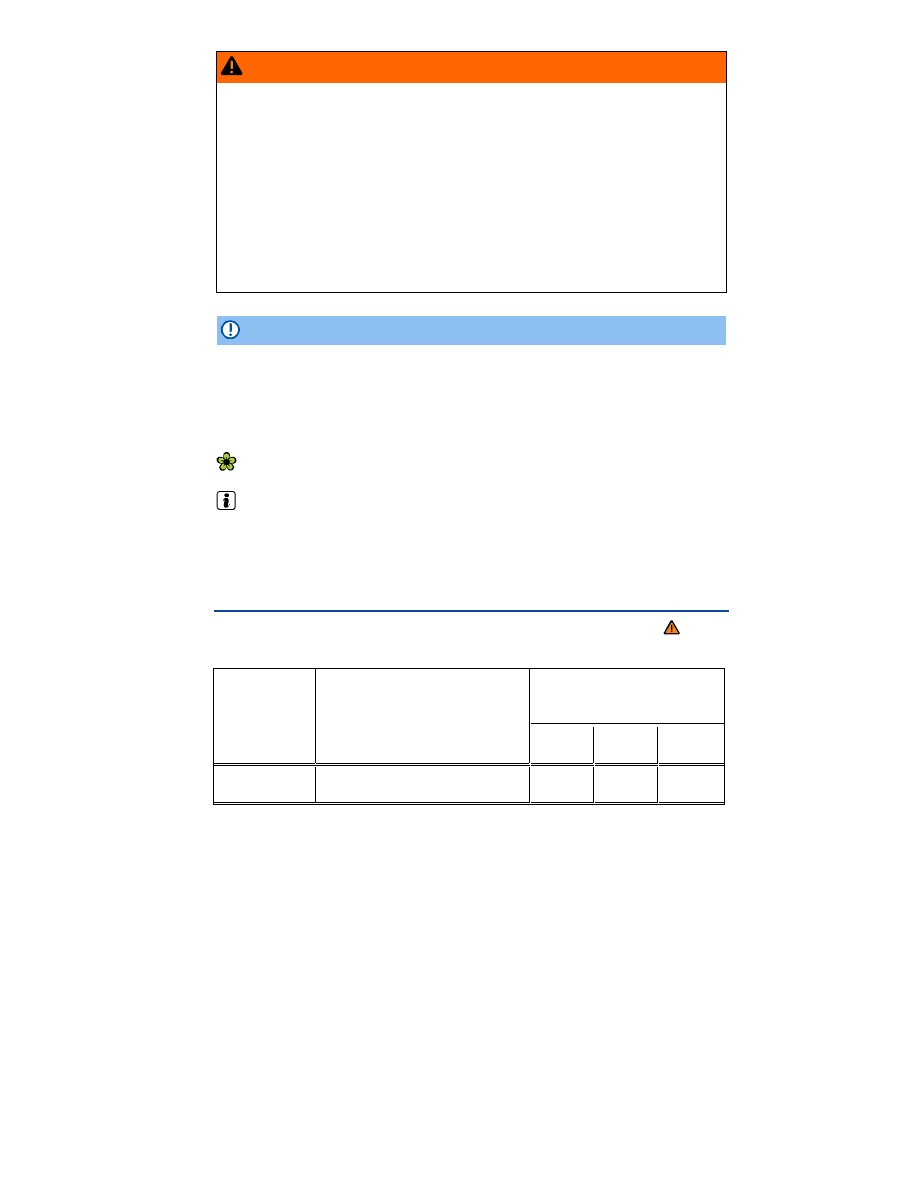
Tire inflation pressure in cold tires
Please first read and note the introductory information and heed the WARNINGS
on
page 176.
Engine
Tire size
Standard tire pressure
(full load)
psi
kPa
bar
1.8 L/170 hp
195/65 R15 91H
33
230
2.3

Engine
Tire size
Standard tire pressure
(full load)
psi
kPa
bar
(125 kW)
205/55 R16 91H
33
230
2.3
225/45 R17 91H
33
230
2.3
225/40 R18 92H xl
38
260
2.6
2.0 L/150 hp
(110 kW)
TDI
195/65 R15 91H
34
230
2.3
205/55 R16 91H
34
230
2.3
225/45 R17 91H
34
230
2.3
225/40 R18 92H xl
38
260
2.6
The Tire Pressure Monitoring System is configured at the factory with the
correct tire inflation pressure applicable for the vehicle model, engine and
factory-installed tires. The tire inflation pressure is listed on the tire infla-
tion pressure label on the driver door jamb
⇒
fig. 106
. The tire inflation
pressures for the road tires are listed on this label. The inflation pressure
for the compact spare is as specified on the tire pressure label or on a
separate label for the compact spare, if there is one. In the event of a dis-
crepancy between the above figures and the tire pressures listed on the
tire inflation pressure label, the pressures listed on the label are the ones
you should use. The listed pressure applies to all road tires. The Tire
Pressure Monitoring System must be recalibrated whenever you change
or adjust the cold tire inflation pressures or remove and remount or
change any wheel or tire on the vehicle, even if the reinstalled or replace-
ment wheels and tires are identical to those that were removed and even if
the tire pressure does not change
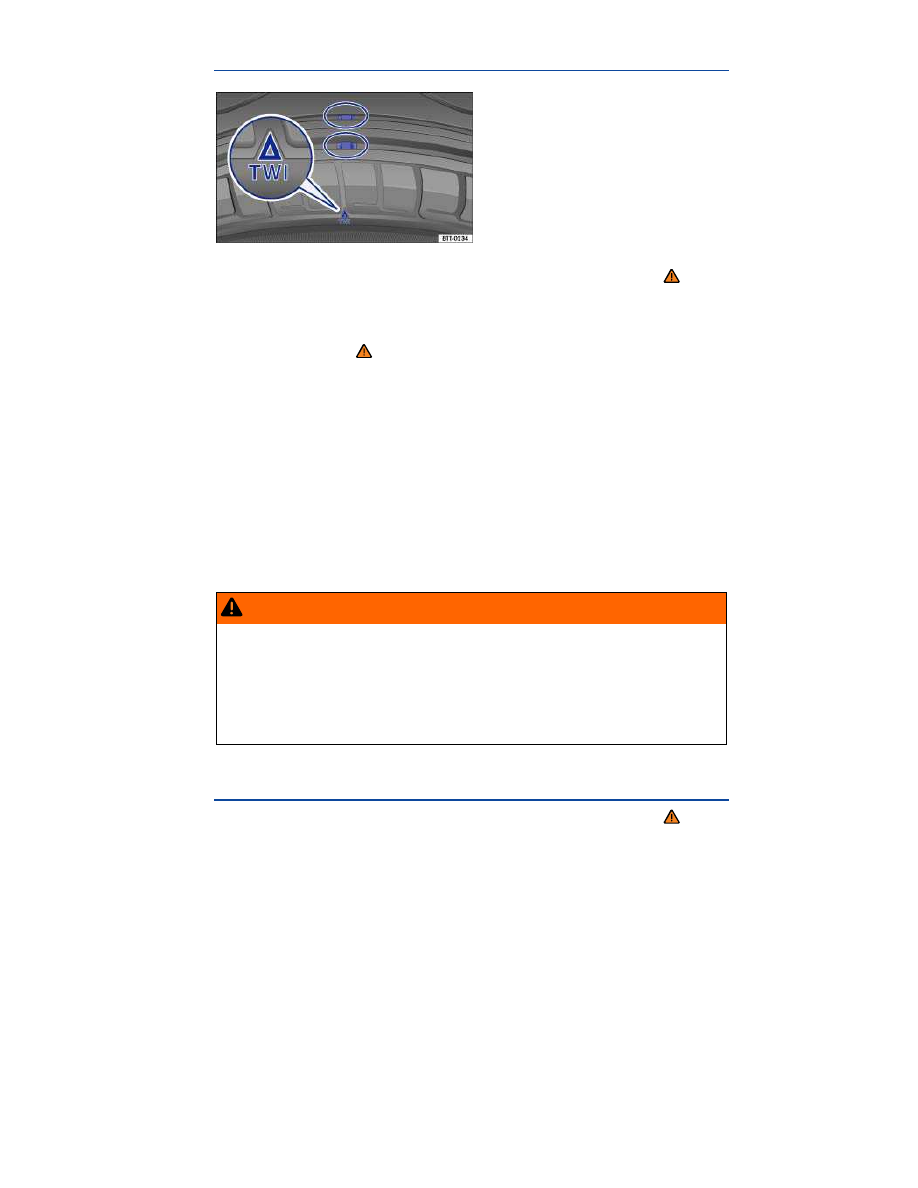
Tread depth and tread wear indicators
Fig. 107 Tread pattern: Wear indicator.
Please first read and note the introductory information and heed the WARNINGS
Tread depth
Most driving situations require as much tread depth as possible and similar tread depth for the tires on
the front and rear wheels. This is especially true when driving in winter weather, at low temperatures
and under wet conditions
⇒ .
In most countries the legally permissible minimum tread depth is 1/16 in. (1.6 mm), as measured in
tread grooves next to the wear indicators. Please be sure to obey country-specific legal requirements.
Winter tires are no longer suitable for winter operation once the tread pattern is worn down to a depth
of 3/16 in. (4.8 mm).
The tread depth of new tires can differ between tire models and manufacturers because of the differ-
ent design features and tread patterns.
Tread wear indicator (TWI) in the tire
The 1/16 in. (1.6 mm) high wear indicators are molded into the bottom of the tread grooves of the
original tires running across the treads
⇒
fig. 107
. Several wear indicators are evenly spaced around
the tire. Markings on the sides of the tires (for example “TWI” or symbols) show the position of the
wear indicators.
Wear indicators show when the tires are worn down. The tires must be replaced no later than when
the tread pattern is worn down to the wear indicators.
WARNING
Worn tires are dangerous and can cause loss of vehicle control including serious personal
injuries.
Never drive a vehicle when the tread on any tire is worn down to the wear indicators, re-
place them sooner.
Worn tires do not grip the road properly, especially on wet roads, increasing your risk of
“hydroplaning” and loss of control.
Worn tires reduce the ability of your vehicle to handle well in normal and difficult driving
situations and increase braking distances and the risk of skidding.
Tire wear and damage
Please first read and note the introductory information and heed the WARNINGS

Wheel rim and tire damage is often difficult to see. Unusual vibrations or pulling to one-side can be
an indication of tire damage
⇒ .
If you suspect tire damage, immediately reduce speed!
Check tires and wheel rims for damage.
If a tire is damaged, do not drive any farther. Get expert assistance.
If no external damage is visible, slowly and carefully drive to the nearest authorized Volkswagen
dealer, authorized Volkswagen Service Facility, or other qualified workshop and have the vehicle
checked.
Objects embedded in the tire
If embedded objects have penetrated to the inside of the tire, do not remove them! If objects are
stuck in the tread grooves of the tire, they can be removed.
If necessary, change the damaged wheel
⇒ Changing a wheel. If necessary, get professional
assistance to change the wheel.
Check tire pressure and adjust if necessary.
Tire wear
Tire wear depends on several factors, including:
Driving style.
Unbalanced wheels.
Wheel alignment.
Driving style – Fast cornering, hard acceleration and braking increase tire wear. If you experience
increased tire wear under normal driving conditions, have the vehicle suspension checked by an
authorized Volkswagen dealer or an authorized Volkswagen Service Facility.
Unbalanced wheels – The wheels on a new vehicle are balanced. When driving, however, various
conditions can cause a wheel to become unbalanced. Unbalanced wheels can cause wear to the
steering and suspension systems. Have all wheels rebalanced. A wheel must always be rebalanced if
a new tire has been mounted.
Wheel alignment – Incorrect wheel alignment causes excessive and uneven tire wear, impairing
vehicle safety. If you notice excessive or uneven tire wear, have the wheel alignment checked by an
authorized Volkswagen dealer or an authorized Volkswagen Service Facility.
WARNING
Unusual vibrations or pulling to one side can indicate tire damage.
Reduce speed immediately and stop when it is safe to do so.
Check tires and wheel rims for damage.
Never drive with a damaged tire or rim. Get expert assistance instead.
If no external damage is visible, slowly and carefully drive to the nearest authorized
Volkswagen dealer, authorized Volkswagen Service Facility, or other qualified workshop and
have the vehicle checked.
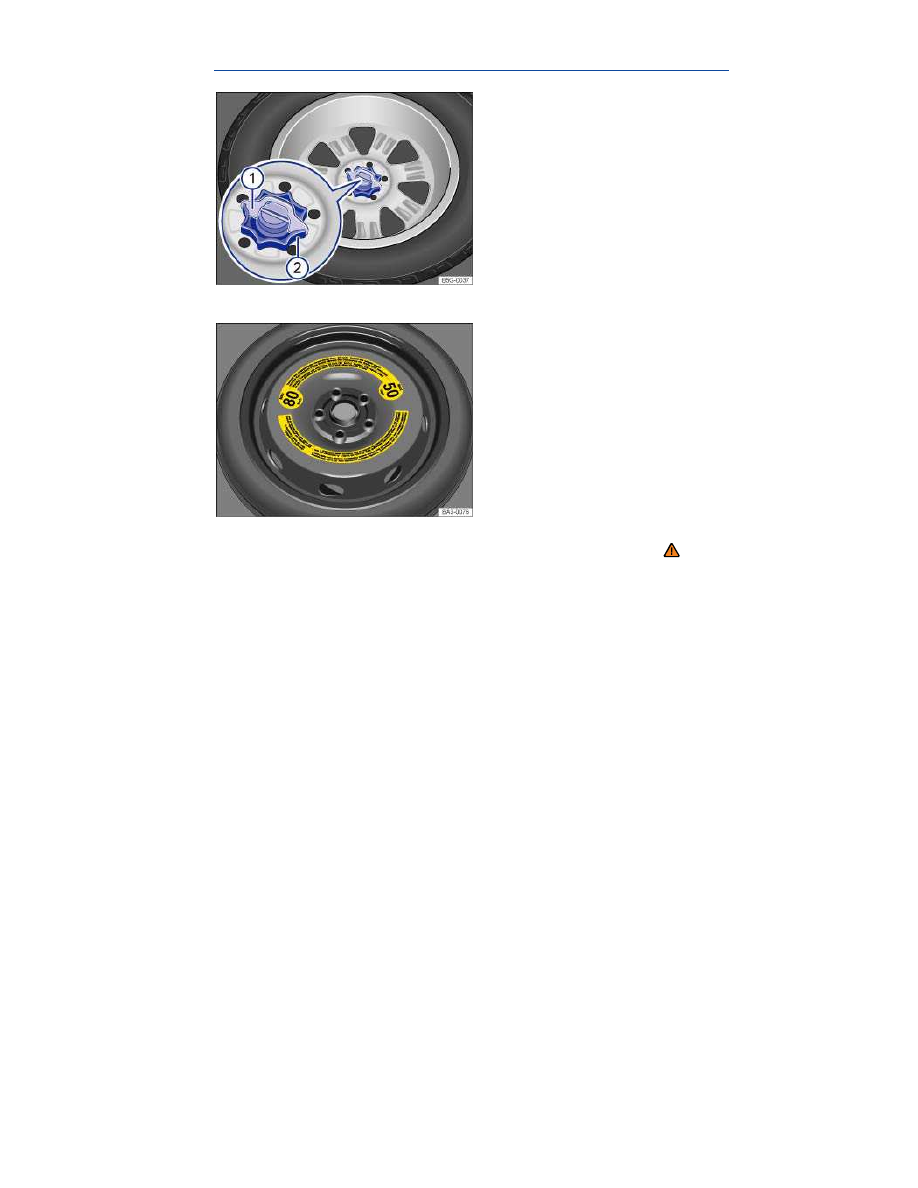
Spare wheel or compact spare wheel
Fig. 108 In the luggage compartment: Handwheel holding the spare wheel in place.
Fig. 109 In the luggage compartment: Compact spare wheel (if equipped).
Please first read and note the introductory information and heed the WARNINGS
Removing the spare wheel or compact spare wheel
Open the rear hatch and lift the luggage compartment floor by the recessed handle. Set the outer
edges of the rear luggage compartment floor section into the recesses on the side supports so it is
held in place
⇒ Variable luggage compartment floor.
If applicable, remove the subwoofer
⇒ Removing the subwoofer.
Pull the securing clip
⇒
fig. 108
(1)
(if equipped) out and up.
Completely unscrew the handwheel in the center of the spare wheel
(2)
or compact spare wheel
⇒
fig. 109
counterclockwise and remove the spare wheel.
Stowing the replaced wheel
Open the rear hatch and lift the luggage compartment floor by the recessed handle. Set the outer
edges of the rear luggage compartment floor section into the recesses on the side supports so it is
held in place
⇒ Variable luggage compartment floor.
If the wheel you took off the vehicle fits in the spare wheel well, position it so that the center hole of
the rim is aligned with the threaded pin in the center of the well.
Turn the handwheel
⇒
fig. 108
(2)
clockwise until the wheel is securely in place.

Insert the securing clip
(1)
(if equipped) in the stud slot so that the handwheel can no longer be
turned.
If necessary, return the vehicle tool kit to its location in the luggage compartment.
Lower the variable luggage compartment floor.
Close the rear hatch.
If the replaced wheel does not fit in the spare wheel well, stow it securely in the luggage compartment
on top of the floor covering.
If the spare wheel is different from the road wheels
If the spare is different from the road wheels, a compact spare wheel, for example, or if the road
wheels are winter tires, the spare wheel must be used only in the event of a flat tire, only for a brief
time, and only when driving with extra caution
⇒ .
Replace it with a tire matching the others on your vehicle as soon as possible.
Please heed the following:
Do not drive faster than 50 mph (80 km/h)!
Avoid full-throttle acceleration, hard braking, and fast cornering!
Do not use snow chains on the compact spare wheel
⇒ Snow chains.
After installing the spare wheel or compact spare wheel, check the tire pressure as soon as possi-
ble
⇒ Tire inflation pressure.
Check the tire inflation pressure of the spare or compact spare whenever you check the tire pressure
of the road wheels, at least once a month. Inflate a spare wheel to the cold tire pressure specified for
the vehicle's road wheels on the tire pressure label; inflate a compact spare wheel to the cold tire
pressure specified for the compact spare on the tire pressure label or on a separate label for the
compact spare, if there is one.

WARNING
Improper use of a spare wheel or a compact spare wheel can cause loss of vehicle control, a
crash or other accident, and serious personal injury.
Never use a spare wheel or compact spare wheel if it is damaged or worn down to the
wear indicators.
In some vehicles, the spare wheel or compact spare wheel is smaller than the original tire.
A smaller compact spare wheel is identified with a sticker and the words “50 mph” or
“80 km/h”. This is the maximum permissible speed when driving with this tire.
Never drive faster than 50 mph (80 km/h) with a compact spare wheel. Avoid full-throttle
acceleration, heavy braking, and fast cornering!
Never drive more than 125 miles (200 km) if a compact spare wheel is installed on the front
axle (drive axle).
Replace the compact spare with a normal wheel and tire as soon as possible. Compact
spare tires are designed for brief use only.
Regularly check the U.S. DOT Tire Identification Number (TIN) to determine the age of the
compact spare wheel
⇒ Tire labeling. Tires age even if they are not being used and can fail
suddenly, especially at higher speeds.
Tires that are more than 6 years old can only be used in an emergency and then with spe-
cial care and at lower speeds.
The compact spare wheel must always be secured with the wheel bolts provided by the
factory.
Never drive using more than one compact spare wheel.
After installing the compact spare wheel, the tire pressure must be checked as soon as
possible
⇒ Tire inflation pressure.
Snow chains cannot be used on the compact spare wheel. If you must use snow chains
and have a compact spare wheel mounted, move the compact spare wheel to the rear axle if a
front tire has to be replaced. The tire taken off the rear axle can then be used to replace the
flat front tire. Be sure you do not change the tire's direction of rotation. Install the snow
chains on the full-sized road tire.
NOTICE
When the spare wheel or compact spare is being used, the TPMS indicator light can light up
after a couple of minutes
⇒ Tire Pressure Monitoring System (TPMS).
If possible, attach the spare wheel, compact spare wheel, or the wheel you took off the vehicle
securely in the luggage compartment.
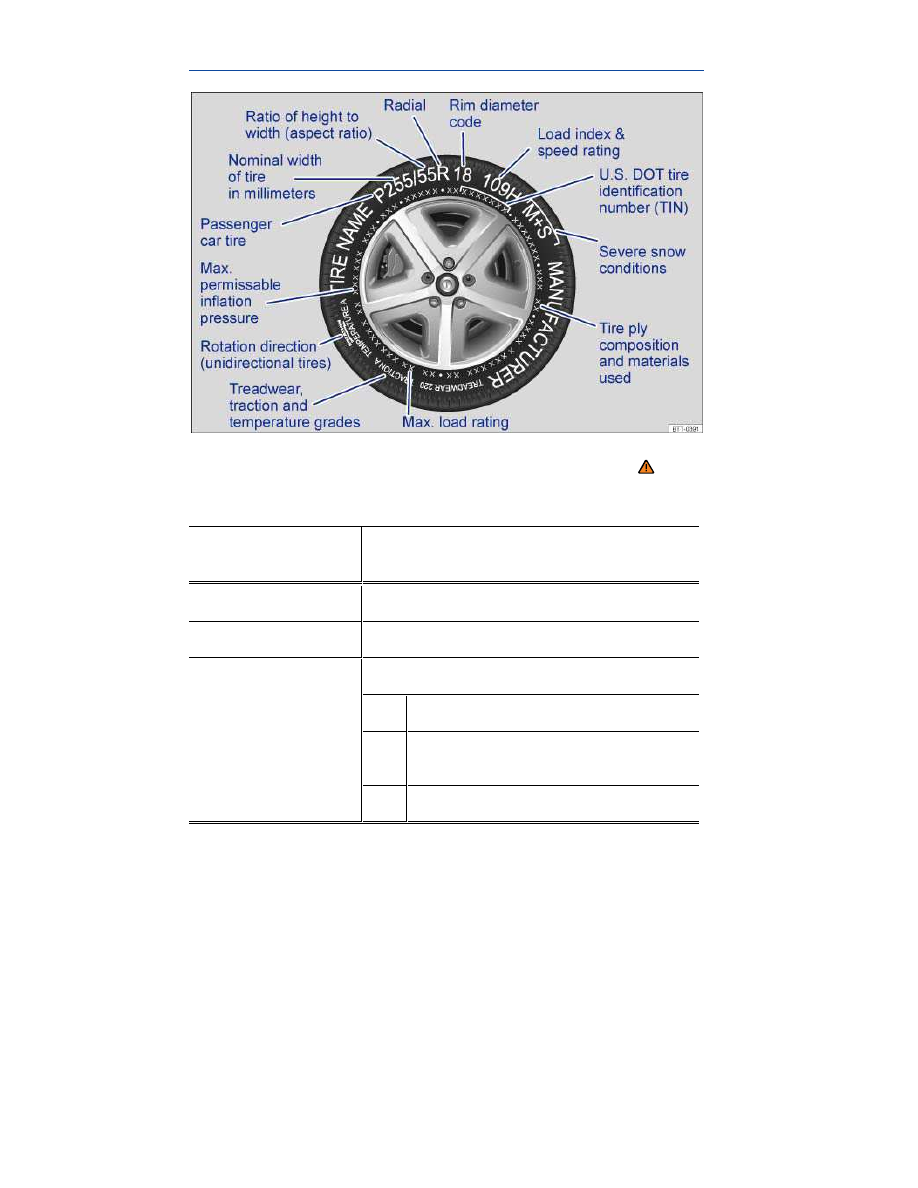
Tire labeling
Fig. 110 International tire labeling.
Please first read and note the introductory information and heed the WARNINGS
Knowing about tire specifications makes it easier to choose the correct replacement tires. Radial tires
have specifications marked on the sidewall.
Tire labeling (exam-
ple)
Meaning
Brand, Logo
Manufacturer
Tire name
Individual tire designation of the manufacturer.
P255 / 55 R 18
Dimensions:
P Tire application: Passenger car
255
Nominal sidewall-to-sidewall width of tire
in millimeters.
55 Ratio of height to width (aspect ratio)

Tire labeling (exam-
ple)
Meaning
R Tire belt design letter code for radial.
18 Rim diameter (in inches)
109 H
Load rating code
⇒ and speed rating code
XL
Indicates “reinforced” tire (heavy-duty)
M+S or M/S
Indicates Mud and Snow capability (also M/S)
⇒
Winter tires.
RADIAL TUBELESS
Tubeless radial tire.
E4 ...
Labeling according to international regulations
(E) including number of the approving country.
The multi-digit approval number is listed next.
DOT BT RA TY5 1709
Tire identification number (TIN)
8
– In some cas-
es the manufacturing date is only on one side of
the tire:
DOT
The tire complies with the requirements of
the United States Department of Trans-
portation, responsible for issuing safety
standards.
BT
Identification letter of the manufacturing
site.
RA
Manufacturer information regarding tire
dimensions.
TY5
Tire characteristics provided by the
manufacturer.
1709 Manufacturing date: 17th week in 2009.
8
TIN represents the serial number of the tire.

Tire labeling (exam-
ple)
Meaning
TWI
Marks the position of the treadwear indicator
⇒
Made in Germany
Country of manufacture.
MAX LOAD 615 KG
(1356 LBS)
United States maximum load rating per wheel.
MAX INFLATION
350 KPA (51 PSI)
United States maximum permissible inflation
pressure.
ROTATION
Rotation direction (unidirectional tires)
SIDEWALL 1 PLY
RAYON
Tire ply composition and materials used:
1 layer of rayon.
TREAD 4 PLIES
1 RAYON + 2 STEEL +
1 NYLON
Tire tread composition and materials used:
In this example there are 4 layers under the
tread: 1 layer of rayon, 2 layers of steel belt and
1 layer of nylon.
Consumer information regarding comparison to specified base tires
(standardized test procedure)
⇒ :
TREADWEAR 220
Relative service life expectancy of the tire refer-
enced to a U.S.-specific standard test.
TRACTION A
Traction rating under wet conditions (AA, A, B or
C).
TEMPERATURE A
Temperature stability of the tire at increased test
bench speeds (A, B or C).
Additional numbers found on the tire could either be tire manufactur-
er internal labels or country-specific labels (such as for Brazil and
China).
Unidirectional tires
Unidirectional tires are designed to rotate only in one direction. Unidirectional tires have arrows on the
sidewalls that show the direction of rotation. Make sure you mount the tire so that it rotates in the
proper direction. The tire's performance with regard to hydroplaning, traction, noise, and wear is worse
if it is not mounted in the proper direction of rotation.
If you have to mount a tire opposite to its proper direction of rotation, you must drive more carefully,
since the tire is no longer being used as designed. This is particularly important on wet roads. You
must replace or remount the tire as soon as possible in order to restore the correct direction of rota-
tion.
Load rating code
The load index indicates the maximum permissible load per individual tire in pounds (kilograms).
91 1356 lbs (615 kg)
92 1388 lbs (630 kg)
93 1433 lbs (650 kg)
95 1521 lbs (690 kg)
97 1609 lbs (730 kg)
98 1653 lbs (750 kg)
99 1709 lbs (775 kg)
100 1763 lbs (800 kg)
101 1819 lbs (825 kg)
102 1874 lbs (850 kg)
103 1929 lbs (875 kg)
104 1984 lbs (900 kg)
110 2337 lbs (1060 kg)
Speed rating code letter
The speed rating code letter indicates the maximum permissible road speed of the tires.
P
up to 93 mph (150 km/h)
Q up to 99 mph (160 km/h)
R up to 106 mph (170 km/h)
S
up to 112 mph (180 km/h)
T
up to 118 mph (190 km/h)
U up to 124 mph (200 km/h)
H up to 130 mph (210 km/h)
V
up to 149 mph (240 km/h)
Z
over 149 mph (240 km/h)
W up to 168 mph (270 km/h)
Y
up to 186 mph (300 km/h)
Some tire manufacturers label tires with a maximum permissible road speed above 149 mph
(240 km/h) with the letter combination “ZR.”

WARNING
Using incorrect or unmatched tires and/or wheels or improper tire and wheel combinations
can lead to loss of control, collision and serious personal injury.
Always use tires, wheels and wheel bolts that meet the specifications of the original facto-
ry-installed tires or other combinations that have been specifically approved by the vehicle
manufacturer.
All 4 wheels must be fitted with radial tires of the same type, the same size (tread circum-
ference), and the same tread pattern. Driving with different tires reduces vehicle handling and
can lead to a loss of control.
Never drive faster than the maximum speed for which the tires installed on your vehicle
are rated because tires that are driven faster than their rated speed can fail suddenly.
Overloading tires can cause heat build-up, sudden tire failure, including a blowout and
sudden deflation and loss of control.
Temperature grades apply to tires that are properly inflated and not over- or underinflated.
Winter tires
Please first read and note the introductory information and heed the WARNINGS
Winter tires improve the handling characteristics of your vehicle significantly when driving under wintry
road conditions. Summer tires have less traction on snow and ice because of their design (width,
rubber composition, tread design). Volkswagen strongly recommends that you always have winter
tires or all-season tires installed on all 4 wheels on your vehicle, especially when winter road condi-
tions are expected. Winter tires also improve the vehicle's braking performance and help reduce
stopping distances during winter weather. Volkswagen recommends installing winter tires once tem-
peratures are below +45 °F (+7 °C).
Winter tires are no longer suitable for winter driving once the tread pattern is worn down to a depth of
3/16 in (4.8 mm). In addition, winter tire performance decreases with age – independent of the tread
profile depth.
When using winter tires:
Obey state and country-specific legal requirements.
Install winter tires on all 4 wheels.
Use winter tires only under wintry road conditions.
Only use winter tires with dimensions approved for the vehicle.
Use only winter tires of the same tire belt design, the same dimensions (tread circumference), and
the same tread design.
Follow speed restrictions according to the winter tire's speed rating code letter
⇒ .
Speed restrictions
Winter tires are certified up to a top speed identified by speed rating code letters on the sidewall
⇒
Tire labeling.
In appropriately equipped vehicles, the speed warning can be set and changed in the Infotainment
system by pressing the
button followed by the
and Tires function keys
⇒ Menu and system
settings (SETUP).
Top speed rating and tire inflation pressure for V winter tires depend on the engine installed in your
vehicle. Be sure to ask you authorized Volkswagen dealer or authorized Volkswagen Service Facility
about the maximum permissible speed and the required tire inflation pressure for the winter tires that
you plan to use.

WARNING
Driving faster than the maximum speed for which the winter tires on your vehicle were de-
signed can cause sudden tire failure including a blowout and sudden deflation, loss of con-
trol, crashes and serious personal injuries.
Winter tires have a maximum speed rating that may be lower than your vehicle's maximum
speed.
Never drive faster than the maximum speed for which the winter tires installed on your
vehicle are rated because tires that are driven faster than their rated speed can fail suddenly.
Never exceed the maximum load rating for the winter tires installed on your vehicle.
Install summer tires promptly in the spring. Summer tires offer better handling characteristics for
temperatures above +45 °F (+7 °C). They are quieter, do not wear as quickly, and reduce fuel con-
sumption.
The Tire Pressure Monitoring System must be recalibrated whenever you remove and remount or
change any wheel or tire on the vehicle, even if the reinstalled or replacement wheels and tires are
identical to those that were removed and even if the tire pressure does not change
⇒ Tire Pressure
Monitoring System (TPMS) and recalibration through the Infotainment system.
If necessary, ask your authorized Volkswagen dealer or authorized Volkswagen Service Facility
about permissible winter tire dimensions.
Snow chains
Please first read and note the introductory information and heed the WARNINGS
Obey local regulations as well as the applicable speed limits when driving with snow chains.
Snow chains improve forward motion, traction and braking characteristics under wintry conditions.
Snow chains may be used only on the front wheels and only in tire and wheel combinations that
have been approved by Volkswagen.
Please contact your authorized Volkswagen dealer or authorized Volkswagen Service Facility about
appropriate wheel, tire and snow chain dimensions.
If possible, use only chains with low profile links that are not thicker than 37/64 in. (15 mm) including
the tensioner.
Remove center hubcaps and decorative rim rings before installing snow chains
⇒ . However, for
safety reasons, caps must be installed on the wheel bolts. These are available from authorized
Volkswagen dealers and authorized Volkswagen Service Facilities.
Compact spare wheel
For technical reasons, snow chains cannot be used on the compact spare
⇒ Spare wheel or compact
spare wheel.
If you must use snow chains and have a compact spare wheel mounted, move the compact spare
wheel to the rear axle if a front tire has to be replaced. The tire taken off the rear axle can then be
used to replace the flat front tire. Be sure to install the unidirectional tires so that they will run in the
proper direction. Volkswagen recommends installing the snow chains before mounting the wheel to
the vehicle.

WARNING
Using the wrong snow chains or installing snow chains improperly can cause accidents and
severe personal injuries.
Always use the proper snow chains.
Follow the installation instructions provided by the snow chain manufacturer.
Never exceed the permissible speed limit when driving with snow chains.
NOTICE
Remove snow chains when roads are free of snow. Otherwise, the chains can damage the
tires, impair vehicle handling and can be quickly worn down.
Snow chains can scratch or damage wheel rims if they have direct contact with the rims.
Volkswagen recommends using coated snow chains.
Glossary of tire and loading terminology
Please first read and note the introductory information and heed the WARNINGS
Accessory weight
The combined weight (in excess of those standard items which may be replaced) of automatic trans-
mission, electro-mechanical power steering, power brakes, power windows, power seats, radio, and
heater, to the extent that these items are available as factory-installed equipment (whether installed or
not).
Aspect ratio
The ratio of sidewall height to tire width, expressed as a percentage. A number of 70 (0.7:1 or 70%) or
lower indicates a low-profile tire with a shorter sidewall for improved steering response and better
overall handling on dry pavement.
Bead
The part of a tire made of steel wires, wrapped or reinforced by ply cords, with the shape and structure
to ensure proper fit to the wheel rim.
Bead separation
A breakdown of the bond between components in the bead.
Carcass
The tire structure, except tread and sidewall rubber which, when inflated, bears the load.
Chunking
The breaking away of pieces of the tread or sidewall.
Cord
The strands of material forming the plies in the tire.
Cord separation
The parting of cords from adjacent rubber compounds.
Cracking
Any parting within the tread, sidewall, or inner liner of the tire extending to cord material.
Cold tire inflation pressure
The tire pressure recommended by the vehicle manufacturer for a tire of a specified size that has not
been driven for more than a couple of miles (kilometers) at low speeds in the 3 hour period before the
tire pressure is measured or adjusted.
Curb weight
The weight of a motor vehicle with standard equipment including the maximum capacity of fuel, oil,
and coolant, air conditioner, and additional weight of optional equipment.
Extra load tire
A tire designed to operate at higher loads and at higher inflation pressures than the corresponding
standard tire.
Gross Axle Weight Rating (GAWR)
The load-carrying capacity of a single axle system, measured where the tire contacts the ground.
Gross Vehicle Weight Rating (GVWR)
The maximum loaded weight of the vehicle.
Groove
The space between 2 adjacent tread ribs.
Load rating (code)
The maximum load that a tire is rated to carry for a given inflation pressure. You may not find this
information on all tires because it is not required by law.
Maximum load rating
The load rating for a tire at the maximum permissible inflation pressure for that tire.
Maximum loaded vehicle weight
The total of:
Curb weight.
Accessory weight.
Vehicle capacity weight.
Production options weight.
Maximum (permissible) inflation pressure
The maximum cold inflation pressure to which a tire may be inflated. Also called “maximum inflation
pressure.”
Normal occupant weight
Means 150 lbs (68 kilograms) times the number of occupants seated in the vehicle up to the total
seating capacity of your vehicle.
Occupant distribution
The placement of passengers in a vehicle.
Outer diameter
The diameter of a new, properly inflated tire.
Overall width
Total width measured at the exterior sidewalls of an inflated tire, including the additional width of
labeling, decorations, or protective bands or ribs.
Passenger car tire
A tire intended for use on passenger cars, multipurpose passenger vehicles, and trucks, that have a
gross vehicle weight rating (GVWR) of 10,000 pounds or less.
Ply
A layer of rubber-coated parallel cords.
Ply separation
A parting of rubber compound between adjacent plies.
Pneumatic tire
A mechanical device made of rubber, chemicals, fabric, and steel or other materials, that, when
mounted on an automotive wheel, provides the traction and contains the gas or fluid that sustains the
load.
Production options weight
The combined weight of installed regular production options weighing over 5 lbs (2.3 kg) more than the
standard items they replace, and not previously considered as curb weight or accessory weight. These
include, for example, heavy-duty brakes, ride levelers, roof rack, heavy-duty battery, and special trim.
Radial ply tires
A pneumatic tire in which the ply cords that extend to the beads are laid at substantially 90 degrees to
the centerline of the tread.
Recommended inflation pressure
The tire pressure recommended by the vehicle manufacturer for a tire of a specified size that has not
been driven for more than a couple of miles (kilometers) at low speeds in the 3 hour period before the
tire pressure is measured or adjusted.
Reinforced tire
A tire designed to operate at higher loads and at higher inflation pressures than the corresponding
standard tire.
Rim
The outer edge of a wheel upon which the tire beads are seated.
Rim diameter
The nominal diameter of the wheel's tire bead seating surface. If you change your wheel size, to
wheels of a different diameter, you will have to purchase new tires to match the new wheels.
Rim size
Designation means rim diameter and width.
Rim type designation
The industry or manufacturer's designation for a rim by style or code.
Rim width
The nominal distance between wheel rim flanges.
Section width
The linear distance between the exteriors of the sidewalls of an inflated tire, excluding elevations due
to labeling decoration, or protective bands.
Sidewall
The portion of a tire between the bead and the tread.
Нет комментариевНе стесняйтесь поделиться с нами вашим ценным мнением.
Текст