Infiniti QX56 (JA60). Manual — part 885

SR-14
< ON-VEHICLE REPAIR >
CRASH ZONE SENSOR
CRASH ZONE SENSOR
Removal and Installation
INFOID:0000000005147761
REMOVAL
CAUTION:
• Before servicing the SRS, turn the ignition switch off, disconnect both battery terminals and wait at
least three minutes.
• Replace crash zone sensor if it has been dropped or sustained an impact.
• Do not disassemble crash zone sensor.
1. Disconnect both the negative and positive battery terminals, then wait at least three minutes.
2. Disconnect the crash zone sensor harness connector.
3. Remove crash zone sensor nuts.
INSTALLATION
Installation is in the reverse order of removal.
• After the work is complete, perform self-diagnosis to check that no malfunction is detected. Refer to
LHIA0056E
SIDE AIR BAG (SATELLITE) SENSOR
SR-15
< ON-VEHICLE REPAIR >
C
D
E
F
G
I
J
K
L
M
A
B
SR
N
O
P
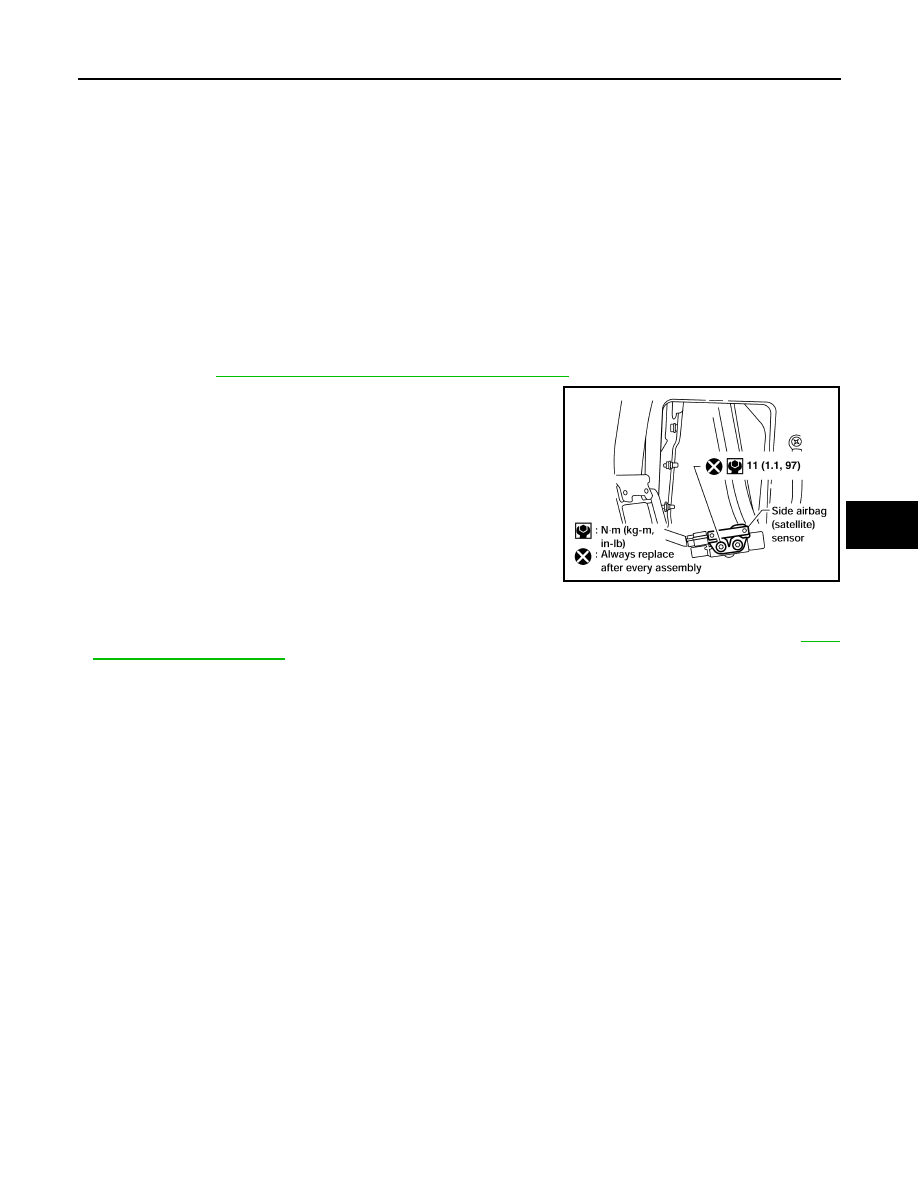
SIDE AIR BAG (SATELLITE) SENSOR
Removal and Installation
INFOID:0000000005147762
REMOVAL
CAUTION:
• Before servicing the SRS, turn the ignition switch off, disconnect both battery terminals and wait at
least three minutes.
• Do not use old nuts after removal; replace with new nuts.
• Check side air bag (satellite) sensor to make sure it is free of deformities, dents, cracks or rust. If it
shows any visible signs of damage, replace it with new one.
• Do not disassemble side air bag (satellite) sensor.
• Replace side air bag (satellite) sensor if it has been dropped or sustained an impact.
1. Disconnect both the negative and positive battery terminals, then wait at least three minutes.
2. Remove seat belt retractor and belt assembly anchor bolt and retractor bolt upper, then set assembly
SB-4, "Removal and Installation of Front Seat Belt"
.
3. Remove side air bag (satellite) sensor nuts.
4. Disconnect the side air bag (satellite) sensor harness connector.
INSTALLATION
Installation is in the reverse order of removal.
• After the work is completed, perform self-diagnosis to check that no malfunction is detected. Refer to
LHIA0057E
SR-16
< ON-VEHICLE REPAIR >
FRONT SEAT BELT PRE-TENSIONER
FRONT SEAT BELT PRE-TENSIONER
Removal and Installation
INFOID:0000000005147763
For removal and installation procedures for seat belt and seat belt buckle pre-tensioners, refer to
.
DIAGNOSIS SENSOR UNIT
SR-17
< ON-VEHICLE REPAIR >
C
D
E
F
G
I
J
K
L
M
A
B
SR
N
O
P
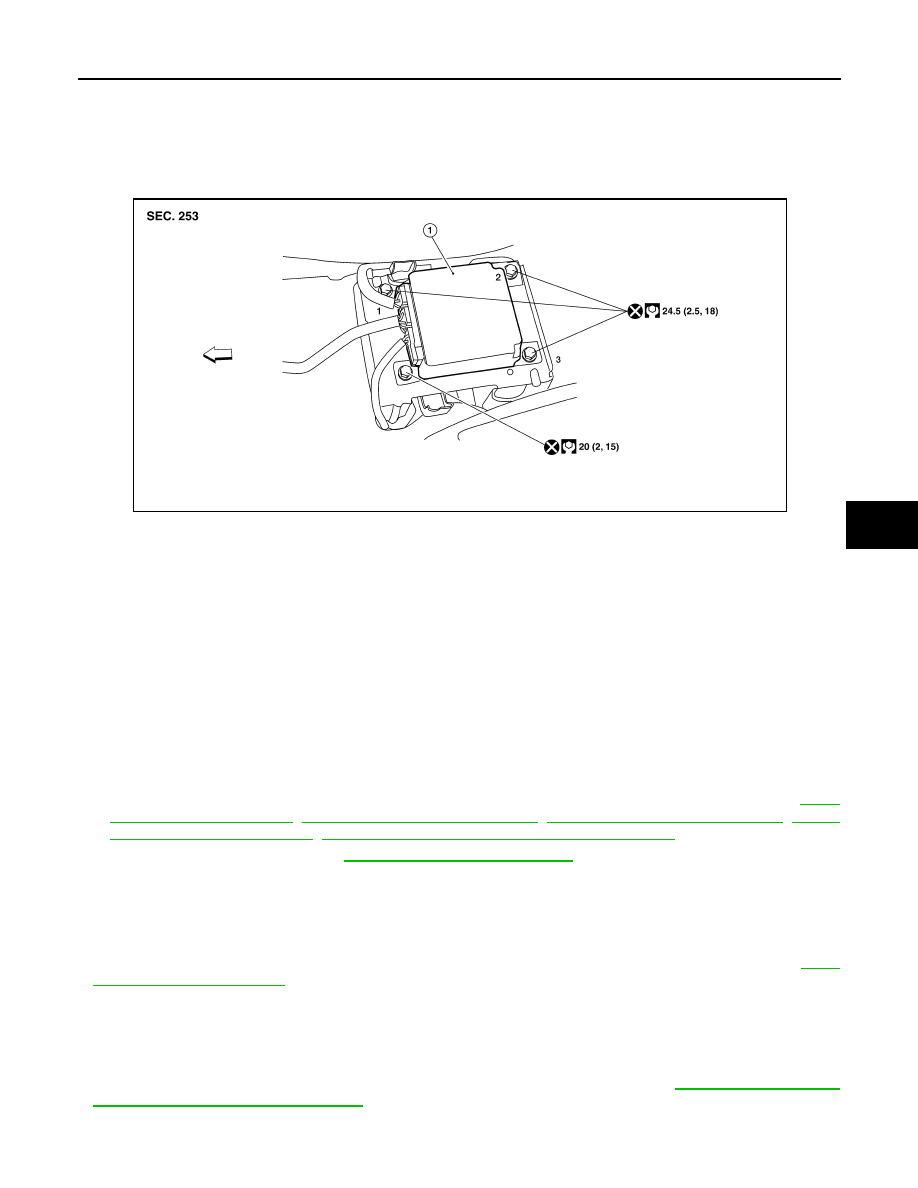
DIAGNOSIS SENSOR UNIT
Removal and Installation
INFOID:0000000005147764
REMOVAL
WARNING:
• Before servicing the SRS, turn the ignition switch off, disconnect both battery terminals and wait at
least three minutes.
• Do not use old bolts; replace with new bolts.
• Check diagnosis sensor unit bracket to make sure it is free of deformities, dents, cracks or rust. If it
shows any visible signs of damage, replace with new one.
• Replace diagnosis sensor unit if it has been dropped or sustained an impact.
• Never use air tools or electric tools for servicing.
• When replacing the air bag diagnosis sensor unit, always check with the parts department for the lat-
est parts information. Installing an incorrect air bag diagnosis sensor unit may or may not cause the
air bag warning lamp to illuminate and may cause incorrect deployment of the supplemental air bags
and seat belt pre-tensioner in a collision resulting in serious personal injury or death.
1. Disconnect the both the negative and positive battery terminals, then wait at least three minutes.
2. Disconnect the harness connectors for each air bag module and seat belt pre-tensioner. Refer to
SR-10, "Removal and Installation"
SR-13, "Removal and Installation"
,
SB-4, "Removal and Installation of Front Seat Belt"
3. Remove center console. Refer to
IP-20, "Removal and Installation"
4. Disconnect diagnosis sensor unit harness connectors.
5. Remove bolts from the diagnosis sensor unit.
INSTALLATION
Installation is in the reverse order of removal.
• After the work is completed, perform self-diagnosis to check that no malfunction is detected. Refer to
CAUTION:
• The diagnosis sensor unit must always be installed with the arrow mark "
⇐" pointing toward the
front of the vehicle for proper operation.
• Never damage the harness while installing.
• If malfunction is detected by the air bag warning lamp, after repair or replacement of the malfunc-
tioning parts, reset the memory using self-diagnosis or CONSULT-III. Refer to
sis Function (Without CONSULT-III)"
• After the work is completed, check that no system malfunction is detected by air bag warning lamp.
1.
Diagnosis sensor unit
⇐
Vehicle front
AWHIA0159ZZ
Нет комментариевНе стесняйтесь поделиться с нами вашим ценным мнением.
Текст