Infiniti G35 (V35) Sedan. Manual — part 403

DLN-46
< PREPARATION >
[TRANSFER: ETX13B]
PREPARATION
Commercial Service Tools
INFOID:0000000000957279
ST30611000
(J-25742-1)
Drift bar
a: 350 mm (13.78 in)
b: 25 mm (0.98 in) dia.
c: M12
×
1.5P
Removing rear bearing
ST35321000
(
—
)
Drift
a: 49 mm (1.93 in) dia.
b: 41 mm (1.61 in) dia.
• Removing rear bearing
• Installing mainshaft assembly
KV38104010
(
—
)
Drift
a: 67 mm (2.64 in) dia.
b: 49 mm (1.93 in) dia.
• Installing front drive shaft rear bearing
• Installing rear bearing
ST30621000
(J-25742-5)
Drift
a: 80 mm (3.15 in) dia.
b: 59 mm (2.32 in) dia.
Installing mainshaft bearing
ST31214000
(J-25269-B)
Drift
a: 34 mm (1.34 in) dia.
b: 25.5 mm (1.004 in) dia.
• Removing front drive shaft front bearing
• Removing front drive shaft rear bearing
ST33200000
(J-26082)
Drift
a: 60 mm (2.36 in) dia.
b: 44.5 mm (1.752 in) dia.
Installing front drive shaft front bearing
Tool number
(Kent-Moore No.)
Tool name
Description
NT663
ZZA1000D
ZZA1000D
ZZA1000D
ZZA0534D
ZZA1002D

PREPARATION
DLN-47
< PREPARATION >
[TRANSFER: ETX13B]
C
E
F
G
H
I
J
K
L
M
A
B
DLN
N
O
P
Tool name
Description
Puller
Removing companion flange
Flange wrench
Removing and installing self-lock nut
Puller
• Removing front drive shaft front bearing
• Removing front drive shaft rear bearing
Power tool
Loosening bolts and nuts
NT077
NT771
ZZB0823D
PBIC0190E
DLN-48
< ON-VEHICLE MAINTENANCE >
[TRANSFER: ETX13B]
TRANSFER FLUID
ON-VEHICLE MAINTENANCE
TRANSFER FLUID
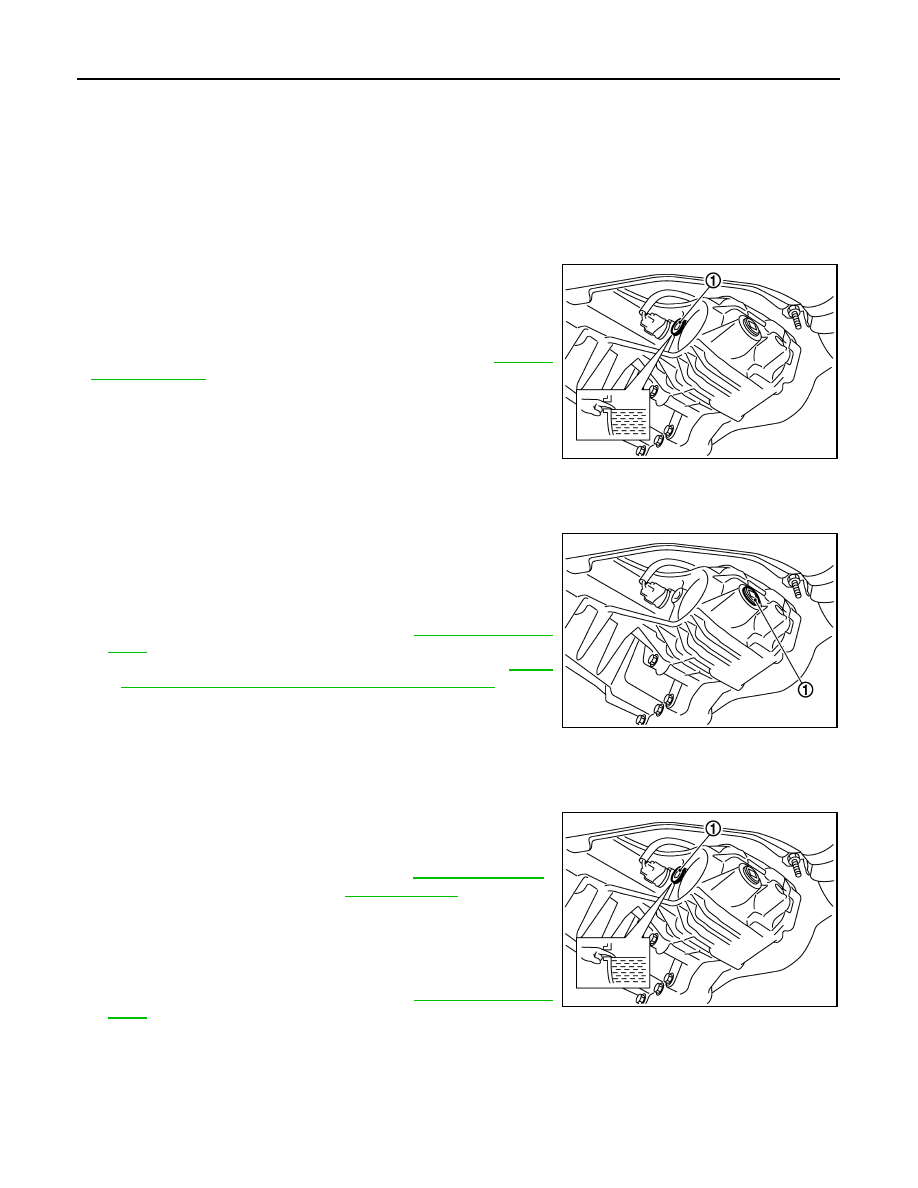
Inspection
INFOID:0000000000957280
FLUID LEAKAGE
• Check if fluid is leaking from transfer or around it.
FLUID LEVEL
• Check fluid level from filler plug (1) mounting hole as shown in the
figure.
CAUTION:
Never start engine while checking fluid level.
• Before installing filler plug, set a new gasket. Install filler plug on
transfer and tighten to the specified torque. Refer to
CAUTION:
Never reuse gasket.
Draining
INFOID:0000000000957281
1.
Run the vehicle to warm up the transfer unit sufficiently.
2.
Stop the engine, and remove the drain plug (1) to drain the
transfer fluid.
CAUTION:
When draining fluid, protect exhaust tube flange with cover.
3.
Apply sealant to drain plug. Install drain plug on transfer and
tighten to the specified torque. Refer to
.
• Use Genuine Silicone RTV or equivalent. Refer to
"Recommended Chemical Products and Sealants"
.
CAUTION:
Remove old sealant adhering to mounting surfaces. Also
remove any moisture, oil, or foreign material adhering to
application and mounting surfaces.
Refilling
INFOID:0000000000957282
1.
Remove filler plug (1) and add transfer fluid until fluid level
reaches the specified limit near filler plug mounting hole.
CAUTION:
Carefully fill the fluid. (Fill up for approx. 3 minutes.)
2.
Leave the vehicle for 3 minutes, and check the fluid level again.
3.
Set a new gasket onto filler plug and install it on transfer and
tighten to the specified torque. Refer to
.
CAUTION:
Never reuse gasket.
JSDIA0096ZZ
JSDIA0095ZZ
Fluid capacity
: Refer to
.
JSDIA0096ZZ

AWD CONTROL UNIT
DLN-49
< ON-VEHICLE REPAIR >
[TRANSFER: ETX13B]
C
E
F
G
H
I
J
K
L
M
A
B
DLN
N
O
P
ON-VEHICLE REPAIR
AWD CONTROL UNIT
Exploded View
INFOID:0000000000957283
Removal and Installation
INFOID:0000000000957284
REMOVAL
1.
Remove the glove box assembly. Refer to
.
2.
Disconnect AWD control unit harness connector.
3.
Remove AWD control unit (1) mounting nuts.
4.
Remove AWD control unit.
INSTALLATION
Install is the reverse order of removal.
1.
AWD control unit
: Vehicle front
JSDIA0050ZZ
JSDIA0051ZZ
Нет комментариевНе стесняйтесь поделиться с нами вашим ценным мнением.
Текст