Infiniti EX35. Manual — part 546
DLN-134
< SYMPTOM DIAGNOSIS >
[REAR FINAL DRIVE: R200]
NOISE, VIBRATION AND HARSHNESS (NVH) TROUBLESHOOTING
SYMPTOM DIAGNOSIS
NOISE, VIBRATION AND HARSHNESS (NVH) TROUBLESHOOTING
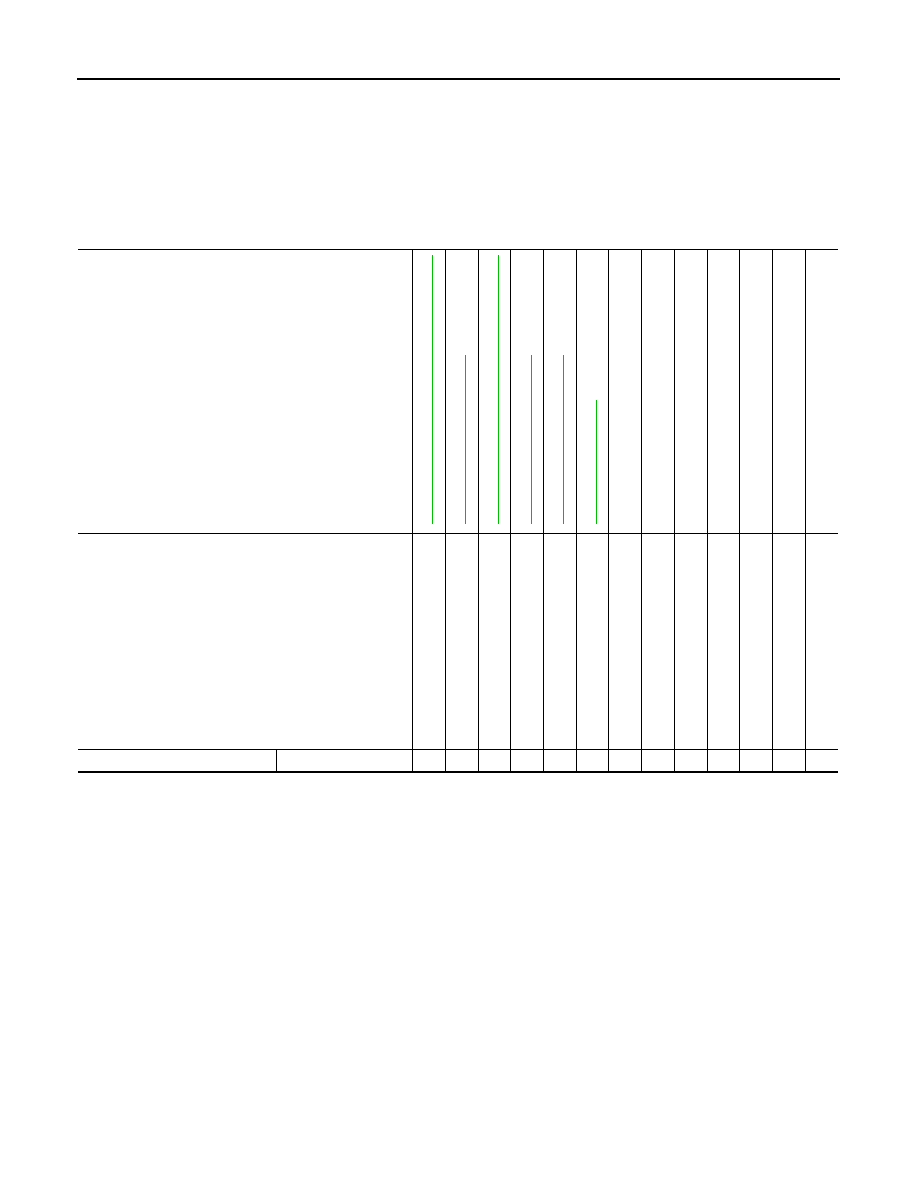
NVH Troubleshooting Chart
INFOID:0000000003135811
2WD
Use the chart below to help you find the cause of the symptom. If necessary, repair or replace these parts.
×
: Applicable
AWD
Use the chart below to help you find the cause of the symptom. If necessary, repair or replace these parts.
Reference
NV
H
in
D
L
N
s
e
c
ti
on.
N
V
H
in F
A
X
, RAX,
FSU and RSU sections.
NV
H in
WT se
cti
on
.
NV
H in
WT se
cti
on
.
NV
H
in
R
A
X
s
e
c
tio
n.
NV
H
in
B
R
s
ec
tio
n.
NV
H
in
S
T
s
e
c
ti
o
n
.
Possible cause and SUSPECTED PARTS
Ge
ar t
o
o
th
rou
g
h
Ge
ar c
o
nt
a
c
t im
pro
p
e
r
T
o
ot
h su
rf
ac
es
w
o
rn
Ba
ck
la
sh
in
co
rrec
t
Co
mp
an
io
n f
lan
ge
e
x
c
e
s
s
iv
e
run
o
u
t
Gea
r oi
l i
mp
rop
er
PR
OP
EL
LE
R
S
H
A
F
T
A
XLE AND
SUSPENSI
ON
TI
RE
ROAD W
H
EEL
DRIV
E SHAFT
BR
AK
E
S
T
EERING
Symptom
Noise
×
×
×
×
×
×
×
×
×
×
×
×
×
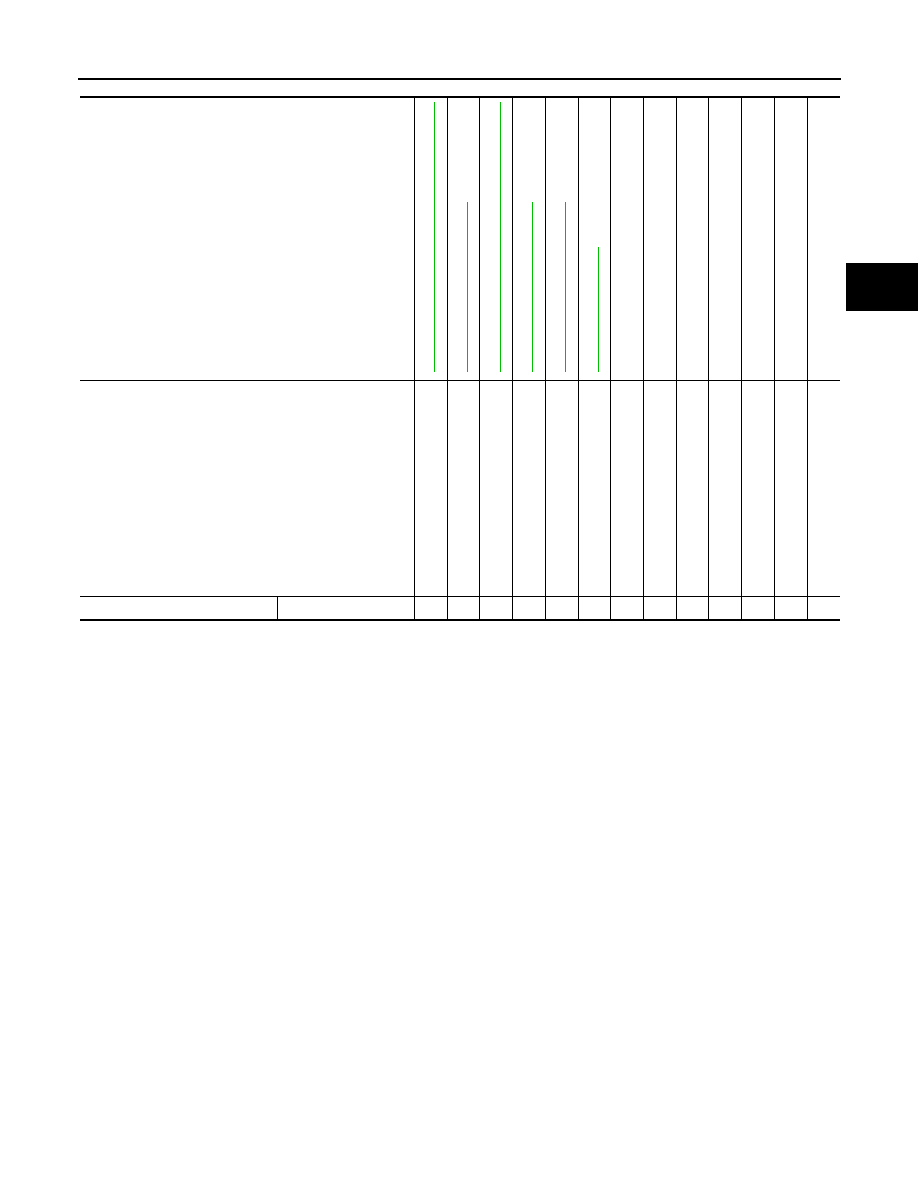
NOISE, VIBRATION AND HARSHNESS (NVH) TROUBLESHOOTING
DLN-135
< SYMPTOM DIAGNOSIS >
[REAR FINAL DRIVE: R200]
C
E
F
G
H
I
J
K
L
M
A
B
DLN
N
O
P
×
: Applicable
Reference
NVH in DLN
section.
NVH in F
AX,
RAX, FS
U and RSU sections.
NVH in WT
section.
NVH in WT
section.
NVH in F
AX and
RAX
section.
NVH in BR
section.
NVH in ST
section.
Possible cause and SUSPECTED PARTS
Ge
ar t
oot
h ro
ug
h
Ge
ar c
o
n
ta
c
t
im
prop
er
T
o
ot
h s
u
rf
ac
es
worn
Ba
ck
la
sh
in
c
o
rre
ct
Co
mp
an
io
n fl
an
ge
ex
c
e
s
s
iv
e
run
o
u
t
Ge
ar o
il
im
pro
p
e
r
PROPELLE
R
SHAFT
AX
LE A
N
D
SUSPENSION
TI
RE
ROAD WH
E
E
L
DRIVE
SHAFT
BRAK
E
ST
EERING
Symptom
Noise
×
×
×
×
×
×
×
×
×
×
×
×
×
DLN-136
< PRECAUTION >
[REAR FINAL DRIVE: R200]
PRECAUTIONS
PRECAUTION
PRECAUTIONS
Service Notice or Precautions for Rear Final Drive
INFOID:0000000003135812
CAUTION:
• Check for the correct installation status prior to removal or disassembly. If matching marks are
required, be certain they never interfere with the function of the parts when applied.
• Overhaul should be done in a clean work area, it is preferable to work in dustproof area.
• Before disassembly, using steam or white gasoline, completely remove sand and mud from the exte-
rior of the unit, preventing them from entering into the unit during disassembly or assembly.
• Check appearance of the disassembled parts for damage, deformation, and unusual wear. Replace
them with a new ones if necessary.
• Gaskets, seals and O-rings should be replaced any time when the unit is disassembled.
• In principle, tighten bolts or nuts gradually in several steps working diagonally from inside to out-
side. If tightening sequence is specified, observe it.
• Clean and flush the parts sufficiently and blow-dry them.
• Be careful not to damage sliding surfaces and mating surfaces.
• When applying sealant, remove the old sealant from the mounting surface; then remove any mois-
ture, oil, and foreign materials from the application and mounting surfaces.
• Always use shop paper for cleaning the inside of components.
• Never use cotton gloves or shop rags to prevent entering of lint.
• During assembly, observe the specified tightening torque, and apply new gear oil, petroleum jelly, or
multi-purpose grease as specified for each vehicle, if necessary.
PREPARATION
DLN-137
< PREPARATION >
[REAR FINAL DRIVE: R200]
C
E
F
G
H
I
J
K
L
M
A
B
DLN
N
O
P
PREPARATION
PREPARATION
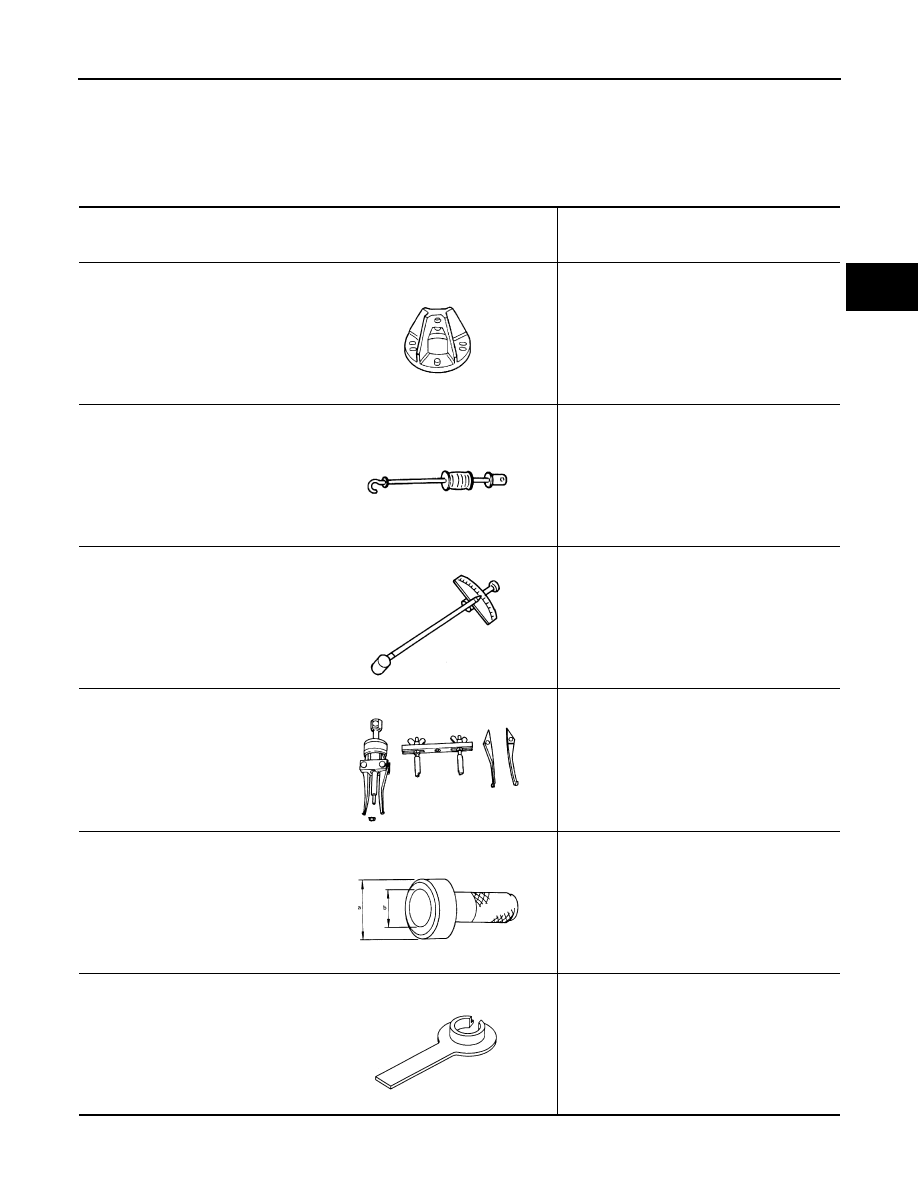
Special Service Tools
INFOID:0000000003135813
The actual shapes of Kent-Moore tools may differ from those of special service tools illustrated here.
Tool number
(Kent-Moore No.)
Tool name
Description
KV40104100
(
—
)
Attachment
Removing side flange
ST36230000
(J-25840-A)
Sliding hammer
Removing side flange
ST3127S000
(J-25765-A)
Preload gauge
Measuring pinion bearing preload and total
preload
KV381054S0
(J-34286)
Puller
Removing front oil seal
ST30720000
(J-25405)
Drift
a: 77 mm (3.03 in) dia.
b: 55.5 mm (2.185 in) dia.
• Installing front oil seal
• Installing pinion rear bearing outer race
KV38107900
(J-39352)
Protector
Installing side flange
ZZA0804D
ZZA0803D
ZZA0806D
ZZA0601D
ZZA0811D
S-NT129
Нет комментариевНе стесняйтесь поделиться с нами вашим ценным мнением.
Текст