Infiniti G Convertible (2012 year). Manual — part 9
3-8
Pre-driving checks and adjustments
nal computer.
. When the vehicle is parked near a
parking meter.
In such cases, correct the operating condi-
tions before using the Intelligent Key
function or use the mechanical key.
Although the life of the battery varies
depending on the operating conditions,
the battery’s life is approximately 2 years.
If the battery is discharged, replace it with
a new one.
When the Intelligent Key battery is almost
discharged, insert the Intelligent Key into
the Intelligent Key port to start the engine.
For more details, see “Push-button ignition
switch” (P.5-9). Replace the discharged
battery with a new one as soon as
possible.
Since the Intelligent Key is continuously
receiving radio waves, if the key is left near
equipment which transmits strong radio
waves, such as signals from a TV and
personal computer, the battery life may
become shorter.
For information regarding replacement of a
battery, see “Intelligent Key battery repla-
cement” (P.8-24).
As many as 4 Intelligent Keys can be
registered and used with one vehicle. For
information about the purchase and use of
additional Intelligent Keys, contact an
INFINITI retailer.
CAUTION
.
Do not allow the Intelligent Key, which
contains electrical components, to come
into contact with water or salt water.
This could affect the system function.
.
Do not drop the Intelligent Key.
.
Do not strike the Intelligent Key sharply
against another object.
.
Do not change or modify the Intelligent
Key.
.
Wetting may damage the Intelligent Key.
If the Intelligent Key gets wet, immedi-
ately wipe until it is completely dry.
.
If the outside temperature is below 148F
(−108C) degrees, the battery of the
Intelligent Key may not function prop-
erly.
.
Do not place the Intelligent Key for an
extended period in an area where
temperatures exceed 1408F (608C).
.
Do not attach the Intelligent Key with a
key holder that contains a magnet.
.
Do not place the Intelligent Key near
equipment that produces a magnetic
field, such as a TV, audio equipment
and personal computers.
If an Intelligent Key is lost or stolen,
INFINITI recommends erasing the ID code
of that Intelligent Key from the vehicle. This
may prevent the unauthorized use of the
Intelligent Key to operate the vehicle. For
information regarding the erasing proce-
dure, contact an INFINITI retailer.
The Intelligent key function can be dis-
abled. For information about disabling the
Intelligent key function, contact an INFINITI
retailer.
-------------------------------------------------------------------------------------------------------------------------------------------------------------

SPA2627
INTELLIGENT KEY OPERATING
RANGE
The Intelligent Key functions can only be
used when the Intelligent Key is within the
specified operating range from the request
switch
*
1
.
When the Intelligent Key battery is dis-
charged or strong radio waves are present
near the operating location, the Intelligent
Key system’s operating range becomes
narrower, and the Intelligent Key may not
function properly.
The operating range is within 31.50 in (80
cm) from each request switch
*
1
.
If the Intelligent Key is too close to the door
glass, handle or rear bumper the request
switches may not function.
When the Intelligent Key is within the
operating range, it is possible for anyone
who does not carry the Intelligent Key to
push the request switch to lock/unlock the
doors and open the trunk lid.
SPA2407
DOOR LOCKS/UNLOCKS PRECAU-
TION
. Do not push the door handle request
switch with the Intelligent Key held in
your hand as illustrated. The close
distance to the door handle will cause
the Intelligent Key system to have
difficulty recognizing that the Intelli-
gent Key is outside the vehicle.
. After locking with the door handle
request switch, verify the doors are
securely locked by testing them.
. To prevent the Intelligent Key from
being left inside the vehicle or the
Pre-driving checks and adjustments
3-9
-------------------------------------------------------------------------------------------------------------------------------------------------------------

3-10
Pre-driving checks and adjustments
trunk, make sure you carry the key with
you and then lock the doors or the
trunk.
. Do not pull the door handle before
pushing the door handle request
switch. The door will be unlocked but
will not open. Release the door handle
once and pull it again to open the door.
. The Intelligent Key system (opening/
closing doors with the door handle
request switch) can be set to remain
inactive. (See “Vehicle information and
settings” (P.4-9).)
SPA2584
INTELLIGENT KEY OPERATION
You can lock or unlock the doors without
taking the key out from your pocket or bag.
SPA2585
When you carry the Intelligent Key with
you, you can lock or unlock all doors by
pushing the door handle request switch
(driver’s or front passenger’s)
*
A
within
the range of operation.
When you lock or unlock the doors or the
trunk lid, the hazard indicator will flash
and the horn (or the outside chime) will
sound as a confirmation. For details, see
“Setting hazard indicator and horn mode”
(P.3-16).
Locking doors and fuel-filler door
1. Push the ignition switch to the OFF
position and make sure you carry the
-------------------------------------------------------------------------------------------------------------------------------------------------------------

Intelligent Key with you.*1
2. Close all the doors.*2
3. Push the door handle request switch
(driver’s or front passenger’s)
*
A
while
carrying the Intelligent Key with you.*3
4. All the doors and fuel-filler door will
lock.
5. The hazard indicator flashes twice and
the outside chime sounds twice.
*1: Doors will lock with the Intelligent Key
while the ignition switch is in the ACC or
ON position.
*2: Doors will not lock with the Intelligent
Key while any door is open.
*3: Doors will not lock by pushing the door
handle request switch with the Intelligent
Key inside the vehicle. However, when an
Intelligent Key is inside the vehicle, doors
can be locked with another registered
Intelligent Key.
Unlocking doors and fuel-filler door
1. Push the door handle request switch
(driver’s or front passenger’s)
*
A
once
while carrying the Intelligent Key with
you.
2. The hazard indicator flashes once and
outside chime sounds once. The corre-
sponding door and the fuel-filler door
will unlock.
3. Push the door handle request switch
again within 1 minute.
4. The hazard indicator flashes once and
outside chime sounds once again. All
the doors will unlock.
All doors and the fuel-filler door will be
locked automatically unless one of the
following operations is performed within 1
minute after pushing the request switch
while the doors are locked.
. Opening any door
. Pushing the ignition switch
. Inserting the Intelligent Key into the
Intelligent Key port.
During this 1-minute time period, if the
UNLOCK
button on the Intelligent Key
is pushed, all doors will be locked auto-
matically after another 1 minute.
SPA2586
SPA2404
Pre-driving checks and adjustments
3-11
-------------------------------------------------------------------------------------------------------------------------------------------------------------
3-12
Pre-driving checks and adjustments
Opening trunk lid
1. Push the trunk open request switch
*
A
for more than 1 second.
2. The trunk will unlatch. An outside
chime will sound four times.
3. Raise the trunk lid to open the trunk.
Lockout protection:
To prevent the Intelligent Key from being
accidentally locked in the trunk, lockout
protection is equipped with the Intelligent
Key system.
When the trunk lid is closed with the
Intelligent Key inside the trunk, the outside
buzzer will sound and the trunk will open.
BATTERY SAVER SYSTEM
When all the following conditions are met
for 60 minutes, the battery saver system
will cut off the power supply to prevent
battery discharge.
. The ignition switch is in the ACC
position, and
. All doors are closed, and
. The selector lever is in the P (Park)
position (Automatic Transmission mod-
els).
WARNING SIGNALS
To help prevent the vehicle from moving
unexpectedly by erroneous operation of
the Intelligent Key listed on the following
chart or to help prevent the vehicle from
being stolen, chime or beep sounds inside
and outside the vehicle and a warning
displays in the dot matrix liquid crystal
display.
When a chime or beep sounds or the
warning displays, be sure to check the
vehicle and Intelligent Key.
See “Troubleshooting guide” (P.3-13) and
“Dot matrix liquid crystal display” (P.2-17).
-------------------------------------------------------------------------------------------------------------------------------------------------------------

TROUBLESHOOTING GUIDE
Symptom
Possible cause
Action to take
When pushing the ignition switch
to stop the engine
The SHIFT P warning appears on the display
and the inside warning chime sounds con-
tinuously (Automatic Transmission models).
The selector lever is not in the P (Park)
position.
Shift the selector lever to the P (Park)
position.
When shifting the selector lever
to the P (Park) position.
The inside warning chime sounds continu-
ously.
The ignition switch is in the ACC or ON
position.
Push the ignition switch to the OFF position.
When opening the driver’s door to
get out of the vehicle
The inside warning chime sounds continu-
ously.
The ignition switch is in the ACC
position.
Push the ignition switch to the OFF position.
The Intelligent Key is in the Intelligent
Key port.
Remove the Intelligent Key from the Intel-
ligent Key port.
When closing the door after get-
ting out of the vehicle
The NO KEY warning appears on the display,
the outside chime sounds 3 times and the
inside warning chime sounds for a few
seconds.
The ignition switch is in the ACC or ON
position.
Push the ignition switch to the OFF position.
The SHIFT P warning appears on the display
and the outside chime sounds continuously
(Automatic Transmission models).
The ignition switch is in the ACC or OFF
position and the selector lever is not in
the P (Park) position.
Move the selector lever to the P (Park)
position and push the ignition switch to the
OFF position.
When closing the door with the
inside lock knob turned to LOCK
The outside chime sounds for a few seconds
and all the doors unlock.
The Intelligent Key is inside the vehicle
or trunk.
Carry the Intelligent Key with you.
When pushing the request switch
or LOCK
button on the
Intelligent key to lock the door
The outside chime sounds for a few seconds.
The Intelligent Key is inside the vehicle
or trunk.
Carry the Intelligent Key with you.
A door is not closed securely.
Close the door securely.
When closing the trunk lid
The outside chime sounds for approximately
10 seconds and the trunk lid opens.
The Intelligent Key is inside the trunk.
Carry the Intelligent Key with you.
Pre-driving checks and adjustments
3-13
-------------------------------------------------------------------------------------------------------------------------------------------------------------

3-14
Pre-driving checks and adjustments
WARNING
The Intelligent Key transmits radio waves
when the buttons are pushed. The FAA
advises that the radio waves may affect
aircraft navigation and communication sys-
tems. Do not operate the Intelligent Key
while on an airplane. Make sure the buttons
are not operated unintentionally when the
unit is stored during a flight.
It is possible to lock/unlock all doors, fuel-
filler door, activate the panic alarm and
open the windows by pushing the buttons
on the Intelligent Key from outside the
vehicle.
Before locking the doors, make sure the
Intelligent Key is not left in the vehicle.
The LOCK/UNLOCK button on the Intelli-
gent Key can operate at a distance of
approximately 33 ft (10 m) from the
vehicle. (The effective distance depends
upon the conditions around the vehicle.)
As many as 4 Intelligent Keys can be used
with one vehicle. For information concern-
ing the purchase and use of additional
Intelligent Keys, contact an INFINITI retai-
ler.
The lock and unlock buttons on the
Intelligent Key will not operate when:
. the distance between the Intelligent Key
and the vehicle is over 33 ft (10 m).
. the Intelligent Key battery is dis-
charged.
After locking with the remote keyless entry
function, pull the door handle to make sure
the doors are securely locked.
The LOCK/UNLOCK operating range varies
depending on the environment. To securely
operate the lock and unlock buttons,
approach the vehicle to about 3 ft (1 m)
from the door.
SPA2100
*
1
LOCK button
*
2
UNLOCK button
*
3
TRUNK button
*
4
PANIC button
HOW TO USE REMOTE KEYLESS
ENTRY SYSTEM
When you lock or unlock the doors or the
trunk lid, the hazard indicator will flash
and the horn (or the outside chime) will
sound as a confirmation. For details, see
“Setting hazard indicator and horn mode”
(P.3-16).
REMOTE KEYLESS ENTRY SYSTEM
-------------------------------------------------------------------------------------------------------------------------------------------------------------

Locking doors and fuel-filler door
1. Push the ignition switch to the OFF
position and make sure you carry the
Intelligent Key with you.*
2. Close all the doors.
3. Push the LOCK
button
*
1
on the
Intelligent Key.
4. All the doors and fuel-filler door will
lock.
5. The hazard indicator flashes twice and
the horn chirps once.
*: Doors will lock with the Intelligent Key
while the ignition switch is in the ACC or
ON position.
Unlocking doors and fuel-filler door
1. Push the UNLOCK
button
*
2
on the
Intelligent Key once.
2. The hazard indicator flashes once. The
driver’s door and fuel-filler door will
unlock.
3. Push the UNLOCK
button on the
Intelligent Key again within 5 seconds.
4. The hazard indicator flashes once
again. All the doors will unlock.
All doors will be locked automatically
unless one of the following operations is
performed within 1 minute after pushing
the UNLOCK button on the Intelligent Key
while the doors are locked. If during this 1-
minute time period, the UNLOCK button on
the Intelligent Key is pushed, all doors will
be locked automatically after another 1
minute.
. Opening any door
. Pushing the ignition switch
. Inserting the Intelligent Key into the
Intelligent Key port. During this 1
minute time period, if the UNLOCK
button on the Intelligent key is
pushed, all doors will be locked auto-
matically after another 1 minute.
Opening windows
The UNLOCK
button
*
2
operation also
allows you to open the window that is
equipped with the automatic open func-
tion. This function will not operate while
the window timer is activated or the
windows need to be initialized. (See
“Power windows” (P.2-48).)
To open the window, push the UNLOCK
button on the Intelligent Key for about 3
seconds after the door is unlocked.
To stop opening, release the UNLOCK
button.
If the window open operation is stopped
on the way while pushing the UNLOCK
button, release and push the UNLOCK
button again until the window opens
completely.
Window cannot be closed using the In-
telligent Key.
The door window can also be operated by
turning the mechanical key in a door lock.
(See “Doors” (P.3-5).)
Opening trunk lid
1. Push the TRUNK
*
3
button on the
Intelligent key for more than 1 second.
2. The trunk will unlatch.
3. Raise the trunk lid to open the trunk.
Using panic alarm
If you are near your vehicle and feel
threatened, you may activate the alarm to
call attention as follows:
1. Push the PANIC
button
*
4
on the
key for more than 1 second.
2. The theft warning alarm and headlights
will stay on for 25 seconds.
3. The panic alarm stops when:
.
It has run for 25 seconds, or
Pre-driving checks and adjustments
3-15
-------------------------------------------------------------------------------------------------------------------------------------------------------------

3-16
Pre-driving checks and adjustments
.
Any of the buttons on the Intelligent
Key is pushed. (Note: Panic button
should be pushed for more than 1
second.)
Setting hazard indicator and horn
mode
This vehicle is set in hazard indicator and
horn mode when you first receive the
vehicle.
In hazard indicator and horn mode, when
the LOCK
button
*
1
is pushed, the
hazard indicator flashes twice and the horn
chirps once. When the UNLOCK
button
*
2
is pushed, the hazard indicator flashes
once.
If horns are not necessary, the system can
be switched to the hazard indicator mode.
In hazard indicator mode, when the LOCK
button is pushed, the hazard indicator
flashes twice. When the UNLOCK
button is pushed, neither the hazard
indicator nor the horn operates.
-------------------------------------------------------------------------------------------------------------------------------------------------------------
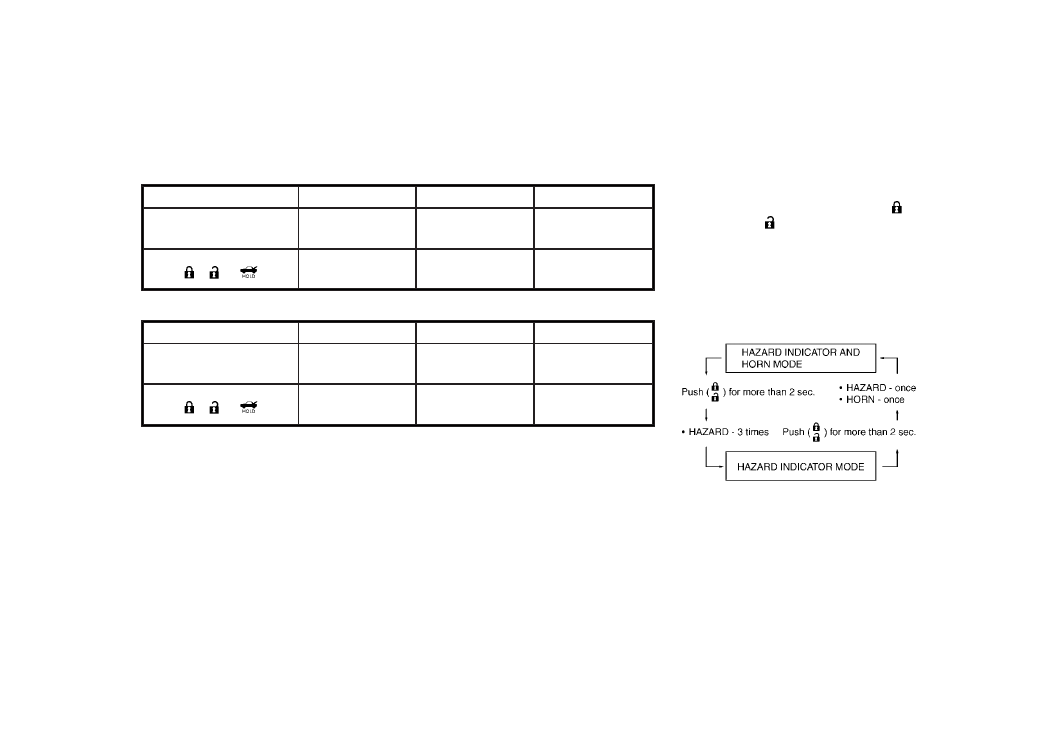
Hazard indicator and horn mode:
DOOR LOCK
DOOR UNLOCK
TRUNK UNLOCK
Intelligent Key system
(Using door handle or trunk
open request switch)
HAZARD - twice
OUTSIDE CHIME - twice
HAZARD - once
OUTSIDE CHIME - once
HAZARD - none
OUTSIDE CHIME - 4
times
Remote keyless entry system
(Using
,
or
button)
HAZARD - twice
HORN - once
HAZARD - once
HORN - none
HAZARD - none
HORN - none
Hazard indicator mode:
DOOR LOCK
DOOR UNLOCK
TRUNK UNLOCK
Intelligent Key system
(Using door handle or trunk
open request switch)
HAZARD - twice
OUTSIDE CHIME - none
HAZARD - none
OUTSIDE CHIME - none
HAZARD - none
OUTSIDE CHIME - none
Remote keyless entry system
(Using
,
or
button)
HAZARD - twice
HORN - none
HAZARD - none
HORN - none
HAZARD - none
HORN - none
Switching procedure:
To switch the hazard indicator and horn
(chime) operation, push the LOCK
*
1
and UNLOCK
*
2
buttons on the In-
telligent Key simultaneously for more than
2 seconds.
. When the hazard indicator mode is set,
the hazard indicator flashes 3 times.
. When the hazard indicator and horn
mode is set, the hazard indicator
flashes once and the horn chirps once.
Pre-driving checks and adjustments
3-17
-------------------------------------------------------------------------------------------------------------------------------------------------------------

3-18
Pre-driving checks and adjustments
SPA2318
1. Pull the hood lock release handle
*
1
located below the instrument panel;
the hood will then spring up slightly.
2. Pull the lever
*
2
up at the front of the
hood with your fingertips and raise the
hood.
3. When closing the hood, slowly close
the hood down to latch both the right
and left locks. Push the hood down to
lock the hood securely into place.
WARNING
.
Make sure the hood is completely closed
and latched before driving. Failure to do
so could cause the hood to fly open and
result in an accident.
.
If you see steam or smoke coming from
the engine compartment, to avoid injury
do not open the hood.
HOOD
-------------------------------------------------------------------------------------------------------------------------------------------------------------

SPA2628
Interior/exterior view
1.
Retractable hard top indicators (in the
dot matrix liquid crystal display)
2.
Retractable hard top operating switch
3.
Hard top
4.
Rear parcel shelf
5.
Trunk lid
6.
Separator
7.
Side flap
BEFORE OPERATING THE RETRACT-
ABLE HARD TOP
The retractable hard top on this vehicle is
electrically operated. You can fully open or
close the retractable hard top only by
pushing the operating switch located on
the center console.
The retractable hard top operating switch
must be operated under all of the following
conditions.
. When the vehicle is stopped
. When the engine is running
. When the separator is fixed in the
position separating the roof storage
area and the trunk room
. When the trunk lid is closed
CAUTION
Always keep the engine running while
operating the retractable hard top. Even if
the engine stops, the retractable hard top
will also operate when the ignition switch is
in the ON position, but be sure to run the
engine to prevent battery discharge.
Be sure to follow the operating instructions
and all of the warnings and cautions in this
section.
Improper operation of the retractable hard
top could cause a system malfunction,
damage or deterioration of the retractable
hard top material and related parts.
WARNING
.
Park the vehicle in a safe and level
location and apply the parking brake.
.
Make sure the parking area is clear of
obstacles and there is enough clearance
Pre-driving checks and adjustments
3-19
RETRACTABLE HARD TOP
-------------------------------------------------------------------------------------------------------------------------------------------------------------
3-20
Pre-driving checks and adjustments
over the retractable hard top (for exam-
ple, in a garage or a covered area). More
than approximately 6.6 ft (2 m) from the
ground and more than approximately 3.3
ft (1 m) from the rear is required to open
or close the retractable hard top safely.
Otherwise, the top may damage any
objects above it while moving. The
retractable hard top operating system
could also be damaged.
.
Do not operate the retractable hard top
in a strong wind. It could be blown by
the wind, striking someone or damaging
the retractable hard top.
.
When the retractable hard top is re-
tracted, do not allow anyone to stand up
or extend any portion of their body out
of the opening while the vehicle is in
motion or while the retractable hard top
is being operated.
.
In an accident you could be thrown from
the vehicle with an open retractable hard
top if you do not use seat belts. Always
use seat belts and proper child re-
straints.
.
Do not place any objects on or near the
retractable hard top operating switch.
Unintentional operation of the retract-
able hard top may cause injuries or an
accident if the objects press the switch.
.
Do not put your fingers or hands in the
gap between the rear seats and the rear
parcel shelf or the side flaps. Doing so
may cause injury if the retractable hard
top is operated.
CAUTION
.
Do not operate the retractable hard top
when the temperature is below 328F
(08C). This may result in damage to the
retractable hard top material or operat-
ing system.
.
Remove water drops, snow, ice or sand
from the retractable hard top, and dry
the surface of the retractable hard top
completely before opening it.
.
Do not open the retractable hard top
when it is wet or damp. If the retractable
hardtop and rear window are wet, water
might get inside of the vehicle. To avoid
this, wipe off any water drops before
opening the retractable hard top.
.
Do not place any objects between the
hard rail and the structure. Doing so
could interfere with retractable hard top
operation and cause damage to the
retractable hard top operating system
or the objects.
.
Do not place any objects on the upper
area of the windshield glass or the hard
rail when the retractable hard top is fully
opened. Doing so could interfere with
retractable hard top operation and cause
damage.
.
Do not place any object between the
retractable hard top when the retract-
able hard top is stored in the storage
space. Doing so may interfere with
retractable hard top operation and cause
damage.
.
Do not place anything on the retractable
hard top, rear parcel shelf, side flaps and
trunk lid. Even small items may interfere
with the retractable hard top operation
and could cause damage to the retract-
able hard top or the vehicle body.
.
Do not place anything in the retractable
hard top storage area. The retractable
hard top will not fit there properly, and
this could damage the retractable hard
top and/or the vehicle body.
-------------------------------------------------------------------------------------------------------------------------------------------------------------

.
Do not sit or place excessive weight on
the top, rear parcel shelf, side flaps and
trunk lid, especially when the retractable
hard top is being operated. The retract-
able hard top may be damaged.
.
Do not drive the vehicle with the
retractable hard top partially opened.
Always make sure the retractable hard
top is either fully opened or closed
before driving.
.
Secure items so that they cannot be
blown from the vehicle while driving
with the retractable hard top open.
.
Do not install a roof rack or a roof carrier
on the retractable hard top. The retract-
able hard top or the roof rack or both
may be damaged when the retractable
hard top is operated.
WHEN OPERATING THE RETRACT-
ABLE HARD TOP
WARNING
Keep hands and other parts of the body
away from moving parts such as the
retractable hard top, rear parcel shelf, side
flaps, trunk lid and power windows.
CAUTION
Do not place any items in the storage space
for the retractable hard top. A caution label
is attached on the floor in the retractable
hard top storage space. Cargo that contacts
the retractable hard top may damage the
retractable hard top or cargo.
NOTE:
In case of low battery or low temperature,
the retractable hard top may temporarily
stop moving during the operation. This
functions to protect the retractable hard
top control mechanism, and it is not a
malfunction.
If the retractable hard top is opened and
closed repeatedly in a short period of time,
it may stop moving to protect the retract-
able hard top motor. Wait for approxi-
mately 20 minutes before operating the
retractable hard top again.
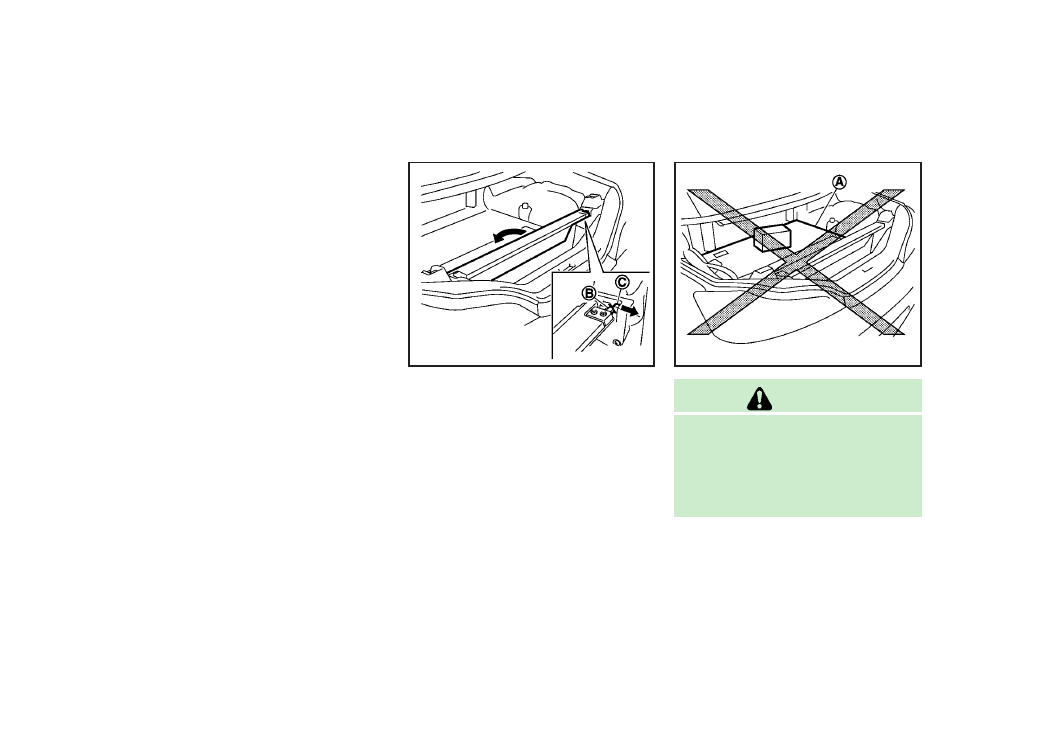
SPA2629
Separator
The retractable hard top can be operated
only when the trunk room is separated.
1. Pull the strap
*
A
and open the
separator.
Pre-driving checks and adjustments
3-21
-------------------------------------------------------------------------------------------------------------------------------------------------------------
3-22
Pre-driving checks and adjustments
2. Hang the hooks
*
B
to the holders
*
C
until they latch.
SPA2630
Storing separator:
1. Pull the separator and unlatch the
hooks
*
B
from the holders
*
C
.
2. Store the separator.
SPA2631
CAUTION
Do not place any items in the storage space
for the retractable hard top. A caution label
*
A
is attached on the floor in the retract-
able hard top storage space. Cargo that
contacts the retractable hard top may
damage the retractable hard top or cargo.
NOTE:
When the hooks of the separator are not
latched in the holders, the retractable hard
top cannot be operated. “CHECK SEPARA-
-------------------------------------------------------------------------------------------------------------------------------------------------------------

TOR” is displayed in the dot matrix liquid
crystal display.
SIC4293
INDICATORS FOR THE RETRACTABLE
HARD TOP
The retractable hard top indicator in the
dot matrix liquid crystal display
*
1
shows
the conditions of retractable hard top
operation. The information displays when
the retractable hard top is being operated
or if it is stopped before reaching the fully
opened or closed position. For details
about the retractable hard top indicator,
see “Indicators for retractable hard top”
(P.2-22).
Automatic window lowering
When the retractable hard top operating
switch is pressed, the power windows will
automatically be lowered completely. The
windows do not rise automatically after the
retractable hard top operation is com-
pleted. Use the power window switches
to raise them.
Pre-driving checks and adjustments
3-23
-------------------------------------------------------------------------------------------------------------------------------------------------------------
Нет комментариевНе стесняйтесь поделиться с нами вашим ценным мнением.
Текст