Infiniti EX35 (2012 year). Manual — part 29

8-26
Maintenance and do-it-yourself
SDI2192
1.
Clearance light
2.
Headlight (high-beam)
3.
Headlight (low-beam)
4.
Map light
5.
Rear personal light
6.
Fog light
7.
Front turn signal light
8.
Front side marker light
9.
Puddle light
10. Step light
11. High-mounted stop light
12. Back-up light
13. Rear combination light (tail/stop/side
marker light)
14. Cargo light (sidewall)
15. Cargo light (lift gate)
16. License plate light
17. Rear turn signal light
HEADLIGHTS
Replacing
Fog may temporarily form inside the lens of
the exterior lights in the rain or in a car
wash. A temperature difference between
the inside and the outside of the lens
causes the fog. This is not a malfunction. If
large drops of water collect inside the lens,
contact an INFINITI retailer.
LIGHTS
-------------------------------------------------------------------------------------------------------------------------------------------------------------

Xenon headlight bulb (if so equipped):
If replacement is required, see an INFINITI
retailer.
WARNING
HIGH VOLTAGE
When xenon headlights are on, they pro-
duce a high voltage. To prevent an electric
shock, never attempt to modify or disas-
semble. Always have your xenon headlights
replaced at an INFINITI retailer. For addi-
tional information, see “Headlight and turn
signal switch” in the “2. Instruments and
controls” section.
Halogen headlight bulb (if so equipped):
The headlight is a semi-sealed beam type
which uses a replaceable headlight (halo-
gen) bulb. If replacement is required, see
an INFINITI retailer for servicing.
CAUTION
.
High pressure halogen gas is sealed
inside the bulb. The bulb may break if
the glass envelope is scratched or the
bulb is dropped.
.
Only touch the plastic base when hand-
ling the bulb. Never touch the glass
envelope. Touching the glass could sig-
nificantly affect bulb life and/or head-
light performance.
.
Do not leave the bulb out of the head-
light reflector for a long period of time
as dust, moisture, and smoke may enter
the headlight body and affect the
performance of the headlight.
.
Aiming is not necessary after replacing
the bulb. When aiming adjustment is
necessary, contact an INFINITI retailer.
Maintenance and do-it-yourself
8-27
-------------------------------------------------------------------------------------------------------------------------------------------------------------

8-28
Maintenance and do-it-yourself
EXTERIOR AND INTERIOR LIGHTS
Item
Wattage (W)
Bulb No.
Headlight*
low beams (Xenon)
35
D2S
low beams (Halogen)
55
H11
high beams (Halogen)
65
H9
Front turn signal light*
21
WY21W
Fog light*
35
H8
Clearance light*
5
W5W
Front side marker light*
5
W5W
Rear combination light*
back-up
16
W16W
stop/tail/side marker
LED
—
Rear turn signal light*
21
PY21W
License plate light*
5
W5W
Puddle light*
LED
—
Map light
8
—
Rear personal light
8
—
Cargo light
8
—
Vanity mirror light
1.4
—
Step light*
5
—
High-mounted stop light*
LED
—
*:
See an INFINITI retailer for replacement.
NOTE: Always check with the Parts Department at an INFINITI retailer for the latest
information about parts.
Replacement procedures
All other lights are either type A, B, C, D, E
or F. When replacing a bulb, first remove
the lens and/or cover.
-------------------------------------------------------------------------------------------------------------------------------------------------------------

SDI1679
SDI2030
Map light
SDI2031
Rear personal light
SDI1500B
Cargo light
SDI1839
Vanity mirror light
Maintenance and do-it-yourself
8-29
-------------------------------------------------------------------------------------------------------------------------------------------------------------
8-30
Maintenance and do-it-yourself
If you have a flat tire, see “Flat tire” in the
“6. In case of emergency” section.
TIRE PRESSURE
Tire Pressure Monitoring System
(TPMS)
This vehicle is equipped with the Tire
Pressure Monitoring System (TPMS). It
monitors tire pressure of all tires except
the spare. When the low tire pressure
warning light is lit and the CHECK TIRE
PRESSURE warning appears on the dot
matrix liquid crystal display, one or more
of your tires is significantly under-inflated.
The TPMS will activate only when the
vehicle is driven at speeds above 16 MPH
(25 km/h). Also, this system may not
detect a sudden drop in tire pressure (for
example a flat tire while driving).
For more details, see “Low tire pressure
warning light” in the “2. Instruments and
controls” section, “Tire Pressure Monitor-
ing System (TPMS)” in the “5. Starting and
driving” section and “Tire Pressure Mon-
itoring System (TPMS) ” in the “6. In case
of emergency” section.
Tire inflation pressure
Check the pressure of the tires
(including the spare) often and al-
ways prior to long distance trips. The
recommended tire pressure specifi-
cations are shown on the Tire and
Loading Information label under the
“Cold Tire Pressure” heading. The
Tire and Loading Information label is
affixed to the driver side center pillar.
Tire pressures should be checked
regularly because:
. Most tires naturally lose air over
time.
. Tires can lose air suddenly when
driven over potholes or other
objects or if the vehicle strikes a
curb while parking.
The tire pressures should be checked
when the tires are cold. The tires are
considered COLD after the vehicle
has been parked for 3 or more hours,
or driven less than 1 mile (1.6 km) at
moderate speeds.
Incorrect tire pressure, including
under inflation, may adversely affect
tire life and vehicle handling.
WARNING
. Improperly inflated tires can fail
suddenly and cause an accident.
. The Gross Vehicle Weight rating
(GVWR) is located on the F.M.V.S.
S./C.M.V.S.S. certification label.
The vehicle weight capacity is
indicated on the Tire and Loading
Information label. Do not load
your vehicle beyond this capacity.
Overloading your vehicle may re-
sult in reduced tire life, unsafe
operating conditions due to pre-
mature tire failure, or unfavorable
handling characteristics and could
also lead to a serious accident.
Loading beyond the specified ca-
pacity may also result in failure of
other vehicle components.
WHEELS AND TIRES
-------------------------------------------------------------------------------------------------------------------------------------------------------------

. Before taking a long trip, or
whenever you heavily load your
vehicle, use a tire pressure gauge
to ensure that the tire pressures
are at the specified level.
. For additional information regard-
ing tires, refer to “Important Tire
Safety Information” (US) or “Tire
Safety Information” (Canada) in
the Warranty Information Booklet.
SDI2703
Tire and Loading Information label
*
1 Seating capacity: The maximum
number of occupants that can be
seated in the vehicle.
*
2 Vehicle load limit: See “Vehicle
loading information” in the “9.
Technical and consumer informa-
tion” section.
*
3 Original size: The size of the tires
originally installed on the vehicle
at the factory.
Maintenance and do-it-yourself
8-31
-------------------------------------------------------------------------------------------------------------------------------------------------------------

8-32
Maintenance and do-it-yourself
*
4 Cold tire pressure: Inflate the
tires to this pressure when the
tires are cold. Tires are consid-
ered COLD after the vehicle has
been parked for 3 or more hours,
or driven less than 1 mile (1.6
km) at moderate speeds. The
recommended cold tire inflation
is set by the manufacturer to
provide the best balance of tire
wear, vehicle handling, driveabil-
ity, tire noise, etc., up to the
vehicle’s GVWR.
*
5 Tire size — see “Tire labeling”
later in this section.
*
6 Spare tire size or compact spare
tire size (if so equipped)
SDI1949
Checking the tire pressure
1. Remove the valve stem cap from
the tire.
2. P r e s s t h e p r e s s u r e g a u g e
squarely onto the valve stem. Do
not press too hard or force the
valve stem sideways, or air will
escape. If the hissing sound of air
escaping from the tire is heard
while checking the pressure, re-
position the gauge to eliminate
this leakage.
3. Remove the gauge.
4. Read the tire pressure on the
gauge stem and compare it to
the specification shown on the
Tire and Loading Information la-
bel.
5. Add air to the tire as needed. If
too much air is added, press the
core of the valve stem briefly with
the tip of the gauge stem to
release pressure. Recheck the
pressure and add or release air
as needed.
6. Install the valve stem cap.
7. Check the pressure of all other
tires, including the spare.
-------------------------------------------------------------------------------------------------------------------------------------------------------------
SIZE
COLD TIRE
INFLATION
PRESSURE
FRONT
ORIGINAL
TIRE
P225/55R18 97V
230 kPa,
33 PSI
P245/45R19 98V
230 kPa,
33 PSI
REAR ORI-
GINAL TIRE
P225/55R18 97V
230 kPa,
33 PSI
P245/45R19 98V
230 kPa,
33 PSI
SPARE TIRE
T165/80R17
420 kPa,
60 PSI
T165/80D17
420 kPa,
60 PSI
SDI1575
Example
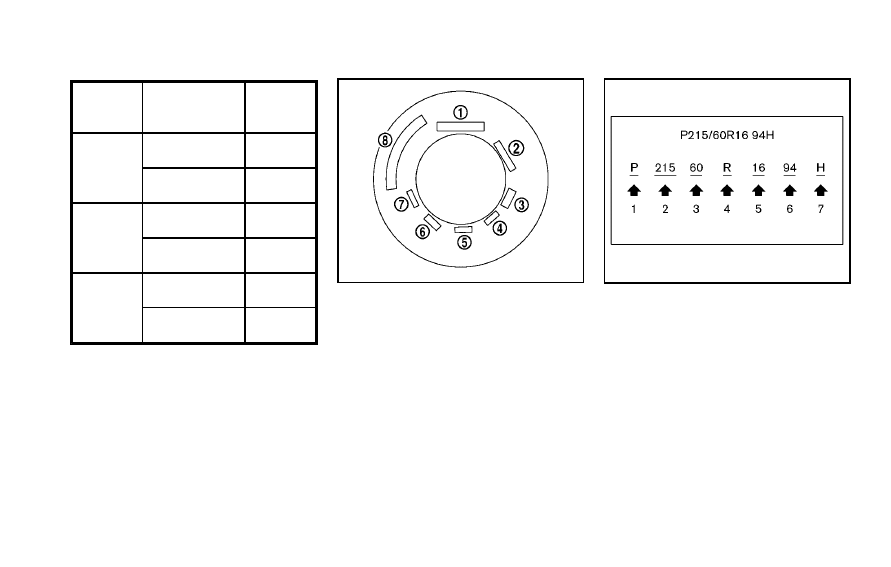
TIRE LABELING
Federal law requires tire manufac-
turers to place standardized informa-
tion on the sidewall of all tires. This
information identifies and describes
the fundamental characteristics of
the tire and also provides the tire
identification number (TIN) for safety
standard certification. The TIN can be
used to identify the tire in case of a
recall.
SDI1606
Example
*
1 Tire size (example: P215/60R16
94H)
1. P: The “P” indicates the tire is
designed for passenger vehicles.
(Not all tires have this informa-
tion.)
2. Three-digit number (215): This
number gives the width in milli-
meters of the tire from sidewall
edge to sidewall edge.
3. Two-digit number (60): This num-
ber, known as the aspect ratio,
Maintenance and do-it-yourself
8-33
-------------------------------------------------------------------------------------------------------------------------------------------------------------

8-34
Maintenance and do-it-yourself
gives the tire’s ratio of height to
width.
4. R: The “R” stands for radial.
5. Two-digit number (16): This num-
ber is the wheel or rim diameter in
inches.
6. Two- or three-digit number (94):
This number is the tire’s load
index. It is a measurement of
how much weight each tire can
support. You may not find this
information on all tires because it
is not required by law.
7. H: Tire speed rating. You should
not drive the vehicle faster than
the tire speed rating.
SDI1607
Example
*
2 TIN (Tire Identification Number)
for a new tire (example: DOT XX
XX XXX XXXX)
1. DOT: Abbreviation for the “Depart-
ment of Transportation”. The sym-
bol can be placed above, below or
to the left or right of the Tire
Identification Number.
2. Two-digit code: Manufacturer’s
identification mark
3. Two-digit code: Tire size
4. Three-digit code: Tire type code
(Optional)
5. Three-digit code: Date of Manu-
facture
6. Four numbers represent the week
and year the tire was built. For
example, the numbers 3103
means the 31st week of 2003. If
these numbers are missing, then
look on the other sidewall of the
tire.
*
3 Tire ply composition and materi-
al
The number of layers or plies of
rubber-coated fabric in the tire.
Tire manufacturers also must
indicate the materials in the tire,
which include steel, nylon,
polyester, and others.
*
4 Maximum permissible inflation
pressure
This number is the greatest
amount of air pressure that
should be put in the tire. Do
not exceed the maximum per-
-------------------------------------------------------------------------------------------------------------------------------------------------------------
missible inflation pressure.
*
5 Maximum load rating
This number indicates the max-
imum load in kilograms and
pounds that can be carried by
the tire. When replacing the tires
on the vehicle, always use a tire
that has the same load rating as
the factory installed tire.
*
6 Term of “tubeless” or “tube
type”
Indicates whether the tire re-
quires an inner tube (“tube
type”) or not (“tubeless”).
*
7 The word “radial”
The word “radial” is shown, if
the tire has radial structure.
*
8 Manufacturer or brand name
Manufacturer or brand name is
shown.
Other tire-related terminology:
In addition to the many terms that
are defined throughout this section,
Intended Outboard Sidewall is (1) the
sidewall that contains a whitewall,
bears white lettering or bears manu-
facturer, brand and/or model name
molding that is higher or deeper than
the same molding on the other side-
wall of the tire, or (2) the outward
facing sidewall of an asymmetrical
tire that has a particular side that
must always face outward when
mounted on a vehicle.
TYPES OF TIRES
WARNING
.
When changing or replacing tires, be
sure all four tires are of the same type
(Example: Summer, All Season or Snow)
and construction. An INFINITI retailer
may be able to help you with information
about tire type, size, speed rating and
availability.
.
Replacement tires may have a lower
speed rating than the factory equipped
tires, and may not match the potential
maximum vehicle speed. Never exceed
the maximum speed rating of the tire.
.
Replacing tires with those not originally
specified by INFINITI could affect the
proper operation of the TPMS.
.
For additional information regarding
tires, refer to “Important Tire Safety
Information” (US) or “Tire Safety Infor-
mation” (Canada) in the Warranty Infor-
mation Booklet.
All season tires
INFINITI specifies all season tires on some
models to provide good performance all
year, including snowy and icy road condi-
tions. All Season tires are identified by ALL
SEASON and/or M&S (Mud and Snow) on
the tire sidewall. Snow tires have better
snow traction than All Season tires and
may be more appropriate in some areas.
Summer tires
INFINITI specifies summer tires on some
models to provide superior performance on
dry roads. Summer tire performance is
substantially reduced in snow and ice.
Summer tires do not have the tire traction
rating M&S on the tire sidewall.
If you plan to operate your vehicle in snowy
or icy conditions, INFINITI recommends the
use of SNOW tires or ALL SEASON tires on
Maintenance and do-it-yourself
8-35
-------------------------------------------------------------------------------------------------------------------------------------------------------------
8-36
Maintenance and do-it-yourself
all four wheels.
Snow tires
If snow tires are needed, it is necessary to
select tires equivalent in size and load
rating to the original equipment tires. If
you do not, it can adversely affect the
safety and handling of your vehicle.
Generally, snow tires will have lower speed
ratings than factory equipped tires and
may not match the potential maximum
vehicle speed. Never exceed the maximum
speed rating of the tire.
If you install snow tires, they must be the
same size, brand, construction and tread
pattern on all four wheels.
For additional traction on icy roads,
studded tires may be used. However, some
U.S. states and Canadian provinces prohi-
bit their use. Check local, state and
provincial laws before installing studded
tires. Skid and traction capabilities of
studded snow tires, on wet or dry surfaces,
may be poorer than that of non-studded
snow tires.
TIRE CHAINS
Use of tire chains may be prohibited
according to location. Check the local laws
before installing tire chains. When instal-
ling tire chains, make sure they are the
proper size for the tires on your vehicle and
are installed according to the chain man-
ufacturer’s suggestions. Use only SAE
Class S chains. Class “S” chains are used
on vehicles with restricted tire to vehicle
clearance. Vehicles that can use Class “S”
chains are designed to meet the SAE
standard minimum clearances between
the tire and the closest vehicle suspension
or body component required to accommo-
date the use of a winter traction device (tire
chains or cables). The minimum clearances
are determined using the factory equipped
tire size. Other types may damage your
vehicle. Use chain tensioners when recom-
mended by the tire chain manufacturer to
ensure a tight fit. Loose end links of the
tire chain must be secured or removed to
prevent the possibility of whipping action
damage to the fenders or underbody. If
possible, avoid fully loading your vehicle
when using tire chains. In addition, drive at
a reduced speed. Otherwise, your vehicle
may be damaged and/or vehicle handling
and performance may be adversely af-
fected.
Tire chains must be installed only on the
rear wheels and not on the front wheels.
Never install tire chains on a TEMPORARY
USE ONLY spare tire.
Do not use tire chains on dry roads. Driving
with tire chains in such conditions can
cause damage to the various mechanisms
of the vehicle due to some overstress.
-------------------------------------------------------------------------------------------------------------------------------------------------------------
SDI1662
CHANGING WHEELS AND TIRES
Tire rotation
INFINITI recommends rotating the
tires every 7,500 miles (12,000 km).
(See “Flat tire” in the “6. In case of
emergency” section for tire replacing
procedures.)
As soon as possible, tighten the
wheel nuts to the specified torque
with a torque wrench.
Wheel nut tightening torque:
80 ft-lb (108 N·m)
The wheel nuts must be kept tigh-
tened to the specification at all
times. It is recommended that wheel
nuts be tightened to the specifica-
tion at each tire rotation interval.
WARNING
. After rotating the tires, check and
adjust the tire pressure.
. Retighten the wheel nuts when
the vehicle has been driven for
600 miles (1,000 km) (also in
cases of a flat tire, etc.).
. Do not include the T-type spare
tire or any other small size spare
tire in the tire rotation.
. For additional information regard-
ing tires, refer to “Important Tire
Safety Information” (US) or “Tire
Safety Information” (Canada) in
the Warranty Information Booklet.
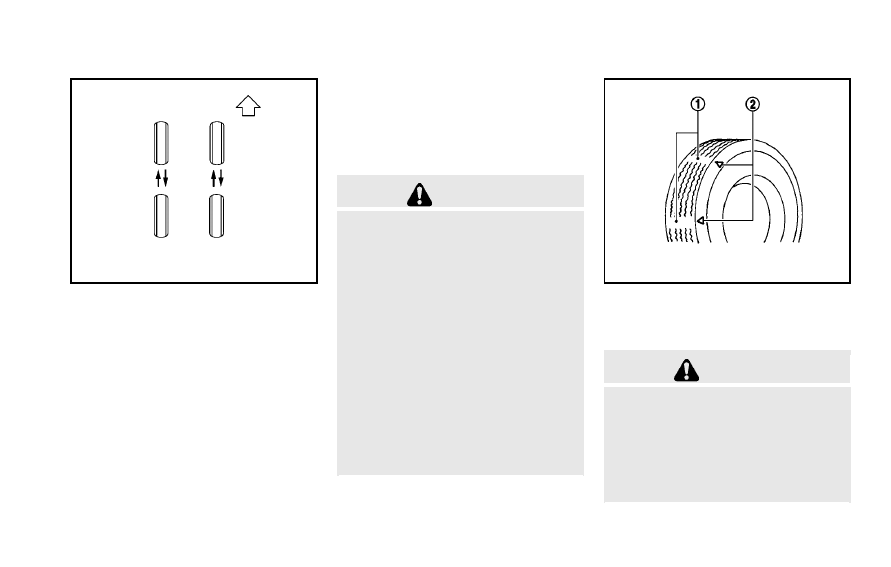
SDI1663
1.
Wear indicator
2.
Wear indicator location mark
Tire wear and damage
WARNING
. Tires should be periodically in-
spected for wear, cracking, bul-
ging or objects caught in the
tread. If excessive wear, cracks,
bulging or deep cuts are found,
the tire(s) should be replaced.
Maintenance and do-it-yourself
8-37
-------------------------------------------------------------------------------------------------------------------------------------------------------------
8-38
Maintenance and do-it-yourself
. The original tires have built-in
tread wear indicators. When wear
indicators are visible, the tire(s)
should be replaced.
. Tires degrade with age and use.
Have tires, including the spare,
over 6 years old checked by a
qualified technician, because
some tire damage may not be
obvious. Replace the tires as
necessary to prevent tire failure
and possible personal injury.
. Improper service of the spare tire
may result in serious personal
injury. If it is necessary to repair
the spare tire, contact an INFINITI
retailer.
. For additional information regard-
ing tires, refer to “Important Tire
Safety Information” (US) or “Tire
Safety Information” (Canada) in
the Warranty Information Booklet.
Replacing wheels and tires
When replacing a tire, use the same size,
tread design, speed rating and load carry-
ing capacity as originally equipped. (See
“Specifications” in the “9. Technical and
consumer information” section for recom-
mended types and sizes of tires and
wheels.)
WARNING
.
The use of tires other than those
recommended or the mixed use of tires
of different brands, construction (bias,
bias-belted or radial), or tread patterns
can adversely affect the ride, braking,
handling, ground clearance, body-to-tire
clearance, tire chain clearance, speed-
ometer calibration, headlight aim and
bumper height. Some of these effects
may lead to accidents and could result in
serious personal injury.
.
If the wheels are changed for any
reason, always replace with wheels
which have the same off-set dimension.
Wheels of a different off-set could cause
premature tire wear, degrade vehicle
handling characteristics and/or interfer-
ence with the brake discs/drums. Such
interference can lead to decreased brak-
ing efficiency and/or early brake pad/
shoe wear. See “Wheels and tires” in the
“9. Technical and consumer information”
section of this manual for wheel off-set
dimensions.
.
When a spare tire is mounted or a wheel
is replaced, the TPMS will not function
and the low tire pressure warning light
will flash for approximately 1 minute.
The light will remain on after 1 minute.
Contact your INFINITI retailer as soon as
possible for tire replacement and/or
system resetting.
.
Replacing tires with those not originally
specified by INFINITI could affect the
proper operation of the TPMS.
.
Do not install a damaged or deformed
wheel or tire even if it has been repaired.
Such wheels or tires could have struc-
tural damage and could fail without
warning.
.
The use of retread tire is not recom-
mended.
.
For additional information regarding
tires, refer to “Important Tire Safety
Information” (US) or “Tire Safety Infor-
-------------------------------------------------------------------------------------------------------------------------------------------------------------
mation” (Canada) in the Warranty Infor-
mation Booklet.
All-Wheel Drive (AWD) models
CAUTION
.
Always use tires of the same type, size,
brand, construction (bias, bias-belted or
radial), and tread pattern on all four
wheels. Failure to do so may result in a
circumference difference between tires
on the front and rear axles which will
cause excessive tire wear and may
damage the transmission, transfer case
and differential gears.
.
ONLY use spare tires specified for the
AWD model.
If excessive tire wear is found, it is
recommended that all four tires be re-
placed with tires of the same size, brand,
construction and tread pattern. The tire
pressure and wheel alignment should also
be checked and corrected as necessary.
Contact an INFINITI retailer.
Wheel balance
Unbalanced wheels may affect vehicle
handling and tire life. Even with regular
use, wheels can get out of balance. There-
fore, they should be balanced as required.
Wheel balance service should be per-
formed with the wheels off the vehicle.
Spin balancing the wheels on the vehicle
could lead to mechanical damage.
For additional information regarding tires,
refer to “Important Tire Safety Information”
(US) or “Tire Safety Information” (Canada)
in the INFINITI Warranty Information Book-
let.
Care of wheels
See “Cleaning exterior” in the “Appearance
and care” section for details about care of
the wheels.
Spare tire (TEMPORARY USE ONLY
(T-type) spare tire)
Observe the following precautions if the T-
type spare tire must be used, otherwise
your vehicle could be damaged or involved
in an accident.
WARNING
.
The T-type spare tire should be used for
emergency use. It should be replaced
with the standard tire at the first
opportunity to avoid possible tire or
differential damage.
.
Drive carefully while the TEMPORARY
USE ONLY spare tire is installed. Avoid
sharp turns and abrupt braking while
driving.
.
Periodically check spare tire inflation
pressure. Always keep the pressure of
the TEMPORARY USE ONLY spare tire at
60 psi (420 kPa, 4.2 bar). Always keep
the pressure of the full size spare tire (if
so equipped) at the recommended pres-
sure for standard tires, as indicated on
the Tire and Loading Information label.
For Tire and Loading Information label
location, see “Tire and Loading Informa-
tion label” in the index of this manual.
.
With the TEMPORARY USE ONLY spare
tire installed do not drive your vehicle at
speeds faster than 50 MPH (80 km/h).
.
When driving on roads covered with
snow or ice, the TEMPORARY USE ONLY
spare tire should be used on the front
Maintenance and do-it-yourself
8-39
-------------------------------------------------------------------------------------------------------------------------------------------------------------
8-40
Maintenance and do-it-yourself
wheels and original tire used on the rear
wheels (drive wheels). Use tire chains
only on the two rear original tires.
.
Tire tread of the TEMPORARY USE ONLY
spare tire will wear at a faster rate than
the standard tire. Replace the spare tire
as soon as the tread wear indicators
appear.
.
Do not use the spare tire on other
vehicles.
.
Do not use more than one spare tire at
the same time.
CAUTION
.
Do not use tire chains on a TEMPORARY
USE ONLY spare tire. Tire chains will not
fit properly and may cause damage to
the vehicle.
.
Because the TEMPORARY USE ONLY
spare tire is smaller than the original
tire, ground clearance is reduced. To
avoid damage to the vehicle, do not
drive over obstacles. Also do not drive
the vehicle through an automatic car
wash since it may get caught.
-------------------------------------------------------------------------------------------------------------------------------------------------------------
9 Technical and consumer information
Capacities and recommended fuel/lubricants. ... 9-2
Fuel recommendation . . . . . . . . . .. 9-3
Engine oil and oil filter recommendation . . . 9-5
Air conditioning system refrigerant and
lubricant recommendations . . . . . . . . 9-6
Specifications . . . . . . . . . . . . . .. 9-7
Engine. . . . . . . . . . . . . . . . 9-7
Wheels and tires . . . . . . . . . . . . 9-8
Dimensions . . . . . . . . . . . . . . 9-9
Vehicle Identification Number (VIN) plate. ... 9-10
Vehicle identification number
(chassis number). . . . . . . . . . ... 9-10
Engine serial number . . . . . . . . . 9-11
F.M.V.S.S./C.M.V.S.S. certification label . . .. 9-11
Emission control information label . . . . 9-11
Tire and loading information label. . . . . 9-12
Air conditioner specification label. . . . .. 9-12
Installing front license plate. . . . . . . .. 9-13
Vehicle loading information. . . . . . . ... 9-14
Terms . . . . . . . . . . . . . . .. 9-14
Vehicle load capacity . . . . . . . . ... 9-15
Loading tips. . . . . . . . . . . . . 9-16
Measurement of weights. . . . . . . .. 9-17
Towing a trailer . . . . . . . . . . . . . 9-17
Flat towing. . . . . . . . . . . . ... 9-17
Uniform tire quality grading . . . . . . . .. 9-18
Emission control system warranty . . . . . . 9-19
Reporting safety defects. . . . . . . . . 9-19
Readiness for Inspection/Maintenance (I/M)
test . . . . . . . . . . . . . . . . .. 9-20
Event Data Recorders (EDR) . . . . . . . ... 9-21
Owner’s Manual/Service Manual
order information . . . . . . . . . . . .. 9-22
-------------------------------------------------------------------------------------------------------------------------------------------------------------
Нет комментариевНе стесняйтесь поделиться с нами вашим ценным мнением.
Текст