Infiniti EX35 (2012 year). Manual — part 8

checks and adjustments” section.
SIC4687
CONSOLE BOX
To open the console box, push the button
*
1
.
To close, push the lid down until latched.
The inner tray (if so equipped) can be
positioned to the front or rear
*
2
. Make
sure that the arrow mark on the tray points
toward the front and the bosses
*
A
are
aligned in the slits.
SIC3663
CARD HOLDER
Pull the sun visor down
*
1
and slide a card
in the card holder
*
A
.
Instruments and controls
2-49
-------------------------------------------------------------------------------------------------------------------------------------------------------------

2-50
Instruments and controls
SSS0831
SEAT-MOUNTED JACKET HANGER (if
so equipped)
The driver’s side head restraint is equipped
with a retractable jacket hanger. Pull the
hanger out as illustrated until it locks. Be
sure to return the hanger after use.
This hanger is designed to be used only for
clothes (maximum load limit: 7.7 lb (3.5
kg)).
To help avoid staining clothes or affecting
the comfort of the passenger behind, do
not use the seat-mounted jacket hanger
while the seat behind is occupied by a
passenger or a child restraint.
SIC3248
COAT HOOKS
The coat hooks are equipped beside the
rear personal lights.
CAUTION
Do not place items which are more than 2 lb
(1 kg) on the hook.
SIC4072
LUGGAGE HOOKS
WARNING
.
Always make sure that the cargo is
properly secured. Use the suitable ropes
and hooks.
.
Unsecured cargo can become dangerous
in an accident or sudden stop.
-------------------------------------------------------------------------------------------------------------------------------------------------------------
CAUTION
Do not apply a total load of more than 22 lb
(10 kg) to a single hook.
SIC3636
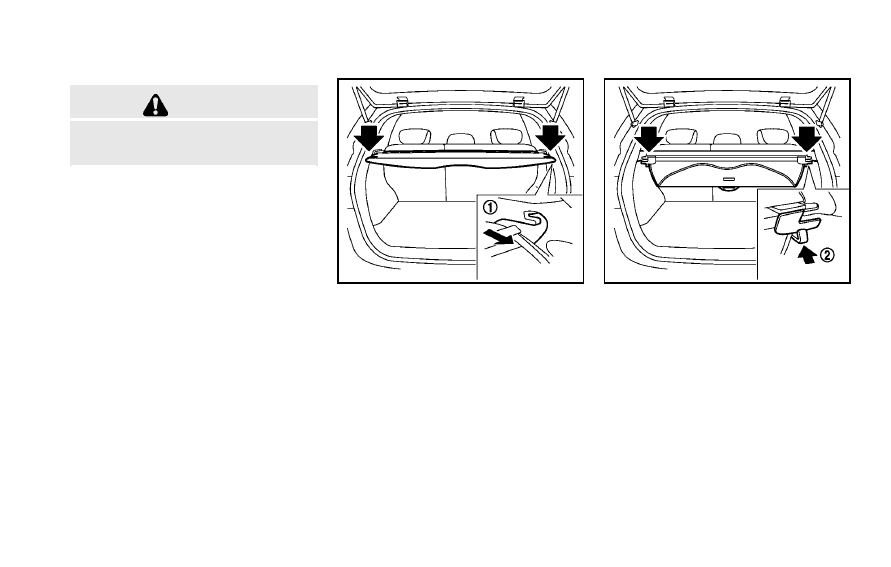
CARGO COVER (if so equipped)
The cargo cover keeps the contents in the
cargo area hidden from the outside.
To use the cargo cover, pull it out and hang
both sides on the hooks
*
1
.
SIC3637
To stow the cargo cover, remove it from the
hooks and hold until it is retracted. Make
sure that the cargo cover is snapped into
the holders
*
2
to keep it from moving
around while driving.
Instruments and controls
2-51
-------------------------------------------------------------------------------------------------------------------------------------------------------------

2-52
Instruments and controls
SIC3638
To remove the cargo cover, stow the cover
and pull the holder to the opposite side
*
3
.
WARNING
.
Never put anything on the cargo cover,
no matter how small. Any object on it
could cause an injury in an accident or
sudden stop.
.
Do not leave the cargo cover in the
vehicle with it disengaged from the
holder.
.
Properly secure all cargo with ropes or
straps to help prevent it from sliding or
shifting. Do not place cargo higher than
the seatbacks. In a sudden stop or
collision, unsecured cargo could cause
personal injury.
.
If the cargo cover contacts the top tether
strap when it is attached to the top
tether anchor, remove the cargo cover
from the vehicle or secure it on the cargo
floor below its attachment location. If
the cargo cover is not removed, it may
damage the top tether strap during a
collision. Your child could be seriously
injured or killed in a collision if the child
restraint top tether strap is damaged.
.
Do not allow cargo to contact the top
tether strap when it is attached to the
top tether anchor. Properly secure the
cargo so it does not contact the top
tether strap. Cargo that is not properly
secured or cargo that contacts the top
tether strap may damage the top tether
strap during a collision. Your child could
be seriously injured or killed in a
collision if the child restraint top tether
strap is damaged.
.
Do not use the cargo cover if the rear
seats are folded down.
SIC3639
ROOF RACK (if so equipped)
Always distribute the luggage evenly on
the roof rack. Do not load more than 220 lb
(100 kg) on the roof rails. Observe the
maximum load limit shown on the cross-
bars or roof carriers when you attach them
on the roof rails. Contact an INFINITI
retailer for crossbar or other equipment
information.
Be careful that your vehicle does not
exceed the Gross Vehicle Weight Rating
(GVWR) or its Gross Axle Weight Rating
(GAWR front and rear). The GVWR and
GAWR are located on the F.M.V.S.S. or C.V.
-------------------------------------------------------------------------------------------------------------------------------------------------------------

M.S.S. certification label (located on the
driver’s door pillar). For more information
regarding GVWR and GAWR, see “Vehicle
loading information” in the “9. Technical
and consumer information” section.
WARNING
.
Drive extra carefully when the vehicle is
loaded at or near the cargo carrying
capacity, especially if the significant
portion of that load is carried on the
roof rack.
.
Heavy loading of the roof rack has the
potential to affect the vehicle stability
and handling during sudden or unusual
handling maneuvers.
.
Roof rack load should be evenly dis-
tributed.
.
Do not exceed maximum roof rack load
weight capacity.
.
Properly secure all cargo with ropes or
straps to help prevent it from sliding or
shifting. In a sudden stop or collision,
unsecured cargo could cause personal
injury.
CAUTION
Use care when placing or removing items
from the roof rack. If you cannot comfortably
lift the items onto the roof rack from the
ground, use a ladder or stool.
POWER WINDOWS
WARNING
.
Make sure that all passengers have their
hands, etc. inside the vehicle while it is
in motion and before closing the win-
dows. Use the window lock switch to
prevent unexpected use of the power
windows.
.
Do not leave children unattended inside
the vehicle. They could unknowingly
activate switches or controls and be-
come trapped in the window. Unat-
tended children could become involved
in serious accidents.
The power windows operate when the
ignition switch is in the ON position or for
about 45 seconds after the ignition switch
is pushed to the OFF position. If the
driver’s or front passenger’s door is
opened during this period of about 45
seconds, power to the windows is can-
celed.
Instruments and controls
2-53
WINDOWS
-------------------------------------------------------------------------------------------------------------------------------------------------------------
2-54
Instruments and controls
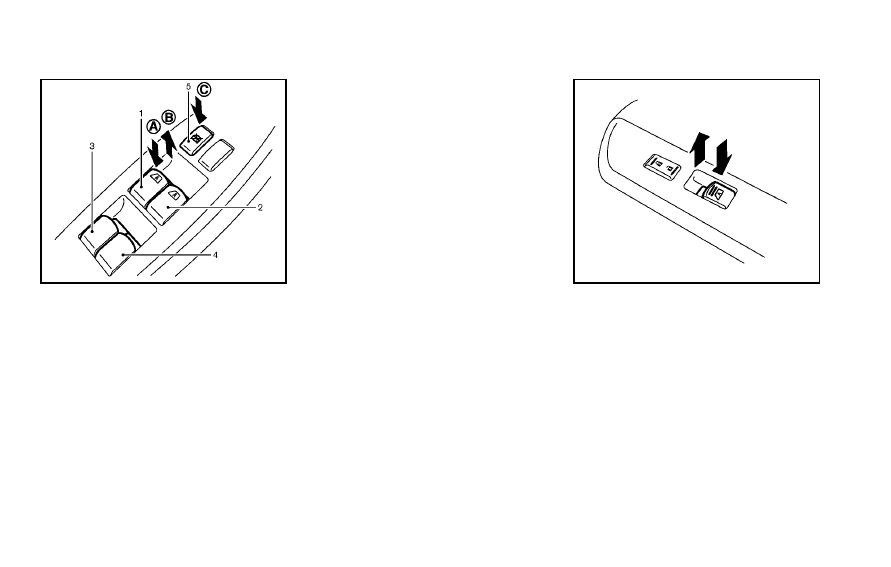
SIC3640
1.
Driver side window
2.
Front passenger side window
3.
Rear left passenger side window
4.
Rear right passenger side window
5.
Window lock button
Main power window switch (driver’s
side)
To open or close the window, push down
*
A
or pull up
*
B
the switch and hold it.
The main switch (driver side switches) will
open or close all the windows.
Locking passengers’ windows
When the lock button
*
C
is pushed in, only
the driver side window can be opened or
closed. Push it in again to cancel.
SIC3241
Passenger side power window
switch
The passenger side switch will open or
close only the corresponding window. To
open or close the window, push down or
pull up the switch and hold it.
-------------------------------------------------------------------------------------------------------------------------------------------------------------

SIC3285
Automatic operation (for front door
windows)
To fully open or close the window, com-
pletely push down or pull up the switch
and release it; it need not be held. The
window will automatically open or close all
the way. To stop the window, just push or
lift the switch in the opposite direction.
A light push or pull on the switch will cause
the window to open or close until the
switch is released.
Auto reverse function
WARNING
There are some small distances immediately
before the closed position which cannot be
detected. Make sure that all passengers
have their hands, etc., inside the vehicle
before closing the window.
If the control unit detects something
caught in the window as it is closing, the
window will be immediately lowered.
The auto reverse function can be activated
when the window is closed by automatic
operation when the ignition switch is in the
ON position or for 45 seconds after the
ignition switch is pushed to the OFF
position.
Depending on the environment or driving
conditions, the auto reverse function may
be activated if an impact or load similar to
something being caught in the window
occurs.
If the windows do not close auto-
matically
If the power window automatic function
(closing only) does not operate properly,
perform the following procedure to initi-
alize the power window system.
1. Push the ignition switch to the ON
position.
2. Close the door.
3. Open the window completely by oper-
ating the power window switch.
4. Pull the power window switch and hold
it to close the window, and then hold
the switch more than 3 seconds after
the window is closed completely.
5. Release the power window switch.
Operate the window by the automatic
function to confirm the initialization is
complete.
6. Perform steps 2 through 5 above for
other windows.
If the power window automatic function
does not operate properly after performing
the procedure above, have your vehicle
checked by an INFINITI retailer.
Instruments and controls
2-55
-------------------------------------------------------------------------------------------------------------------------------------------------------------

2-56
Instruments and controls
WARNING
.
In an accident you could be thrown from
the vehicle through an open moonroof.
Always use seat belts and child re-
straints.
.
Do not allow anyone to stand up or
extend any portion of their body out of
the moonroof opening while the vehicle
is in motion or while the moonroof is
closing.
CAUTION
.
Remove water drops, snow, ice or sand
from the moonroof before opening.
.
Do not place any heavy object on the
moonroof or surrounding area.
AUTOMATIC MOONROOF
The moonroof only operates when the
ignition switch is in the ON position.
The automatic moonroof is operational for
about 45 seconds, even if the ignition
switch is pushed to the OFF position. If the
driver’s door or the passenger’s door is
opened during this period of about 45
seconds, power to the moonroof is can-
celed.
SIC3243
Sunshade
The sunshade will open automatically
when the moonroof is opened. However,
it must be closed manually.
Tilting the moonroof
To tilt up, first close the moonroof, then
push the UP
*
1
side of the moonroof
switch and release it; it need not be held.
To tilt down the moonroof, push the DOWN
*
2
side.
Sliding the moonroof
To fully open or close the moonroof, push
the OPEN
*
2
or CLOSE
*
1
side of the
MOONROOF (if so equipped)
-------------------------------------------------------------------------------------------------------------------------------------------------------------

moonroof switch and release it; it need not
be held. The roof will automatically open or
close all the way. To stop the roof, push the
switch once more while it is opening or
closing.
Auto reverse function
WARNING
There are some small distances immediately
before the closed position which cannot be
detected. Make sure that all passengers
have their hands, etc., inside the vehicle
before closing the moonroof.
If the control unit detects something
caught in the moonroof when it is closing,
the moonroof will be immediately opened.
The auto reverse function can be activated
when the moonroof is closed by automatic
operation when the ignition switch is in the
ON position or for about 45 seconds after
the ignition switch is pushed to the OFF
position.
If the moonroof cannot be closed auto-
matically when the auto reverse function
activates due to a malfunction, push and
hold the CLOSE
*
1
side of the moonroof
switch.
Depending on the environment or driving
conditions, the auto reverse function may
be activated if an impact or load similar to
something being caught in the moonroof
occurs.
If the moonroof does not operate
If the moonroof does not operate properly,
perform the following procedure to initi-
alize the moonroof operation system.
1. If the moonroof is open, close it fully by
repeatedly pushing the CLOSE
*
1
side
of the moonroof switch.
2. Push and hold the CLOSE
*
1
side of
the moonroof switch to tilt the moon-
roof up.
3. Release the moonroof switch after the
moonroof moves slightly up and down.
4. Push and hold the OPEN
*
2
side of the
moonroof switch to fully tilt the moon-
roof down.
5. Check if the moonroof switch operates
normally.
If the moonroof does not operate properly
after performing the procedure above, have
your vehicle checked by an INFINITI retailer.
SIC3642
To activate or deactivate the welcome light
function, perform the following procedure.
Note that the function is set to disabled as
the factory default setting.
1. Push the ignition switch to the ON
position.
2. Open the driver’s side door.
3. Within 20 seconds after the ignition
switch is pushed to the ON position,
push the door open request switch on
the driver’s side door handle for more
than 5 seconds with the driver’s door
open.
Instruments and controls
2-57
WELCOME LIGHT
-------------------------------------------------------------------------------------------------------------------------------------------------------------

2-58
Instruments and controls
4. A chime sounds when the setting is
completed.
Once the welcome light function is active,
the puddle light
*
A
and the passenger
cabin illumination will illuminate when you
approach the vehicle with the Intelligent
Key (within approximately 3.3 feet (1 m) of
the antenna built inside the door handles)
and the following conditions are met.
. All doors are closed and locked.
. The ignition switch is in the LOCK or OFF
position.
. The Intelligent Key is outside the
vehicle.
. The puddle light operates within a set
duration.
The welcome light function will be deacti-
vated automatically if it does not operate
within a set duration to prevent battery
discharge. Note that the duration is set to
14 days.
SIC3249
MAP LIGHTS
Push the button as illustrated to turn the
light on or off.
SIC3250
PERSONAL LIGHTS
Rear
Push the button as illustrated to turn the
light on or off.
INTERIOR LIGHTS
-------------------------------------------------------------------------------------------------------------------------------------------------------------

SIC3251
INTERIOR LIGHT CONTROL SWITCH
The interior light control switch has three
positions: ON, DOOR and OFF.
ON position
When the switch is in the ON position
*
1
the map lights and rear personal lights will
illuminate.
DOOR position
When the switch is in the DOOR position
*
2
, the map lights and rear personal lights
will illuminate under the following condi-
tions:
. ignition switch is switched to the LOCK
position
— remain on for about 15 seconds.
. doors are unlocked by pushing the
UNLOCK button on the Intelligent Key
or door handle request switch with the
ignition switch in the LOCK position
— remain on for about 15 seconds.
. any door is opened and then closed
with the ignition switch in the LOCK
position
— remain on for about 15 seconds.
. any door is opened with the ignition
switch in the ACC or ON position
— remain on while the door is opened.
When the door is closed, the lights
go off.
The lights will also turn off after 15
minutes when the lights remain illumi-
nated after the ignition switch has been
pushed to the OFF or LOCK position to
prevent the battery from becoming dis-
charged.
When the auto interior illumination is set
to the OFF position (see “Vehicle informa-
tion and settings” in the “4. Monitor,
climate, audio, phone and voice recogni-
tion systems” section), the lights will
illuminate under the following condition:
. any door is opened with the ignition
switch in any position
— remain on while the door is opened.
When the door is closed, the lights
go off.
OFF position
When the switch is in the OFF position
*
3
,
the lights will not illuminate, regardless of
the condition.
CAUTION
Do not use for extended periods of time with
the engine stopped. This could result in a
discharged battery.
Instruments and controls
2-59
-------------------------------------------------------------------------------------------------------------------------------------------------------------

2-60
Instruments and controls
SIC3869
The light on the vanity mirror will turn on
when the cover on the vanity mirror is
opened.
When the cover is closed, the light will turn
off.
The lights will also turn off after 15
minutes when the lights remain illumi-
nated to prevent the battery from becom-
ing discharged.
SIC2925
When the switch is in the DOOR position
*
A
, the light illuminates while the lift gate
is opened. When the lift gate is closed, the
light will turn off.
When the switch is in the OFF position
*
B
,
the light will turn off.
The light will turn off after 15 minutes
when the lights remain illuminated to
prevent the battery from becoming dis-
charged.
HomeLink
®
Universal Transceiver provides
a convenient way to consolidate the func-
tions of up to three individual hand-held
transmitters into one built-in device.
HomeLink
®
Universal Transceiver:
. Will operate most Radio Frequency (RF)
devices such as garage doors, gates,
home and office lighting, entry door
locks and security systems.
. Is powered by your vehicle’s battery. No
separate batteries are required. If the
vehicle’s battery is discharged or is
disconnected, HomeLink
®
will retain all
programming.
Once HomeLink
®
Universal Transceiver is
programmed, retain the original transmit-
ter for future programming procedures
(Example: new vehicle purchases). Upon
sale of the vehicle, the programmed
HomeLink
®
Universal Transceiver buttons
should be erased for security purposes.
For additional information, see “Program-
ming HomeLink
®
” later in this section.
WARNING
.
Do not use HomeLink
®
Universal Trans-
ceiver with any garage door opener that
lacks safety stop and reverse features as
VANITY MIRROR LIGHTS
CARGO LIGHT (if so equipped)
HomeLink
®
UNIVERSAL TRANSCEIVER (if
equipped)
-------------------------------------------------------------------------------------------------------------------------------------------------------------

required by federal safety standards.
(These standards became effective for
opener models manufactured after April
1, 1982.) A garage door opener which
cannot detect an object in the path of a
closing garage door and then automati-
cally stop and reverse, does not meet
current federal safety standards. Using a
garage door opener without these fea-
tures increases the risk of serious injury
or death.
.
During programming procedure, your
garage door or security gate may open
or close. Make sure that people and
objects are clear of the garage door,
gate, etc. that you are programming.
.
Your vehicle’s engine should be turned
off while programming HomeLink
®
Uni-
versal Transceiver.
PROGRAMMING HomeLink
®
To program your HomeLink
®
Transceiver to
operate a garage door, gate, or entry door
opener, home or office lighting, you need
to be at the same location as the device.
Note: Garage door openers (manufactured
after 1996) have “rolling code protection”.
To program a garage door opener equipped
with “rolling code protection”; you will
need to use a ladder to get up to the
garage door opener motor to be able to
access the “smart or learn” program
button.
SIC3182
1. To begin, push and hold the 2 outer
HomeLink
®
buttons (to clear the mem-
ory) until the indicator light
*
A
blinks
(after 20 seconds). Release both but-
tons.
2. Position the end of the hand-held
transmitter 1-3 inches away from the
HomeLink
®
surface.
Instruments and controls
2-61
-------------------------------------------------------------------------------------------------------------------------------------------------------------

2-62
Instruments and controls
SIC3183
3. Using both hands, simultaneously push
and hold both the HomeLink
®
button
you want to program and the hand-held
transmitter button.
DO NOT release the buttons until step 4
has been completed.
4. Hold down both buttons until the
indicator light on HomeLink
®
flashes,
changing from a “slow blink” to a
“rapid blink”. This could take up to 90
seconds. When the indicator light
blinks rapidly, both buttons may be
released. The rapidly flashing light
indicates successful programming. To
activate the garage door or other
programmed device, push and hold
the programmed HomeLink
®
button -
releasing when the device begins to
activate.
5. If the indicator light on HomeLink
®
blinks rapidly for two seconds and then
turns solid, HomeLink
®
has picked up a
“rolling code” garage door opener
signal. You will need to proceed with
the next steps to train HomeLink
®
,
completing the programming may re-
quire a ladder and another person for
convenience.
6. Push and release the program button
located on the garage door opener’s
motor to activate the “training mode”.
This button is usually located near the
antenna wire that hangs down from the
motor. If the wire originates from under
a light lens, you will need to remove the
lens to access the training button.
NOTE:
Once you have pushed and released
the training button on the garage door
opener’s motor and the “training light”
is lit, you have 30 seconds in which to
perform step 7. For convenience, use
the help of a second person to assist
when performing this step.
7. Quickly (within 30 seconds of pushing
and releasing the garage door opener
training button) and firmly push and
release the HomeLink
®
button you’ve
just programmed. Push and release the
HomeLink
®
button up to three times to
complete the training.
8. Your HomeLink
®
button should now be
programmed. To program the remaining
HomeLink
®
buttons for additional door
or gate openers, follow steps 2 through
8 only.
NOTE:
Do not repeat step 1 unless you want to
“clear” all previously programmed
HomeLink
®
buttons.
If you have any questions or are having
difficulty programming your HomeLink
®
buttons, please refer to the HomeLink
®
web site at: www.homelink.com or call 1-
800-355-3515.
-------------------------------------------------------------------------------------------------------------------------------------------------------------
PROGRAMMING HomeLink
®
FOR
CANADIAN CUSTOMERS
Prior to 1992, D.O.C. regulations required
hand-held transmitters to stop transmitting
after 2 seconds. To program your hand-
held transmitter to HomeLink
®
, continue to
push and hold the HomeLink
®
button (note
steps 2 through 4 under “Programming
HomeLink
®
”) while you push and re-push
(“cycle”) your hand-held transmitter every
2 seconds until the indicator light flashes
rapidly (indicating successful program-
ming).
NOTE:
If programming a garage door opener, etc.,
it is advised to unplug the device during
the “cycling” process to prevent possible
damage to the garage door opener com-
ponents.
OPERATING THE HomeLink
®
UNI-
VERSAL TRANSCEIVER
HomeLink
®
Universal Transceiver (once
programmed) may now be used to activate
the garage door, etc. To operate, simply
push the appropriate programmed
HomeLink
®
Universal Transceiver button.
The red indicator light will illuminate while
the signal is being transmitted.
PROGRAMMING TROUBLE-DIAGNO-
SIS
If HomeLink
®
does not quickly learn the
hand-held transmitter information:
. replace the hand-held transmitter bat-
teries with new batteries.
. position the hand-held transmitter with
its battery area facing away from the
HomeLink
®
surface.
. push and hold both the HomeLink
®
and
hand-held transmitter buttons without
interruption.
. position the hand-held transmitter 2 to
5 in (50 to 127 mm) away from the
HomeLink
®
surface. Hold the transmit-
ter in that position for up to 15
seconds. If HomeLink
®
is not pro-
grammed within that time, try holding
the transmitter in another position -
keeping the indicator light in view at all
times.
If you continue to have programming
difficulties, please contact the INFINITI
Consumer Affairs Department. The phone
numbers are located in the Foreword of
this Owner’s Manual.
CLEARING THE PROGRAMMED IN-
FORMATION
Individual buttons cannot be cleared,
however to clear all programming, push
and hold the two outside buttons and
release when the indicator light begins to
flash (in approximately 20 seconds).
REPROGRAMMING A SINGLE
HomeLink
®
BUTTON
To reprogram a HomeLink
®
Universal
Transceiver button, complete the following.
1. Push and hold the desired HomeLink
®
button. Do not release the button until
step 4 has been completed.
2. When the indicator light begins to flash
slowly (after 20 seconds), position the
hand-held transmitter 2 to 5 in (50 to
127 mm) away from the HomeLink
®
surface.
3. Push and hold the hand-held transmit-
ter button.
4. The HomeLink
®
indicator light will
flash, first slowly and then rapidly.
When the indicator light begins to flash
rapidly, release both buttons.
The HomeLink
®
Universal Transceiver but-
ton has now been reprogrammed. The new
Instruments and controls
2-63
-------------------------------------------------------------------------------------------------------------------------------------------------------------
2-64
Instruments and controls
device can be activated by pushing the
HomeLink
®
button that was just pro-
grammed. This procedure will not affect
any other programmed HomeLink
®
but-
tons.
IF YOUR VEHICLE IS STOLEN
If your vehicle is stolen, you should change
the codes of any non-rolling code device
t h a t h a s
b e e n
p r o g r a m m e d i n t o
HomeLink
®
. Consult the Owner’s Manual
of each device or call the manufacturer or
retailer of those devices for additional
information.
When your vehicle is recovered, you will
need to reprogram the HomeLink
®
Uni-
versal Transceiver with your new transmit-
ter information.
FCC Notice:
For USA:
This device complies with Part 15 of the
FCC Rules. Operation is subject to the
following two conditions: (1) This device
may not cause harmful interference, and
(2) this device must accept any interfer-
ence received, including interference that
may cause undesired operation.
NOTE:
Changes or modifications not expressly
approved by the party responsible for
compliance could void the user’s authority
to operate the equipment.
For Canada:
This device complies with RSS-210 of
Industry Canada. Operation is subject to
the following two conditions: (1) this
device may not cause interference, and
(2) this device must accept any interfer-
ence, including interference that may
cause undesired operation of the device.
-------------------------------------------------------------------------------------------------------------------------------------------------------------
Нет комментариевНе стесняйтесь поделиться с нами вашим ценным мнением.
Текст