Infiniti G37 Coupe. Manual — part 831

CENTER CONSOLE ASSEMBLY
IP-25
< ON-VEHICLE REPAIR >
C
D
E
F
G
H
I
K
L
M
A
B
IP
N
O
P
• Remove clips from rear of console finisher (1), and then remove pawl of front.
• Pull console finisher (1) upward to disengage from center console.
• Disconnect harness connectors.
5.
Remove screws (B) of center console front side with screw
driver (A).
6.
Remove rear upper console assembly (A/T models only).
• Slide to front, pull up rear upper console assembly (1), and
disconnect metal clips.
• Disconnect heated seat switch harness connectors.
(with heated seat)
7.
Disconnect auxiliary input jacks connector (A) and power socket
harness connector (B) (A/T models only).
8.
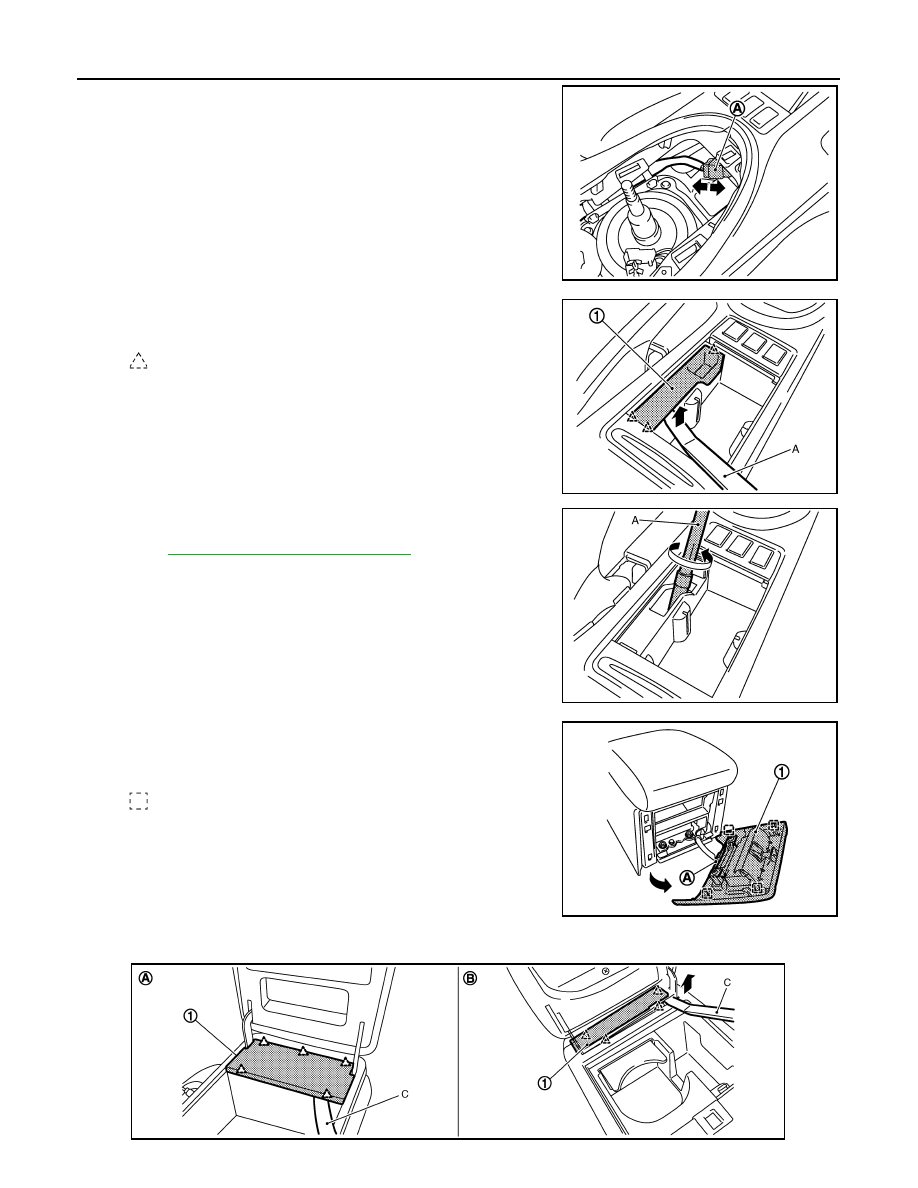
Disconnect console sub harness connectors (A) (M/T models
only).
: Pawl
: Metal clip
JMJIA0032GB
: Pawl
: Metal clip
JMJIA0033GB
JMJIA0065ZZ
JMJIA0038GB
IP-26
< ON-VEHICLE REPAIR >
CENTER CONSOLE ASSEMBLY
9.
Disconnect heated seat switch connector (A) (M/T models with
heated seat only).
10. Remove coin pocket fixing pawl using a remover tool (A), and
then remove coin pocket (1) (M/T models only).
11. Insert a deep-well socket wrench (A) to rotate adjusting nut to
loosen cable sufficiently (M/T models only).
Refer to
PB-8, "LEVER TYPE : Adjustment"
.
12. Remove console rear finisher.
• Pull back the console rear finisher (1).
• Disconnect inside key antenna connector (A).
13. Remove console mask.
JMJIA0286ZZ
: Pawl
JMJIA0034GB
JMJIA0035GB
: Metal clip
JMJIA0037GB
JMJIA0948ZZ

CENTER CONSOLE ASSEMBLY
IP-27
< ON-VEHICLE REPAIR >
C
D
E
F
G
H
I
K
L
M
A
B
IP
N
O
P
• Open the console lid.
• Pull up console mask (1) by using a remover tool (C), and disengage pawls.
14. Remove screws (C) of center console rear side, and then remove center console assembly (1).
INSTALLATION
Install in the reverse order of removal.
Disassembly and Assembly
INFOID:0000000001722824
DISASSEMBLY AND ASSEMBLY OF CENTER CONSOLE (A/T MODELS)
Disassembly
1.
Remove screws of console finisher assembly back side, and remove ashtray (front portion).
2.
Remove rear upper console assembly. Refer to
3.
Remove screws and remove cup holder assembly.
4.
Remove screws and remove console front bracket.
5.
Remove console mask. Refer to
.
6.
Remove console lid mounting screws and remove console lid.
7.
Remove metal clips and remove console rear finisher. Refer to
.
8.
Remove console ashtray.
9.
Remove screw and remove console ashtray bracket.
10. Remove console pocket from center console assembly.
11. Remove auxiliary input jacks and socket knob, cigarette lighter case.
Assembly
Assemble in the reverse order of disassembly.
DISASSEMBLY AND ASSEMBLY OF CENTER CONSOLE (M/T MODELS)
Disassembly
1.
Remove screws of console finisher assembly back side, and remove ashtray (front portion).
2.
Remove coin pocket. Refer to
3.
Remove console mask. Refer to
.
4.
Remove console lid mounting screws and remove console lid.
5.
Remove metal clips and remove console rear finisher. Refer to
.
6.
Remove console ashtray.
7.
Remove screw and remove console ashtray bracket.
8.
Remove screws and remove cup holder assembly.
(A)
Console mask (A/T models)
(B)
Console mask (M/T models)
: Pawl
(A)
Console mounting screws (A/T models)
(B)
Console mounting screws (M/T models)
JMJIA0949ZZ
IP-28
< ON-VEHICLE REPAIR >
CENTER CONSOLE ASSEMBLY
9.
Remove auxiliary input jacks and socket knob, cigarette lighter case.
10. Remove console sub harness.
Assembly
Assemble in the reverse order of disassembly.
Нет комментариевНе стесняйтесь поделиться с нами вашим ценным мнением.
Текст