2017 Infiniti QX60/JX (2017 year). Manual — part 32
Do not attach stickers (including transparent ma-
terial), install accessories or apply additional
paint near the sonar sensors.
Do not strike or damage the area around the
sonar sensors. It is recommended that you visit
an INFINITI retailer if the area around the sonar
sensors is damaged due to a collision.
FREEING A FROZEN DOOR LOCK
To prevent a door lock from freezing, apply de-
icer through the key hole. If the lock becomes
frozen, heat the key before inserting it into the key
hole, or use the INFINITI Intelligent Key.
ANTIFREEZE
In the winter when it is anticipated that the tem-
perature will drop below 32°F (0°C), check the
antifreeze to assure proper winter protection. For
additional information, refer to “Engine cooling
system” in the “Do-it-yourself” section of this
manual.
BATTERY
If the battery is not fully charged during extremely
cold weather conditions, the battery fluid may
freeze and damage the battery. To maintain maxi-
mum efficiency, the battery should be checked
regularly. For additional information, refer to “Bat-
tery” in the “Do-it-yourself” section of this manual.
DRAINING OF COOLANT WATER
If the vehicle is to be left outside without anti-
freeze, drain the cooling system, including the
engine block. Refill before operating the vehicle.
For additional information, refer to “Changing
engine coolant” in the “Do-it-yourself” section of
this manual.
TIRE EQUIPMENT
1. SUMMER tires have a tread designed to
provide superior performance on dry pave-
ment. However, the performance of these
tires will be substantially reduced in snowy
and icy conditions. If you operate your ve-
hicle on snowy or icy roads, INFINITI recom-
mends the use of MUD & SNOW or ALL
SEASON TIRES on all four wheels. It is
recommended that you visit an INFINITI re-
tailer for the tire type, size, speed rating and
availability information.
2. For additional traction on icy roads, studded
tires may be used. However, some U.S.
states and Canadian provinces prohibit their
use. Check local, state and provincial laws
before installing studded tires.
Skid and traction capabilities of studded
snow tires on wet or dry surfaces may be
poorer than that of non-studded snow tires.
3. Tire chains may be used. For additional in-
formation, refer to “Tire chains” in the “Do-it-
yourself” section of this manual.
COLD WEATHER DRIVING
5-142
Starting and driving
-------------------------------------------------------------------------------------------------------------------------------------------------------------

SPECIAL WINTER EQUIPMENT
It is recommended that the following items be
carried in the vehicle during winter:
● A scraper and stiff-bristled brush to remove
ice and snow from the windows and wiper
blades.
● A sturdy, flat board to be placed under the
jack to give it firm support.
● A shovel to dig the vehicle out of snowdrifts.
● Extra washer fluid to refill the windshield-
washer fluid reservoir.
DRIVING ON SNOW OR ICE
WARNING
● Wet ice (32°F, 0°C and freezing rain),
very cold snow or ice can be slick and
very hard to drive on. The vehicle will
have much less traction or “grip” under
these conditions. Try to avoid driving on
wet ice until the road is salted or
sanded.
● Whatever the condition, drive with cau-
tion. Accelerate and slow down with
care. If accelerating or downshifting too
fast, the drive wheels will lose even
more traction.
● Allow more stopping distance under
these conditions. Braking should be
started sooner than on dry pavement.
● Allow greater following distances on
slippery roads.
● Watch for slippery spots (glare ice).
These may appear on an otherwise
clear road in shaded areas. If a patch of
ice is seen ahead, brake before reach-
ing it. Try not to brake while on the ice,
and
avoid
any
sudden
steering
maneuvers.
● Do not use the cruise control on slip-
pery roads.
● Snow can trap dangerous exhaust
gases under your vehicle. Keep snow
clear of the exhaust pipe and from
around your vehicle.
ENGINE BLOCK HEATER (if so
equipped)
Engine block heaters are used to assist with cold
temperature starting.
The engine block heater should be used when
the outside temperature is 20°F (-7°C) or lower.
WARNING
● Do not use your engine block heater
with an ungrounded electrical system or
a 2-pronged adapter. You can be seri-
ously injured by an electrical shock if
you use an ungrounded connection.
● Disconnect and properly store the en-
gine block heater cord before starting
the engine. Damage to the cord could
result in an electrical shock and can
cause serious injury.
● Use a heavy-duty 3-wire, 3-pronged ex-
tension cord rated for at least 10 A. Plug
the extension cord into a Ground Fault
Interrupt
(GFI)
protected,
grounded
110-VAC outlet. Failure to use the
proper extension cord or a grounded
outlet can result in a fire or electrical
shock
and
cause
serious
personal
injury.
To use the engine block heater:
1. Turn the engine off.
2. Open the hood and unwrap the engine block
heater cord.
3. Plug the engine block heater cord into a
grounded
3-wire,
3-pronged
extension
cord.
Starting and driving
5-143
-------------------------------------------------------------------------------------------------------------------------------------------------------------
4. Plug the extension cord into a Ground Fault
Interrupt (GFI) protected, grounded 110-
volt AC (VAC) outlet.
5. The engine block heater must be plugged in
for at least 2 - 4 hours, depending on outside
temperatures, to properly warm the engine
coolant. Use an appropriate timer to turn the
engine block heater on.
6. Before starting the engine, unplug and prop-
erly store the cord to keep it away from
moving parts.
5-144
Starting and driving
-------------------------------------------------------------------------------------------------------------------------------------------------------------
6 In case of emergency
Hazard warning flasher switch . . . . . . . . . . . . . . . . . . . . . . 6-2
Roadside assistance program. . . . . . . . . . . . . . . . . . . . . . . 6-2
Emergency engine shut off . . . . . . . . . . . . . . . . . . . . . . . . . 6-3
Flat tire . . . . . . . . . . . . . . . . . . . . . . . . . . . . . . . . . . . . . . . . . . . 6-3
Tire Pressure Monitoring System (TPMS). . . . . . . . . . 6-3
Changing a flat tire . . . . . . . . . . . . . . . . . . . . . . . . . . . . . 6-4
Jump starting . . . . . . . . . . . . . . . . . . . . . . . . . . . . . . . . . . . . 6-10
Push starting. . . . . . . . . . . . . . . . . . . . . . . . . . . . . . . . . . . . . 6-12
If your vehicle overheats . . . . . . . . . . . . . . . . . . . . . . . . . . . 6-12
Towing your vehicle . . . . . . . . . . . . . . . . . . . . . . . . . . . . . . . 6-13
Towing recommended by INFINITI . . . . . . . . . . . . . . . 6-13
Vehicle recovery (freeing a stuck vehicle) . . . . . . . . . 6-15
-------------------------------------------------------------------------------------------------------------------------------------------------------------
Push the switch on to warn other drivers when
you must stop or park under emergency condi-
tions. All turn signal lights flash.
WARNING
● If stopping for an emergency, be sure to
move the vehicle well off the road.
● Do not use the hazard warning flashers
while moving on the highway unless
unusual circumstances force you to
drive so slowly that your vehicle might
become a hazard to other traffic.
● Turn signals do not work when the haz-
ard warning flasher lights are on.
The flashers will operate with the ignition switch
placed in any position.
Some jurisdictions may prohibit the use of
the hazard warning flasher switch while
driving.
In the event of a roadside emergency, roadside
assistance service is available to you. Please
refer to your Warranty Information Booklet (U.S.)
or the Warranty & Roadside Assistance Informa-
tion Booklet (Canada) for details.
LIC0394
HAZARD WARNING FLASHER
SWITCH
ROADSIDE ASSISTANCE PROGRAM
6-2
In case of emergency
-------------------------------------------------------------------------------------------------------------------------------------------------------------
To shut off the engine in an emergency situation
while driving, perform the following procedure:
– Rapidly push the push-button ignition switch
three consecutive times in less than 1.5 sec-
onds, or
– Push and hold the push-button ignition switch
for more than 2 seconds.
TIRE PRESSURE MONITORING
SYSTEM (TPMS)
This vehicle is equipped with TPMS. It monitors
tire pressure of all tires except the spare. When
the low tire pressure warning light is lit, and the
“Tire Pressure Low - Add Air” warning appears in
the vehicle information display, one or more of
your tires is significantly under-inflated. If
equipped, the system also displays pressure of
all tires (except the spare tire) on the display
screen by sending a signal from a sensor that is
installed in each wheel. If the vehicle is being
driven with low tire pressure, the TPMS will acti-
vate and warn you of it by the low tire pressure
warning light. This system will activate only when
the vehicle is driven at speeds above 16 mph
(25 km/h). For additional information, refer to
“Warning lights, indicator lights and audible re-
minders” in the “Instruments and controls” sec-
tion and the “Tire Pressure Monitoring System
(TPMS)” in the “Starting and driving” sections of
this manual.
WARNING
● Radio waves could adversely affect
electric medical equipment. Those who
use a pacemaker should contact the
electric medical equipment manufac-
turer for the possible influences before
use.
● If the low tire pressure warning light
illuminates while driving, avoid sudden
steering maneuvers or abrupt braking,
reduce vehicle speed, pull off the road
to a safe location and stop the vehicle
as soon as possible. Driving with under-
inflated tires may permanently damage
the tires and increase the likelihood of
tire failure. Serious vehicle damage
could occur and may lead to an accident
and could result in serious personal in-
jury. Check the tire pressure for all four
tires. Adjust the tire pressure to the
recommended
COLD
tire
pressure
shown on the Tire and Loading Informa-
tion label to turn the low tire pressure
warning light OFF. If you have a flat tire,
replace it with a spare tire as soon as
possible.
EMERGENCY ENGINE SHUT OFF
FLAT TIRE
In case of emergency
6-3
-------------------------------------------------------------------------------------------------------------------------------------------------------------
● Since the spare tire is not equipped with
the TPMS, when a spare tire is mounted
or a wheel is replaced, tire pressure will
not be indicated, the TPMS will not
function and the low tire pressure warn-
ing light will flash for approximately
1 minute. The light will remain on after
1 minute. Have your tires replaced
and/or TPMS system reset as soon as
possible. It is recommended that you
visit an INFINITI retailer for these
services.
● Replacing tires with those not originally
specified by INFINITI could affect the
proper operation of the TPMS.
● Do not inject any tire liquid or aerosol
tire sealant into the tires, as this may
cause a malfunction of the tire pressure
sensors.
CHANGING A FLAT TIRE
If you have a flat tire, follow the instructions be-
low:
Stopping the vehicle
1. Safely move the vehicle off the road and
away from traffic.
2. Turn on the hazard warning flashers.
3. Park on a level surface and apply the parking
brake. Move the shift lever to P (Park).
4. Turn off the engine.
5. Raise the hood to warn other traffic and to
signal professional road assistance person-
nel that you need assistance.
6. Have all passengers get out of the vehicle
and stand in a safe place, away from traffic
and clear of the vehicle.
WARNING
● Make sure the parking brake is securely
applied and the CVT is shifted into P
(Park).
● Never change tires when the vehicle is
on a slope, ice or slippery areas. This is
hazardous.
● Never change tires if oncoming traffic is
close to your vehicle. Wait for profes-
sional road assistance.
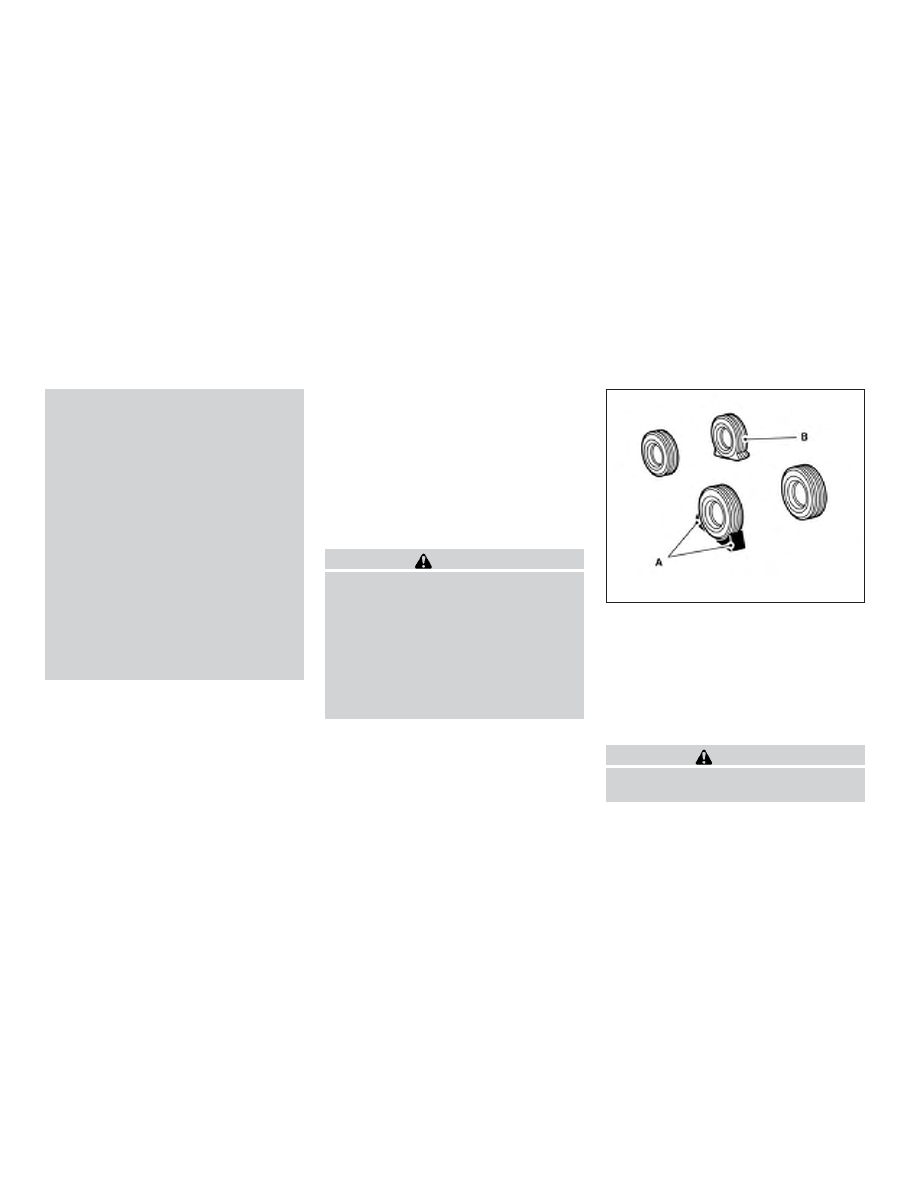
A.
Blocks
B.
Flat tire
Blocking wheels
Place suitable blocks at both the front and back
of the wheel diagonally opposite the flat tire to
prevent the vehicle from moving when it is jacked
up.
WARNING
Be sure to block the wheel as the vehicle
may move and result in personal injury.
LCE2142
6-4
In case of emergency
-------------------------------------------------------------------------------------------------------------------------------------------------------------
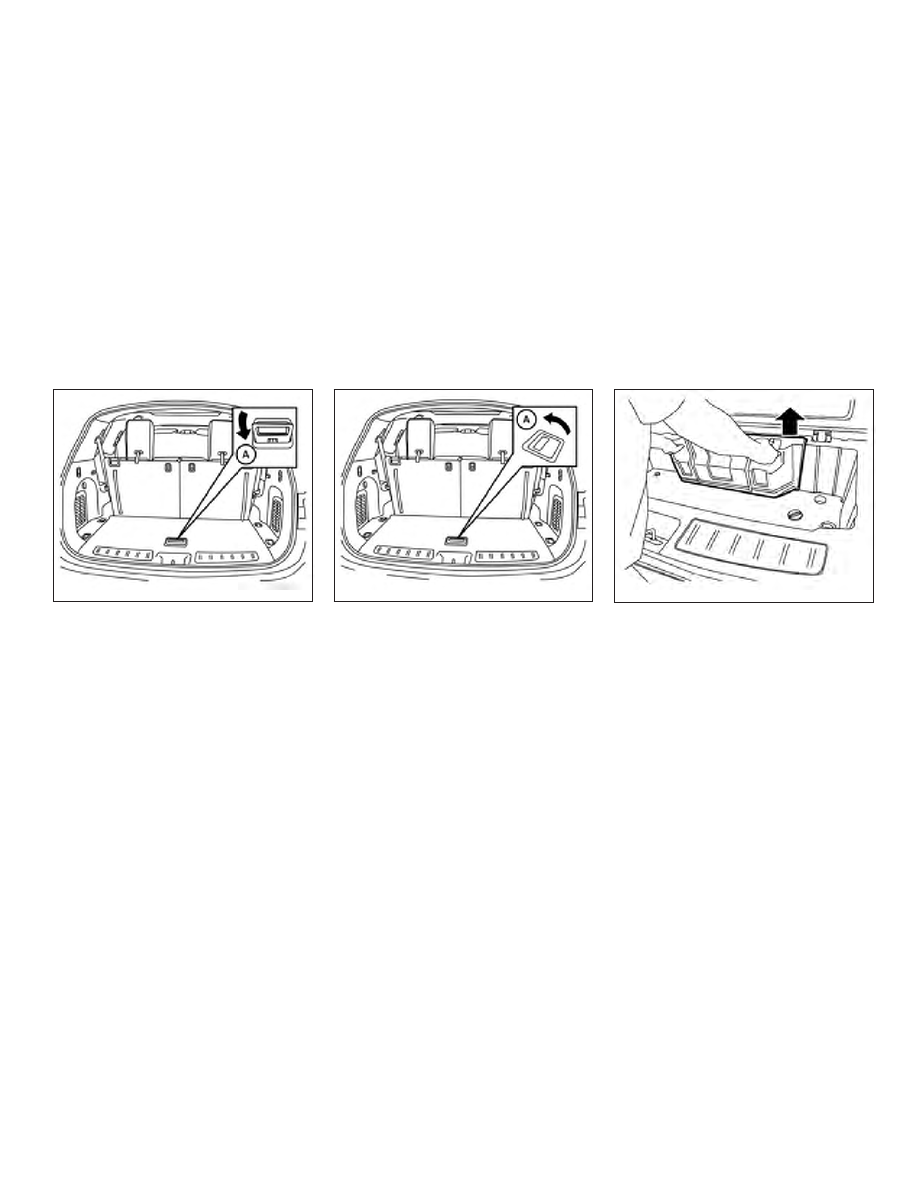
Getting the spare tire and tools
1. Open the liftgate and lift the luggage board
in the cargo area using the handle
䊊
A
.
2. Remove the jack and tool kit cover by lifting
up using the handles.
Type A (if so equipped)
LCE2285
Type B (if so equipped)
LCE2269
LCE2036
In case of emergency
6-5
-------------------------------------------------------------------------------------------------------------------------------------------------------------
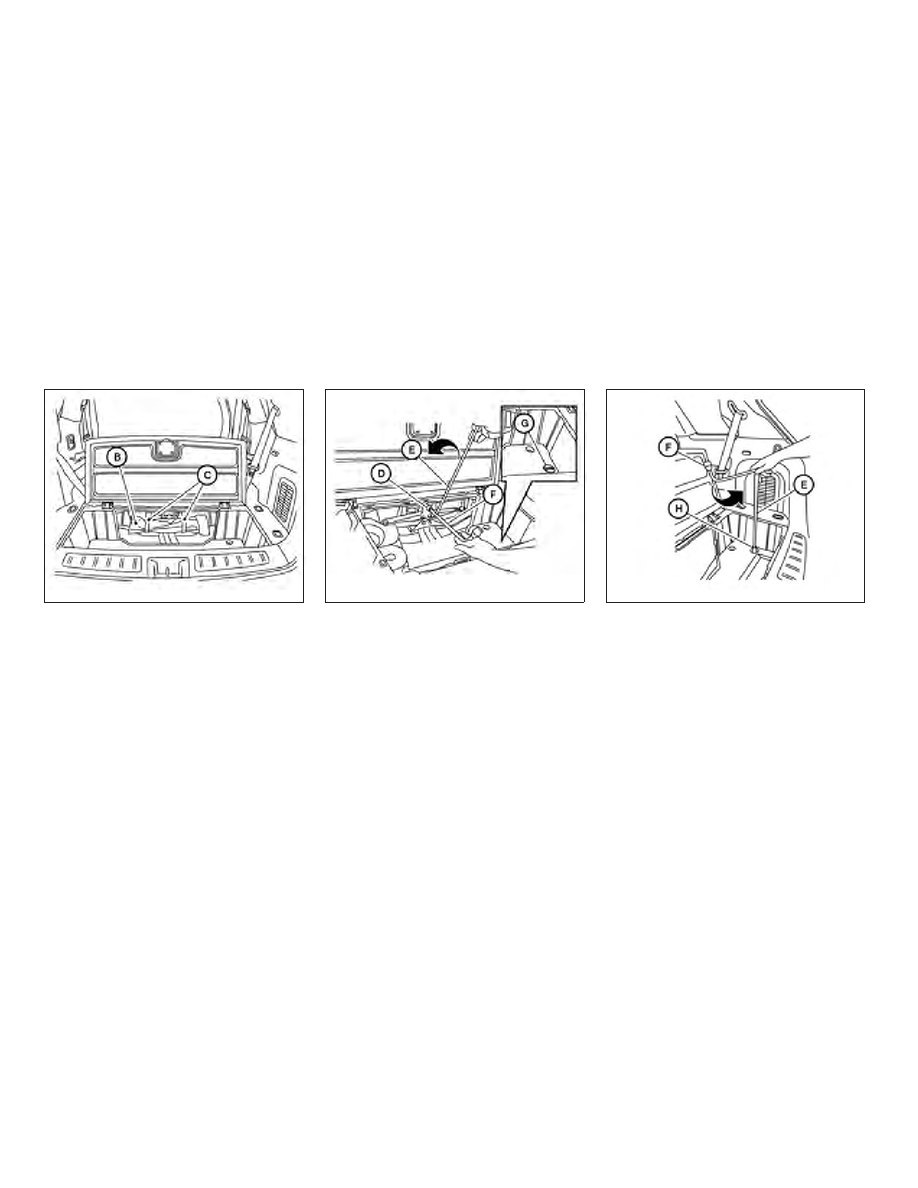
3. Remove the tool kit
䊊
B
.
● To release the tool kit, release the hook
and eye straps
䊊
C
.
4. Remove the jack.
● The jack is secured by a fastener
䊊
D
. To
release the fastener, assemble the exten-
sion
䊊
E
into the wheel nut wrench
䊊
F
as
illustrated and rotate counterclockwise to
release.
● Insert the flat end of the wheel nut wrench
䊊
F
into the slot of the fastener
䊊
D
, and
rotate counterclockwise to release the
jack.
5. The lowering mechanism for the spare tire is
located on the passenger side of the cargo
area. Remove the cover
䊊
G
to access the
spare tire winch.
6. Insert the spare tire winch socket
䊊
H
to the
lowering mechanism nut.
7. To lower the spare tire, insert the wheel nut
wrench
䊊
F
to the extension
䊊
E
and insert
the T-shaped end to the winch socket
䊊
H
and rotate counterclockwise.
8. After removing the spare tire from under the
vehicle, be sure to crank the cable up to
stow it.
NOTE:
Fully lower the spare tire below the vehicle
before attempting to remove the winch
from the spare tire.
LCE2037
LCE2038
LCE2169
6-6
In case of emergency
-------------------------------------------------------------------------------------------------------------------------------------------------------------

9. Securely store the flat tire, tools and jacking
equipment in the vehicle.
CAUTION
● Make sure safety cable is coiled above
spare
tire
when
reinstalling
spare
tire/wheel.
● When re-installing the spare tire under
the vehicle after use, be sure to secure it
with the tire stem facing down toward
the ground. If the spare tire is improp-
erly secured with the tire stem facing up
towards the bottom of the vehicle, there
is an increased risk of separating from
the vehicle in the event of a crash which
may pose a hazard in traffic or risk of
injury to others.
Jacking up vehicle and removing the
damaged tire
WARNING
● Never get under the vehicle while it is
supported only by the jack. If it is nec-
essary to work under the vehicle, sup-
port it with safety stands.
● Use only the jack provided with your
vehicle to lift the vehicle. Do not use the
jack provided with your vehicle on other
vehicles. The jack is designed for lifting
only your vehicle during a tire change.
● Use the correct jack-up points. Never
use any other part of the vehicle for jack
support.
● Never jack up the vehicle more than
necessary.
● Never use blocks on or under the jack.
● Do not start or run the engine while
vehicle is on the jack. It may cause the
vehicle to move. This is especially true
for
vehicles
with
limited
slip
differentials.
● Do not allow passengers to stay in the
vehicle while it is on the jack.
● Never run the engine with a wheel(s) off
the ground. It may cause the vehicle to
move.
Always refer to the illustration for the correct
placement and jack-up points for your specific
vehicle model and jack type.
Carefully read the caution label attached to
the jack body and the following instruc-
tions.
In case of emergency
6-7
-------------------------------------------------------------------------------------------------------------------------------------------------------------
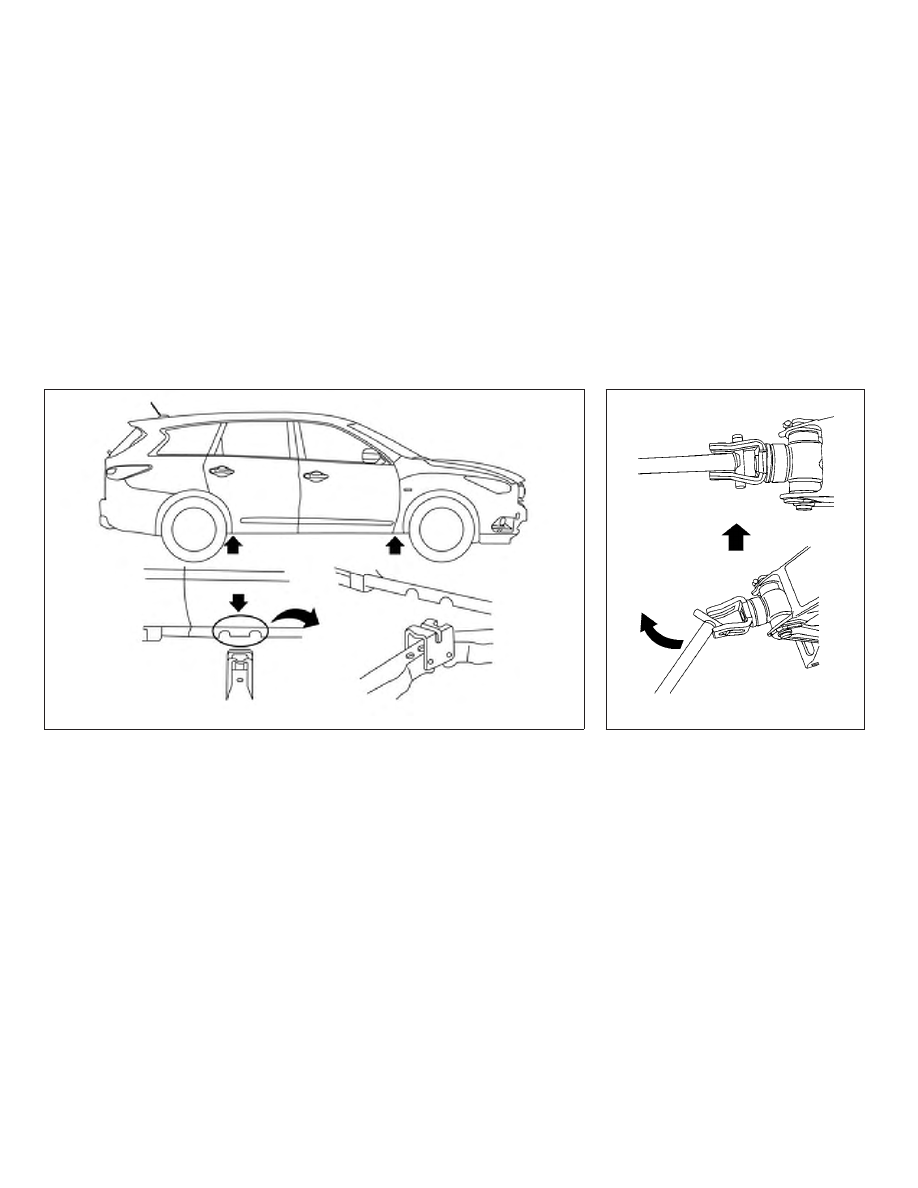
1. Loosen each wheel nut one or two turns by
turning counterclockwise with the wheel nut
wrench. Do not remove the wheel nuts
until the tire is off the ground.
2. Place the jack directly under the jack-up
point as illustrated so the top of the jack
contacts the vehicle at the jack-up point. The
jack-up points are indicated by stamped ar-
rows on the side of the frame.
The jack should be used on firm and
level ground.
3. Install the assembled jack rod into the jack
as shown.
4. To lift the vehicle, securely hold the jack lever
and rod. Carefully raise the vehicle until the
tire clears the ground.
LCE2040
LCE0087
6-8
In case of emergency
-------------------------------------------------------------------------------------------------------------------------------------------------------------
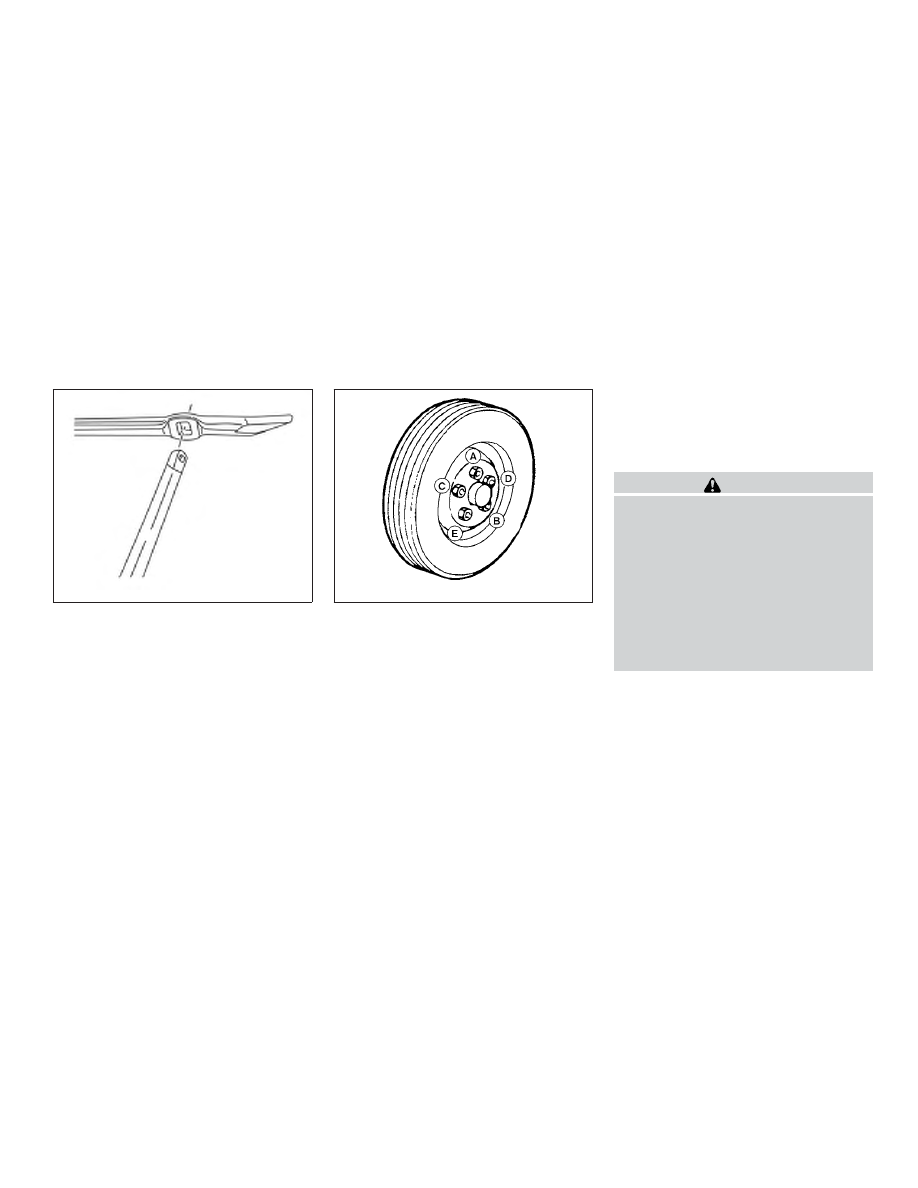
NOTE:
If the lug nut wrench/jack handle contacts
the ground while raising the vehicle, disas-
semble the lug nut wrench from the jack
extension rod, rotate it 90 degrees and re-
assemble.
5. Remove the wheel nuts and then remove the
tire.
Installing the spare tire
The spare tire is designed for emergency
use. For additional information, refer to
“Wheels and tires” in the “Do-it-yourself”
section of this manual.
1. Clean any mud or dirt from the surface be-
tween the wheel and hub.
2. Carefully put the spare tire on and tighten
the wheel nuts finger tight.
3. With the wheel nut wrench, tighten wheel
nuts alternately and evenly in the sequence
illustrated (
䊊
A
,
䊊
B
,
䊊
C
,
䊊
D
,
䊊
E
) until they are
tight.
4. Lower the vehicle slowly until the tire
touches the ground. Then, with the wheel
nut wrench, tighten the wheel nuts securely
in the sequence illustrated (
䊊
A
,
䊊
B
,
䊊
C
,
䊊
D
,
䊊
E
). Lower the vehicle completely.
WARNING
● Incorrect wheel nuts or improperly
tightened wheel nuts can cause the
wheel to become loose or come off.
This could cause an accident.
● Do not use oil or grease on the wheel
studs or nuts. This could cause the nuts
to become loose.
● Retighten the wheel nuts when the ve-
hicle has been driven for 621 miles
(1,000 km) (also in cases of a flat tire,
etc.).
As soon as possible, tighten the wheel nuts
to the specified torque with a torque
wrench.
Wheel nut tightening torque:
83 ft-lb (113 N·m)
The wheel nuts must be kept tightened to
specification at all times. It is recom-
mended that wheel nuts be tightened to
specifications at each lubrication interval.
LCE2043
WCE0056
In case of emergency
6-9
-------------------------------------------------------------------------------------------------------------------------------------------------------------

Adjust tire pressure to the COLD pressure.
COLD pressure: After vehicle has been
parked for 3 hours or more or driven less
than 1 mile (1.6 km).
COLD tire pressures are shown on the tire
and loading information label affixed to the
driver side center pillar.
5. Securely store the flat tire, tools and jacking
equipment in the vehicle.
6. Close the liftgate.
WARNING
● Always make sure that the spare tire
and jacking equipment are properly se-
cured after use. Such items can become
dangerous projectiles in an accident or
sudden stop.
● The spare tire is designed for emer-
gency use. For additional information,
refer to “Wheels and tires” in the “Do-
it-yourself” section of this manual.
To start your engine with a booster battery, the
instructions and precautions below must be fol-
lowed.
WARNING
● If done incorrectly, jump starting can
lead to a battery explosion, resulting in
severe injury or death. It could also
damage your vehicle.
● Explosive hydrogen gas is always pres-
ent in the vicinity of the battery. Keep all
sparks and flames away from the
battery.
● Do not allow battery fluid to come into
contact with eyes, skin, clothing or
painted surfaces. Battery fluid is a cor-
rosive sulfuric acid solution which can
cause severe burns. If the fluid should
come into contact with anything, imme-
diately flush the contacted area with
water.
● Keep battery out of the reach of
children.
● The booster battery must be rated at
12 volts. Use of an improperly rated
battery can damage your vehicle.
● Whenever working on or near a battery,
always wear suitable eye protectors (for
example, goggles or industrial safety
spectacles) and remove rings, metal
bands, or any other jewelry. Do not lean
over the battery when jump starting.
● Do not attempt to jump start a frozen
battery. It could explode and cause se-
rious injury.
● Your vehicle has an automatic engine
cooling fan. It could come on at any
time. Keep hands and other objects
away from it.
JUMP STARTING
6-10
In case of emergency
-------------------------------------------------------------------------------------------------------------------------------------------------------------
WARNING
Always follow the instructions below. Fail-
ure to do so could result in damage to the
charging
system
and
cause
personal
injury.
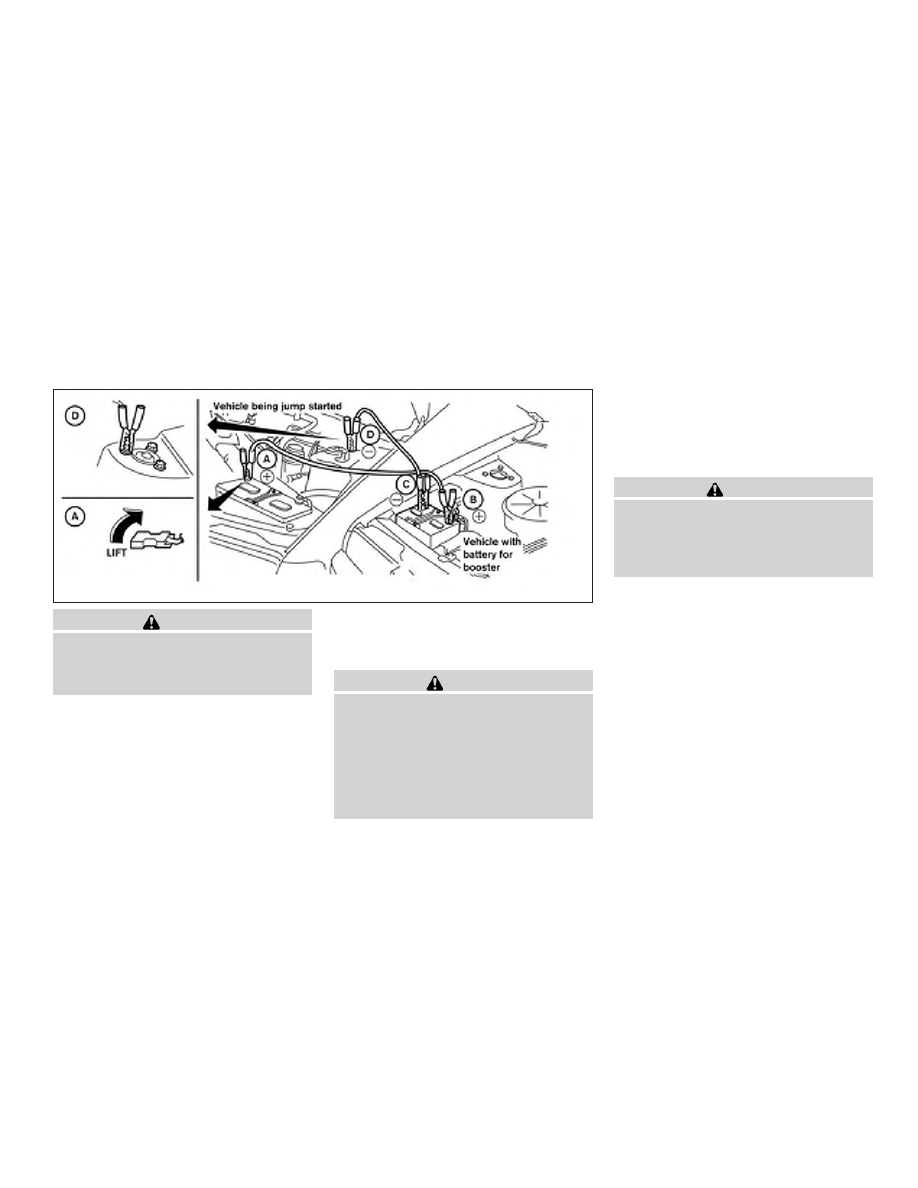
1. If the booster battery is in another vehicle,
position the two vehicles to bring their bat-
teries near each other.
Do not allow the two vehicles to touch.
2. Apply the parking brake. Move the shift lever
to P (Park). Switch off all unnecessary elec-
trical systems (lights, heater, air conditioner,
etc.).
3. Ensure the vent caps are level and tight.
4. Connect the jumper cables in the sequence
illustrated (
䊊
A
,
䊊
B
,
䊊
C
,
䊊
D
).
CAUTION
● Always connect positive (⫹) to positive
(
⫹) and negative (⫺) to body ground (for
example, strut mounting bolt, engine
lift bracket, etc.) — not to the battery.
● Make sure the jumper cables do not
touch moving parts in the engine com-
partment and that the cable clamps do
not contact any other metal.
5. Start the engine of the booster vehicle and
let it run for a few minutes.
6. Keep the engine speed of the booster ve-
hicle at about 2,000 rpm and start the en-
gine of the vehicle being jump started.
CAUTION
Do not keep the starter motor engaged for
more than 10 seconds. If the engine does
not start right away, place the ignition
switch in the OFF position and wait 3 to
4 seconds before trying again.
7. After starting the engine, carefully discon-
nect the negative cable and then the positive
cable.
LCE2223
In case of emergency
6-11
-------------------------------------------------------------------------------------------------------------------------------------------------------------

CAUTION
● CVT models cannot be push-started or
tow-started. Attempting to do so may
cause transmission damage.
● Do not push start this vehicle. The
three-way catalyst may be damaged.
WARNING
● Do not continue to drive if your vehicle
overheats. Doing so could cause engine
damage or a vehicle fire.
● To avoid the danger of being scalded,
never remove the radiator or coolant
reservoir cap while the engine is still
hot. When the radiator or coolant reser-
voir cap is removed, pressurized hot
water will spurt out, possibly causing
serious injury.
● Do not open the hood if steam is com-
ing out.
If your vehicle is overheating (indicated by an
extremely high temperature gauge reading and
the illumination of the engine oil pressure mes-
sage), or if you feel a lack of engine power, detect
abnormal noise, etc. take the following steps.
1. Move the vehicle safely off the road, apply
the parking brake and move the shift lever to
P (Park).
Do not stop the engine.
2. Turn off the air conditioner. Open all the
windows, move the heater or air conditioner
temperature control to maximum hot and fan
control to high speed.
3. Get out of the vehicle. Look and listen for
steam or coolant escaping from the radiator
before opening the hood. (If steam or cool-
ant is escaping, turn off the engine.) Do not
open the hood further until no steam or
coolant can be seen.
4. Open the engine hood.
WARNING
If steam or water is coming from the en-
gine,
stand
clear
to
prevent
getting
burned.
5. Visually check drive belts for damage or
looseness. Also check if the cooling fan is
running. The radiator hoses and radiator
should not leak water. If coolant is leaking,
the water pump belt is missing or loose, or
the cooling fan does not run, stop the en-
gine.
WARNING
Be careful not to allow your hands, hair,
jewelry or clothing to come into contact
with, or get caught in, engine belts or the
engine cooling fan. The engine cooling fan
can start at any time.
PUSH STARTING
IF YOUR VEHICLE OVERHEATS
6-12
In case of emergency
-------------------------------------------------------------------------------------------------------------------------------------------------------------

6. After the engine cools down, check the cool-
ant level in the engine coolant reservoir tank
with the engine running. Add coolant to the
engine coolant reservoir tank if necessary.
Have your vehicle repaired. It is recom-
mended that you visit an INFINITI retailer for
this service.
When towing your vehicle, all jurisdictions and
local regulations for towing must be followed.
Incorrect towing equipment could damage your
vehicle. Towing instructions are available from an
INFINITI retailer. Local service operators are gen-
erally familiar with the applicable laws and proce-
dures for towing. To assure proper towing and to
prevent accidental damage to your vehicle,
INFINITI recommends having a service operator
tow your vehicle. It is advisable to have the ser-
vice operator carefully read the following precau-
tions:
WARNING
● Never ride in a vehicle that is being
towed.
● Never get under your vehicle after it has
been lifted by a tow truck.
CAUTION
● When towing, make sure that the trans-
mission, axles, steering system and
powertrain are in working condition. If
any of these conditions apply, dollies or
a flatbed tow truck must be used.
● Always attach safety chains before
towing.
For additional information about towing your ve-
hicle behind a Recreational Vehicle (RV), refer to
“Flat towing” in the “Technical and consumer
information” section of this manual.
TOWING RECOMMENDED BY
INFINITI
INFINITI recommends towing your vehicle based
upon the type of drivetrain. Please refer to the
diagrams in this section to ensure that your ve-
hicle is properly towed.
TOWING YOUR VEHICLE
In case of emergency
6-13
-------------------------------------------------------------------------------------------------------------------------------------------------------------
Нет комментариевНе стесняйтесь поделиться с нами вашим ценным мнением.
Текст