Infiniti M35/M45 Y50. Manual — part 657
DTC P0442 EVAP CONTROL SYSTEM
EC-1101
[VK45DE]
C
D
E
F
G
H
I
J
K
L
M
A
EC
CAUTION:
●
Use only a genuine NISSAN fuel filler cap as a replacement. If an incorrect fuel filler cap is used,
the MIL may come on.
●
If the fuel filler cap is not tightened properly, the MIL may come on.
●
Use only a genuine NISSAN rubber tube as a replacement.
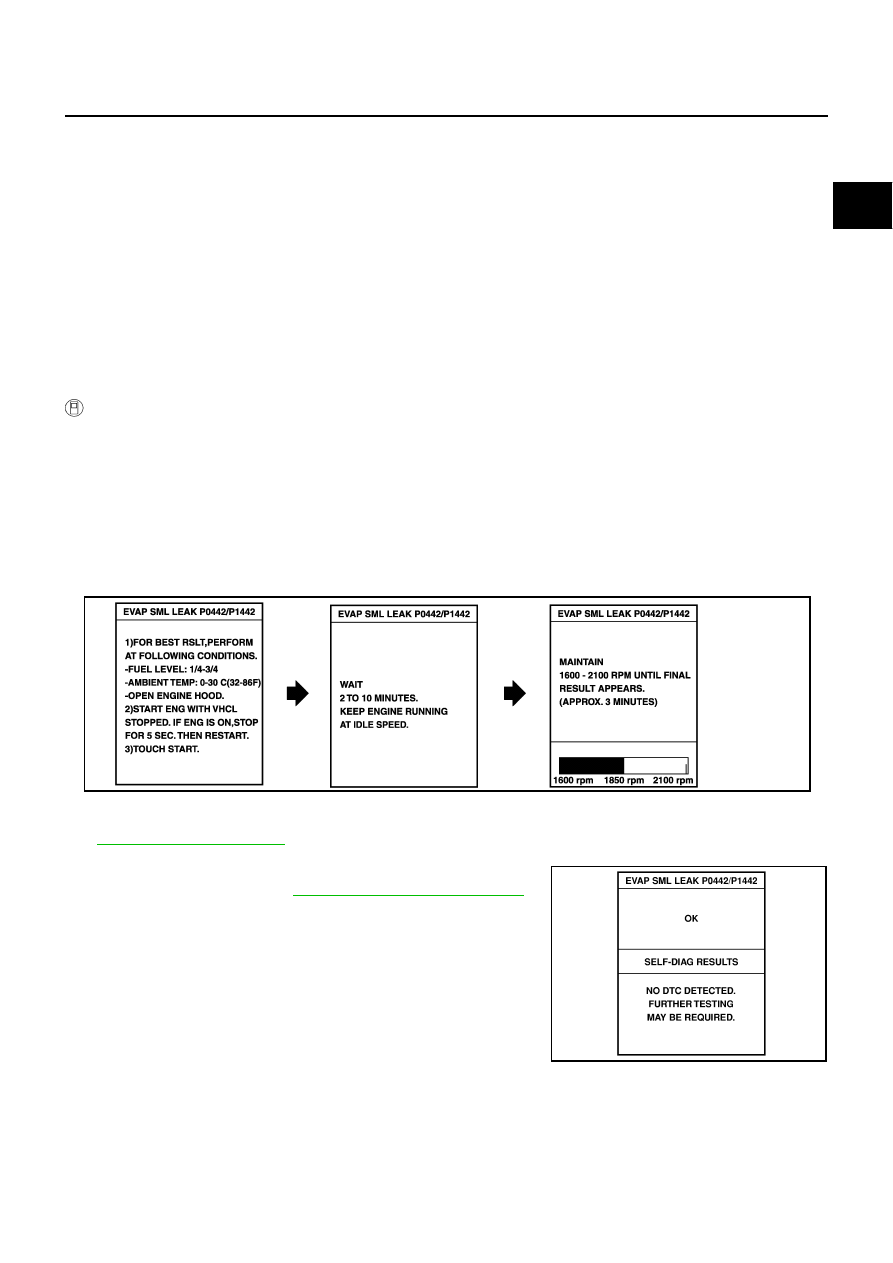
DTC Confirmation Procedure
NBS005H2
NOTE:
●
If DTC Confirmation Procedure has been previously conducted, always turn ignition switch OFF and wait
at least 10 seconds before conducting the next test.
TESTING CONDITION:
●
Perform “DTC WORK SUPPORT” when the fuel level is between 1/4 and 3/4 full, and vehicle is
placed on flat level surface.
●
Always perform test at a temperature of 0 to 30
°
C (32 to 86
°
F).
WITH CONSULT-II
1.
Turn ignition switch ON.
2.
Turn ignition switch OFF and wait at least 10 seconds.
3.
Turn ignition switch ON and select “DATA MONITOR” mode with CONSULT-II.
4.
Make sure that the following conditions are met.
COOLAN TEMP/S: 0 - 70
°
C (32 - 158
°
F)
INT/A TEMP SE: 0 - 30
°
C (32 - 86
°
F)
5.
Select “EVAP SML LEAK P0442/P1442” of “EVAPORATIVE SYSTEM” in “DTC WORK SUPPORT” mode
with CONSULT-II.
Follow the instruction displayed.
NOTE:
If the engine speed cannot be maintained within the range displayed on the CONSULT-II screen, go to
6.
Make sure that “OK” is displayed.
If “NG” is displayed, refer to
EC-1102, "Diagnostic Procedure"
.
NOTE:
Make sure that EVAP hoses are connected to EVAP canister
purge volume control solenoid valve properly.
PBIB0829E
SEC763C
EC-1102
[VK45DE]
DTC P0442 EVAP CONTROL SYSTEM
WITH GST
NOTE:
Be sure to read the explanation of
before driving vehicle.
1.
Start engine.
2.
Drive vehicle according to
.
3.
Stop vehicle.
4.
Turn ignition switch OFF, wait at least 10 seconds and then turn ON.
5.
Select Service $07 with GST.
●
If P0442 is displayed on the screen, go to
EC-1102, "Diagnostic Procedure"
●
If P0441 is displayed on the screen, go to
EC-1097, "Diagnostic Procedure"
.
Diagnostic Procedure
NBS005H3
1.
CHECK FUEL FILLER CAP DESIGN
1.
Turn ignition switch OFF.
2.
Check for genuine NISSAN fuel filler cap design.
OK or NG
OK
>> GO TO 2.
NG
>> Replace with genuine NISSAN fuel filler cap.
2.
CHECK FUEL FILLER CAP INSTALLATION
Check that the cap is tightened properly by rotating the cap clockwise.
OK or NG
OK
>> GO TO 3.
NG
>> 1. Open fuel filler cap, then clean cap and fuel filler neck threads using air blower.
2. Retighten until ratcheting sound is heard.
3.
CHECK FUEL FILLER CAP FUNCTION
Check for air releasing sound while opening the fuel filler cap.
OK or NG
OK
>> GO TO 5.
NG
>> GO TO 4.
4.
CHECK FUEL TANK VACUUM RELIEF VALVE
Refer to
EC-744, "FUEL TANK VACUUM RELIEF VALVE (BUILT INTO FUEL FULLER CAP)"
OK or NG
OK
>> GO TO 5.
NG
>> Replace fuel filler cap with a genuine one.
SEF915U
DTC P0442 EVAP CONTROL SYSTEM
EC-1103
[VK45DE]
C
D
E
F
G
H
I
J
K
L
M
A
EC
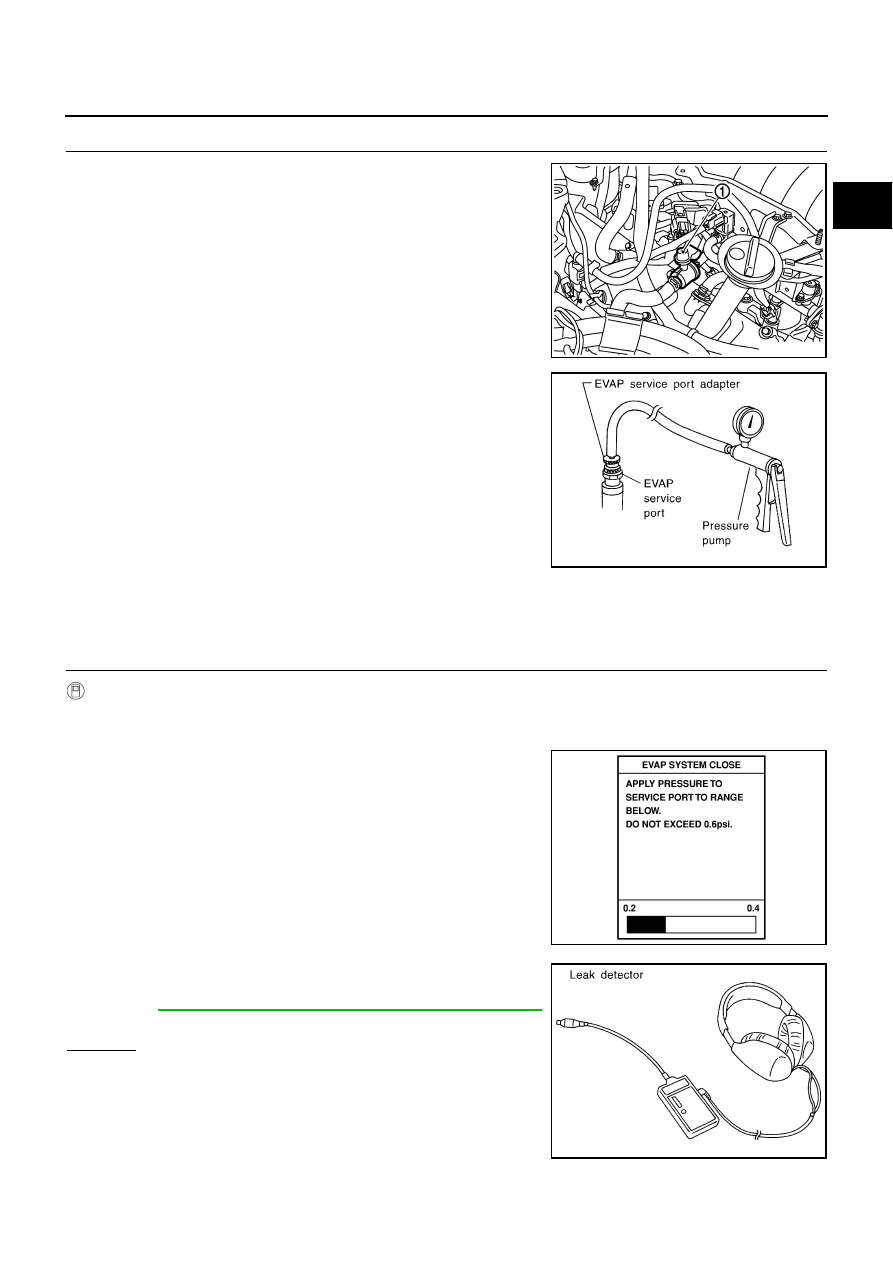
5.
INSTALL THE PRESSURE PUMP
To locate the EVAP leak, install EVAP service port adapter and pres-
sure pump to EVAP service port (1) securely.
NOTE:
Improper installation of the EVAP service port adapter to the
EVAP service port may cause leaking.
With CONSULT-II>>GO TO 6.
Without CONSULT-II>>GO TO 7.
6.
CHECK FOR EVAP LEAK
With CONSULT-II
1.
Turn ignition switch ON.
2.
Select “EVAP SYSTEM CLOSE” of “WORK SUPPORT” mode with CONSULT-II.
3.
Touch “START” and apply pressure into the EVAP line until the
pressure indicator reaches the middle of the bar graph.
CAUTION:
●
Never use compressed air or a high pressure pump.
●
Do not exceed 4.12 kPa (0.042 kg/cm
2
, 0.6 psi) of pres-
sure in the system.
4.
Using EVAP leak detector, locate the EVAP leak. For the leak
detector, refer to the instruction manual for more details.
Refer to
EC-742, "EVAPORATIVE EMISSION LINE DRAWING"
.
OK or NG
OK
>> GO TO 8.
NG
>> Repair or replace.
PBIB2689E
SEF916U
PEF917U
SEF200U
EC-1104
[VK45DE]
DTC P0442 EVAP CONTROL SYSTEM
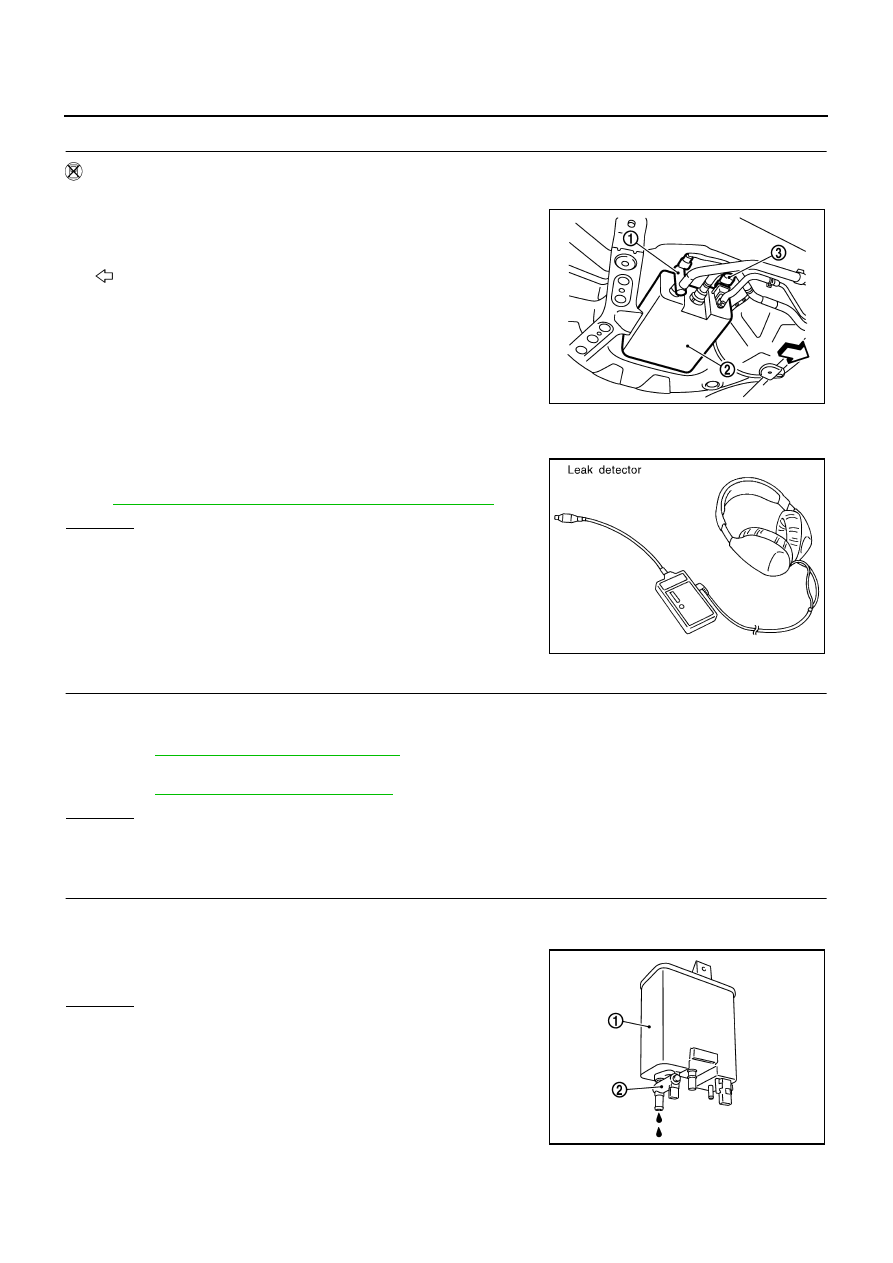
7.
CHECK FOR EVAP LEAK
Without CONSULT-II
1.
Turn ignition switch OFF.
2.
Apply 12 volts DC to EVAP canister vent control valve (1). The
valve will close. (Continue to apply 12 volts until the end of test.)
–
Illustration shows the view from under the vehicle
–
: Vehicle front
–
EVAP canister (2)
–
EVAP control system pressure sensor (3)
3.
Pressurize the EVAP line using pressure pump with 1.3 to 2.7
kPa (10 to 20 mmHg, 0.39 to 0.79 inHg), then remove pump and
EVAP service port adapter.
CAUTION:
●
Never use compressed air or a high pressure pump.
●
Do not exceed 4.12 kPa (0.042 kg/cm
2
, 0.6 psi) of pressure in the system.
4.
Using EVAP leak detector, locate the EVAP leak. For the leak
detector, refer to the instruction manual for more details. Refer
to
EC-742, "EVAPORATIVE EMISSION LINE DRAWING"
OK or NG
OK
>> GO TO 8.
NG
>> Repair or replace.
8.
CHECK EVAP CANISTER VENT CONTROL VALVE
Check the following.
●
EVAP canister vent control valve is installed properly.
Refer to
EC-745, "Removal and Installation"
●
EVAP canister vent control valve.
Refer to
EC-1128, "Component Inspection"
.
OK or NG
OK
>> GO TO 9.
NG
>> Repair or replace EVAP canister vent control valve and O-ring.
9.
CHECK IF EVAP CANISTER SATURATED WITH WATER
1.
Remove EVAP canister with EVAP canister vent control valve and EVAP control system pressure sensor
attached.
2.
Does water drain from the EVAP canister (1)?
–
EVAP canister vent control valve (2)
Yes or No
Yes
>> GO TO 10.
No (With CONSULT-II)>>GO TO 12.
No (Without CONSULT-II)>>GO TO 13.
PBIB2702E
SEF200U
PBIB2731E
Нет комментариевНе стесняйтесь поделиться с нами вашим ценным мнением.
Текст