Infiniti M35/M45 Y50. Manual — part 1160
FRONT WIPER AND WASHER SYSTEM
WW-45
C
D
E
F
G
H
I
J
L
M
A
B
WW
DISASSEMBLY
1.
Remove wiper linkage from wiper motor and motor frame.
2.
Remove wiper motor mounting bolts, and remove wiper motor from wiper frame.
CAUTION:
Be careful not to bend linkage and not to damage the resin part of ball joint when removing wiper link-
age.
ASSEMBLY
1.
Connect wiper motor connector. Turn wiper switch ON to operate wiper motor, and then turn wiper switch
OFF (auto stop).
2.
Disconnect wiper motor connector.
3.
Install wiper motor to wiper frame.
4.
Install wiper linkage to wiper frame and wiper motor.
CAUTION:
●
Never drop the wiper motor or cause it to contact other parts.
●
Check grease conditions of the motor arm and wiper linkage joint (at retainer). Apply grease if
necessary.
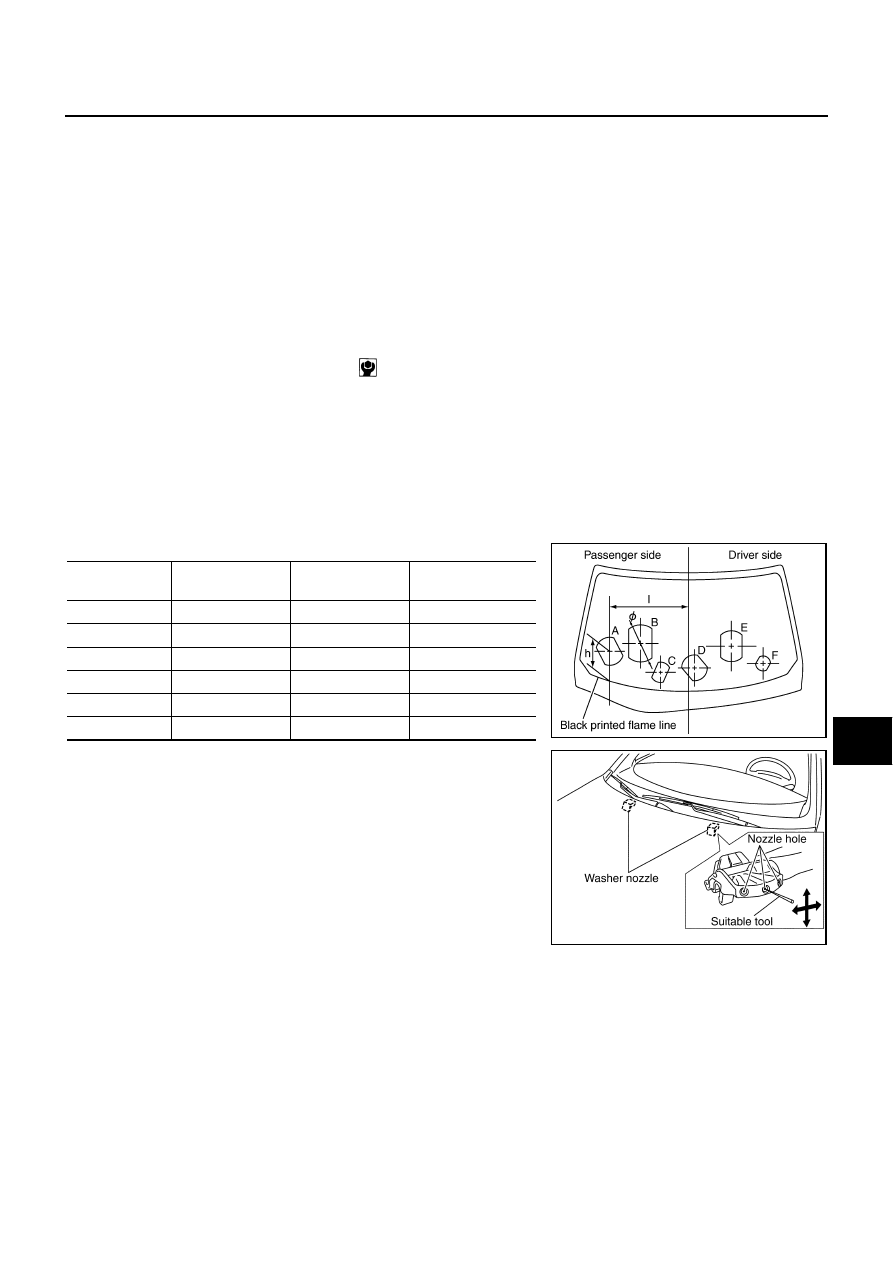
Washer Nozzle Adjustment
NKS004HP
Adjust spray positions to match the positions shown in the figure.
Unit: mm (in)
Insert a needle or suitable tool into the nozzle hole and move up/
down and left/right to adjust the spray position.
Wiper motor mounting bolts
: 4.5 N·m (0.46 kg-m, 40 in-lb)
Spray position
h (height)
l (width)
φ
(Diameter)
(spray point area)
A
193.9 (7.63)
514.2 (20.24)
180 (7.09)
B
288.7 (11.37)
307.5 (12.11)
240 (9.45)
C
119.7 (4.71)
175.6 (6.91)
130 (5.12)
D
158.0 (6.22)
42.7 (1.68)
165 (6.50)
E
279.0 (10.98)
280.3 (11.04)
200 (7.87)
F
127.6 (5.02)
488.4 (19.23)
95 (3.74)
PKID0429E
SKIB4250E

WW-46
FRONT WIPER AND WASHER SYSTEM
Washer Tube Layout
NKS003X2
Removal and Installation of Front Washer Nozzle
NKS003X3
REMOVAL
1.
Open hood, and turn off the washer hose seal rubber.
2.
While pushing nozzle spray point side along body, use the noz-
zle stop point as the support point and rotate nozzle (1) to
remove it from body.
3.
Remove washer tube (2).
INSTALLATION
1.
Install washer tube in nozzle.
2.
Install nozzle to the vehicle.
3.
Adjust nozzle spray location. Refer to
WW-45, "Washer Nozzle Adjustment"
CAUTION:
The spray points differ, so be sure to install left and right nozzles correctly.
SKIB4253E
SKIB4255E

FRONT WIPER AND WASHER SYSTEM
WW-47
C
D
E
F
G
H
I
J
L
M
A
B
WW
Inspection for Washer Nozzle
NKS003X4
CHECK VALVE INSPECTION
Blow air in the injection direction, and make sure that air flows only
one way. Make sure that the reverse direction (inhale) is not possi-
ble.
Inspection of Front Wiper and Washer Switch Circuit
NKS003X5
Refer to
LT-239, "Combination Switch Inspection"
Removal and Installation of Front Wiper and Washer Switch
NKS003X6
REMOVAL
1.
Remove steering column cover. Refer to
IP-10, "INSTRUMENT PANEL ASSEMBLY"
.
2.
Disconnect the wiper and washer switch connector.
3.
Pull wiper and washer switch (1) toward the passenger door
while pressing pawls (A) in direction shown by the arrow in the
figure, and remove it from the base.
INSTALLATION
Installation is the reverse order of removal.
SKIB4256E
SKIB4257E
WW-48
FRONT WIPER AND WASHER SYSTEM
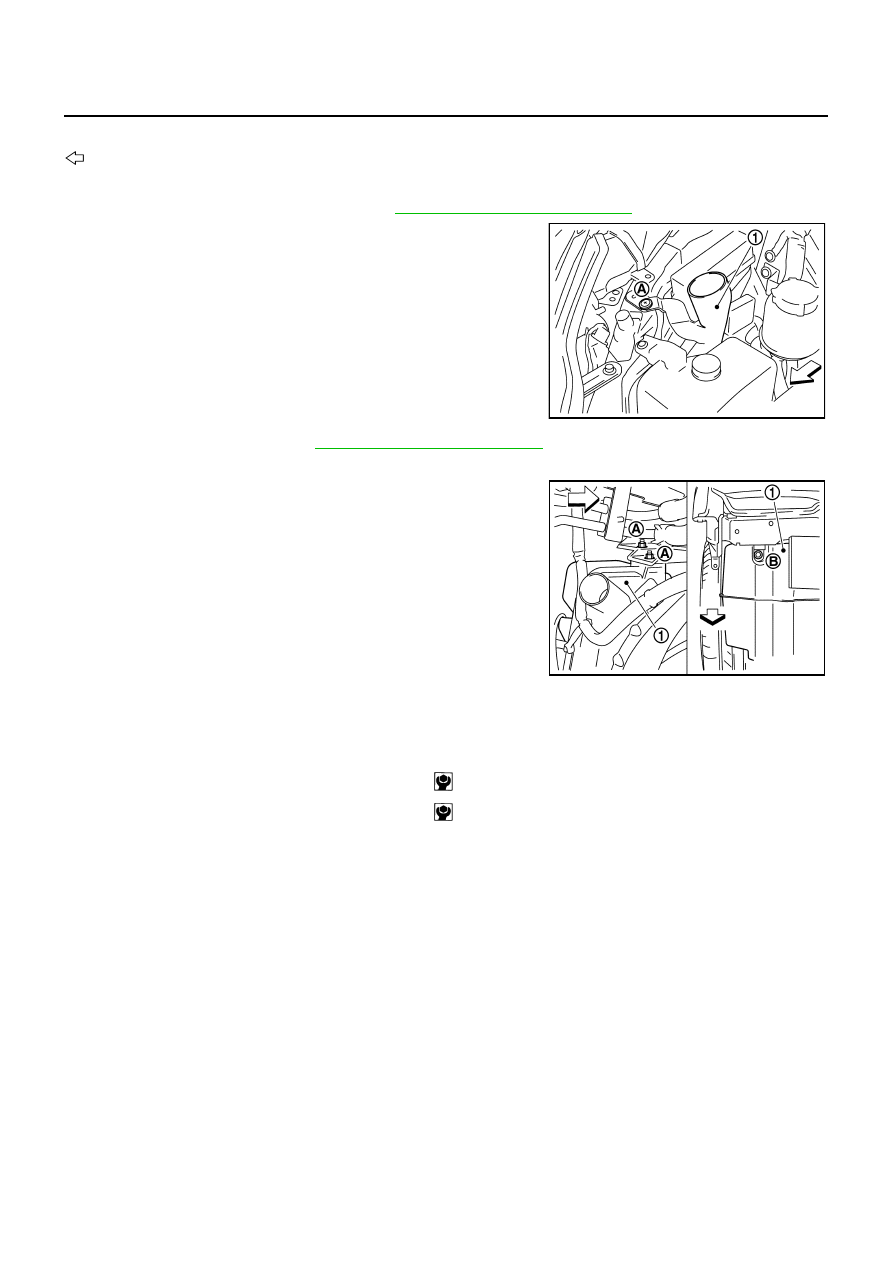
Removal and Installation of Washer Tank
NKS003X7
: Vehicle front
REMOVAL
1.
Remove engine room cover (RH). Refer to
EM-15, "Removal and Installation"
2.
Remove clip (A) and pull washer tank inlet (1) out of washer
tank.
3.
Remove front bumper. Refer to
EI-11, "Removal and Installation"
.
4.
Disconnect washer pump connector and wash fluid level sensor connector.
5.
Remove washer tank mounting nuts (A) and remove bolt (B).
6.
Remove washer tube, and remove washer tank (1) from vehicle.
INSTALLATION
Note the following, and installation is the reverse order of removal.
CAUTION:
After installation, add water up to the upper level of washer tank inlet, and check for water leaks.
SKIB4258E
SKIB4259E
Washer tank mounting nuts
: 4.5 N·m (0.46 kg-m, 40 in-lb)
Washer tank mounting bolt
: 4.5 N·m (0.46 kg-m, 40 in-lb)
Нет комментариевНе стесняйтесь поделиться с нами вашим ценным мнением.
Текст