Infiniti M35/M45 Y50. Manual — part 746
REAR BUMPER
EI-15
C
D
E
F
G
H
J
K
L
M
A
B
EI
REMOVAL
1.
Fully open trunk lid assembly.
2.
Remove trunk floor carpet, trunk side box assembly, trunk rear plate, and trunk side finisher. Refer to
56, "TRUNK ROOM TRIM & TRUNK LID FINISHER"
.
3.
Remove rear combination lamp (LH/RH). Refer to
LT-265, "Removal and Installation"
4.
Remove clips of rear combination lamp lower. (Figure to illustration B)
5.
Remove clips of bumper fascia lower side.
6.
Remove screws of bumper fascia left/right side. (Figure to illustration C)
7.
Remove bumper fascia left/right bolt from trunk room inside. (Figure to illustration A)
8.
Remove clip and bumper clamp from bumper fascia upper side, and then pull out bumper fascia toward
rear of vehicle. (Figure to illustration D)
9.
Remove bumper fascia assembly.
CAUTION:
When removing bumper fascia, 2 workers are required so as to prevent it from dropping.
10. Remove bumper stay mounting clips, and remove bumper stay
(LH/RH).
11. Remove bumper energy absorber.
12. Remove bumper reinforcement mounting nuts and bumper reinforcement with power tool.
INSTALLATION
Install in the reverse order of removal.
NOTE:
After installing, perform fitting adjustment.
PIIB4119J

EI-16
FRONT GRILLE
FRONT GRILLE
PFP:62310
Removal and Installation
NIS0024G
CAUTION:
Apply protection tape around outer circumference of front grille (bumper fascia side).
REMOVAL
1.
Fully open hood assembly.
2.
Remove plastic clip from upper surface of the grille.
3.
Remove plastic clip from front bumper upper side (convex part).
4.
Pull front grille frontward. Disengage upper side plastic clip joint from back of front grille using pliers. (Fig-
ure to illustration A.)
5.
Pull front grille out toward vehicle front. (Figure to illustration B.)
NOTE:
Plastic clips of front grille lower are engaged strongly. Strong power is necessary to disengage them. (When it
is not easy to disengage them, disengage the joint of lower side clip using a screwdriver while pulling the front
grille frontward.)
INSTALLATION
Install in the reverse order of removal.
1.
Front grille
PIIB4647E
HOOD
EI-17
C
D
E
F
G
H
J
K
L
M
A
B
EI
HOOD
PFP:F5100
Removal and Installation
NIS0024H
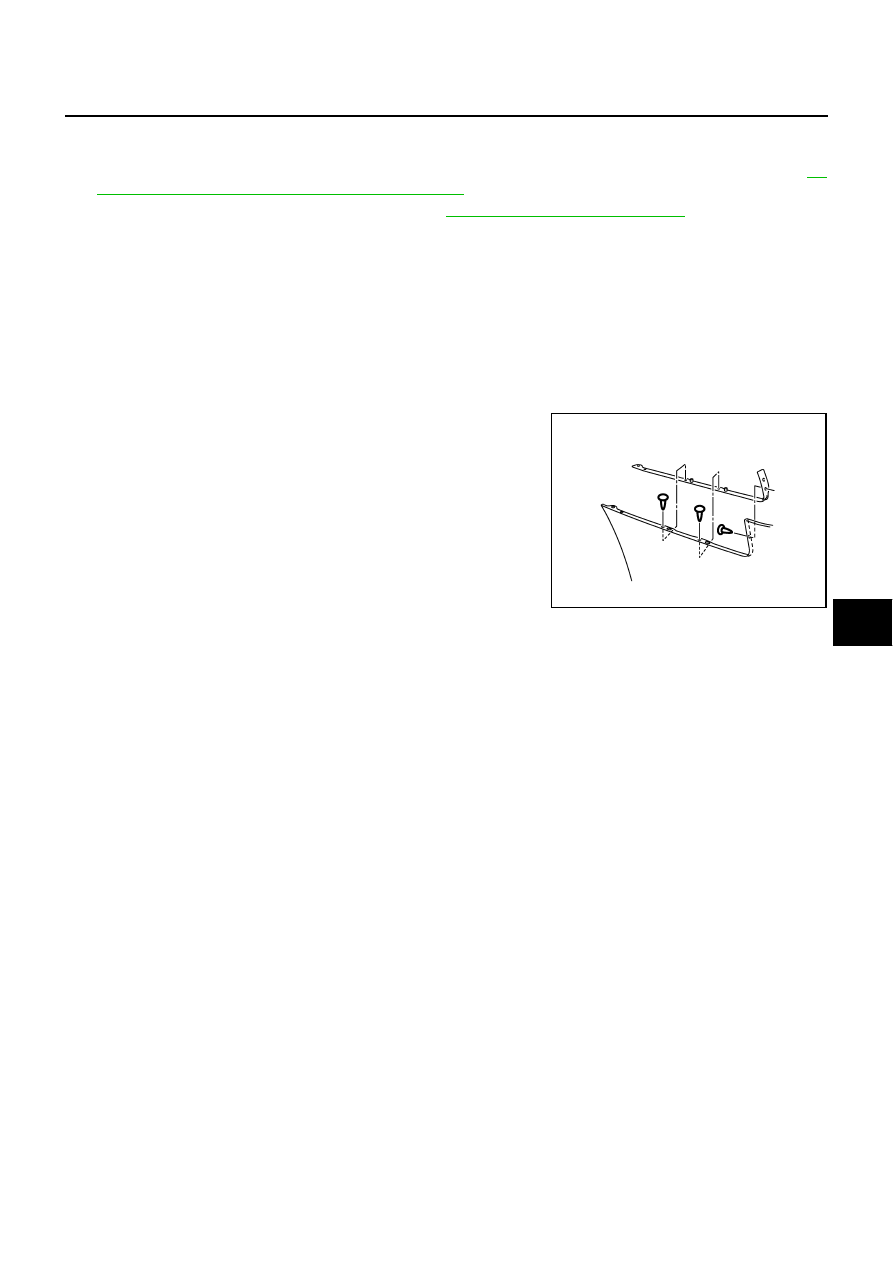
HOOD TOP MOLDING
Removal
1.
Open hood fully.
2.
Remove nuts of hood top molding.
3.
Remove hood top molding assembly.
Installation
Install in the reverse order of removal.
CAUTION:
Note that hood might be distorted when nuts is tightened too much.
1.
Hood top molding
PIIB4938E
: 1.4 - 2.1 N·m (0.15 - 0.21 Kg-m, 13 - 18 in-lb)
EI-18
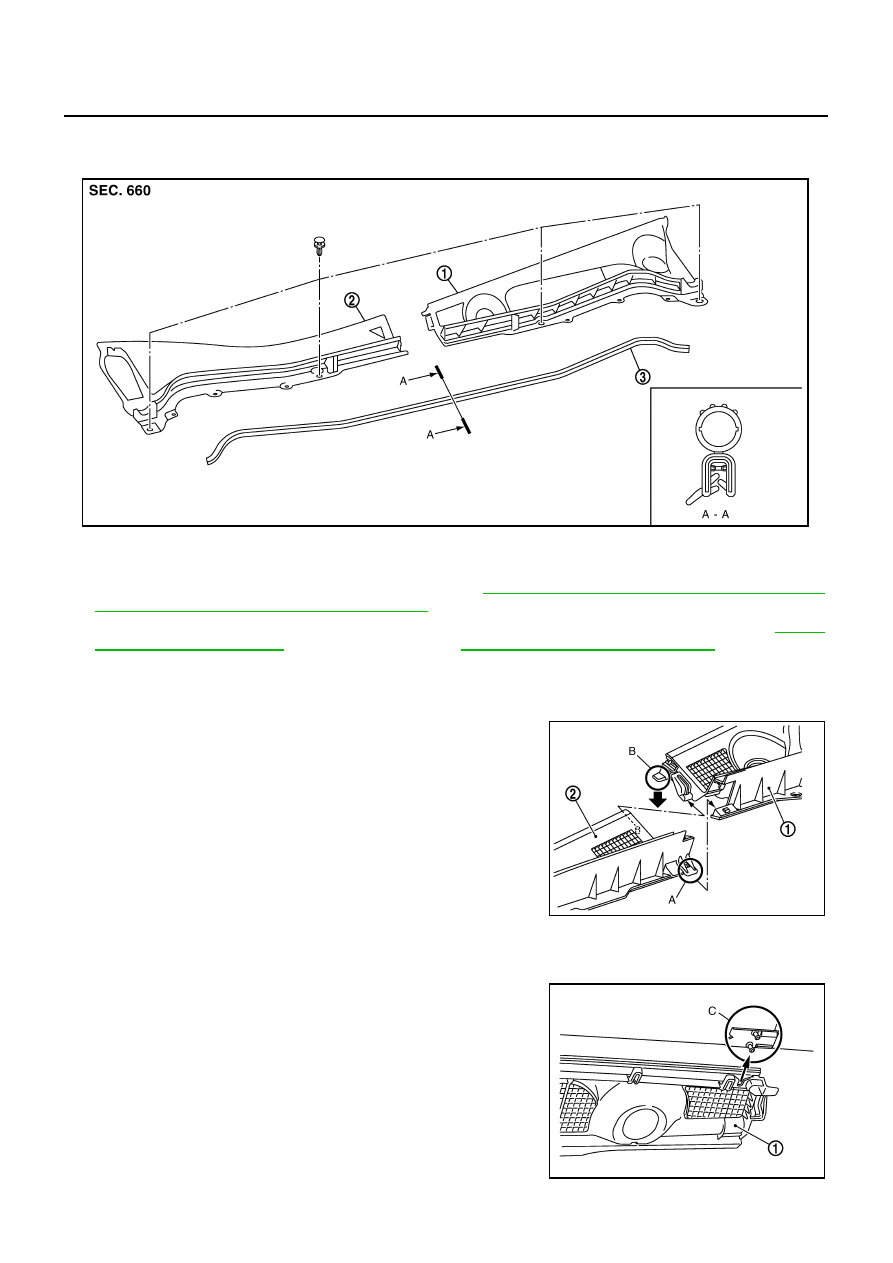
COWL TOP
COWL TOP
PFP:66100
Removal and Installation
NIS0024I
REMOVAL
1.
Remove front wiper arm (LH/RH) from vehicle. Refer to
WW-43, "Removal and Installation of Front Wiper
Arms, Adjustment of Wiper Arms Stop Location"
.
2.
Remove engine room cover (LH/RH), battery cover and brake master cylinder cover. Refer to
(VQ35 engine model),
model).
3.
Remove cowl top seal rubber.
4.
Remove cowl top cover mounting clips (LH/RH).
5.
Plastic pawl A is pull up and cowl top cover RH (2) is removed
ahead of vehicles.
6.
Plastic pawl B is push down and cowl top cover LH (1) is
removed ahead of vehicles.
INSTALLATION
Note the following, and install in the reverse order of removal.
●
Install cowl top cover LH (1) with C (pin from front windshield
glass) aligned with concave part.
1.
Cowl top cover (LH)
2.
Cowl top cover (RH)
3.
Cowl top seal rubber
PIIB5075E
PIIB5077E
PIIB5078E
Нет комментариевНе стесняйтесь поделиться с нами вашим ценным мнением.
Текст