Infiniti M35/M45 Y50. Manual — part 1109
FRONT SEAT BELT PRE-TENSIONER
SRS-51
C
D
E
F
G
I
J
K
L
M
A
B
SRS
FRONT SEAT BELT PRE-TENSIONER
PFP:86884
Removal and Installation
NHS0009I
For removal and installation procedures, refer to
SRS-52
DIAGNOSIS SENSOR UNIT
DIAGNOSIS SENSOR UNIT
PFP:28556
Removal and Installation
NHS0009J
REMOVAL
CAUTION:
●
Before servicing, turn ignition switch OFF, disconnect both battery terminal and wait at least 3
minutes.
●
Before disconnecting the air bag sensor unit harness connector, be sure to disconnect the each
harness connector of the air bag module and pre-tensioner seatbelt to prevent air bag deployment
by static electricity and pre-tensioner seatbelt operation.
●
Do not use air tools or electric tools for servicing.
●
Do not use old fixing bolts after removal; replace with new bolts.
●
Do not make an impact to the diagnosis sensor unit by dropping etc. Replace the diagnosis sen-
sor unit if it has been dropped or sustained an impact.
●
Replace the diagnosis sensor unit of deployed SRS air bag and deployed SRS front seat belt pre-
tensioner.
1.
Remove the diagnosis sensor unit.
●
Disconnect each connector of all air bag modules and pre-tensioner seat belts.
●
Remove the center console assembly. Refer to
IP-10, "INSTRUMENT PANEL ASSEMBLY"
.
●
Disconnect diagnosis sensor unit harness connector.
●
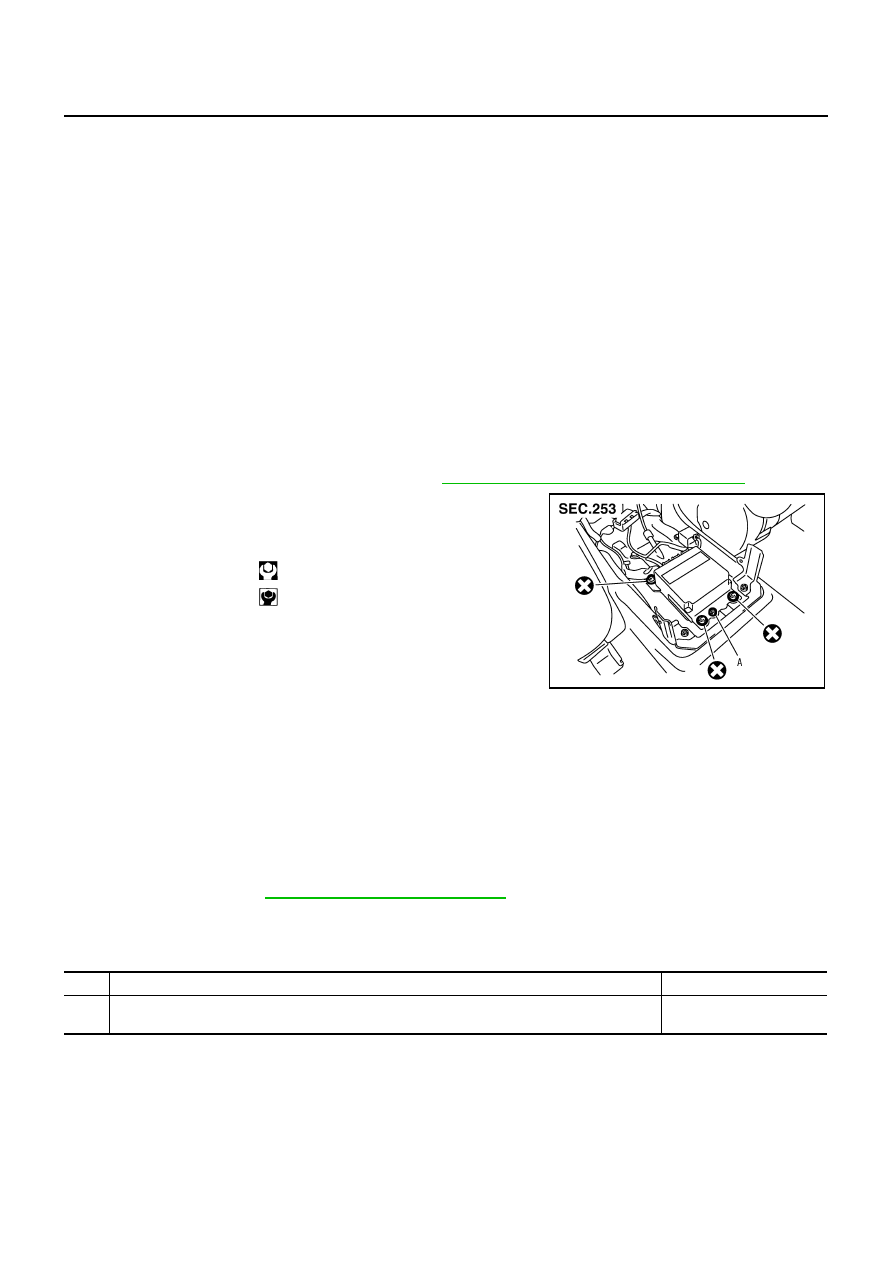
Remove hex bolts and ground bolt, then remove the diagno-
sis sensor unit.
INSTALLATION
Install in the reverse order of removal.
CAUTION:
●
Be careful not to damage the diagnosis sensor harness.
●
After the work is completed, make sure no system malfunction is detected by air bag warning
lamp.
●
In case that malfunction is detected by the air bag warning lamp, reset by the self-diagnosis func-
tion and delete the memory by CONSULT
−
ll.
●
In case that malfunction is still detected after the above operation, perform self-diagnosis to repair
malfunctions. Refer to
.
ECU DISCRIMINATED NO.
After replacing the diagnosis sensor unit, confirm that the diagnosis sensor unit identification is correct for the
vehicle as equipped.
Hex bolts
:
24.5 N·m (2.5 kg
−
m, 18 ft
−
lb)
Ground bolt A
:
6.9 N·m (0.7kg
−
m, 61 in
−
lb)
PHIA0869J
Specification
ECU DISCRIMINATED No.
2WD
AWD
Models with driver and passenger air bags, seat belt pre-tensioner, side air bags and curtain air
bags
FAD4H
OCCUPANT CLASSIFICATION SYSTEM CONTROL UNIT
SRS-53
C
D
E
F
G
I
J
K
L
M
A
B
SRS
OCCUPANT CLASSIFICATION SYSTEM CONTROL UNIT
PFP:98852
Removal and Installation
NHS0009K
The occupant classification system control unit, seat pressure sensor, and bladder are an integral part of the
front passenger seat cushion and are replaced as an assembly. Refer to
SE-166, "Passenger's Seat Compo-
.

SRS-54
COLLISION DIAGNOSIS
COLLISION DIAGNOSIS
PFP:00015
For Frontal Collision
NHS0009L
To repair the SRS, perform the following steps.
When SRS (except the front side air bag and side curtain air bag modules) is activated in a collision:
1.
Replace the diagnosis sensor unit.
2.
Remove the air bag modules (except the front side air bag modules and side curtain air bag modules),
crash zone sensor assembly, bracket and seat belt pre-tensioner assemblies.
3.
Check the SRS components using the table below:
–
Replace any SRS components showing visible signs of damage (dents, cracks and deformation).
4.
Install new air bag modules (except the front side air bag modules and side curtain air bag modules) crash
zone sensor assembly, bracket and seat belt pre-tensioner assemblies.
5.
Conduct self-diagnosis using CONSULT-II or “AIR BAG” warning lamp. Refer to
for details. Ensure entire SRS operates properly.
When SRS is not activated in a collision:
1.
Check the SRS components using the table below:
–
Replace any SRS components showing visible signs of damage (dents, cracks and deformation).
2.
Conduct self-diagnosis using CONSULT-II or “AIR BAG” warning lamp. Refer to
for details. Ensure entire SRS operates properly.
When only one front air bag module is activated in a collision:
1.
Replace the following components:
–
Diagnosis sensor unit
–
Crash zone sensor
–
Activated front air bag and seat belt pre-tensioner.
2.
Check the other SRS components using the table below (Refer to “SRS is NOT activated”).
–
Replace any SRS components showing visible signs of damage (dents, cracks and deformation).
3.
Conduct self-diagnosis using CONSULT-II or “AIR BAG” warning lamp. Refer to
for details. Ensure entire SRS operates properly.
Only one front air bag may inflate a crash, depending on the crash severity and whether the front occupants
are belted or unbelted. This does not indicate improper performance of the system. Perform self-diagnosis to
make sure the entire SRS operates properly.
SRS INSPECTION (FOR FRONTAL COLLISION)
Part
SRS is activated
SRS is NOT activated
Driver airbag
module
If the Driver airbag has deployed:
REPLACE.
Install with new fasteners.
If the Driver air bag has NOT been activated:
[same text as in current manual]
Passenger front
airbag module
If the Passenger front airbag has deployed:
REPLACE.
Install with new fasteners.
If the Passenger front air bag has NOT been activated:
[same text as in current manual]
Crash zone
sensor
If any of the front airbags or seat belt pre-
tensionsers have been activated:
REPLACE the crash zone sensor and bracket
with new fasteners.
If the front airbags or seat belt pre-tensionsers have NOT
been activated:
[same text as in current manual]
Seat belt pre-ten-
sioner assemblies
If the driver or passenger Seat belt pre-ten-
sioner has been activated:
REPLACE the seat belt pre-tensioner
assemblies with new fasteners.
If the pre-tensioners have NOT been activated:
[same text as in current manual]
Diagnosis sensor
unit
If any of the SRS components have been
activated:
REPLACE the Diagnosis sensor unit.
Install with new fasteners.
If none of the SRS components have been activated:
[same text as in current manual]
Нет комментариевНе стесняйтесь поделиться с нами вашим ценным мнением.
Текст