Skoda Scala (2021 year). Manual in english — page 2

28
Doors, windows and boot lid › Window - with electrical operation
once again and the window goes down by several
› Pull the corresponding button until it stops; the
centimetres.
window closes automatically. By pressing the but-
ton again, the closing process is stopped.
If you attempt to close the window again within
10 seconds of the window being moved down for
After switching off the ignition, the windows can
the second time, even though the obstacle was not
still open and close for about 10 minutes so long as
yet been removed, the closing process is only stop-
none of the doors are opened.
ped. During this time, it is not possible to automati-
Open all of the windows at the same time
cally close the windows by pulling the button all the
way. The force limiter is, however, switched on.
› Press and hold the button on the key.
Or:
The force limiter is only not operational if you at-
tempt to close the window again within the next
› Turn off the ignition, open the driver's door, and
10 seconds - the window will now close with full
hold down the driver's window button until it
force! If you wait longer than 10 seconds, the force
stops.
limiter is switched on again.
Close all of the windows at the same time
CAUTION
› Press and hold the button on the key.
Risk of injury!
Or:
▶ Close the windows carefully, even though they
have a force limiter.
› Turn off the ignition, open the driver's door, and
pull upwards on the driver's window button until it
stops.
Overview of the operating buttons on the
Or:
driver's door
›
For vehicles with a keyless locking system, hold
Depending upon vehicle
one fiģe٠on the sensor on the outside of the han-
equipment:
dle on the front door.
A
Front left window
B
Front right window
Settings
C
Rear left window
The window operation is set in the following menu in
the Infotainment system:
D
Rear right window
Menu item for window operation
E
Deactivation/activa-
tion of the buttons in
Or:
the rear doors
Menu item for window operation
Operation
Troubleshooting
When the windows are open, irritating noises
The window regulator has stopped working after
may occur at certain speeds.
repeated opening and closing
The window regulator mechanism could have over-
Opening
heated.
› Press the corresponding button slightly down-
wards and hold it until the window has reached the
› Allow the window regulator mechanism to cool
desired position.
down.
Or:
The window operation does not work after discon-
› Press the corresponding button until it stops; the
necting the 12 volt vehicle battery
window opens automatically. Pressing the button
› Enable window operation » page 28.
again will stop the opening process.
Closing
Activation after disconnecting the 12-volt
› To close, pull gently upwards on the top edge of
vehicle battery
the corresponding button and hold until the win-
dow has reached the desired position.
Activate automatic window operation
Or:
› Turn on the ignition.
› Pull the corresponding button upwards and the
window closes.

Doors, windows and boot lid › Sunblind - with electrical operation
29
› Release the button.
Boot lid - with manual operation
› Pull up the respective button and hold for 1 sec-
ond.
What you should be mindful of
NOTICE
Sunblind - with electrical operation
▶ Do not attach a bike rack to the tailgate on vehi-
cles with an extended rear window.
Operation
Closing
Operation
Opening
Opening
› Press or hold the but-
› Press the handle and
ton to move the roller
lift the lid.
blind.
› Press or release the
button to stop the roll-
er blind from moving.
Activation after disconnecting the 12-volt
vehicle battery
The option to open by pressing the handle is deacti-
› Turn on the ignition.
vated once a speed of 5 km/h is reached. This is acti-
› Keep the button pressed down. The sunblind
vated again after the vehicle has stopped and a door
opens and closes again.
is opened.
› Release the button.
Closing
› Grasp the fixtuÙe A
Sun visors
and pull the lid down.
Folding up and folding down
CAUTION
Danger of opening the tailgate while driving!
▶ Make sure that the latch engages after the Ĕap is
closed.
1
Swivel the front visor towards the windscreen
2
Swivel the visor towards the door
Set a delayed lid lock
CAUTION
If the lid is unlocked with the
button on the key,
the lid is automatically locked again after closing.
Objects attached to the sun visors can restrict the
view to the outside.
The period after which the lid is locked automatically
In the event of sudden braking or an impact, these
can be extended by a specialist garage.
can also cause injuries.
▶ Do not attach anything to the sun visor.
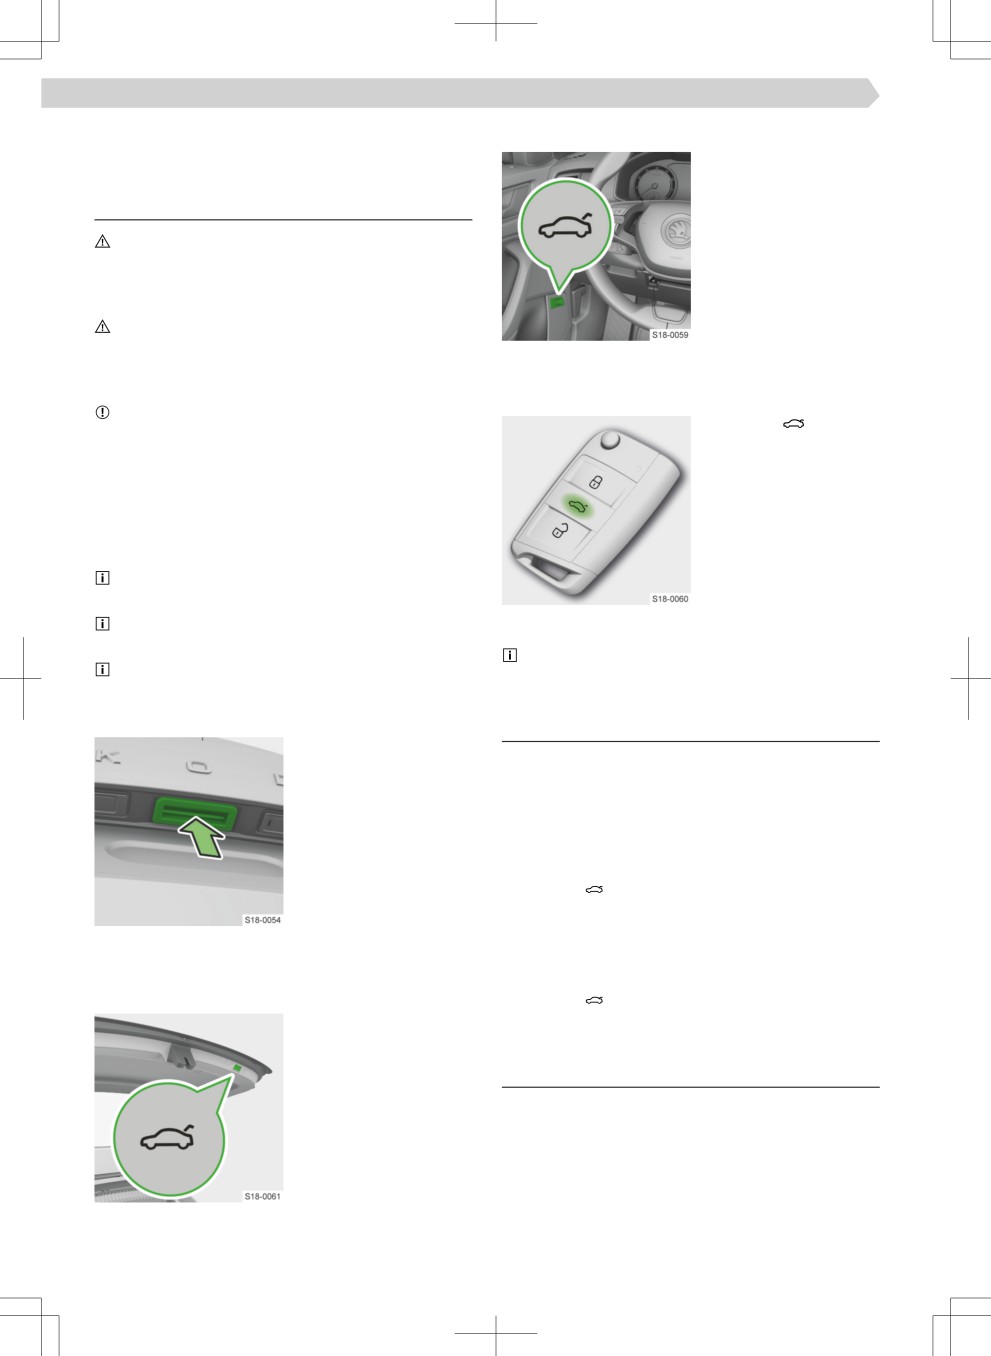
Boot lid - with electrical control
What you should be mindful of
NOTICE
30
Doors, windows and boot lid › Boot lid - with electrical control
▶
Do not attach a bike rack to the tailgate of vehicles
Button in the door
with an extended rear window.
› To open the tailgate,
pull and hold the but-
ton until the tailgate
Operation
starts to open.
CAUTION
› To close the tailgate,
Risk of injury!
pull and hold the but-
▶ Only operate the tailgate when there is nobody or
ton until the tailgate is
no objects in the swivel area.
fully closed.
CAUTION
› To stop the movement
Danger of opening the tailgate while driving!
of the tailgate, pull or
▶ Make sure that the latch engages after the Ĕap is
release the button.
closed.
Button on the key
NOTICE
› Press the
button to
▶ Do not manually close the tailgate when moving.
open, close or stop the
▶ Before operating the tailgate, check that there are
movement of the tail-
no objects in the swivel area that could damage the
gate.
tailgate. Also check that there are no objects with-
in the immediate vicinity of the vehicle that could
The option to lock exists
damage the vehicle interior and the transported
only on vehicles with a
objects.
keyless locking system.
The key must not be in
If the tailgate hits an obstacle when closing, it
the vehicle and must be
stops and an audible signal sounds.
at a distance of max. 2 m
When automatically closing the tailgate, e.g. un-
from the tailgate.
der the weight of snow, a broken beep sounds.
The tailgate can also be closed by pulling it bÙieĔû
The rear parking light ĔashiÄ£ twice indicates
downwards.
that the Ĕap is closed.
Handle in the tailgate
Settings
› Press the handle to
open, close or stop the
Set the uppermost position of the tailgate and
movement of the tail-
store it
gate.
It makes sense to set the top position of the tailgate,
e.g. setting for the opening of the tailgate in a limited
The option to open by
space due to the garage height.
pressing the handle is
deactivated once a
› Stop the tailgate in the desired position.
speed of 5 km/h is
› Press the button and hold down on the lower
reached. This is activated
edge of the tailgate until an audible signal sounds.
again after the vehicle
Re-adjusting the top starting position of the tail-
has stopped and a door
gate
is opened.
›
Carefully raise the tailgate manually to the limit.
Button in the tailgate
› Press the button and hold down on the lower
› Press the button to
edge of the tailgate until an audible signal sounds.
open, close or stop the
movement of the tail-
gate.
Troubleshooting
The tailgate does not react to the opening signal
› There is a possible obstacle, e.g. snow; remove it.
Or:
› Press the handle in the tailgate and lift the lid.
Or:
› Mechanically unlock the Ĕap » page 31.
Doors, windows and boot lid › Unlocking the boot lid
31
The tailgate does not react to the closing signal
Seats, steering wheel and mirror
› Close the tailgate manually.
NOTICE
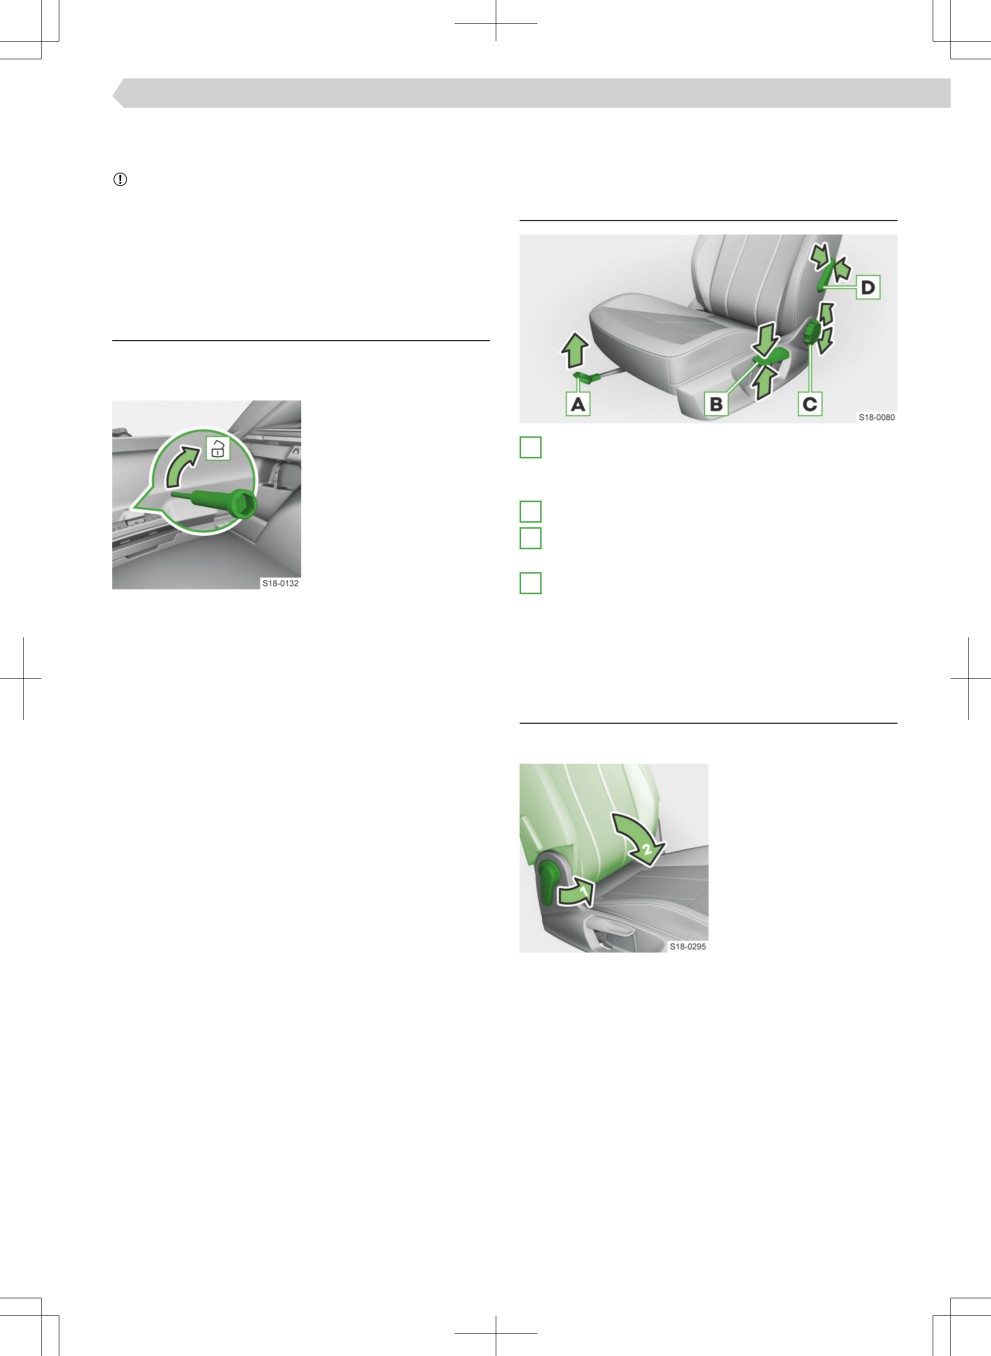
Front seat - with manual operation
▶ Close the tailgate slowly, push down the tailgate
Controls on the seat
and push in the lock on the centre of the rear edge
of the tailgate.
Unlocking the boot lid
Release
If the boot lid does not open, it can be unlocked
manually by the following procedure.
› Insert a screwdriver in-
to the opening in the
panel.
A
Adjusting the seat in the longitudinal direction -
› Release the tailgate by
after releasing the operating lever, the lock must
moving it in the direc-
audibly click into place
tion of the arrow.
B
Adjusting the height
C
Adjusting the angle of the backrest - do not lean
against the backrest during adjustment
D
Adjusting the lumbar support: Extent of the cur-
vature
After a certain time, play can develop within the ad-
justment mechanism of the backrest angle.
Folding passenger seat backrest
Folding down
› Pull on the operating
lever.
› Fold the backrest for-
wards until it clicks in-
to place.
Folding back up
› Pull on the operating lever.
› Press the backrest backwards until it audibly clicks
into place.

32
Seats, steering wheel and mirror › Front seat - with electrical operation
Front seat - with electrical operation
Folding down
› Press the release han-
Controls on the seat
dle and fold the seat
forwards.
Adjusting the seat
A
Adjust in a longitudi-
nal direction
B
Adjust the inclination
C
Adjusting the height
Folding back up
› Pull the outer seat belt
to the side trim.
Adjusting the seat back
› Fold the seat backrest
back up.
A
Adjust the inclination
The release handle must
audibly click into place.
› Check that the seat
backrest has locked in
place. The pin A must
not be visible.
Park position of rear seat belts
Adjusting the lumbar support
A
Set the position of
the curvature
B
Set the extent of the
curvature
Headrests
Rear seats
Adjusting the headrests
Folding down the seat backs
Front headrests
Before folding down
› Hold the safety button
› Insert the rear headrests as far as they will go or
remove them.
and move the headrest
in the desired direc-
› Adjust the position of the front seats in such a way
tion.
that they are not damaged by the folded-down
seat backrests.
› Pull the outer seat belt to the side trim.

Seats, steering wheel and mirror › Front armrest
33
Rear headrests
Rear armrest
› Move the headrest in
Settings
the desired direction.
When pushing down,
› Fold down the armrest.
press and hold the
The folded-down arm-
safety button.
rest can be used as a
storage table.
Removing and inserting the rear headrests
Removing
Steering wheel
› Partially fold the re-
spective seat back for-
Buttons/dials on the multifunction steering
wards.
wheel
› Move the headrest up
to the stop.
› Press safety buttons
A and B at the same
time and remove the
support.
Inserting
› Insert the headrest into the seat backrest.
The safety button must click into place.
Switch voice control oÄ/off
Front armrest
Heated steering wheel » page 55
A
Rotate - Adjust the volume
Settings
Press - Switch the sound off/oÄ
› Move the backrest to
Switch to the next track/station played
the desired position.
Switch to the previous track/station played
Show menu of assistance systems
B
Depending upon vehicle equipment:
▶ Operating an analogue instrument clus-
ter » page 56
▶ Operating a digital instrument clus-
ter » page 57
Depending upon vehicle equipment:
▶ Operating an analogue instrument clus-
ter » page 56
▶ Operating a digital instrument clus-
ter » page 57
Depending upon vehicle equipment:
▶ Operating an analogue instrument clus-
ter » page 56
▶ Operating a digital instrument clus-
ter » page 57
34
Seats, steering wheel and mirror › Interior rear-view mirror
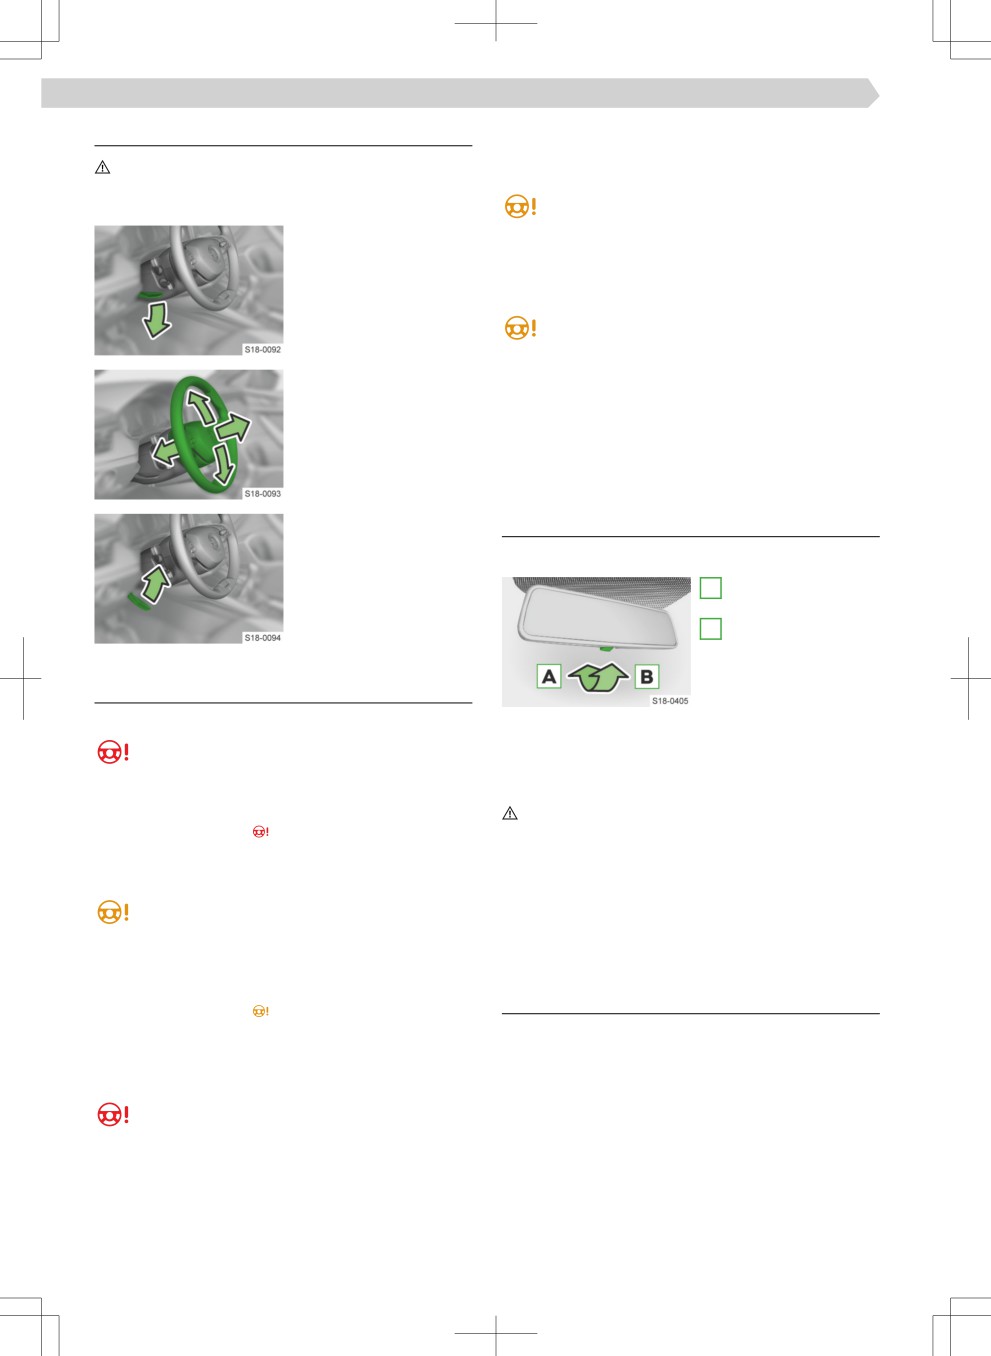
Setting the steering wheel position
After switching off the ignition, it is then no longer
possible to switch on the ignition, to lock the steer-
WARNING
ing and to switch on the electrical components.
Risk of an accident!
Ĕashes
▶ Do not adjust the steering wheel while driving.
Message regarding a fault in the steering lock
› Swing the safety lever
› You may continue driving, exercising appropriate
downwards.
caution. Seek the help of a specialist garage.
Steering column lock not unlocked
Ĕashes
Message concerning the required steering
wheel movement
› Adjust the steering
› Move the steering wheel slightly back and forth.
wheel to the desired
› If the steering does not unlock, stop the vehicle
position.
and seek the help of a specialist garage.
Interior rear-view mirror
› Press the safety lever
Operation
as far as it will go.
Interior mirror with manual darkening
A
Mirror is not dark-
ened
B
Mirror darkens
Troubleshooting
Power assisted steering faulty
Interior mirror with automatic darkening
illuminates - total failure of the power assisted
Darkening of the mirror is automatically controlled
steering, failure of steering assistance
through the sensors in the mirror once the engine is
› Turn off the ignition, start the engine and drive a
started.
few meters.
CAUTION
› If the indicator light
does not go out, do not
Risk of an accident!
continue driving. Seek the help of a specialist ga-
A glowing display e.g. a mobile phone or navigation
rage.
device may affet the function of the automatic mir-
ror darkening.
illuminates - partial failure of the power assis-
▶ Do not attach these devices close to the mirror.
ted steering, possible reduction in power
steering
› Turn off the ignition, start the engine and drive a
Wing mirror
few meters.
Operation
› If the indicator light
does not go out, you can
drive on, exercising appropriate caution. Seek the
Depending on the equipment, the mirrors can be fol-
help of a specialist garage.
ded in manually or electrically.
Steering column lock faulty
Ĕashes
Message regarding a fault in the steering col-
umn lock
› Stop the vehicle.
› Seek the help of a specialist garage.

Seats, steering wheel and mirror › Wing mirror
35
Positions of the rotary knob
CAUTION
Risk of burns!
Adjust the left-hand
▶ Do not touch heated exterior mirror surfaces.
exterior mirror
Switch off operation
Adjust the right-
hand exterior mirror
Fold mirror in elec-
trically (to fold back
out, select a diffeÙ-
eÄt position)
Heat the mirror
when the engine is running
Adjusting the mirror surface
› Select position or .
› Turn the rotary knob in the direction of the arrows.
Folding electrically folding mirrors automatically
If this function is activated, the mirrors are folded in
when the vehicle is locked and folded back when it is
unlocked.
Locking of the vehicle is not indicated by the fact
that the mirrors fold in. Locking of the vehicle is indi-
cated by the turn signal lights ĔashiÄ£.
Manually foldable mirrors
› Fold the mirror towards the side window by apply-
ing pressure with your hand.
WARNING
Risk of an accident!
The exterior mirrors make objects appear farther
away.
▶ Use the rear-view mirror to determine the distance
from vehicles behind.
NOTICE
Danger of mirror damage!
▶ If the electrically foldable mirror is swung out by
external iÄĔueÄes (e.g. due to an impact during
manoeuvring), fold the mirror in using the rotary
knob and wait for an audible folding sound.
Settings
Automatic folding of the exterior mirrors is activated
or deactivated in the following menu in the Infotain-
ment system:
Or:
Troubleshooting
Electric mirror operation impaired
› Adjust the mirror surface by pressing it lightly with
your fiÄ£eÙ.
36
Restraint systems and airbags › Seat belts
illuminated - a front or rear seat belt is not fas-
Restraint systems and airbags
tened
Seat belts
lights up - rear seat not occupied
Functionality
illuminated - a rear seat belt is not fastened
Seat belts that are fastened correctly offeÙ very
good protection in the event of an accident. They re-
illuminated - a rear seat belt is not fastened
duce the risk of an injury and increase the chance of
survival in the event of a major accident.
illuminated - a rear seat belt is fastened.
WARNING
▶ The seat belts must not be removed or altered in
illuminated - a rear seat belt is fastened.
any other way.
▶ If the driver's seat belt is damaged, stop driving.
illuminated - a rear seat belt is fastened.
▶ If another seat belt is damaged, the seat must not
be occupied.
▶ Do not repair damaged seat belts yourself.
Operation
▶ Have a damaged seat belt replaced immediately by
a specialist garage.
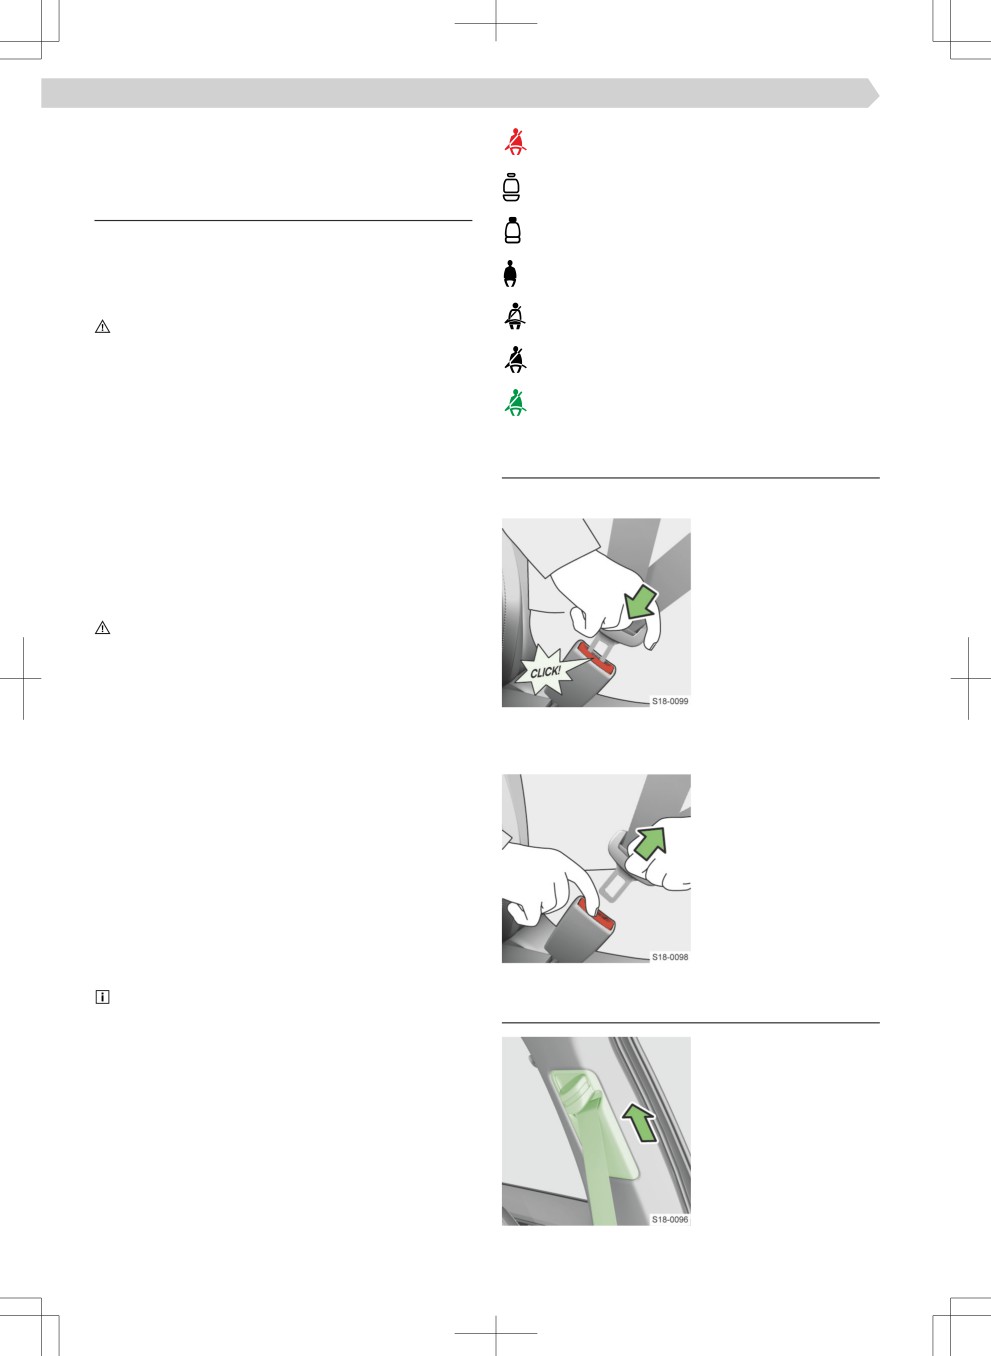
Fastening the seat belt
Automatic belt retractor
› Grasp the buckle latch
The automatic retractor locks the belt in the event
and slowly pull the belt
of a jerky pull on the belt. The belts lock, for example,
over the chest and pel-
when full braking, when the car accelerates, when
vis towards the buckle.
driving downhill and when cornering.
› Insert the buckle latch
WARNING
into the buckle until
▶ If the seat belt does not lock when pulled jerkily,
there is an audible
have the retractor checked by a specialist garage.
click.
› Pull on the belt to en-
Belt tensioners
sure that the buckle is
The safety of the driver, front passenger and passen-
securely fastened.
gers on the outer rear seats who are wearing their
seat belts is enhanced by the belt tensioners fitted
Unfastening the seat belt
to the inertia reels on the front and rear external seat
› Grasp the buckle latch
belts.
and release it by press-
If there is a collision with a certain severity, the seat
ing the red button.
belt is tightened by the belt tensioner so that unwan-
› Hold the belt so it does
ted body movement is prevented.
not twist when rolling
The belt tensioner can also be deployed when the
up.
seat belt is not fastened.
Belt tensioners are not activated in the event of a
roll-over, minor collisions or in accidents in which no
major forces are produced.
Smoke is released when the belt tensioner is de-
ployed. This does not indicate a vehicle fiÙe.
Settings
Reversible belt tensioner
› Move the seat belt
Vehicles with a proactive occupant protection sys-
height adjuster up-
tem include reversible belt tensioners » page 143.
wards to increase the
height.
The reversible belt tensioners increase safety for the
belted driver and front passenger by automatically
tightening the seat belt tightly over the body in criti-
cal driving situations and then releasing it again.
Status display in the instrument cluster display
Depending on the type of display, the display can be
as follows:

Restraint systems and airbags › Child seat
37
› Press the safety button
tween the front seat and the child seat or the child
and move the seat belt
carried in the child seat.
height adjuster down
▶ Before installing a forward-facing child seat, adjust
to reduce the height.
the headrest so that it is as low as possible.
› After adjustment, fiÙm-
▶ If the headrest prevents the child seat from being
lû pull on the belt to
fitted, adjust the headrest to the highest position.
ensure that the seat
▶ When installing the child seat, avoid contact be-
belt height adjuster has
tween the roof and the rear pillar. If the head air-
correctly locked in
bag is deployed, there is a risk of injury.
place and that the belt
▶ If using a separate child seat cushion, adjust the
is locked securely.
headrest so that the child's head is Ĕush with, but
not protruding above the height of the top edge of
the headrest.
Troubleshooting
Blocked belt retractor
Using a child seat on the front passenger seat
› Grasp the strap in the
middle and pull quickly.
When using a child seat on the passenger seat, any
ouÄtÙû-speifi regulations must be observed.
› Hold the strap and let
it roll up slowly.
Never use a child seat in which the child is carried
› Pull on the strap to see
with his or her back to the direction of travel on a
if the retractor is
seat protected by an active airbag placed in front of
working properly.
the seat. This could cause serious injury to the child,
even death.
› If the strap is still
blocked, repeat the un-
This is also indicated by the following stickers:
locking procedure
once or twice.
› If the strap is still blocked, seek the help of a spe-
cialist garage.
Child seat
What you should be mindful of
For how to install and use the child seat, please note
Sticker on the passenger sun visor
instructions of the child seat manufacturer.
Sticker on the central body pillar on the passenger
For safety reasons, we always recommend that chil-
side
dren are transported on the back seats. Carry chil-
dren on the front passenger seat only in exceptional
The following instructions must be followed when
cases.
using a child seat on the front passenger seat:
Use child seats according to standard ECE-R 44 and
▶ It is essential to deactivate the front passenger air-
ECE-R 129 of the European Economic Commission.
bag if using a child seat in which the child is trans-
Child seats according to standard ECE-R 44 and
ported with its back facing the direction of trav-
ECE-R 129 are marked with the test symbol: large E
el » page 42.
in a circle, with the test number below.
▶ If possible, adjust the front passenger seat back-
We recommend using child seats from the ŠKODA
rest so that it is vertical, to ensure that there is se-
Original Accessories range. These child seats have
cure contact between the backrest and the child
been developed and tested for use in ŠKODA vehi-
seat.
cles. They satisfy the standard ECE-R 44 or ECE-R
▶ If possible, move the front passenger seat back-
129.
wards so that there is no contact between the
front passenger seat and the child seat behind it.
WARNING
▶ Adjust the height-adjustable front passenger seat
▶ When installing the child seat on the rear seat, ad-
as much as possible.
just the front seat so that there is no contact be-
▶ Set the front passenger seat belt as high up as pos-
sible.

38
Restraint systems and airbags › Fasteners for child seats
WARNING
without kinking and is not bent over the edge of
Risk of the seat belt causing a neck injury to the
the guide fittiģ.
transported child!
WARNING
▶ For child seats in groups 2 and 3, ensure that the
▶ As soon as the rear-facing child seat is no longer
guide fittiģ attached to the child seat headrest is
being used on the front passenger seat, activate
positioned in front of or at the same height as the
the front passenger airbag again.
seat belt height adjuster on the central body pillar.
▶ Adjust the height of the front passenger seat belt
so that the belt passes through the guide fittiģ
Recommended child seats
Grouping of child seats according to standard ECE-R 44.
Group
Weight of the child
0
up to 10 kg
0+
up to 13 kg
1
9-18 kg
2
15-25 kg
3
22-36 kg
Recommended child seats
Approval number
Group
Manufacturer
Type
Attachment
Order number
(E1 ...)
0+
(up to 13
Britax Römer
Baby Safe Plus
Isofix base frame
1ST019907
04 301146
kg)
1
ISOFIX and TOP
Britax Römer
Duo Plus TT
DDA000006
04 301133
(9-18 kg)
TETHER
2-3
Britax Römer
Kidfix XP a)
ISOFIX
000019906K
04 301198
(15-36 kg)
Britax Römer
Kidfix II XP
ISOFIX
000019906L
04 301323
a)
For optimum protection, especially in the event of a side impact, it is recommended that you use this child
seat complete with the backrest.
Fasteners for child seats
Use of child seats
Overview of usability of child seats according to standard ECE-R 16.

Restraint systems and airbags › Fasteners for child seats
39
Child seats with the ISOFIX system
Front passenger’s seat
Rear seats
Size category of
With deactiva-
Group
With activated
child seat a)
ted front airbag
-
Outer seats c)
Centre seat
front airbag b)
b)
0
E
X
X
IL
X
(up to 10 kg)
E
0+
D
X
X
IL
X
(up to 13 kg)
C
D
C
1
IL
B
X
X
X
(9-18 kg)
IUF
B1
A
2
-
X
X
IL
X
(15-25 kg)
3
-
X
X
IL
X
(22-36 kg)
a)
The size category of the child seat is indicated on the child seat plate.
b)
If the passenger seat is equipped with ISOFIX system holding eyelets, it is suitable for the installation of
an ISOFIX child seat with “Semi-Universal” approval.
c)
The seat is suitable for the fixiģ system ISO/R3.
IL The seat is suitable for the ISOFIX child seats with “Semi-Universal” approval.
IUF The seat is suitable for forward-facing child seats and is permitted for use in this weight category.
X The seat is not equipped with eyelets for the ISOFIX system.
i-Size
Front passenger’s seat
Rear seats
With activated front air-
With deactivated front
Outer seats
Centre seat
bag a)
airbag b)
X
X
i-U
X
a)
If the passenger seat is equipped with the i-Size system, it is only suitable for i-Size children's seats that
are forward-facing and part of the “Universal” category.
b)
If the passenger seat is equipped with the i-Size system, it is suitable for i-Size children's seats that are
forward- and backward-facing and part of the “Universal” category.
i-UF The seat is suitable for forward- and backward-facing i-Size child seats of the “Universal” category.
X The seat is not suitable for i-Size child seats of the “Universal” category.
Child seat fastened with a safety belt
When using a child seat of the “Universal” category on the middle rear seat, it is necessary to move the buckle
of the middle seat behind the buckle of the outer seat.
Correct position - the belt buckles are behind each
other
Incorrect position - the buckles are next to each
other

40
Restraint systems and airbags › Fasteners for child seats
Front passenger’s seat
Rear seats
Group
With activated front
With deactivated front
Outer seats
Centre seat a)
airbag
airbag
0
X
U b)
U
U
(up to 10 kg)
0+
X
U b)
U
U
(up to 13 kg)
1
UF
U
U
U
(9-18 kg)
2
UF
U
U
U
(15-25 kg)
3
UF
U
U
U
(22-36 kg)
a)
It is forbidden to install a child seat with a support foot in the middle rear seat.
b)
Adjust the height-adjustable front passenger seat as much as possible.
U The seat is suitable for the child seat category “Universal” and is permitted for use in this weight group.
UF The seat is suitable for forward-facing child seats in the “Universal”category and is permitted for use in this
weight group.
X The seat is not suitable for children in this weight group.
Overview
TOP TETHER
WARNING
ISOFIX
▶
Child seats with the TOP TETHER- Only use the
WARNING
system on the seats with the eyelets TOP TETH-
▶ On the retaining eyelets that are used to install the
ERSymbol are provided.
child seat with the ISOFIXSystem provided, do not
▶ Only attach one belt from the child seat to a lock-
attach any other child seats, belts or objects.
ing eye TOP TETHER-Fasten the system.
The ISOFIX system allows for the fast and secure in-
▶ When attaching the child seat with the TOP TETH-
stallation of the child seat. The eyelets for installing
ER- No other object may be attached to the eyelet
the child seat using the ISOFIX system are located
TOP TETHERSystem.
on the outer rear seats and possibly on the front pas-
senger seat.
A child seat that uses the ISOFIXsystem can only be
installed in the vehicle if it is approved for this vehi-
cle type. Further information can be obtained from a
ŠKODA partner or from a list of vehicles enclosed
with the child seat.
› Remove the covers be-
fore installing the child
seat.
Holding eyelets on the rear seats
Restraint systems and airbags › Airbags
41
The belt fastened into
In the following situations, no airbags are deployed:
the TOP TETHER system
▶ Minor frontal and side collisions
restricts the movement
▶ Rear-end collision
of the upper part of the
▶ Vehicle rollover
child seat.
If the measured deceleration rate is below the refer-
The holding eyelets for
ence values programmed into the control unit, the
attaching the belt are lo-
airbags will not be deployed despite possible serious
cated on the outer rear
vehicle damage.
seats, as well as on the
middle rear seat or pas-
Holding eyelet on the pas-
senger seat when neces-
senger seat
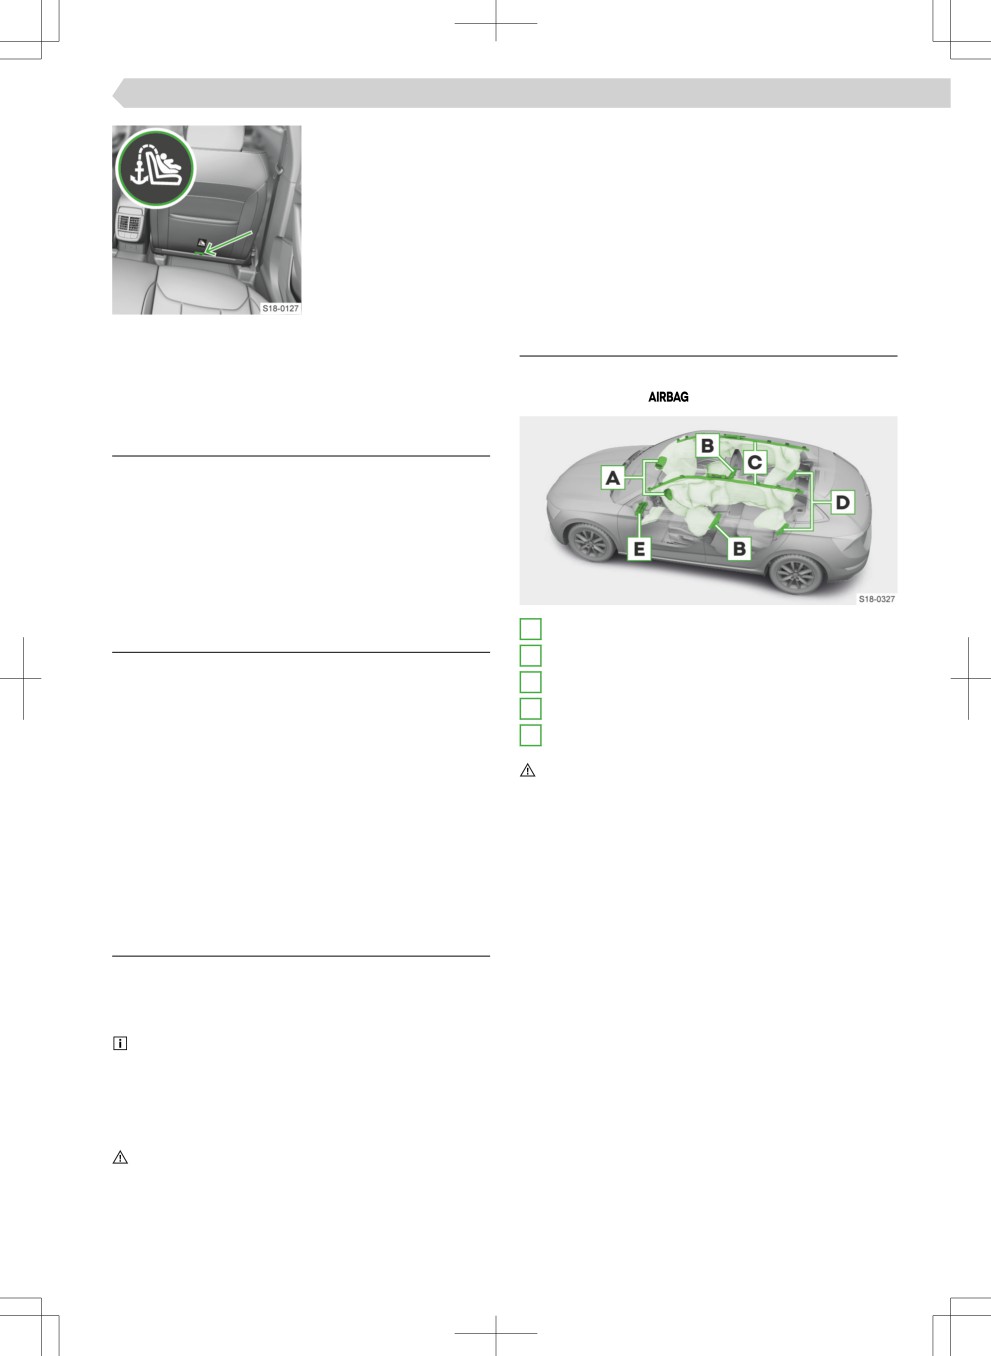
Airbag overview
sary.
The installation location of the airbags is marked
with the lettering
Airbags
Usage
The airbag system provides, as a supplement to the
seat belts, additional occupant protection during se-
vere frontal and side-on collisions.
The best possible protective effet of the airbag is
achieved only when the seat belt is also worn. The
airbag system is no substitute for the seat belts.
A
Front airbags
What you should be mindful of
B
Side airbags - front
Airbag systems can only properly protect if all occu-
C
Head airbags
pants have been secured and they are in the correct
seating position.
D
Side airbags - rear
No persons, animals or objects such as cup holders
E
Driver's knee airbag
or hangers for clothes may be in the deployment
WARNING
area of the airbags » page 41.
Danger of a functional restriction of the side airbags!
▶ Do not cover or stick anything over the steering
▶ Do not exert excessive forces, e.g. impacts, on the
wheel or the dash panel. The front airbags were
seat backs.
not able to deploy.
▶ Do not use seat covers that have not been ap-
The front passenger airbag should be switched off in
proved by ŠKODA.
some situations » page 42.
▶ Have damaged seat covers at the installation loca-
tion of the side airbags repaired by a specialist ga-
rage.
Functionality
Deactivating the airbags
When sinking into the iÄĔated airbag, the forward
We recommend having airbags other than the front
movement of the body is damped and the risk of in-
passenger airbag deactivated » page 42, Opera-
jury is reduced.
tionby a ŠKODA service partner.
As the airbags iÄĔate, smoke is released. This
Deactivation of the airbags should be considered in
does not indicate a vehicle fiÙe.
cases such as the ones below:
Airbag deployment in the event of an accident
▶ If the driver's seat adjustment is correct, the dis-
Airbag deployment is iÄĔueÄed by many factors.
tance of at least 25 cm between the centre of the
The deceleration rate at the time of impact is crucial.
steering wheel and the sternum cannot be main-
tained.
WARNING
Danger of serious or fatal injuries!
▶ Additional operating controls for a physically disad-
▶ Maintain the correct seating position.
vantaged driver are installed in the vehicle.
▶ Do not keep your limbs in the deployment area of
▶ The vehicle has special seats, e.g. orthopaedic
the airbags.
seats without side airbags.

42
Restraint systems and airbags › Key switch for the front passenger airbag
illuminates for 4 seconds after the ignition is
Operation
switched on and then Ĕashes for 12 seconds
Before switching off/sõitchiÄg on the front pas-
- Airbag or belt tensioner deactivated with the diag-
nostic device
senger airbag
Message regarding the deactivated airbag or belt
› Completely fold out the key bit.
tensioner
Switch front passenger front airbag oÄ/off
WARNING
› Switch off the ignition.
If an airbag is deactivated during the sale of the vehi-
› Open the passenger
cle, inform the buyer!
door.
› Insert the key bit into
the slot in the key
Requirements
switch as far as it will
✓ Ignition on
go.
› To Switch off, carefully
rotate the key switch
Troubleshooting
into the position
Airbag system faulty
› To Switch on, carefully rotate the key switch into
illuminates
the position
Message regarding an airbag fault
› Remove the key bit from the slot.
› Close the passenger door.
› Seek the help of a specialist garage.
› Turn on the ignition and check that the front pas-
senger airbag indicator lights are lit up.
Key switch for the front passenger
WARNING
airbag
When the passenger airbag is switched off, the head
airbag on the passenger side is also switched off at
Usage
the same time.
Deactivation of the front passenger airbag is provi-
Warning lights
ded for the following cases, for example:
▶ A rear-facing child seat is mounted on the front
passenger seat.
▶ The vehicle has special seats, e.g. orthopaedic
seats without side airbags.
▶ The minimum distance to the control panel cannot
be maintained.
What you should be mindful of
▶ After switching on the ignition, the two indicator
WARNING
lights light up bÙieĔû.
Danger of fault in the passenger airbag deactivation
▶ If the system is OK, both of the indicator lights go
system!
out.
▶ Only switch off the airbag when the ignition is
switched off.
▶ One of the indicator lights then lights up again de-
pending on the position of the key switch:
WARNING
lights up - front passenger airbag switched
Danger of unexpected deployment of the passenger
airbags in an accident!
off
▶ After switching off the passenger airbag with the
lights up 65 secs after the ignition is
key bit, do not leave the key bit inserted in the key
switched on - passenger front airbag
switch while driving. Shocks can cause the Key as-
switched on
signment to turn in the slot and trigger the airbag.

Lighting, windscreen wipers and washers › Exterior lighting
43
Troubleshooting
Lighting, windscreen wipers and
Key switch for airbag deactivation is faulty
washers
Ĕashes together with
The front passenger airbag will not be de-
Exterior lighting
ployed in the event of an accident!
Functionality
› Have the airbag system checked by a specialist ga-
rage immediately.
Unless otherwise stated, the light works when the
ignition is switched on.
Daylight running lights
The daytime running lights illuminate the area in
front of the vehicle.
In vehicles for certain markets, this also provides
lighting for the rear area of the vehicle.
Operating conditions
✓ The lights switch is in position
,
or
Switching the low beam oÄ/off automatically
The low beam is automatically switched on or off de-
pending on the lighting conditions.
Operating conditions
✓ The light switch is in the
position.
The automatic headlight circuit is indicated by the il-
lumination of the symbol
in the light switch.
Switching low beam on automatically in rain
Operating conditions
✓ The light switch is in the
position.
✓ The function is activated.
✓ The windscreen wipers are switched on for lon-
ger than 30 seconds.
The automatic headlight circuit is indicated by the il-
lumination of the symbol
in the light switch.
Full LED Headlights
When the light switch is in position
, the head-
lights provide the best possible beam of light in front
of the vehicle. The Dynamic cornering light function
ensures the best possible illumination of the curve
area.
CORNER function
The CORNER function is intended for turning or ma-
noeuvring (e.g. when parking).
The function illuminates the vicinity of the vehicle
front in the direction of travel.
Operating conditions
✓ The turn signal is switched on or the front wheels
are steered sharply.
✓ The low beam is switched on.
✓ The fog lights are not switched on.
✓ The driving speed is lower than 40 km/h.
When no light is switched on
The symbol in the light switch may also light up in
the instrument cluster, indicating that it is necessary
to switch on the light.
44
Lighting, windscreen wipers and washers › Exterior lighting
illuminates
Tap the lever in the opposite direction ahead of
time to stop signalling.
› Switch on the light.
Fog light
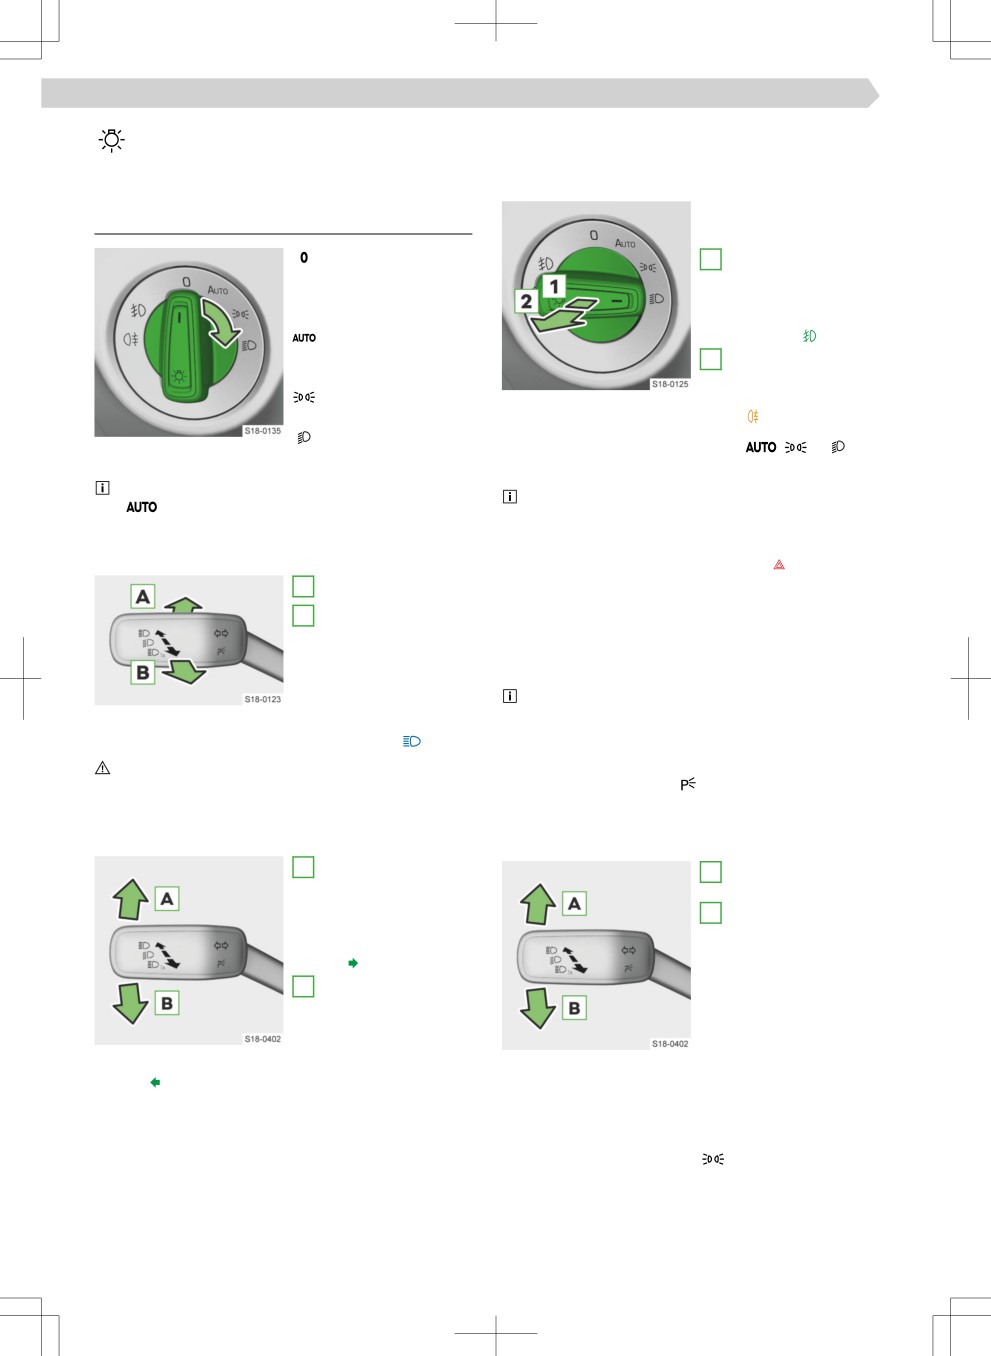
Positions for pulling out
Operation
the light switch
Switching off the
1
Fog lights - when
lights except the
switched on, the in-
daytime running
dicator light in the
lights
instrument cluster il-
Switching the low
luminates
beam oÄ/off auto-
2
Rear fog light - when
matically
switched on, the in-
Switching on the
dicator light in the
parking lights
instrument cluster illuminates
Switching on the low
› Turn the light switch to position
,
or
beam
›
Pull the light switch to the appropriate position.
As the basic position of the light switch, use posi-
The rear fog light does not illuminate when an ac-
tion
cessory is connected to the trailer socket.
High beam and headlight Ĕasher
Hazard warning light system
The high beam works when the low beam is on.
› Press the button to switch on or off in the mid-
A
Switch on high beam
dle part of the control panel.
B
Switch off main
The hazard warning lights can be switched on auto-
beam / switch on
matically during hard braking. The hazard warning
headlight ĔasheÙ
lights are then switched off again automatically
when starting off or accelerating.
When the main beam or
When the hazard warning system is on and the
headlight ĔasheÙ is
turn signal is switched on, the hazard warning lights
switched on, the indica-
will be switched off temporarily and only the turn
tor lamp lights up in the instrument cluster
signal will Ĕash on the relevant side of the vehicle.
CAUTION
Risk of an accident!
One-sided parking light
▶ Do not dazzle other road users with the high beam.
The one-sided parking light allows one side of the
parked vehicle to be illuminated through activation
Turn signal
of the corresponding sidelights.
A
Switching on the
A
Switch on the side-
turn signal light on
lights on the right
the right - the warn-
B
Switch on the side-
ing light Ĕashes in
lights on the left
the instrument clus-
ter
› Switch off the ignition.
B
Switching on the
› Move the lever to the
turn signal light on
appropriate position.
the left - the warn-
› Lock the vehicle.
ing light Ĕashes in
When the parking light is
the instrument clus-
switched on, an acoustic
ter
warning signal sounds and the driver's door is
Turn signal - convenience signalling
opened. After a few seconds or after the driver's
Convenience signalling enables three Ĕashes of the
door is closed, the warning signal will stop.
turn signal lights without having to move the lever
Double-sided parking light
up or down.
The two-sided parking light allows the parked vehi-
› Tap the control lever up or down.
cle to be illuminated through activation of the side-
lights.
The corresponding turn signal lights Ĕash three
times.
› Turn on the ignition.

Lighting, windscreen wipers and washers › Exterior lighting
45
› Turn the light switch to position
Adjust headlights for driving in right / left-hand
traffic
› Switch off the ignition.
Applies to full LED headlights.
› Lock the vehicle.
When the parking light is switched on, an acoustic
› In Infotainment, select the following menu:
warning signal sounds after the ignition is switched
off and the driver's door is opened. After a few sec-
Or:
onds or after the driver's door is closed, the warning
signal will stop.
› Activate the travel mode function.
The light may switch off automatically if the 12-volt
vehicle battery is too low. If the parking lights on
both sides are switched on with the ignition off, the
Troubleshooting
lights will not be switched off automatically and the
12 volt vehicle battery may be discharged.
Turn signal light defective
Ĕashes faster - turn signal light on the right de-
fective
Settings
›
Check the turn signal light on the right.
Activating/deactivating the automatic headlights
Ĕashes faster - turn signal light on the left de-
system in rain
fective
The function is activated or deactivated in the fol-
lowing menu in the Infotainment system:
› Check the turn signal light on the left.
does not Ĕash when the trailer is hitched -
Or:
trailer turn signal light defective
› Check the trailer lighting.
Activating/deactivating convenience signalling
Light bulb or LED bulb is defective
The function is activated or deactivated in the fol-
or
illuminates
lowing menu in the Infotainment system:
Information appears in the display regarding
the defective lights.
Or:
› Replace the defective bulb.
› In case of a defective LED bulb, contact a specialist
garage for help.
Headlamp levelling, LED headlights
› Select the position of the control according to the
The headlights are misted up on the inside
vehicle's current load status.
Inside the headlights, moisture may occur. This is not
a defect.
Front seats occu-
pied, boot empty
Malfunction of the automatic headlight circuit
All seats occupied,
› Clean the windscreen in the area of the rain/light
boot empty
sensor.
All seats occupied,
Beam of light in front of the vehicle has shortened
boot loaded
Headlight defective.
Driver's seat occu-
pied, boot loaded
› Seek the help of a specialist garage.
Driving lights defective
If a message regarding the failed driving lights is dis-
For the Full LED headlights, the headlight range
played, the light will work in emergency mode.
control is adjusted automatically.
›
Drive on, exercising appropriate caution.
WARNING
› Seek the help of a specialist garage.
Risk of an accident!
An incorrectly adjusted headlight range can cause in-
suffiieÄt vehicle lighting or can dazzle other road
users.
▶ Adjust the headlight range correctly.

46
Lighting, windscreen wipers and washers › COMING HOME, LEAVING HOME exterior lighting
COMING HOME, LEAVING HOME
Operation
exterior lighting
Switching on
Functionality
› Push the lever in the
direction of the arrow.
The COMING HOME function turns on the light after
It lights up in the instru-
turning off the ignition and opening the driver's door.
ment cluster
from
The light switches off automatically after the set
the isolation box.
lighting time has elapsed.
The LEAVING HOME function switches on the light
when unlocking the vehicle with the wireless remote
Switching off
control.
› Manually switch the high beam on or off.
Operating conditions
Function restriction
✓ Visibility has worsened.
The system may dazzle other road users if their
✓ The light switch is in the
position.
headlights/lights are not detected for the following
reasons, for example:
▶ The headlights/lights of oncoming vehicles are
Settings
covered by crash barriers, for example.
This function is set in the following menu in the Info-
▶ The headlamps/lights of the oncoming or preced-
tainment system:
ing vehicle are dirty or not functioning.
Or:
Settings
Activation/deactivation
The function is activated or deactivated in the fol-
lowing menu in the Infotainment system:
Light Assist high-beam assist system
Functionality
Or:
The high beam assist system automatically switches
the high beam on and off.
WARNING
Replace light bulbs
Risk of accident!
▶ If necessary, manually switch the high beam on or
What you should be mindful of
off.
DIY replacement of the following bulbs is possible.
Have the remaining light sources replaced by a spe-
Operating conditions
cialist garage.
✓ The system is activated.
The new bulb must conform to the speifiatioÄ of
the original light bulb. The name of the bulb is
✓ The light switch is in the
position.
marked on the bulb socket.
✓ The driving speed is higher than 30 km/h.
✓ The low beam is switched on.
After changing a bulb in the high beam or in the front
fog light, have the headlights adjusted by a specialist
garage.
CAUTION
Halogen lamps are pressurised and can burst during
replacement!
▶ Wear gloves and safety goggles.
Lighting, windscreen wipers and washers › Replace light bulbs
47
NOTICE
Symbols on the cover
Contamination of the halogen lamp reduces the life
cap:
of the lamp!
Secure position
▶ Do not touch the glass of the light bulb with your
Removal/insertion
bare fiÄ£eÙs.
position
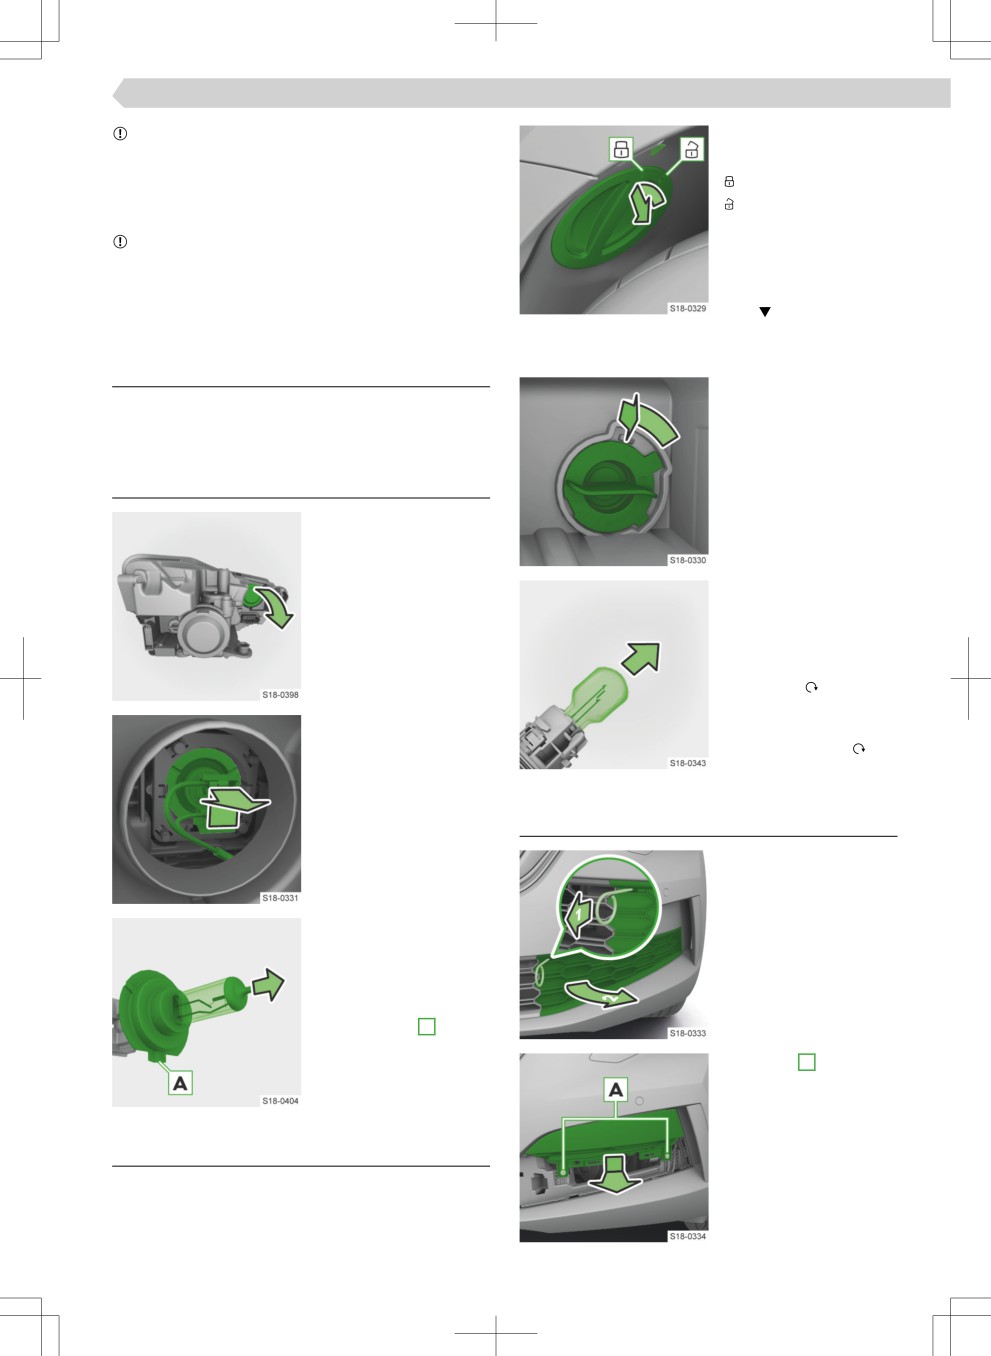
NOTICE
› Turn the cover cap
Danger of headlight damage due to the ingress of
with the corresponding
water and dirt!
symbol until it is facing
▶ Always fit the protective cap on the headlight cor-
the marking on the
rectly after changing a bulb.
wheel arch.
› Remove the cover cap.
Conditions for changing a bulb
› Turn and remove the
✓ Ignition off
socket with the bulb.
✓ Light switched off
Main beam
› Remove the protective
cap from the headlight.
› Change the bulb in the
socket.
› Insert the socket with
the light bulb into the
headlight and turn it
clockwise to secure.
› Insert the cover cap in-
› Press the socket with
to the wheel arch and
the light bulb upwards
turn it clockwise to
and remove it.
secure.
Fog lights
› Remove the cover with
the bracket from the
tool kit and remove it
towards the outside of
› Change the bulb in the
the bumper.
socket.
› Insert the base with
the new light bulb into
the headlight so that
the fixiģ lug A is
pointing down.
› Unscrew screws A.
› Reinstall the protective
› Remove the light
cap on the headlight.
downwards and for-
wards.
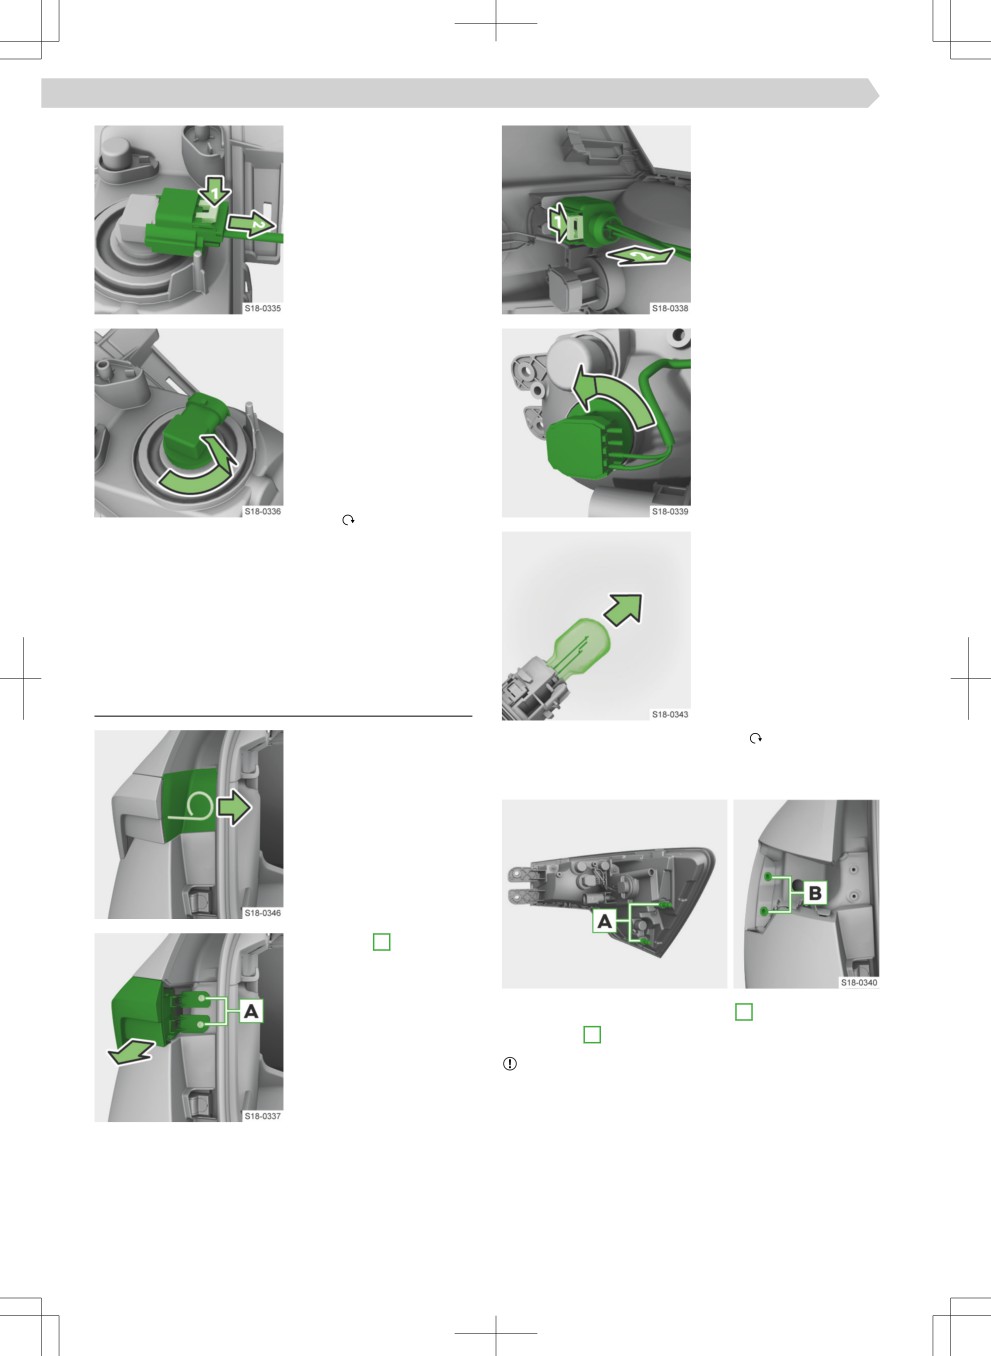
Front turn signal
› Adjust the front wheels so that the cover cap in
the wheel arch is accessible.
48
Lighting, windscreen wipers and washers › Replace light bulbs
› Release the connector
› Press the lock mecha-
and remove it from the
nisms on the connec-
bulb.
tor and remove the
connector.
› Turn the light bulb and
› Turn and remove the
take it out.
socket with the bulb.
› Push the new light bulb
into the light so that
the guide lugs on the
light bulb and the asso-
ciated openings in the
light are in alignment.
› Turn the bulb clock-
wise to secure.
› Attach the connector to the bulb, ensuring it clicks
› Change the bulb in the
into place.
socket.
› Reinstall the lamp and screw it on.
› Push the base with the
new light bulb into the
› First insert the cover in the outer bumper area.
luminaire so that the
› Press the cover in towards the centre of the
guide lugs on the base
bumper until it clicks into place.
and the associated
openings in the lumin-
aire are Ĕush.
Rear turn signal
› Turn the socket clock-
› Remove the cover with
wise to secure.
the bracket from the
› Insert the connector into the light until it clicks into
tool kit.
place.
› Unscrew screws A and
remove the lamp.
› Insert the lamp with the cones screws into the
openings B in the body.
NOTICE
Risk of damage to the electrical system!
▶ Make sure that the lines between the lamp and the
body are not pinched when the lamp is inserted.
› Screw on the lamp.
› Fit the cover of the light, ensuring it clicks into
place.
Большое спасибо!
Ваше мнение очень важно для нас.
Нет комментариевНе стесняйтесь поделиться с нами вашим ценным мнением.
Текст