Skoda Karoq (2019 year). Manual — part 2

›
Carefully insert the key into the slot in the key switch as far as the stop.
›
Use the key to turn the slot of the key switch carefully into the position .
›
Pull the key out of the slot in the key switch
›
Close the passenger door.
›
Check that the warning light
illuminates after the ignition is switched
on.
Switching on
›
Switch off the ignition.
›
Open the passenger door.
›
On the radio key, fold the key bit out fully
»
.
›
Carefully insert the key into the slot in the key switch as far as the stop.
›
Use the key to turn the slot of the key switch carefully into the position .
›
Pull the key out of the slot in the key switch
›
Close the passenger door.
›
Check that the warning light
illuminates after the ignition is switched
on.
WARNING
■
The driver is responsible for whether the airbag is switched on or switch-
ed off.
■
Only switch off the airbag when the ignition is switched off! Otherwise a
fault can occur in the system for deactivating the airbag.
■
If the warning lights
flash, the front passenger airbag will not
be deployed in the event of an accident! Have the airbag system checked
by a specialist garage immediately.
CAUTION
An insufficiently folded out key bit can damage the key switch!
Transporting children safely
Child seat
Introduction
To reduce the risk of injury in the event of an accident, children must be trans-
ported in child seats!
The information in this Owner´s Manual as well as the instructions of the child
seat manufacturer must be observed when installing and using the child seat.
For safety reasons, we recommend that you always transport child seats on
the rear seats. Children should be transported on the front passenger seat only
in exceptional circumstances.
Child seats complying with the ECE-R 44 Economic Commission for Europe
standard must be used.
Child seats that comply with the ECE-R 44 standard are identified with a test
mark that cannot be removed: large E within a circle with the test number be-
low.
WARNING
■
One should never carry children, and also not babies! - on one's lap.
■
When leaving the vehicle, do not leave children unattended in the vehicle.
Children might not be capable of leaving the vehicle or helping themselves
independently in the event of an emergency. Can be fatal at very high or
very low temperatures!
■
The child must be secured in the vehicle during the entire journey! Other-
wise, the child would be thrown through the vehicle in the event of an acci-
dent, causing fatal injuries to both the child and other occupants.
■
Children are exposed to an increased risk of injury in the event of an acci-
dent if they lean forward or adopt an incorrect seated position when the
vehicle is moving. This particularly applies to children who are transported
on the front passenger seat as they can suffer severe, or even fatal injuries
if the airbag system is deployed!
■
Pay particular attention to the information provided by the manufacturer
of the child safety seat regarding the correct routing of the belt. Seat belts
which are not correctly adjusted can themselves cause injuries even in mi-
nor accidents.
29
Transporting children safely
-------------------------------------------------------------------------------------------------------------------------------------------------------------

WARNING (Continued)
■
Safety belts must be checked to ensure that they are running properly.
One should also ensure that the belt is not damaged by sharp-edged fit-
tings.
■
When installing the child seat on the back seat, the corresponding front
seat must be adjusted so that there is no contact between the front seat
and the child seat or the child being transported in a child seat.
■
When installing a child seat in which the child faces forward, adjust the
head restraints so that they are as high as possible.
■
If the head restraints still prevent the child seat from being installed, even
in the lowest position, you will need to remove them
moving the child seat, refit the head restraints.
■
When using a separate child seat cushion, set the headrest so that the
child's head is flush to the height of the headrest upper edge, but does not
protrude above this
C
.
Note
We recommend that you use child seats from ŠKODA Original Accessories.
These child seats were developed and also tested for use in ŠKODA vehicles.
They meet the ECE-R 44 standard.
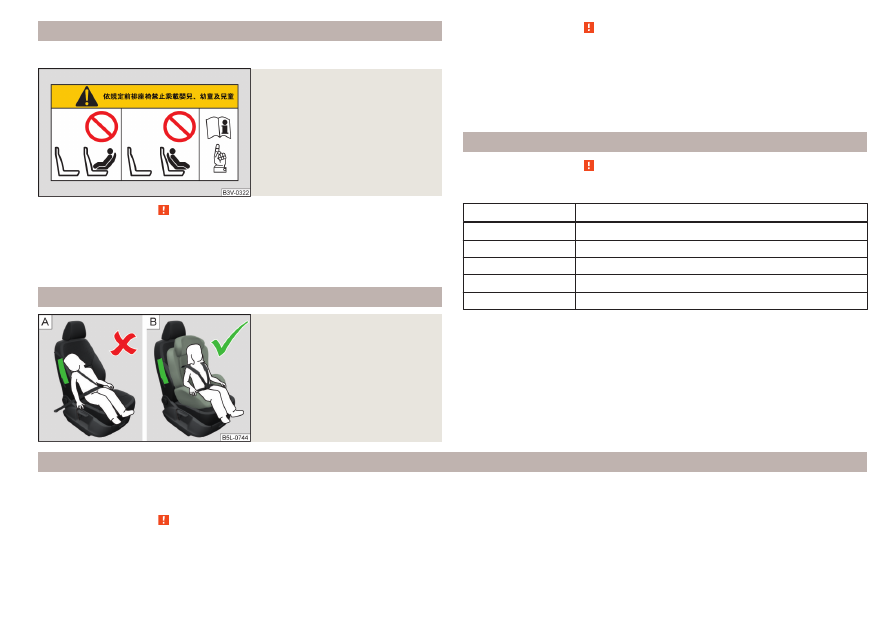
Use of a child seat on the front passenger seat (variant 1)
Does not apply to Taiwan
Fig. 25 Warning stickers
Read and observe on page 29 first.
Never use a rear-facing child restraint system on a seat which is protected
by an active airbag positioned in front of it. This could cause serious injury
to the child, even death.
This is indicated also on stickers that are located at the following positions.
▶
On the passenger sun visor
- .
▶
On the B-pillar on the front passenger side
– .
The following instructions must be followed when using a child seat on the
front passenger seat.
▶
The front passenger airbag must be deactivated if using a rear-facing child
seat
»
▶
If possible, adjust the front passenger seat backrest so that it is as vertical, so
as to ensure secure contact between the passenger seat backrest and the
back of the child seat.
▶
If possible, move the front passenger seat backwards so that there is no con-
tact between the front passenger seat and the child seat behind it.
▶
Set the height-adjustable front passenger seat as high up as possible.
▶
Set the front passenger seat belt as high up as possible.
▶
With child safety seats in groups 1, 2 and 3, make sure that the loop-around
fittings attached to the child seat headrest is positioned in front of or at the
same height as the loop-around fittings on the B pillar on the passenger side.
Adjust the height of the front passenger seat belt so that the belt does not
“jam” in the return pulley. In the event of an accident, there is the risk of in-
jury to the neck of the child carried due to the seat belt!
WARNING
■
Never use a rear-facing child seat on the front passenger seat if the pas-
senger airbag is activated. This child safety seat is positioned in the deploy-
ment area of the front passenger airbag. The airbag may cause the child se-
vere, or even fatal injuries, in the event of it being deployed.
■
As soon as the child seat, in which the child is transported with their back
in the direction of travel, is no longer used in the front passenger seat, the
front passenger airbag should be switched on again.
30
Safety
-------------------------------------------------------------------------------------------------------------------------------------------------------------
Use of a child seat on the front passenger seat (variant 2)
Applies to Taiwan
Fig. 26
Warning stickers
Read and observe on page 29 first.
No babies, infants or children to be carried on the passenger seat.
A sticker to this effect can also be found on the front passenger's sun visor
.
Child safety and the side airbag
Fig. 27
Incorrect seated position of a
child who is not properly se-
cured – risk from the side air-
bag/Child properly protected by
safety seat
Read and observe on page 29 first.
The child must not be positioned in the deployment area of the side airbag
- .
There must be sufficient room between the child and the area into which the
side airbag will deploy to allow the airbag to provide as much protection as
possible
- .
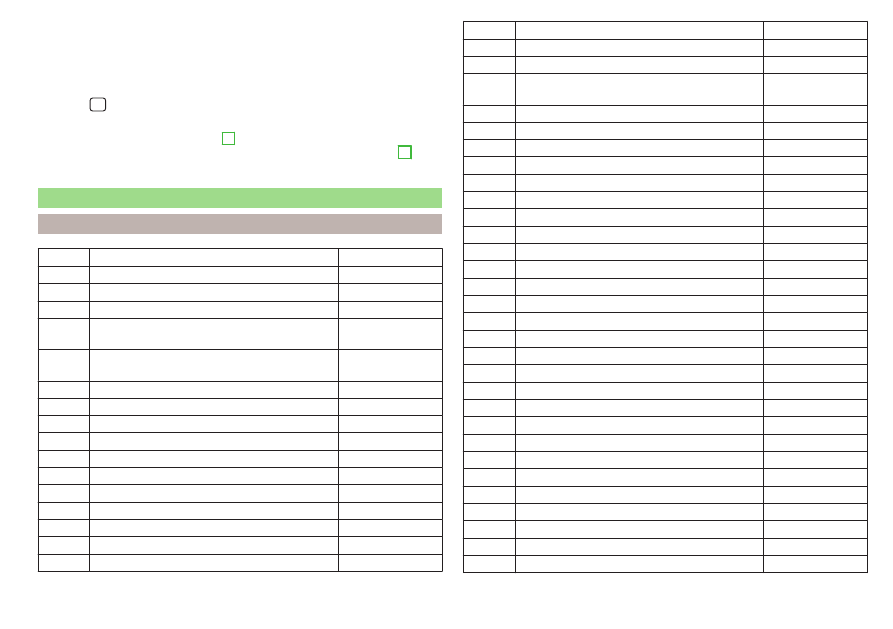
Classification of child seats
Read and observe on page 29 first.
Classification of child seats according to the ECE-R 44 standard.
Group
Weight of the child
0
up to 10 kg
0+
up to 13 kg
1
9 - 18 kg
2
15 - 25 kg
3
22-36 kg
Use of child safety seats which are secured with a safety belt
Never use a rear-facing child seat on the front passenger seat if the passenger airbag is activated. This child safety seat is positioned in the deployment area of
the front passenger airbag. The airbag may cause the child severe, or even fatal injuries, in the event of it being deployed.
Read and observe on page 29 first.
Overview of the usability of child seats secured with a seat belt on seats in accordance with the ECE-R 16 standard.
31
Transporting children safely
-------------------------------------------------------------------------------------------------------------------------------------------------------------
Group
Passenger seat with activated
front airbag
Passenger seat with deactivated
front airbag
Rear seats
Outside
Rear seat
Centre
0
up to 10 kg
X
U
U
U
0+
up to 13 kg
X
U
U
U
1
9 - 18 kg
UF
U
U
U
2
15 - 25 kg
UF
U
U
U
3
22 - 18 kg
UF
U
U
U
a)
It is forbidden to install a child seat with a support base on the middle rear seat.
b)
Set the height-adjustable front passenger seat as high up as possible.
U
The seat is suitable for the use of approved child seats in this weight group category “Universal”.
UF
The seat is suitable for the use of approved forward-facing child seats in the “Universal” weight group category.
X
The seat is not suitable for children in this weight group.
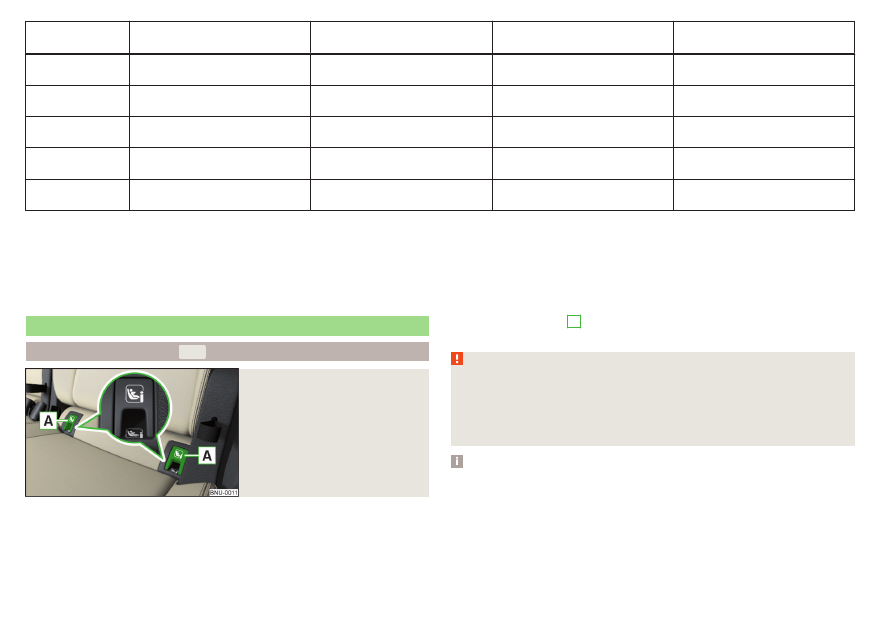
Fastening systems
attachment points of the system
Fig. 28
Labels of the system
is a system for securing child seats quickly and safely.
Two locking eyes are located between the seat backrest and the seat cushion
of the outer rear seats and front passenger seat for fixing the system
child seat in place.
First, remove the caps
A
in order to access the locking eyes
. After
removing the child seat, replace he caps.
WARNING
■
Always refer to the instructions of the manufacturer of the child seat
when installing and removing a child seat with the system.
■
Never attach other child seats, belts or objects to the attachment points
intended for the installation of a child seat with the system – risk of
death!
Note
■
A child seat fitted with the system can only be mounted in a vehicle fit-
ted with a system if the child seat has been approved for this type of ve-
hicle. Further information is available from a ŠKODA Partner.
■
Child seats with the system can be purchased from ŠKODA Original Ac-
cessories.
32
Safety
-------------------------------------------------------------------------------------------------------------------------------------------------------------

Use of child safety seats with the System
Never use a rear-facing child seat on the front passenger seat if the passenger airbag is activated. This child safety seat is positioned in the deployment area of
the front passenger airbag. The airbag may cause the child severe, or even fatal injuries, in the event of it being deployed.
Overview of the usability of child seats fastened with the system on each of the seats in accordance with the ECE-R 16 standard.
Group
Size class of
Front passenger seat
with activated front air bag
Front passenger seat
with front airbag switched
off
Rear seats
Rear seat
Centre
0
up to 10 kg
E
X
X
IL
X
0+
up to 13 kg
E
X
X
IL
X
D
C
1
9 - 18 kg
D
X
X
IL
IUF
X
C
B
B1
A
2
15 - 25 kg
-
X
X
IL
X
3
22 - 18 kg
-
X
X
IL
X
a)
The size category is shown on the label attached to the child seat.
b)
If the front passenger seat is fitted with system attachment points, it is suitable for the installation of an child seat with “Semi-Universal” approval.
c)
The seat is suitable for the fixing system.
IL
The seat is suitable for installation of a child seat with the “Semi-Universal” approval. The “Semi-Universal” category means that the child seat with
the system is approved for your vehicle. Observe the list of vehicles that comes with the child seat.
IUF
The seat is suitable for the use of forward-facing child seats approved in this weight group.
X
The seat is not fitted with system attachment points.
33
Transporting children safely
-------------------------------------------------------------------------------------------------------------------------------------------------------------
Using child seats with the system
Front passenger seat
with activated front air bag
Front passenger seat
with front airbag switched off
Rear seats outside
Rear seat middle
X
X
i-U
X
The seat is suitable for forward and backward facing child seats of
the category “Universal”.
The seat is not suitable for the child seat of the category “Universal”.
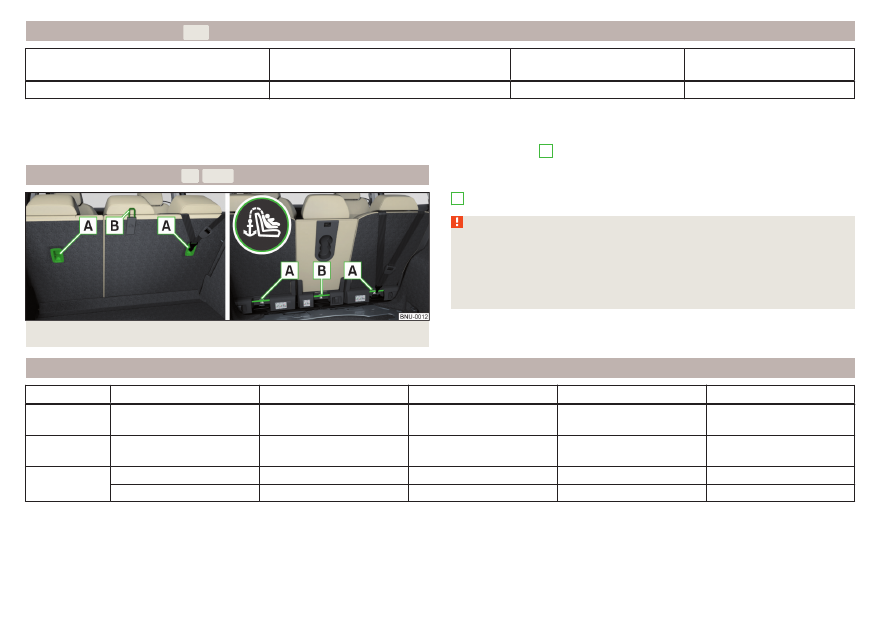
Attachment points of the system
Fig. 29 System attachment points : Version 1/version 2
i-U
X
is a fastening system, which restricts the movement of the upper part
of the child seat.
The locking eyes
A
for attaching the belt of a child seat with the
system are located on the rear side of the rear seat backrests
Some country-specific models can also be fitted with an attachment point
B
.
WARNING
■
Always refer to the instructions from the manufacturer of the child seat
when installing and removing a child seat with the system.
■
Only use child seats with the system on the seats equipped with
attachment points with the logo .
■
Only ever attach one belt from the child seat to a locking eye.
Recommended child seats
Group
Manufacturer
Type
Attachment
Order number
Approval number (E1 ...)
0+
up to 13 kg
Britax Römer
Baby Safe Plus
Isofix base frame
1ST019907
04 301146
1
9 - 18 kg
Britax Römer
Duo Plus TT
and
DDA000006
04 301133
2-3
15 - 18 kg
Britax Römer
000019906K
04 301198
Britax Römer
Kidfix II XP
000019906L
04 301323
a)
For optimum protection, especially in the case of a side collision, it is recommended to use this child seat together with back part.
34
Safety
-------------------------------------------------------------------------------------------------------------------------------------------------------------
35
Transporting children safely
-------------------------------------------------------------------------------------------------------------------------------------------------------------
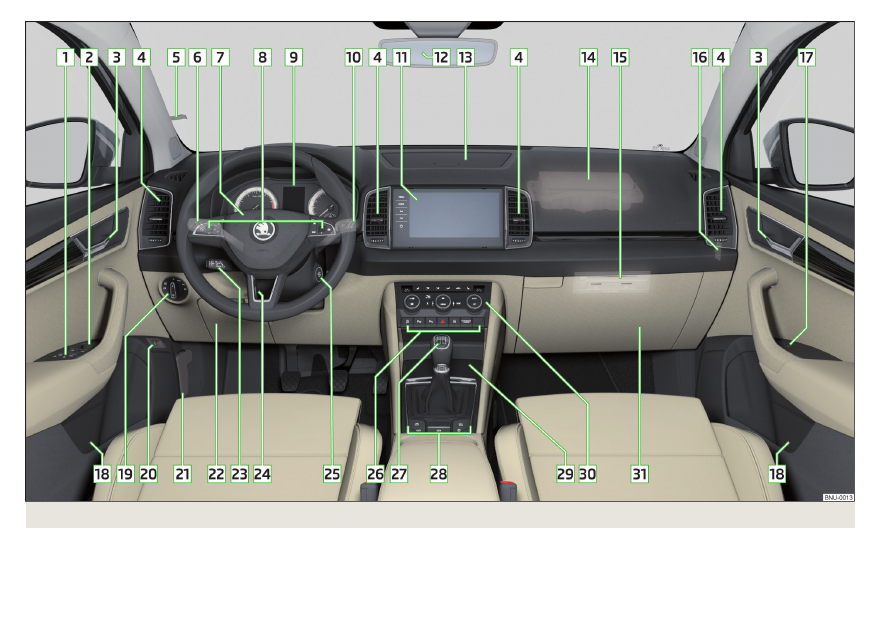
Fig. 30 Cockpit example for LHD
36
Operation
-------------------------------------------------------------------------------------------------------------------------------------------------------------
Operation
Cockpit
Overview
Electric power windows
Electric exterior mirror adjustment
Door opening lever
Air outlet vents
Ticket holder
Operating lever (depending on equipment):
▶
Indicator light and high-beam headlight
▶
Speed regulating system
▶
Speed limiter
▶
Headlight assist
Steering wheel with horn/with driver's front airbag
Buttons for operating the information system
Instrument cluster
Operating lever:
▶
Windscreen wipers and washers
▶
Information system
Infotainment
Interior rear-view mirror
Storage compartment on the dash panel
Front passenger airbag
External Infotainment module (in the passenger storage com-
partment)
Key switch for front passenger airbag deactivation (on the dash-
board side)
Power window in the front passenger door
Storage compartment
Light switch
Button for the boot lid
Bonnet release lever
Storage compartment
1
2
3
4
5
6
7
8
9
10
11
12
13
14
15
16
17
18
19
20
21
22
Operating lever for adaptive cruise control
Steering wheel locking lever
Depending on equipment fitted:
▶
Ignition lock
▶
Starter button
Bar with buttons and warning lights (depending on the equip-
ment fitted):
▶
START STOP
▶
Park Assist
▶
Parking aid
▶
Hazard lights
▶
Central locking system
▶
/
Warning lights for the front seat passenger air-
bag
Depending on equipment fitted:
▶
Gearshift lever (manual gearbox)
▶
Selector lever (automatic gearbox)
Bars with buttons (depending on the equipment fitted):
▶
Selection of travel mode
▶
Auto Hold
▶
Electric parking brake
▶
Stabilisation control ESC / Traction control TCS
▶
Offroad mode
Storage compartment
Depending on equipment fitted:
▶
Phonebox
▶
12 volt power socket
▶
Cigarette lighter
▶
Ashtrays
▶
USB input
Controls for heating/air conditioning
Storage compartment on the front passenger side
Note
The layout of the controls on right-hand drive vehicles differs partially from
that shown in
23
24
25
26
27
28
29
30
31
37
Cockpit
-------------------------------------------------------------------------------------------------------------------------------------------------------------
Instruments and warning lights
Instrument cluster
Introduction
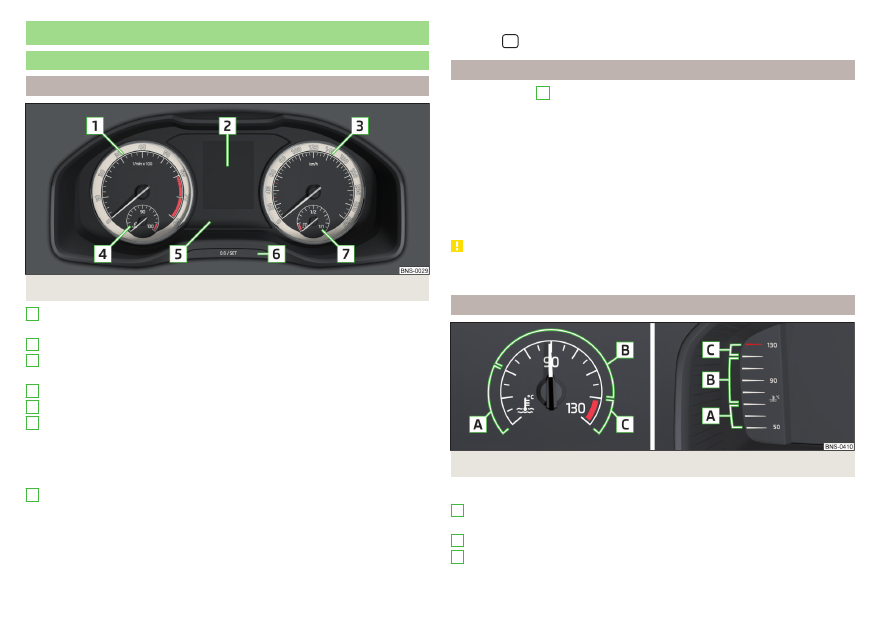
Fig. 31 Instrument cluster
Engine revolutions counter
▶
with warning lights
Display
Speedometer
▶
with warning lights
Coolant temperature gauge
Bar with warning lights
Operation button
▶
Set the time
▶
Reset counter for distance travelled (trip)
▶
Displaying the distance and days until the next service interval
Fuel gauge
The brightness of the instrument illumination is set automatically depending
on the ambient lighting throughout. If the visibility is poor and the lights are
not on, the brightness of the instrument lighting reduces to alert the driver to
switch on the lights in due time.
1
2
3
4
5
6
7
The brightness of the instrument lighting can be adjusted in Infotainment in
the menu
/ → → → Light.
Engine revolutions counter
The tachometer
1
on page 38 shows the actual engine speed per mi-
nute.
The beginning of the tachometer red scale range indicates the maximum per-
mitted speed for an engine that has been driven-in and has reached operating
temperature.
You should shift into the next highest gear before the red scale of the revolu-
tion counter is reached, or select mode D/S on the automatic gearbox.
The gear recommendation is important to note in order to maintain the opti-
mum engine speed
.
CAUTION
The pointer of the engine revolutions counter must reach the red area for only
a short time - there is a risk of engine damage!
Coolant temperature gauge
Fig. 32 Coolant temperature gauge: Version 1/version 2
The display only works if the ignition is switched on.
Cold area, The engine has not yet reached its operating temperature.
Avoid high speeds and high engine loads.
The operating range
High temperature range, the warning light illuminates in the instrument
cluster
A
B
C
38
Operation
-------------------------------------------------------------------------------------------------------------------------------------------------------------
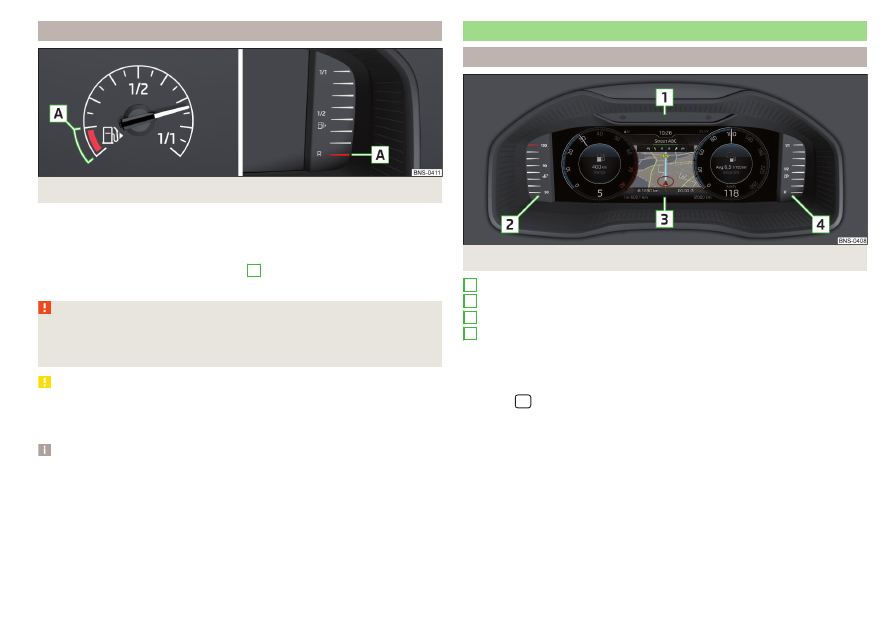
Fuel gauge
Fig. 33 Fuel gauge: Version 1/version 2
The display only works if the ignition is switched on.
The capacity of the fuel tank is approximately 50 litres for vehicles with front-
wheel drive, and approximately 55 litres for vehicles with four-wheel drive.
If the fuel level reaches the reserve level
A
, the
instrument cluster
illuminates
WARNING
For the vehicle systems to function correctly, and thus for safe driving,
there must be sufficient fuel in the tank. Never drain the fuel tank com-
pletely – risk of accident!
CAUTION
Never drive until the fuel tank is completely empty! The irregular supply of fuel
can cause misfiring, which can result in damage to parts of the engine and the
exhaust system.
Note
The arrow next to the symbol within the fuel gauge displays the installa-
tion location of the fuel filler on the right side of the vehicle.
Digital instrument cluster
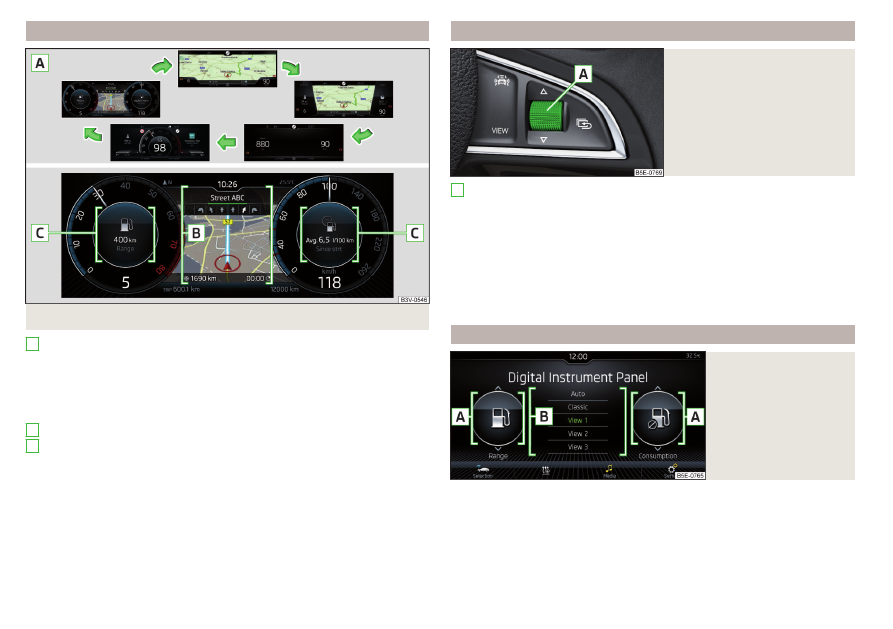
Introduction
Fig. 34 Digital instrument panel
Bar with warning lights
Coolant temperature gauge
Display
Fuel gauge
The brightness of the instrument illumination is set automatically depending
on the ambient lighting throughout.
The brightness of the instrument lighting can be adjusted in Infotainment in
the menu
/ → → → Light.
1
2
3
4
39
Instruments and warning lights
-------------------------------------------------------------------------------------------------------------------------------------------------------------
Display in the digital instrument cluster
Fig. 35 Display versions / example of the classic display
Display versions (from the left)
▶
Classic display
▶
Advanced display
▶
Modern display
▶
Basic display
▶
Sporty display
Central display area
Additional information
A
B
C
Operating the instrument cluster
Fig. 36
Buttons/dial on the multifunc-
tion steering wheel
Rotate - Movement in the selected menu / setting values / Manually
change map scale (applies to Infotainment Columbus, Amundsen)
Press - confirm selected menu item
Turn and press - switch on automatic change of the map scale (applies to
Infotainment Columbus, Amundsen)
Press - Change the display version
Hold - Display the prefix options menu with additional information
Press - display main menu / return to a previous level in the menu
pre-selection options for additional information
Fig. 37
Set the pre-selection
option in Infotainment
Select the pre-selection option
›
Hold the button on the multi-function steering wheel.
›
Select and confirm one of the following pre-selection options.
▶
Auto - additional information is displayed depending on the driving mode se-
lected
▶
Classic - Information on the engaged gear and the current speed
A
40
Operation
-------------------------------------------------------------------------------------------------------------------------------------------------------------
▶
View 1 - adjustable pre-selection option
▶
View 2 - adjustable pre-selection option
▶
View 3 - adjustable pre-selection option
Set the preselection option
The area code options View 1. View 2 and View 3 can be found in infotainment in
the menu
/ in the → Dig. Instrument cluster menu item.
▶
The desired additional information can be selected by moving your finger
vertically across the display in the
A
▶
Hold the desired function surface for the preselection option in area
B
to
save the selection.
Warning lights
Introduction
Parking brake
Brake system
Front seat belt warning light
Adaptive Cruise Control (ACC)
Power steering
Steering lock (KESSY system)
Stabilisation control (ESC)
Traction control (TCS)
Traction control (ASR) deactivated
Antilock brake system (ABS)
Rear fog light
Exhaust control system
Glow plug system (diesel engine)
EPC fault light (petrol engine)
Safety systems
Tyre pressure
Brake pads
Fuel reserve
Lane Assist
Turning signal system
Trailer turn signal lights
Fog lights
Speed regulating system
Speed limiter
Brake pedal (automatic gearbox)
Auto Hold function
Main beam
Automatic gearbox
Rear seat belt warning light
Alternator
Coolant
Engine oil pressure
Engine oil level
AdBlue
®
level too low (diesel engine)
AdBlue
®
error (diesel engine)
Bulb failure
Display when the light is switched off
Particle filter
Windscreen washer fluid level
Headlight assist
START STOP system
Display of a low temperature
Water in fuel filter (diesel engine)
Adaptive Cruise Control (ACC)
Distance warning (Front Assist)
Front Assist
Emergency call
Economy mode
Offroad mode
Adaptive chassis (DCC)
Service
41
Instruments and warning lights
-------------------------------------------------------------------------------------------------------------------------------------------------------------

The warning lights in the instrument cluster indicate certain functions or faults.
Some warning lights can be accompanied by acoustic signals and messages in
the display of the instrument cluster.
After switching on the ignition, some warning lights light up briefly as a func-
tion test. If the tested systems are OK, the corresponding warning lights go
out a few seconds after switching on the ignition or after starting the engine.
Warning lights in the display
Depending on the significance, the warning light
(danger) or
(warning) il-
luminates along with some other warning lights in the display.
Depending on vehicle equipment fitted, some indicator lights can be shown in
the display. For example. the coolant warning light can be shown as follows.
▶
- monochrome (“black and white”) display
▶
- coloured display
WARNING
■
Ignoring illuminated warning lights and related messages or instructions
in the display of the instrument cluster may lead to serious personal injury
or damage to the vehicle.
■
If you have to stop for technical reasons, then park the vehicle at a safe
distance from the traffic, switch off the engine and switch on the hazard
warning lights
. Place the warning triangle at the prescribed dis-
tance.
■
The engine compartment of your car is a hazardous area. While working
in the engine compartment, be sure to observe the following warnings
Parking brake
Read and observe on page 42 first.
illuminates - the parking brake is switched on.
Parking brake error
illuminates
Message: Fault: electronic parking brake
▶
Seek help from a specialist garage.
Parking on a slope that is too steep
illuminates
Message: Parking brake: gradient too steep. Log book!
▶
Find a parking space on a flat surface or on a slope that is not so steep.
Braking system
Read and observe on page 42 first.
lights up – the brake fluid level in the brake system is too low.
▶
Stop the vehicle, switch off the engine, and check the level of the brake fluid
WARNING
■
If warning light
illuminates simultaneously with warning light
Anti-lock braking system (ABS),
stop driving! Seek help
from a specialist garage.
■
A fault to the ABS system or the braking system can increase the vehi-
cle's braking distance – risk of accident!
Front seat belt warning light
Read and observe on page 42 first.
illuminates - the driver or front passenger has not fastened their seat belt.
At a speed of more than approximately 30 km/h, the warning light
flashes
and an audible warning sounds at the same time.
If the seat belt is not fastened by the driver or front passenger during the next
approx. 2 minutes, the warning signal is deactivated and the warning light
illuminates permanently.
Adaptive cruise control (ACC)
Read and observe on page 42 first.
illuminates – the ACC delay is not sufficient.
▶
Apply the brake.
For more information about the ACC system
.
42
Operation
-------------------------------------------------------------------------------------------------------------------------------------------------------------
Power steering/steering lock (KESSY system)
Read and observe on page 42 first.
Fault in the power steering
lights up – this indicates a complete failure of the power steering and the
steering assist is no longer working (significantly higher steering forces).
illuminates - this indicates a partial failure of the power steering and the
steering forces may be greater.
▶
Switch off the ignition, start the engine again and travel a short distance.
▶
If the warning light
does not go off, stop the vehicle,
do not continue
your journey. Seek help from a specialist garage.
▶
If the warning light
does not go off, you can drive on, exercising appropri-
ate caution. Seek assistance from a specialist garage immediately.
Steering lock defect (KESSY system)
flashes
Message: Steering lock faulty. Stop!
▶
Park the vehicle, and
stop driving. After switching off the ignition, it is no
longer possible to lock the steering, to activate the electrical components
(e.g. Infotainment ), to switch on the ignition again and to start the engine.
Seek help from a specialist garage.
flashes
Message: Steering lock: workshop!
▶
It is possible to continue driving with due caution. Seek assistance from a
specialist garage immediately.
Steering column lock not unlocked (System KESSY)
flashes
Message: Steering lock: workshop!
▶
Move the steering wheel slightly back and forth, thereby facilitating unlock-
ing the steering lock.
▶
If the steering does also not unlock then, the help of a specialist garage is re-
quired.
Disconnecting the vehicle battery
If the vehicle's battery has been disconnected and reconnected, the indicator
light
comes on after switching on the ignition.
The warning light should go out after driving a short distance.
If, after the motor is restarted and a short drive, the indicator light does not go
out, there is a system error.
▶
It is possible to continue driving with due caution. Seek assistance from a
specialist garage immediately.
Stability Control (ESC)/Traction control (TCS)
Read and observe on page 42 first.
flashes – the ESC or TCS is currently being activated.
illuminates – there is an ESC or TCS fault.
▶
It is possible to continue driving with due caution. Seek assistance from a
specialist garage immediately.
If the warning light
comes on after starting the engine, the TCS may be
switched off for technical reasons.
▶
Switch the ignition off and on again.
If the warning light
does not illuminate after you switch the engine back on,
the TCS is fully functional again.
Disconnecting the vehicle battery
If the vehicle's battery has been disconnected and reconnected, the indicator
light
comes on after switching on the ignition.
The warning light should go out after driving a short distance.
If, after a short drive, the indicator light does not go out, there is a system er-
ror.
▶
It is possible to continue driving with due caution. Seek assistance from a
specialist garage immediately.
For more information on the ESC system
or TCS system
.
Traction control (TCS) deactivated
Read and observe on page 42 first.
illuminates – the TCS system is disabled.
43
Instruments and warning lights
-------------------------------------------------------------------------------------------------------------------------------------------------------------

Anti-lock braking system (ABS)
Read and observe on page 42 first.
lights up – there is an ABS fault.
The vehicle will only be braked by the normal brake system without the ABS.
▶
It is possible to continue driving with due caution. Seek assistance from a
specialist garage immediately.
WARNING
■
If warning light
illuminates simultaneously with warning light
stop driving! Seek help from a specialist
garage.
■
A fault to the ABS system or the braking system can increase the vehi-
cle's braking distance – risk of accident!
Rear fog light
Read and observe on page 42 first.
illuminates - the rear fog light is switched on.
Emission control system
Read and observe on page 42 first.
illuminates – there is a fault in the emission control system. The system
makes it possible to drive on in emergency mode – there may be a noticeable
reduction in engine performance.
▶
It is possible to continue driving with due caution. Seek assistance from a
specialist garage immediately.
Preheating unit (diesel)
Read and observe on page 42 first.
flashes – there is a fault in the engine management system. The system
makes it possible to drive on in emergency mode – there may be a noticeable
reduction in engine performance.
There is a fault in the glow plug system if the warning light
does not come
on or illuminates continuously.
▶
It is possible to continue driving with due caution. Seek assistance from a
specialist garage immediately.
EPC warning light (petrol engine)
Read and observe on page 42 first.
lights up – there is a fault in the engine management system. The system
makes it possible to drive on in emergency mode – there may be a noticeable
reduction in engine performance.
▶
It is possible to continue driving with due caution. Seek assistance from a
specialist garage immediately.
Safety systems
Read and observe on page 42 first.
System fault
illuminates
Message: Error: airbag
▶
Seek help from a specialist garage.
The front passenger airbag has been disabled with the key switch
illuminates for 4 seconds after the ignition has been switched on.
One of the airbags or a belt tensioner has been disabled by the diagnostic
tool
lights up for around 4 seconds after the ignition is switched on and then
flashes for approximately 12 seconds
Message: Airbag/belt tensioner deactivated.
ProActive passenger protection
illuminates and the following message is shown in the information cluster
display
Message:
Proactive passenger protection unavailable.
or
ProActive passenger protection: funct. restricted.
44
Operation
-------------------------------------------------------------------------------------------------------------------------------------------------------------
Нет комментариевНе стесняйтесь поделиться с нами вашим ценным мнением.
Текст