Skoda Karoq (2019 year). Manual — part 12
Infotainment enables guidance to the GPScoordinate data stored in the image.
›
Tap the
sensor field and then the function surface Images.
›
Select the connected source and open the image with GPS coordinates.
›
Tap the function surface
Surface in the image, a menu opens
with the option to start route guidance.
The image can be obtained from an external device in which GPS coordinates
are stored during the imaging process. This can be created and imported in
the“MyDestination” application
Map
Map display options
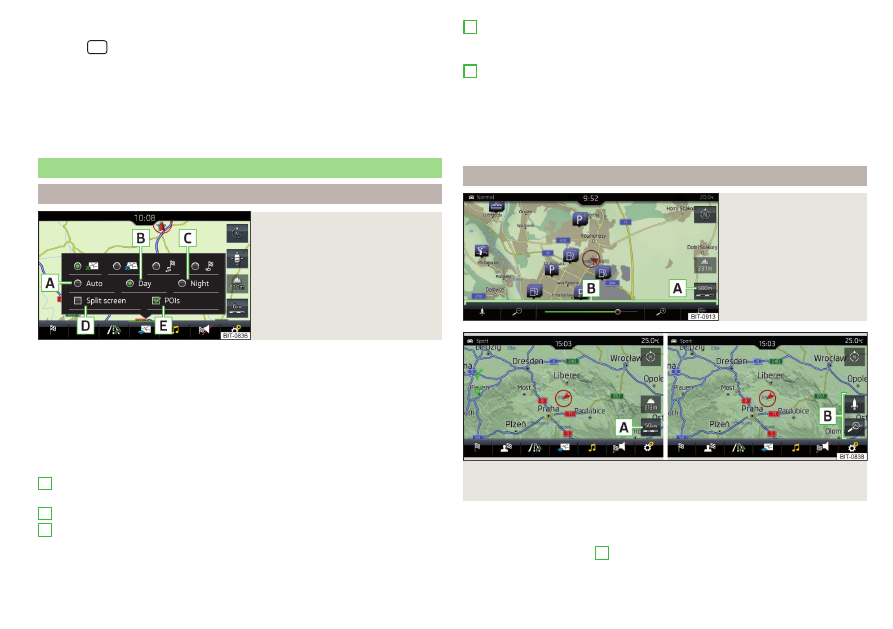
Fig. 227
Map options
›
In the Navigation main menu, tap the function surface .
The following function surfaces are displayed
2D - Two-dimensional map display
3D - Three-dimensional map display
Display of the route from the current vehicle location to the destination
Presentation of the destination position or the next interim destination in
the map (depending on the menu item setting ) → Advanced settings → Sta-
tus line:)
Automatic map display in day or night mode (depending on the currently
active vehicle lighting)
Daytime map display
Night-time map display
A
B
C
Turns the auxiliary window on / off
(does not apply to vehicles
with Infotainment Amundsen when the map is displayed in the digital in-
strument cluster)
Switching on/ off of the selected POI categories display
ing a destination via the map point
If the map scale of the 2D Map or 3D Map is greater than 10 km, then the map
is automatically displayed as 2D and aligned in the direction of north. If the
scale is increased beyond this value, then the map is switched back to the orig-
inal representation.
Map scale
Fig. 228
Function surfaces for
changing the map scale:
Infotainment Columbus
Fig. 229 Function surfaces for changing the map scale: Infotainment
Amundsen
It is possible to change the map scale manually or to turn on the automatic
change of scale.
›
Tap on function surface
A
» Fig. 229
.
D
E
189
Navigation
-------------------------------------------------------------------------------------------------------------------------------------------------------------

In area
B
or
, function surfaces for changing the map
scale are displayed.
Types of manual scale change
▶
Touching the screen with two fingers and pulling them apart or closing them
together.
▶
Turn the control knob (not applicable to Infotainment Columbus)
▶
Tap the function surface
A
and use the slider or tap the function
surface / in area
B
(applies to Columbus Infotainment).
Turn on/off the automatic change of scale
If the automatic scale is active, the map scale will change automatically de-
pending on the type of roads travelled (motorway - smaller map scale / town
larger map scale) and from the manoeuvre to be carried out.
▶
To switch on the automatic scale change, go to the Navigation main menu
and tap on function surface → .
Tap the functional surface is highlighted in green.
The automatic scale is only active as long as the map is centred on the vehicle
position (the function surface is hidden).
▶
To switch off the automatic scale change, go to the Navigation main menu
and tap on function surface → .
Tap the functional surface is highlighted in white.
The turning off occurs likewise when the map is moved or the map scale is
changed manually.
Map view in reduced scale
▶
In the Navigation main menu, tap on function surface
A
→ .
The map scale is reduced for a few seconds and then restored.
Change map orientation
Fig. 230
Change the map orientation
Changing map orientation is possible under the following conditions.
The map is in the 2D display.
The map is centred (the functional surface is hidden).
The map scale is max. 10 km away.
›
to Change the map orientation From the main menu navigation the func-
tional surface
A
The map is oriented to the north
The symbol the vehicle position rotates, the map and the Polar Star Symbol
do not rotate.
With a larger map scale than 10 km, the map is automatically oriented towards
north.
Map oriented to the direction of travel
The map and the Polar Star Symbol rotate, the vehicle position symbol
does not rotate.
Map alignment
Fig. 231
Map alignment
190
Infotainment
-------------------------------------------------------------------------------------------------------------------------------------------------------------
The moved map can be centred/aligned to the vehicle, destination or route po-
sition.
›
To centre the map, tap on function surface
A
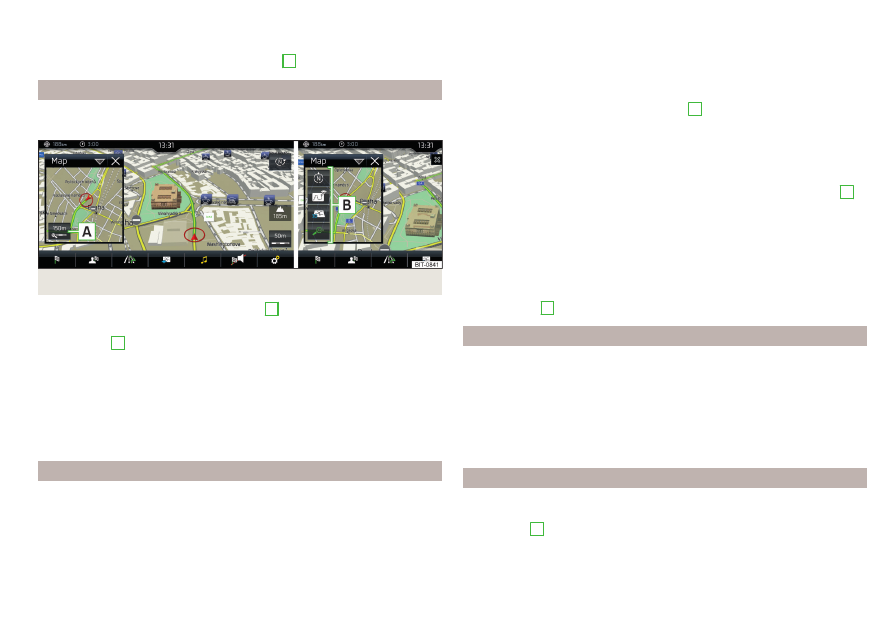
Options for map display in the split screen
Applies to vehicles with Infotainment Columbus, without the digital instrument
cluster.
Fig. 232 Map in split screen
›
In the split screen, tap on function surface
A
.
Depending on the context, some of the following function surfaces will be dis-
played in area
B
.
Map display with the route from the current vehicle location to the desti-
nation
Change the map orientation
2D - Two-dimensional map display
3D - Three-dimensional map display
Turn on/off the automatic change of scale
Map display options in the digital instrument cluster
Applies to vehicles with Infotainment Columbus, with the digital instrument
cluster.
The ignition must be switched on for map display in the digital instrument
cluster.
Only applies to Infotainment Columbus
The map can be displayed in the digital instrument cluster and in Infotainment
at the same time.
The map type shown in the digital instrument cluster can be selected in
thenavigation menu item → Map → Map view in instrum. cluster:.
The map scale can be adjusted with the dial
A
on the multifunction steering
wheel
,
Applies to Infotainment Amundsen
The map can be displayed in the digital instrument cluster or infotainment
screen.
▶
To change the display in the navigation main menu, tap function surface
B
The map type shown in the digital instrument cluster can be changed in
thenavigation main menu in the menu item .
Changing the map scale can be carried out in one of the following ways.
▶
With the function surfaces in Infotainment
.
▶
Turning the knob .
▶
With the dial
A
on the multifunctional steering wheel
POIs display
The Infotainment system offers the possibility of displaying POI symbols on
the map on the Infotainment screen.
›
To activate/deactivate the display, go to the main Navigation menu and tap
on the function surface → POIs.
›
To select the POIs to be displayed, go to the main Navigation menu and tap
on the function surface → Map → Select categories for POIs and select the de-
sired categories (max. 10).
Road sign display
Infotainment offers the option of displaying the traffic signs stored in the navi-
gation data or detected by the front camera during guidance on the Infotain-
ment screen
G
›
To switch on/off the road sign display in the main menu Navigation, tap the
function surface → Map → Show road signs.
191
Navigation
-------------------------------------------------------------------------------------------------------------------------------------------------------------
For some vehicles it is possible to set an alert when exceeding the permitted
speed limit set by a road sign.
›
Tap the
sensor field and then the function surface → Driver assistance →
Speed warning:.
For trailer towing, we recommend that you activate detection of road signs
relevant to trailers.
›
Tap the
sensor field and then the function surface → Driver assistance →
Show road signs relevant to trailers.
Route guidance
Introduction to the subject
A routeis created by starting route guidance to a destination. Additional inter-
mediate destinations can be added to the route.
The route guidance takes place as follows
▶
Through graphical driving instructions in the Infotainment display screen and
in the display of the instrument cluster.
▶
With navigation announcements.
Infotainment tries to allow for continued guidance even if the navigation data
is incomplete or there is no data at all for the given area.
The route is recalculated each time if you ignore driving recommendations or
change the route.
CAUTION
The nav. announcements provided may vary from the actual situations, e.g. due
to out-of-date navigation data.
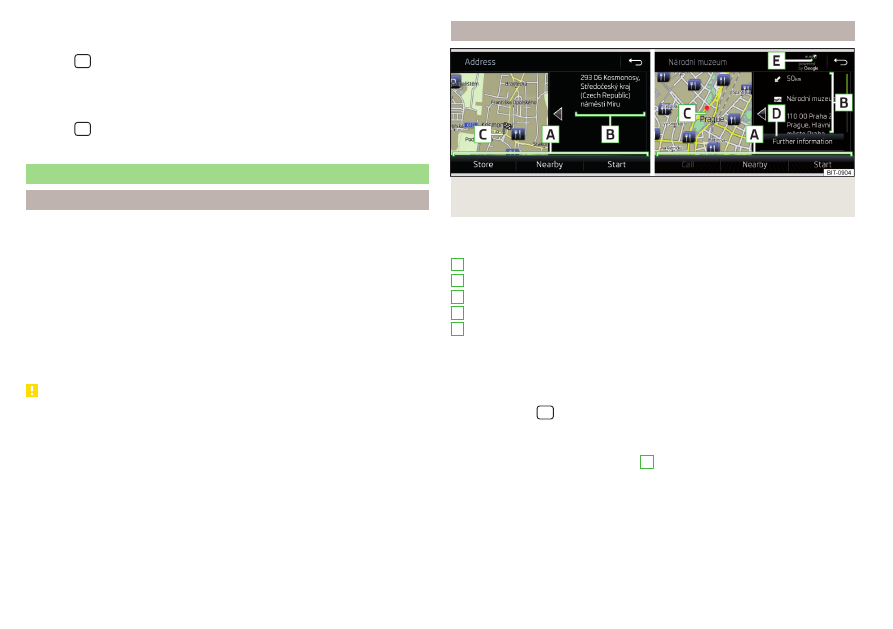
Destination details
Fig. 233 Details of the: in the navigation data / destination searched for
online
The following menu items and information are displayed in the destination de-
tails
.
Area with functional surfaces
Detailed destination information
Destination position in the map
Detailed target information (if available)
Status of online services
Display the destination details
The destination details can be displayed in one of the following ways.
▶
While entering a destination.
▶
By tapping the function surface in the destination list.
▶
By tapping the
sensor field in the Navigation main menu (not applicable
to Infotainment Columbus), the details of the last destination are displayed.
Function surfaces
Using functional surfaces in the field
A
the following functions can be per-
formed, depending on the context.
▶
Start / Stop route guidance.
▶
Searching for a nearby destination
.
▶
Setting route options.
▶
Store destination.
A
B
C
D
E
192
Infotainment
-------------------------------------------------------------------------------------------------------------------------------------------------------------
▶
Edit destination (the object can be deleted, renamed or saved).
▶
Dial the POI telephone number (if Infotainment is connected to a tele-
phone
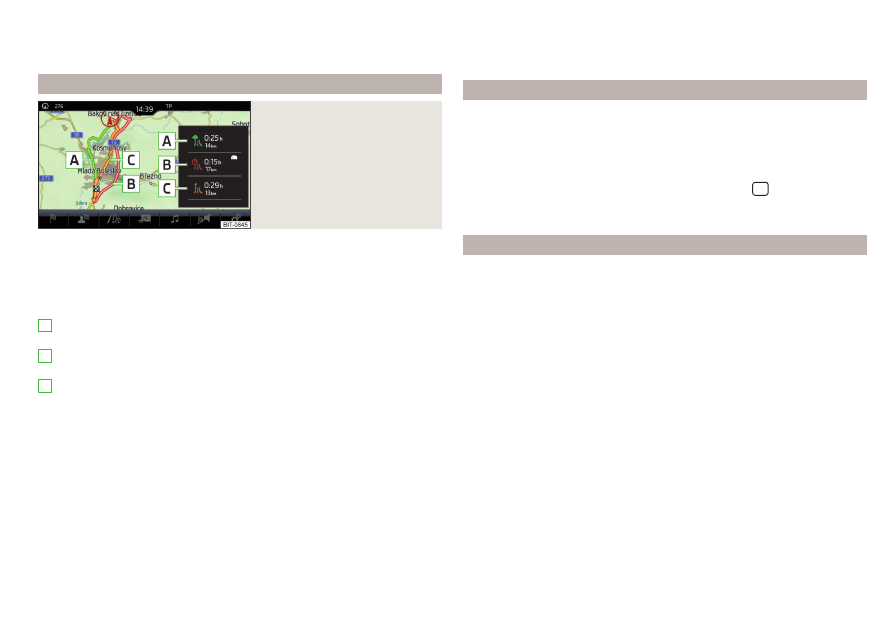
Route calculation and start route guidance
Fig. 234
Alternative routes
Route calculation is done on the basis of the set route options. The route op-
tions can be set: → Route options.
Alternative routes
With selection of alternative routes turned on, the following menu is displayed
after the calculation of a new route
Calculate the most economical route with shortest travelling time and
distance travelled – the route is highlighted green
Calculate the fastest route to the destination, even if a detour is neces-
sary - the route is highlighted in red
Calculate the shortest route to the destination, even if a longer travel-
ling time is required - the route is highlighted in orange
In the functional surfaces of the alternative routes, information on the route
length estimated travel time and the following symbols are displayed (applies
to the Infotainment Columbus).
Use of a toll motorway
Use of a train / ferry
Using a tunnel
Use of a toll road
Using a vignette duty road
It is possible to select an already calculated alternative route before the calcu-
lation of the remaining routes is completed.
A
B
C
Selecting the type of route will start the route guidance.
If no route selection is made within 30 s after the calculation of all routes, the
route guidance is automatically started according to the preferred route type.
Route calculation for the trailer
When driving with a trailer or any other accessory connected to the trailer
socket, we recommend that you switch on the trailer recognition, if necessary
to set the maximum speed for towing a trailer.
›
For calculating the route for towing a trailer, tap the functional surface in the
main navigation menu → Route options → .
›
To set the maximum speed for towing a trailer, tap the
sensor field and
then the function surface → Driver assistance → Trailer recognition → Maximum
speed for trailer.
Demo mode
The Demo mode provides a travel simulation to the entered destination. The
function offers the chance to travel through the calculated route “virtually”.
When the Demo mode is turned on, a menu for route guidance in the Demo
mode or in normal operation is displayed before the start of route guidance.
›
To switch on/offin the main menu Navigation, tap on the function surface
→ Advanced settings → Demo mode.
When the demoMode is switched on, the route starting point can be defined.
›
In the Navigation main menu, tap the function surface Tap→ Advanced set-
tings → Define demo mode starting point.
›
Define the starting point by entering the address or the current vehicle posi-
tion.
›
The demo mode starting point can also be set provided demo mode is turned
on by tapping on the desired map location and selecting the menu item Start
Demo Mode
, Entering a destination via the map point.
193
Navigation
-------------------------------------------------------------------------------------------------------------------------------------------------------------
Graphical driving recommendations
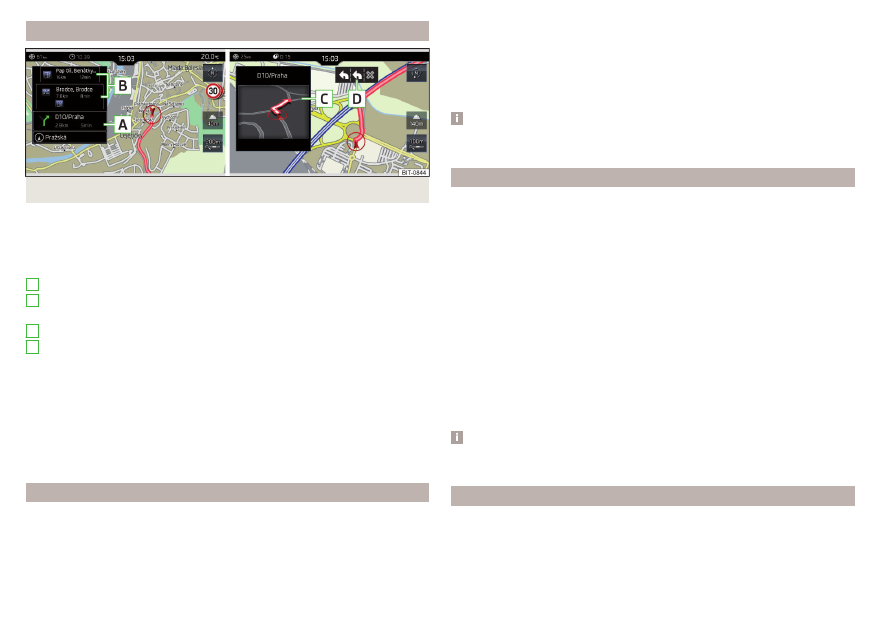
Fig. 235 Driving recommendations / travel recommendation detail
The display of the graphical driving recommendations is carried out in the split
screen Manoeuvre as well as the display of the instrument cluster.
In the split screen Manoeuvre the following driving recommendations are shown
Street name / street number of the current vehicle position
Driving recommendations with street names / road numbers, with the
route and the travel time to the manoeuvre place
Details of driving recommendation (is displayed near the manoeuvre)
Lane guidance
In the split screen Manoeuvre, Infotainment also announces TMC traffic obstruc-
tions and on motorways, car parks, petrol stations or restaurants.
Speed limits
With activated function → Advanced settings → Note:National border crossed ,
display the country-specific speed limits when crossing international borders.
These speed limits can be displayed by tapping the function surface → Top
speed in the main menu navigation.
Nav. announcements
Infotainment issues nav. announcements during route guidance.
The navigation announcements are generated by Infotainment. The flawless
clarity of the message (e.g., road or city name) cannot always be guaranteed.
A
B
C
D
The last navigation announcement can be repeated in the main Navigation
menu by tapping on the function surface → .
The timing of the navigation message is dependent on the type of road and on
the driving speed.
The type of nav. announcements can be set: → Navigation announcements.
Note
Route guidance on the most frequently travelled route takes place without
navigation announcements.
Most common routes
The most frequently travelled routes are automatically saved by Infotainment.
Of these, up to 3 routes can be offered, which best match the current time,
day of the week as well as the vehicle position.
A route guidance to one of the most travelled routes can be started as long as
no route guidance takes place.
›
To display the menu with the most frequently travelled routes, tap on func-
tion surface Freq. in the split screen routes → Show on map.
›
Select the desired route.
Then a selected route is calculated and the route guidance starts.
The menu display in the split can be turned on/off in the main menu navigation
by tapping the function surface → Route options → Freq. Routes .
The stored most frequent routes can be deleted in the main menu navigation
by tapping the functional surface → Manage memory → Delete user data → Freq.
Routes .
Note
Route guidance on the most frequently travelled route takes place without
navigation announcements.
Finish route guidance
The route guidance can be finished in one of the following ways.
›
The final destination is reached.
›
In the main menu Navigation by tapping the functional surface → Stop route
guidance.
194
Infotainment
-------------------------------------------------------------------------------------------------------------------------------------------------------------
›
By turning off the ignition for longer than 120 minutes.
Abort route guidance
If the ignition is switched off and on again, then the route guidance is contin-
ued depending on the stop time in one of the following ways.
▶
Within 15 min. - route guidance is continued taking into account the calcula-
ted route.
▶
From 15 min to 120 min - after confirming the message on the infotainment
screen, the route guidance continues, taking into account the calculated
route.
▶
After 120 min - the route guidance is cancelled.
Route
Route schedule
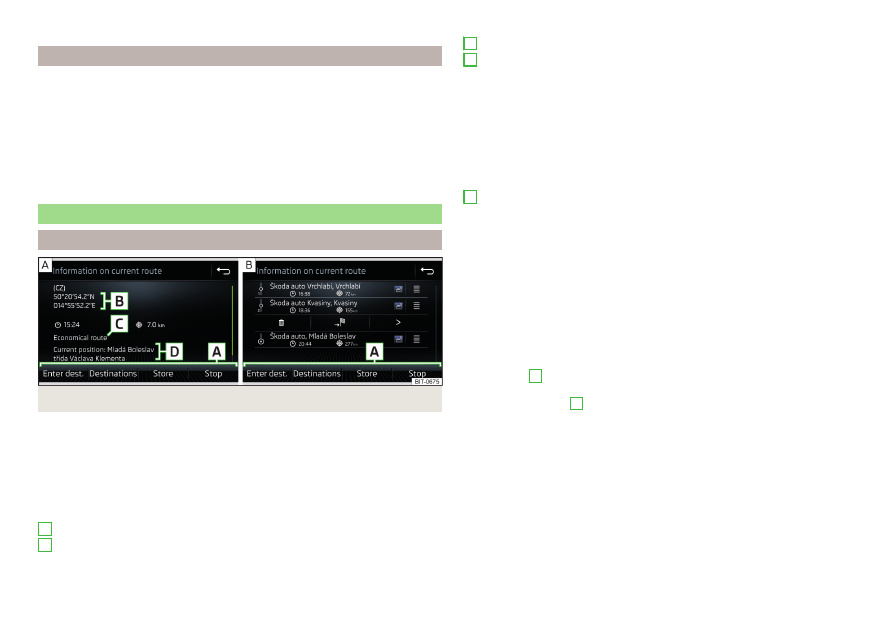
Fig. 236 Route details: a route destination / several route destinations
During route guidance, the Route details (Information about the current route)
can be displayed.
›
In the Navigation main menu, tap the function surface → Route details.
A route destination
In the route plan, the following information is displayed at the destina-
tion
- .
Area with functional surfaces
Destination information
Estimated time of arrival at destination / remaining driving time to desti-
nation
A
B
Remaining distance to the destination
Chosen route type (economic, fastest, shortest)
Current vehicle position (address / GPS coordinates)
The display of the arrival time or the remaining driving time can be adjusted as
follows.
▶
In the Navigation main menu, tap the function surface → Advanced settings →
Time display:.
Several route destinations
In the route plan, the following information is displayed at the respective desti-
nations
- .
Area with functional surfaces
Stopover (with sequential number)
Final destination
Estimated time of arrival at destination / stopover
Driving distance to destination / stopover
Substitution of destinations among themselves
Delete the destination
Continuation of the route guidance from the selected target (previous
waypoints are skipped)
Display the destination details
Insert destination into the route
▶
In the area
A
, tap on the function surface Enter destination and enter a new
destination.
▶
or: Tap on the area
A
the function surface destinations and select an object in
the list of stored destinations.
Each additional destination is added to the list as the first subsequent destina-
tion route.
Change positions of destinations with each other
▶
The relevant function surface and move the destination to the desired po-
sition.
With destinations on the route already reached, the note Destination reached is
displayed below the destination name. It is not possible to change the position
of these destinations with each other.
C
D
A
195
Navigation
-------------------------------------------------------------------------------------------------------------------------------------------------------------
Store route
▶
In the area
A
, tap the functional surface Save.
▶
Save the edited route as a new route or replace the existing saved route.
The route is saved in the route list
Stop route guidance
▶
In the area
A
, tap the functional surface Stop.
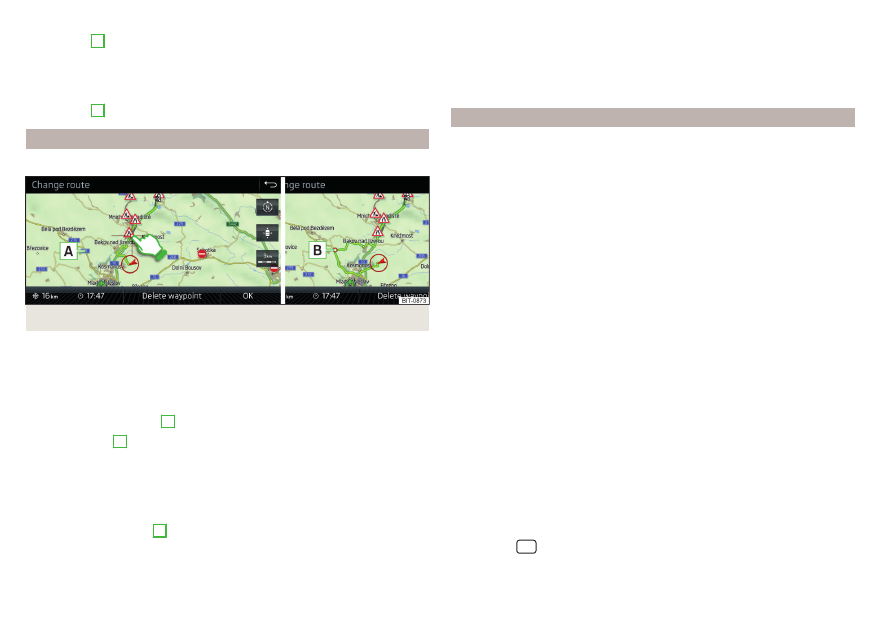
Route change in the map
Only valid for Infotainment Columbus.
Fig. 237 Route change in the map / route transit point
A route in which there are no intermediate targets can be changed during
route guidance by inserting a transit point.
Add a transit point
›
In the Navigation main menu, tap the function surface → Change route in map.
›
Touch the screen in the route field and move the cross-point to the desired
location on the map, e.g.
A
, move
).
The transit point
B
is added to the route
›
Tap the function surface .
Then a new route is calculated and route guidance starts.
Customise transit point
›
In the Navigation main menu, tap the function surface → Change route in map.
›
Touch the transit point
B
and move to a different location on the map.
›
Tap the function surface .
Then a new route is calculated and route guidance starts.
Remove transit point
›
In the Navigation main menu, tap the function surface → Change route in map.
›
Tap on function surface Delete waypoint.
›
Tap the function surface .
Then a new route is calculated and route guidance starts.
route list
In the route list, it is possible to create routes, save, delete, or start navigation.
New route
›
In the Navigation main menu, tap the function surface → Routes → New route.
Insert a route destination in one of the following ways.
›
Tap on the function surface Enter destination and enter a new destination.
›
or: Tap on the function surface Destinations and select a destination from the
list of stored destinations.
›
To save the created route, tap the functional surface Store.
›
Tap the functional surface Startto start route guidance.
route import
A prerequisite for importing the route is that “Infotainment Online”
services are activated.
A route that has been created in the user profile on the “ŠKODA Connect
Portal” website and sent to the Infotainment system can be imported into the
Infotainment memory even before switching on the ignition .
If the route was created when the ignition was switched on and sent to Info-
tainment, Infotainment is not imported until after switching off (for at least 15
minutes) and after switching the ignition back on again.
›
Switch on the ignition. When a new route is available, a message regarding
the option to import this route appears in the Infotainment screen automati-
cally .
If the user opts not to import the route immediately, the route can be impor-
ted later manually as follows.
›
In the Navigation main menu, tap the function surface → Routes Tap to
check if a new route is available.
›
or: Tap the
sensor field and then the function surface → .
›
The function surface import routes Tap.
196
Infotainment
-------------------------------------------------------------------------------------------------------------------------------------------------------------
If a new route available, then a message is displayed on the Infotainment.
›
Tap the function surface Retrieveto start route guidance.
After being successfully imported, the route is displayed in the list of saved
routes.
Managing saved routes
›
In the Navigation main menu, tap the function surface → routes .
›
Choose the desired route, and then select one of the following functions.
Clear saved route
- Edit the route
- Calculate route and start route guidance
Waypoint mode
Introduction to the subject
Only valid for Infotainment Columbus.
This mode is suitable for off-road navigation or for areas where maps are not
available.
Infotainment allows the recording of waypoint tours driven using automatic of
manually entered waypoints.
Then there is the option to start route guidance to the stored waypoint tour or
to save the waypoint tour on the SD card.
Main menu
Fig. 238
Waypoint mode: Main
menu
›
In the Navigation main menu, tap on function surface → Waypoint mode.
Delete
Edit
Start
The main menu is displayed
.
Any ongoing route guidance is terminated after the selection of this way-
point mode menu.
Description of the function interfaces
A
Context-dependent:
▶
No route guidance is taking place - Start recording a waypoint
tour/display saved waypoint tour management/exit menu
▶
A waypoint tour is being recorded - Stop recording a waypoint
tour/manually adjust waypoint/exit menu
▶
Route guidance is taking place - Stop route guidance/skip the next
waypoint/exit menu
Setting the map display / show / hide the split screen / switch on / off the
display of POIs on the map
Operation of Radio/Mediaplayback
Setting Navigation is not available in theWaypoint mode menu
Record waypoints
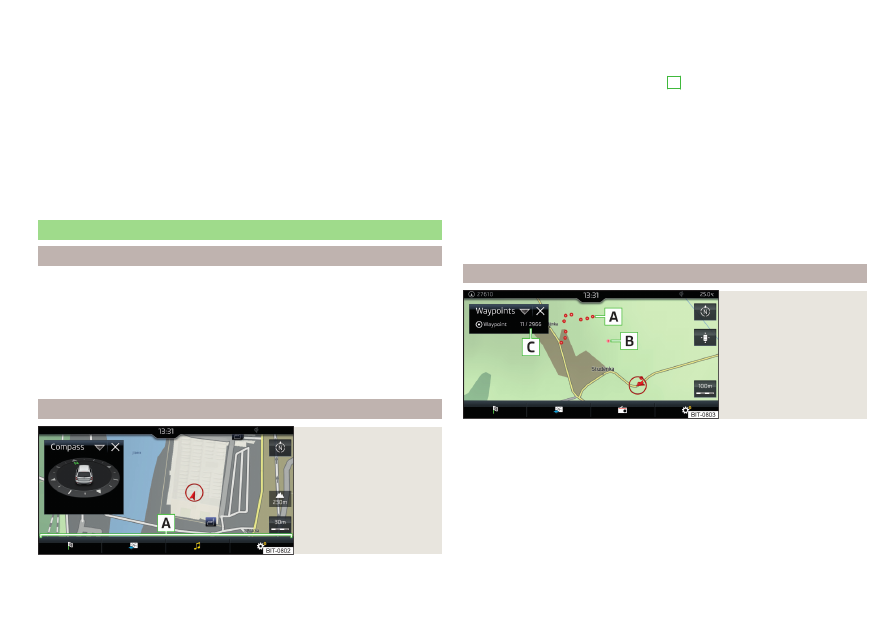
Fig. 239
Recording a waypoint
tour
Start recording a waypoint tour
▶
In the Waypoint mode main menu, tap on the function surface → Record
waypoint tour.
Select one of the following recording types.
■
Select on map - Enter destination on the map and start recording waypoints
■
Start recording - Start recording waypoints without entering a destination
Recording a waypoint tour
After starting the recording of a waypoint tour, the following contextual infor-
mation may be displayed
.
197
Navigation
-------------------------------------------------------------------------------------------------------------------------------------------------------------
Automatically set waypoints
Manually set waypoints
Split screen Waypoints with the number of already set waypoints / maxi-
mum number of waypoints
Add waypoint manually
▶
In the Waypoint mode main menu, tap on the function surface → Add way-
point manually.
Stop recording
▶
In the Waypoint mode main menu, tap on the function surface → Stop re-
cording.
The recording also stops when the waypoint mode menu is exited.
The recorded waypoints are merged to a waypoint tour and stored in the way-
point memory after completion of the recording.
The recording cannot be continued once it has been stopped. A new recording
must be started.
Guide along a saved waypoint tour
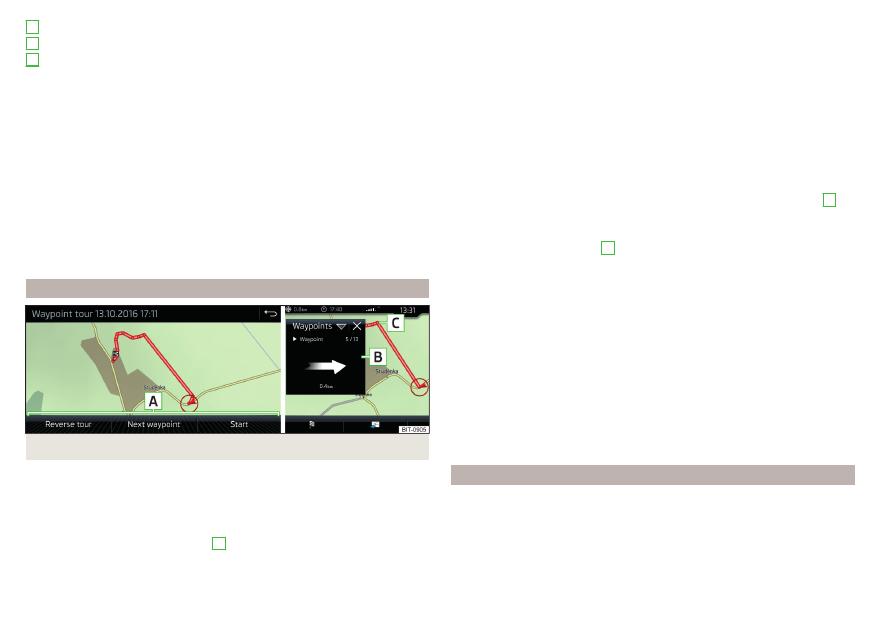
Fig. 240 Display a waypoint / guide along a waypoint tour
Start guidance
›
In the Waypoint mode main menu, tap on the function surface → Waypoint
memory.
›
Select the desired route from the displayed list.
›
Tap the function surface .
›
Select one of the following menus
A
.
A
B
C
■
Reverse tour - Reverse the order of waypoints (suitable for guiding along a
waypoint tour in the reverse direction)
■
Next. Waypoint. - Skip to the next waypoint
■
Start - starts route guidance
Route guidance
During the guidance along a waypoint tour, no nav. announcements are made
by Infotainment.
When driving along the waypoint tour shown, follow as closely as possible the
information shown on the Infotainment screen.
While driving along a waypoint tour, the split screen shows the Waypoints and
the direction to drive as well as the distance to the next waypoint, the se-
quence number of the next waypoint and the total number of waypoints
B
.
The waypoint tour from the vehicle position to the next waypoint “reduces”
continuously while driving “ ”
C
.
If you drive past but very close to the next waypoint, the route guidance will
continue with the subsequent waypoint.
If you drive past a waypoint and this does “not disappear” from the waypoint
tour (e.g. because the distance to this waypoint is too large), then there is the
option to “skip” over this waypoint and continue the guidance to the next way-
point.
▶
In the Waypoint mode main menu, tap on the function surface → Skip way-
point.
Stop route guidance
▶
In the Waypoint mode main menu, tap on the function surface → Stop route
guidance.
The guidance also stops when waypoint mode is exited.
Manage waypoint tour memory
›
to display a list of saved and imported waypoint tours, from main menu
Waypoint mode, tap the function surface → Waypoint memory.
The name of the waypoint tour, the date and time of storage and the number
of waypoints appears in the function surface for the waypoint tour.
198
Infotainment
-------------------------------------------------------------------------------------------------------------------------------------------------------------
›
Choose the desired waypoint tour, and then select one of the following menu
items.
Store the waypoint tour on the SD card
Delete the waypoint tour
Rename the waypoint tour
Display the waypoint tour
Import waypoint tour from the SD card
▶
In the Waypoint mode main menu, tap on the function surface → Waypoint
memory → Import.
▶
Select the source of the waypoint tour recording and confirm the import.
Traffic reports
List of traffic reports
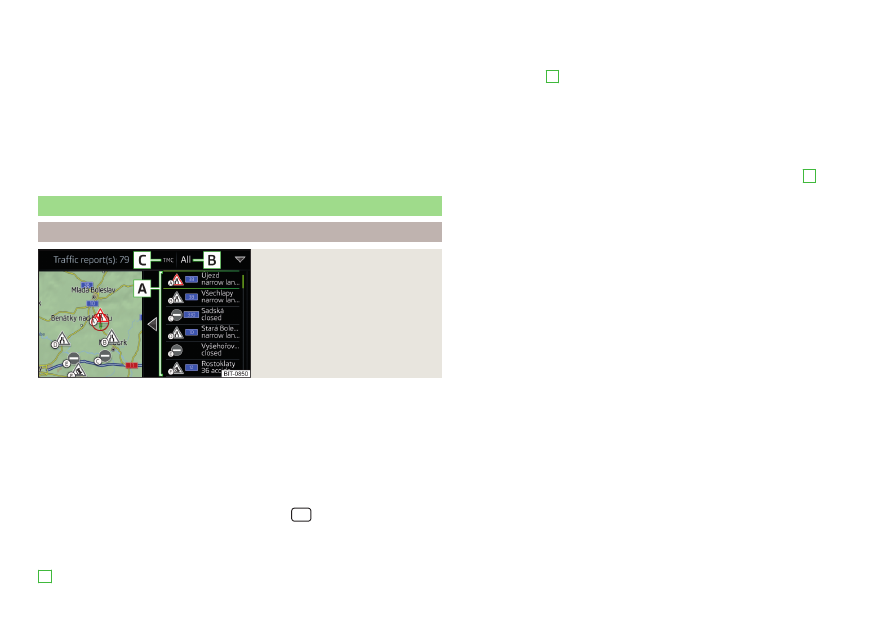
Fig. 241
List of traffic reports
The Infotainment system enables the reception of traffic reports, which in-
clude information regarding traffic congestion, using TMC (Traffic Message
Channel) or online (when “Infotainment Online”
ted).
ŠKODA AUTO does not accept responsibility for the availability, content, up-
to-dateness or evaluation of TMC traffic reports or other data provided by
third parties. ŠKODA AUTO is not entitled to examine or adapt this data in any
way. The data can only be edited by Infotainment in areas where it is available.
›
To display the list of traffic reports, tap on the
sensor field and then tap
the function surface .
In the list of traffic messages and the map, a max. of 6 messages are displayed,
that are provided with a letter and a traffic obstruction symbol (e.g. , , )
A
At present on the route traffic information is taken by using a nav. announce-
ment.
Source of Traffic Information
On the position
C
can the following symbols are displayed.
TMC Traffic Information (with strikethrough icon, the Infotainment is out
of range of any traffic information provider)
Online traffic report
Display options
▶
Route guidance is disabled - All traffic messages are displayed.
▶
Route guidance is taking place - After tapping function surface
B
in the displayed menu, you can select all traffic messages by tapping the
function surface All areas, or you can select only the traffic messages present
on the route by tapping the function surface Route.
A traffic report may contain some of the following information.
▶
Symbol of the traffic obstruction
▶
Number of roads affected
▶
Name of the location in question
▶
Description of the traffic obstruction
The importance of a traffic obstruction is distinguished in colour by a TMC
message
The symbol for traffic obstruction (e.g. , , ) precedes the obstruction and
the length of the obstruction is shown in the map on the right along the route.
Depending on the context, the symbol for the obstruction is displayed in one
of the following ways.
No route guidance is carried out
▶
Red - All traffic obstructions
Route guidance takes place
▶
Gray - The traffic obstruction is not on the route
▶
Red - The traffic obstruction is on the route, the route will not be recalcula-
ted the route and the route passes through the traffic obstruction
▶
Orange - The traffic obstruction is on the route, the route is recalculated and
an alternative route is available
199
Navigation
-------------------------------------------------------------------------------------------------------------------------------------------------------------
Distinguish the importance of a TMC message traffic obstruction using
colour
The colour differentiation of traffic conditions on the provider of the online
traffic reports depends.
To change the map orientation, go to the Navigation main menu and tap on
function surface → Map → Traffic flow settings.
Update
The list of traffic reports will be automatically updated by Infotainment on a
continuous basis.
Detail of the traffic report
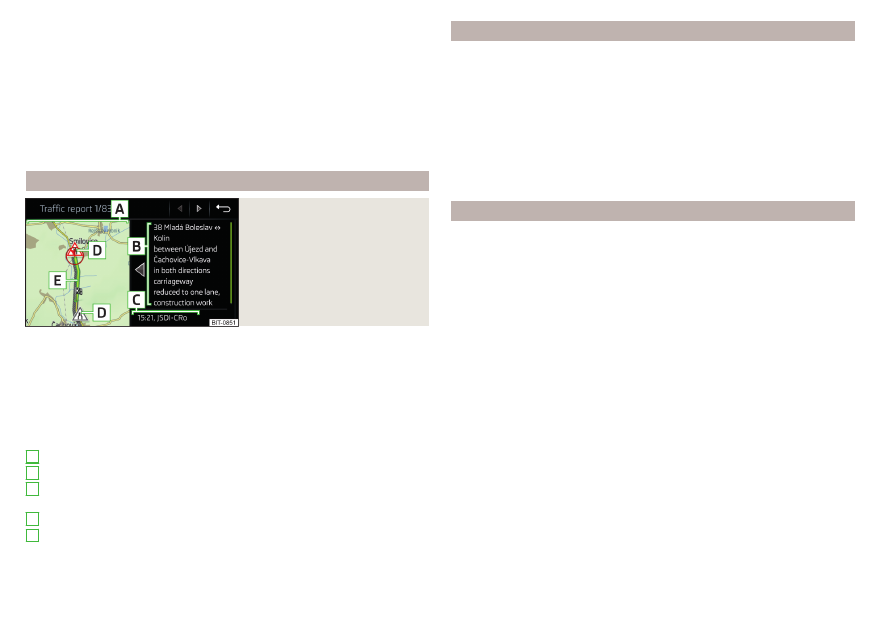
Fig. 242
Detail of the traffic report
The details of the traffic message depends on the source of the traffic mes-
sage.
›
To display this, select the desired traffic report from the list of traffic re-
ports.
›
or: Tap on the traffic obstruction icon in the map.
Depending on the context, the following information and functional surfaces
are displayed
Map of the affected location
Description of the traffic obstruction
Reception timing and information relating to the traffic report provider
(if “ŠKODA Connect” is the provider, it is an online traffic report)
Symbol of the traffic obstruction
Length of the traffic obstruction
A
B
C
D
E
Dynamic route
Infotainment enables an evaluation of the traffic reports received during the
route guidance. In fulfilling the following conditions a bypass route is calcula-
ted, and the appropriate announcement is issued.
The dynamic route function is turned on.
The traffic congestion included in the traffic information is on the route.
The traffic obstruction will be evaluated by Infotainment as of great im-
portance.
›
To switch on/offin the main menu Navigation, tap on the function surface
→ Route options → Dynamic route.
Entering/removing a traffic obstruction on the route manually
If a traffic obstruction is detected during route guidance (e.g. traffic jam), this
traffic obstruction be manually entered into the route.
After entering, Infotainment calculates and provides an alternative route.
Enter traffic obstruction
›
In the Navigation main menu, tap the function surface → Congestion ahead.
›
Adjust the length of the traffic obstruction.
The traffic obstruction will be displayed in red in the map to the right along the
route.
Remove traffic obstruction
The traffic obstruction is removed from the route after completion of the
route guidance or can manually be removed as follows.
›
In the Navigation main menu, tap the function surface → Delete "congestion
ahead".
200
Infotainment
-------------------------------------------------------------------------------------------------------------------------------------------------------------
vehicle systems
CAR - Vehicle settings
Introduction to the subject
In the menu CAR travel data and information displayed on the vehicle and
some vehicle systems can be set.
Reset to factory settings
You can reset to factory settings in the Infotainment system in menu
/ →
→ Factory settings menu.
Note
Settings relating to the vehicle systems can only be made when the ignition is
switched on.
Main menu
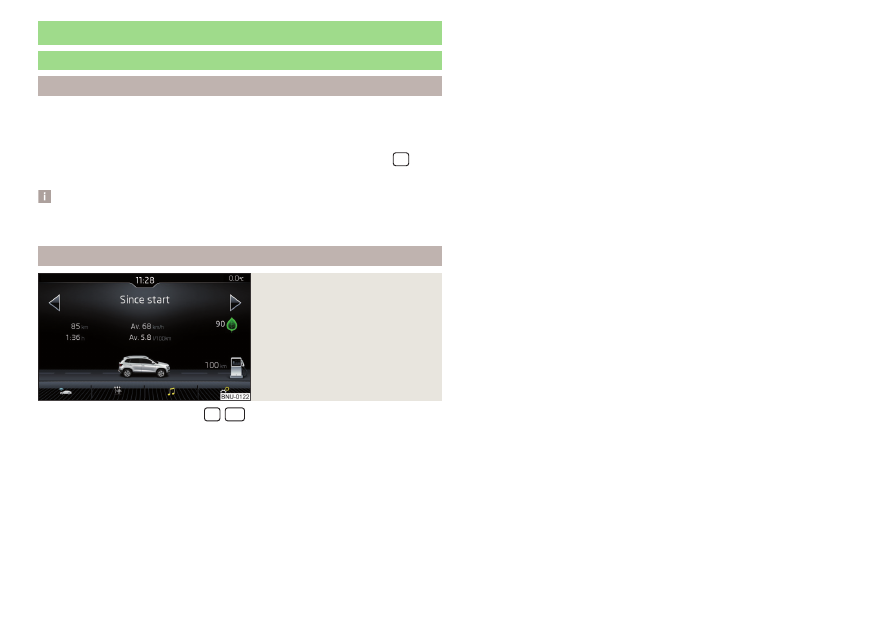
Fig. 243
Function surfaces in the main
menu
›
Tap on the button/sensor field
/
→ to display the main menu with
the following function surfaces
.
Selecting the following menu points
▶
Dig. Instrument panel
▶
Offroad
▶
Convenience consumers
▶
Driving data
▶
DriveGreen
▶
Vehicle status
Playback control - Radio / Media
Depending on the vehicle equipment with manual air conditioning: Set-
ting the auxiliary heating and ventilation / operating the heated wind-
screen
Operation of the steering wheel heating
Vehicle system settings
201
vehicle systems
-------------------------------------------------------------------------------------------------------------------------------------------------------------
Driving
Starting-off and Driving
Starting and stopping the engine
Introduction
Depending on equipment fitted, it is possible to switch the ignition on/off and
start/stop the engine with the key in the ignition or using the starter button.
WARNING
■
Never switch off the engine before the vehicle is stationary – risk of acci-
dent!
■
The ignition must always be switched during the journey when the engine
is idling. Otherwise, the steering may lock - danger of an accident!
■
Do not withdraw the ignition key from the ignition lock until the vehicle
has come to a stop
, Parking. Otherwise, the steering may lock -
danger of an accident!
■
Never leave the vehicle unattended with the engine running - there is a
risk of theft, accident etc.!
■
Never run the engine in an enclosed space (e.g. in garages) - there is the
danger of poisoning and death!
CAUTION
■
Only start the engine when the engine and the vehicle are stationary - there
is a danger of starter and engine damage!
■
Do not push-start the engine – there is a risk of damaging the engine and the
catalytic converter! The battery from another vehicle can be used as a push-
start aid.
■
On vehicles with the starter button, pay attention to where the key is loca-
ted. The system can recognize the valid key, even if it has been accidentally
left on the vehicle roof - there is danger of loss or damage to the key!
Note
Do not warm up the engine while the vehicle is stationary. If possible, start
your journey as soon as the engine has started. The engine will reach its oper-
ating temperature faster.
Electronic immobiliser and steering lock
Read and observe and on page 202 first.
The electronic immobiliser (hereinafter referred to as immobiliser) makes it
more difficult for someone to attempt to steal or use your vehicle without au-
thorisation.
Immobilizer
The immobilizer allows the engine to be started only with the original car key.
Malfunction of the immobilizer
If the immobiliser in the key fails, it is not possible to start the engine. A mes-
sage appears in the display of the instrument cluster to explain that the immo-
biliser is active.
To start, use the other vehicle key or seek help from a specialist garage.
Steering lock - lock
›
On vehicles with ignition lock, remove the key and turn the steering wheel
until the steering lock engages.
›
On vehicles with a starter button, switch off the ignition and open the driv-
er's door. If the driver's door is opened and the ignition is switched off after-
wards, the steering is only locked automatically after the vehicle has been
locked.
Steering lock - unlock
›
On vehicles with ignition lock, insert the key into the ignition and turn on the
ignition. If this is not possible, move the steering wheel slightly back and
forth and thereby unlock the steering lock.
›
On vehicles with starter button, get into the car and close the driver's door.
Under certain circumstances, the steering lock can be unlocked only when
the ignition is switched on or the engine is started.
WARNING
Never let the vehicle roll with locked steering lock - there is a risk of acci-
dent!
202
Driving
-------------------------------------------------------------------------------------------------------------------------------------------------------------
Switching the ignition on/off
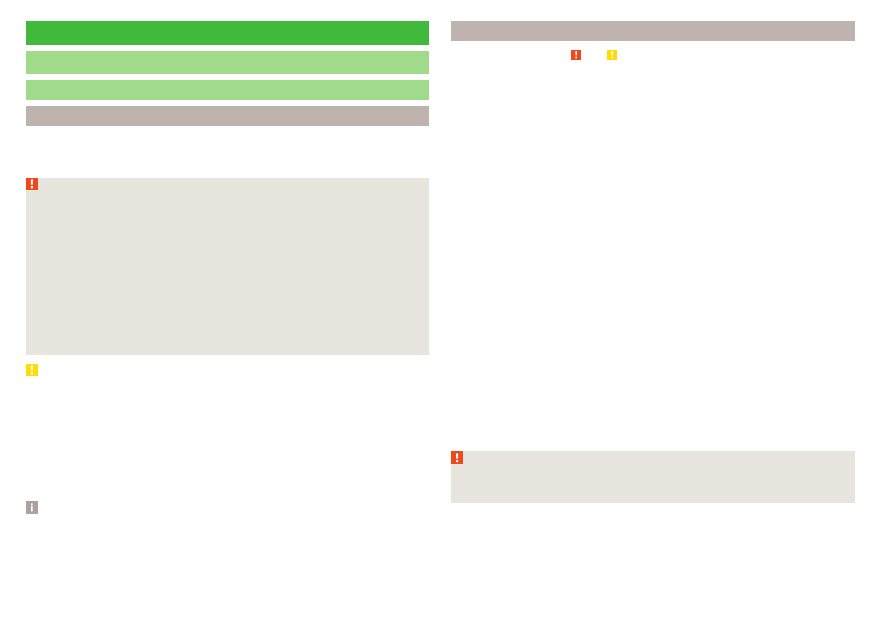
Fig. 244 Positions of the vehicle key in the ignition lock / starter button
Read and observe and on page 202 first.
Positions of the vehicle key in the ignition lock
-
Ignition switched off, engine switched off
Ignition switched on
Starting engine
Switching on /off ignition in vehicles with starter button
›
Press the
- button, the ignition is turned on / off.
On vehicles with manual transmission the pedal must not be depressed to
switch on / off the ignition, otherwise the engine will start.
On vehicles with automatic transmission, the brake pedal must not be de-
pressed to switch on / off the ignition, otherwise the engine will start.
Starting engine / Stopping
Read and observe and on page 202 first.
Before starting the engine
›
Switch on the parking brake.
›
For vehicles with manual transmission, shift gear stick to neutral, depress
the clutch pedal and hold it there until the engine starts.
›
For vehicles with automatic transmission, place the selector lever in position
P or N and
depress the brake pedal until the engine starts.
1
2
3
Starting engine
›
On vehicles with Ignition lock, turn the key to position
3
and the engine
starts
on page 203 . Release the key, the engine will start auto-
matically.
If the engine does not start within 10 seconds, turn the key to position
1
. Re-
peat the starting process after 30 seconds.
›
On vehicles with starter button, press the button briefly
page 203 - , the motor will start automatically.
In vehicles with diesel engines, the glow plug warning lights
up after the
ignition is switched on. The engine can be started after the indicator light goes
out.
Stopping the engine
›
Stop the vehicle.
›
On vehicles with ignition lock, turn the key to position
1
page 203 .
›
On vehicles with starter button, press the button
on page 203 - ,
The engine and the ignition will be switched off simultaneously.
For vehicles with automatic transmission, the ignition key can only be removed
if the selector lever is in position P (this only applies to a few countries).
Do not switch the engine off immediately at the end of your journey after the
engine has been running for a prolonged period at high loads. Leave it to run at
an idling speed for about 1 minute. This prevents any possible accumulation of
heat when the engine is switched off.
Emergency shutdown of the engine in vehicles with starter button
The system is equipped with a protective device against accidental switching
off, the engine can only be shut off while driving in the event of an emergency.
›
Keep the knob pressed
on page 203 - or press it twice within 1
second.
After the emergency stop of the engine, the steering lock will remain un-
locked.
CAUTION
When the outdoor temperature is below -10 ° C, the selector lever when start-
ing must always be in P mode.
203
Starting-off and Driving
-------------------------------------------------------------------------------------------------------------------------------------------------------------
Note
■
The engine running noises may be louder at first for a short time after start-
ing the cold engine.
■
You should not switch on any major electrical components during the heating
period, otherwise the vehicle battery will be drained unnecessarily.
■
After switching off the ignition, the radiator fan may intermittently continue
to run for approx. 10 minutes (also continuously).
Problems with the engine start - vehicles with starter button
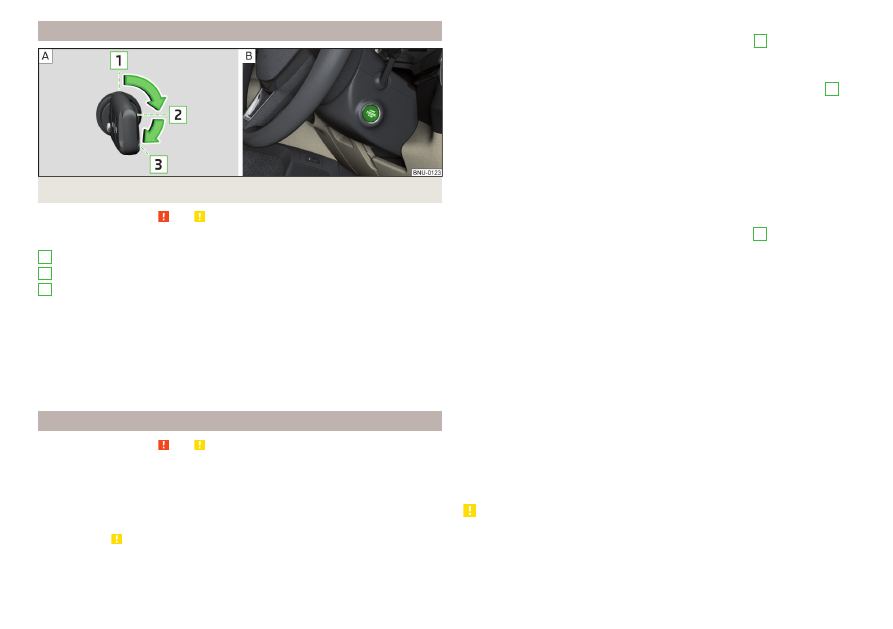
Fig. 245
Engine start - hold key on but-
ton
Read and observe and on page 202 first.
If no engine start is possible and the display of the instrument cluster shows a
message that the key could not be detected by the system or there is a sys-
tem fault, then try to start the engine as follows.
›
Press the starter button with the key
.
If the engine does not start, the help of a specialist garage is required.
CAUTION
The key may not be detected by the system if the battery in the key is running
out of charge or the signal fails.
START STOPsystem
Introduction
The START-STOPsystem (hereinafter referred to as the system) reduces
CO
2
emissions and harmful emissions, and saves fuel.
If the system determine that the engine is not needed when the vehicle stops
or is at a standstill (e.g. at the traffic lights), it turns off the engine and starts it
again when moving off.
The system function depends on many factors. Some of them are down to the
driver, while others are systemic and can neither be influenced nor identified.
For this reason, the system may react differently in situations which seem
identical from the driver's perspective.
The system is automatically activated every time the ignition is switched on
(even when it has previously been manually deactivated with the button).
Note
If the engine has stopped due to the system, the ignition remains switched on.
functionality
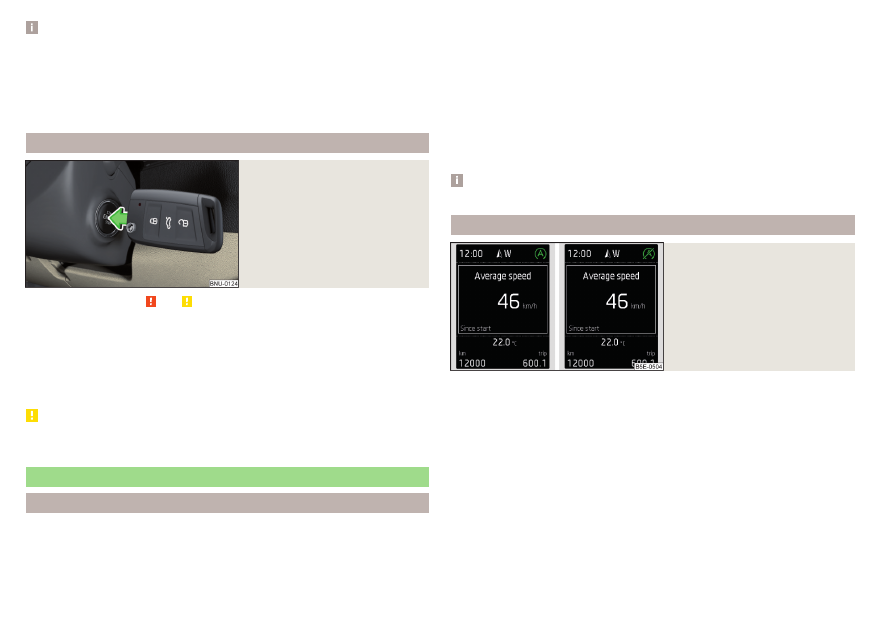
Fig. 246
Display
Vehicles with manual transmission
The engine is automatically switched off as soon as the vehicle comes to a
halt, the shift lever is moved into neutral and the clutch pedal is released.
The engine is automatically started as soon as the clutch pedal is depressed.
Vehicles with automatic transmission
The engine is automatically switched off as soon as the vehicle comes to a
halt and the brake pedal is operated.
The engine is automatically started as soon as the accelerator pedal is de-
pressed or the brake pedal is released (with deactivated Auto Hold function).
204
Driving
-------------------------------------------------------------------------------------------------------------------------------------------------------------
Нет комментариевНе стесняйтесь поделиться с нами вашим ценным мнением.
Текст