Lincoln Corsair (2022 year). Manual in english — page 6
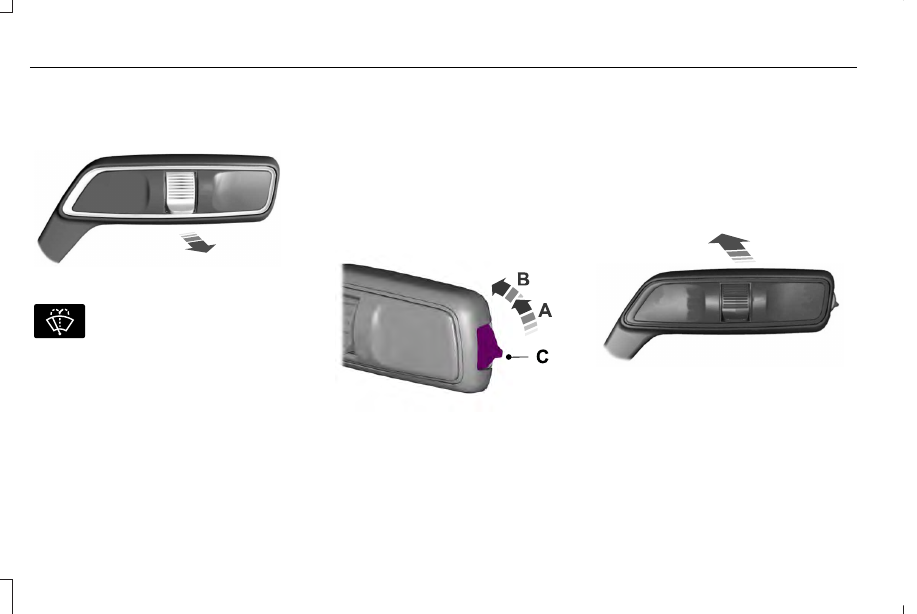
WINDSHIELD WASHERS
E269412
E270967
Pull the lever toward you to
operate the windshield washers.
When you release the lever, the wipers
operate for a short time. When activated, a
courtesy wipe occurs a short time after the
wipers stop to clear any remaining washer
fluid.
Note: You can switch courtesy wipe on or
off in the touchscreen.
Note: Do not operate the washers when the
washer reservoir is empty. This could cause
the washer pump to overheat.
Front Camera Washer
(If Equipped)
Operating the windshield washer also turns
on the front camera washer.
REAR WINDOW WIPER AND
WASHERS
Rear Window Wiper
E242324
Intermittent wipe.
A
Continuous wipe.
B
Rear window wiper off.
C
Depending on your vehicle, when you switch
on the front wipers and move the gearshift
lever to reverse (R), the rear intermittent wipe
may turn on.
Note: Make sure you switch the rear window
wiper off before entering a car wash.
Rear Window Washer
E269727
Push the lever away from you to operate the
rear window washer. When you release the
lever, the wipers operate for a short time.
Do not operate the washers when the
washer reservoir is empty. This could cause
the washer pump to overheat.
104
Wipers and Washers
-------------------------------------------------------------------------------------------------------------------------------------------------------------

GENERAL INFORMATION
Condensation in the Exterior Front
Lamps and Rear Lamps
Exterior front lamps and rear lamps have
vents to accommodate normal changes in
air pressure.
Condensation can be a natural by-product
of this design. When moist air enters the
lamp assembly through the vents, there is a
possibility that condensation can occur when
the temperature is cold. When normal
condensation occurs, a fine mist can form on
the interior of the lens. The fine mist
eventually clears and exits through the vents
during normal operation.
Clearing time may take as long as 48 hours
under dry weather conditions.
Examples of acceptable condensation are:
•
The presence of a fine mist (no streaks,
drip marks or large droplets).
•
A fine mist covers less than 50% of the
lens.
Examples of unacceptable condensation are:
•
A water puddle inside the lamp.
•
Streaks, drip marks or large droplets
present on the interior of the lens.
If you see any unacceptable condensation,
have your vehicle checked by an authorized
dealer.
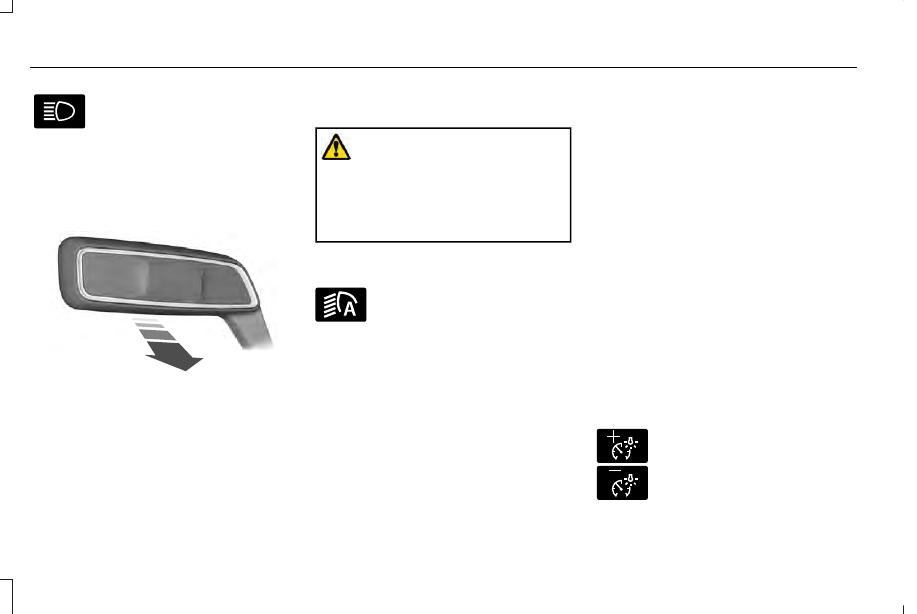
LIGHTING CONTROL
Lighting Control Selections
E281338
Press the toggle switch upward or downward
to make a selection.
Note: An indicator illuminates next to the
active selection.
E265031
Lamps off.
Parking lamps, instrument panel
lamps, license plate lamps and rear
lamps.
E281240
Autolamps.
E270968
Headlamps on.
Note: The lighting control defaults to
autolamps each time you switch your vehicle
on.
Switching High Beam Headlamps On
and Off
E273182
105
Lighting
-------------------------------------------------------------------------------------------------------------------------------------------------------------
Push the lever away from you to
switch the high beam on.
Push the lever forward again or pull the lever
toward you to switch the high beams off.
Flashing High Beam Headlamps
E273181
Pull the lever toward you and release it to
flash the high beam headlamps.
AUTOLAMPS
WARNING: The system does not
relieve you of your responsibility to drive
with due care and attention. You may need
to override the system if it does not turn
the headlamps on in low visibility
conditions, for example daytime fog.
Autolamps turn the headlamps on in low light
situations or when the wipers operate.
E281240
Switch the lighting control to the
autolamps position.
Note: The lighting control defaults to
autolamps each time you switch your vehicle
on.
The headlamps remain on for a period of
time after you switch the ignition off. Use the
touchscreen to adjust the period of time that
the headlamps remain on.
Note: If you switch the autolamps on, you
cannot switch the high beams on until the
system turns the low beams on.
Windshield Wiper Activated Headlamps
When you switch the autolamps on, the
headlamps turn on within 10 seconds of
switching the wipers on. They turn off
approximately 60 seconds after you switch
the windshield wipers off.
The headlamps do not turn on with the
wipers:
•
During a single wipe.
•
When using the windshield washers.
•
If the wipers are in intermittent mode.
Note: If you switch the autolamps and the
autowipers on, the headlamps turn on when
the windshield wipers continuously operate.
INSTRUMENT LIGHTING DIMMER
The instrument lighting dimmer buttons are
on the lighting control.
E291299
E296433
Repeatedly press one of the
buttons to adjust the brightness.
106
Lighting
-------------------------------------------------------------------------------------------------------------------------------------------------------------

HEADLAMP EXIT DELAY
After you switch the ignition off, you can
switch the headlamps on by pulling the
direction indicator lever toward you. You will
hear a short tone. The headlamps will switch
off automatically after three minutes with any
door open or 30 seconds after the last door
has been closed. You can cancel this feature
by pulling the direction indicator lever toward
you again or switching the ignition on.
DAYTIME RUNNING LAMPS -
VEHICLES WITH: CONFIGURABLE
DAYTIME RUNNING LAMPS
WARNING: The daytime running
lamps system does not activate the rear
lamps and may not provide adequate
lighting during low visibility driving
conditions. Make sure you switch the
headlamps on, as appropriate, during all
low visibility conditions. Failure to do so
may result in a crash.
Switch the daytime running lamps on or off
using the touchscreen:
1. Select Settings. See Settings (page 555).
2. Select Vehicle.
3. Select Lighting.
The daytime running lamps turn on when:
1. The lamps are on in the information
display.
2. You switch the ignition on.
3. The transmission is not in park (P) for
vehicles with automatic transmissions or
you release the parking brake for
vehicles with manual transmissions.
4. The lighting control is in the autolamps
position.
5. The headlamps are off.
The other lighting control switch positions
do not turn on the daytime running lamps.
If the daytime running lamps are off in the
information display, the lamps stay off in all
switch positions.
DAYTIME RUNNING LAMPS -
VEHICLES WITH: DAYTIME
RUNNING LAMPS (DRL)
WARNING: The daytime running
lamps system does not activate the rear
lamps and may not provide adequate
lighting during low visibility driving
conditions. Make sure you switch the
headlamps on, as appropriate, during all
low visibility conditions. Failure to do so
may result in a crash.
The system turns the lamps on in daylight
conditions.
To switch the system on, switch the lighting
control to any position except headlamps.
FRONT FOG LAMPS
(IF EQUIPPED)
Switching the Front Fog Lamps On or
Off
Only switch the front fog lamps on during
reduced visibility.
107
Lighting
-------------------------------------------------------------------------------------------------------------------------------------------------------------

You can switch the front fog lamps on if any
of the following occur:
•
You set the lighting control to the parking
lamps position.
•
You set the lighting control to the
headlamps position.
•
You set the lighting control to the
autolamps position and the headlamps
are on.
The front fog lamp button is on the lighting
control.
Press the button to switch the front
fog lamps on or off.
Note: The brightness of the daytime running
lamps may decrease when the front fog
lamps are switched on.
Front Fog Lamp Indicator
It illuminates when you switch the
front fog lamps on.
ADAPTIVE HEADLAMPS
(IF EQUIPPED)
About Adaptive Headlamps
The headlamps are designed to adapt when
you are steering around a curve, or if the
camera detects lane markings indicating a
curve or traffic signs indicating an
intersection.
The system is designed to operate if all of
the following occur:
•
You switch the system on through your
vehicle settings.
•
You set the lighting control to the
autolamps position.
•
The ambient light level is low enough that
low beams are required.
108
Lighting
-------------------------------------------------------------------------------------------------------------------------------------------------------------

Steering Around a Curve
E161714
Without adaptive headlamps.
A
B
With adaptive headlamps.
Camera Detects Lane Markings
(If Equipped)
WARNING: Inspect and replace the
windshield wiper blades regularly to make
sure the camera sensor has a clear view.
The windshield wiper blades must be the
correct length.
E267903
109
Lighting
-------------------------------------------------------------------------------------------------------------------------------------------------------------
Camera Detects Traffic Signs
(If Equipped)
E292505
Note: The camera only detects traffic signs
if your vehicle speed is below 31 mph
(50 km/h).
Switching Adaptive Headlamps On or
Off
Use the touchscreen to select the following:
1. Select Settings.
2. Select Vehicle.
3. Select Lighting.
DIRECTION INDICATORS
E273180
Push the lever up or down to use
the direction indicators.
Indicating a Lane Change
Tap the lever up or down to make the
direction indicators flash three times to
indicate a lane change.
WELCOME LIGHTING
(IF EQUIPPED)
The Lincoln welcome mat projection lights
are on the bottom of the exterior mirror
housings. They project an image onto the
ground a short distance from your vehicle
when welcome lighting or lighted entry turns
on.
For auto-fold mirrors, the Lincoln welcome
mat turns on when welcome lighting or
lighted entry turns on and the mirrors fold in
upon locking or using the switch on the door.
Note: Moisture, frost and ice build-up or
other types of contamination on the surface
of the light lens can cause non-permanent
distortion or reduced brightness of the
image. Do not use abrasive materials to
clean the lens.
Note: If you enable auto-fold and then you
fold the mirrors in to the door window glass,
the welcome mats do not turn on.
Switching the Welcome Lighting On or
Off
Use the touchscreen to select the following:
110
Lighting
-------------------------------------------------------------------------------------------------------------------------------------------------------------
1. Select Settings. See Settings (page 555).
2. Select Vehicle.
3. Select Lighting.
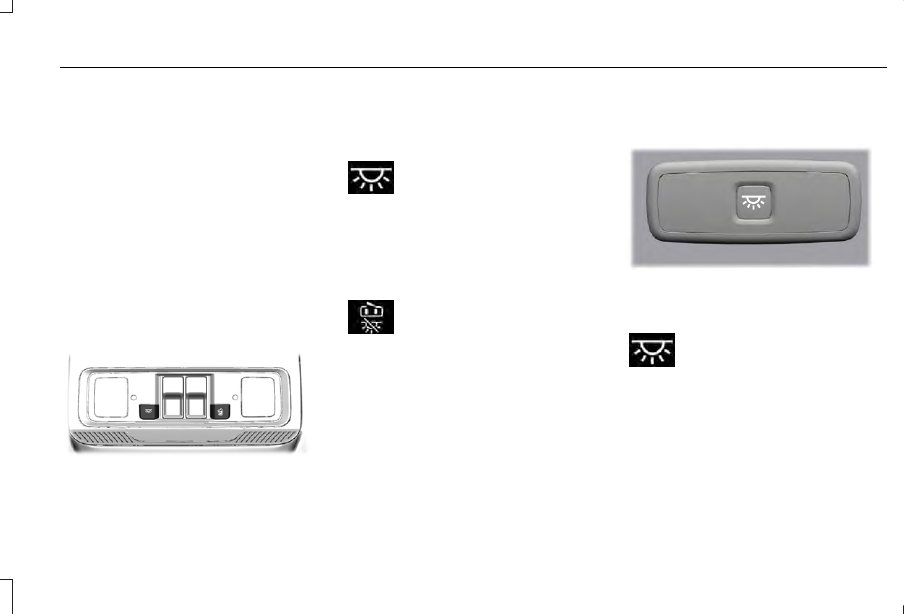
INTERIOR LAMPS
The lamps turn on under the following
conditions:
•
You open any door.
•
You press a button on the remote control.
•
You press the all lamps on button on the
overhead console.
Front Interior Lamp
E301059
The front interior lamp switches are on the
overhead console.
Note: The position of each button on the
overhead console depends on your vehicle.
All Lamps On or Off
Press to switch all interior lamps
on or off.
Individual Map Lamps
Touch the lamp lens to switch the map lamps
on and off.
Interior Lamp Function
Press to switch the interior lamp
function on and off.
When the interior lamp function is off and
you open a door, the courtesy and door
lamps stay off.
When the interior lamp function is on and
you open a door, the courtesy and door
lamps turn on.
Note: The indicator lamp lights amber when
the door function is off.
Rear Interior Lamps
E281231
The rear interior lamps may be above the
rear seat or above the rear windows.
Press to switch the lamps on or off.
Note: If the rear lamps are switched on
through the overhead console, you cannot
switch them off with the rear lamp switch.
AMBIENT LIGHTING
(IF EQUIPPED)
Use the touchscreen to select the following:
111
Lighting
-------------------------------------------------------------------------------------------------------------------------------------------------------------

E280315
Select the settings option on the
feature bar.
E279027
Select ambient lighting.
E281470
Switching Ambient Lighting On
Touch a color once.
Changing the Color
Touch any color once.
Adjusting the Brightness
Drag the selected color up or down.
Switching Ambient Lighting Off
Touch the selected color once or drag the
selected color down to zero brightness.
112
Lighting
-------------------------------------------------------------------------------------------------------------------------------------------------------------
WHAT IS AUTOMATIC HIGH BEAM
CONTROL
The system turns on high beams if it is dark
enough and no other traffic is present. If it
detects an approaching vehicle’s headlamps
or tail lamps, or street lighting ahead, the
system turns the high beams off. Low beams
remain on.
A camera sensor, centrally mounted behind
the windshield of your vehicle, continuously
monitors conditions to turn the high beams
on and off.
SWITCHING AUTOMATIC HIGH
BEAM CONTROL ON AND OFF
WARNING: Do not use the system in
poor visibility, for example fog, heavy rain,
spray or snow.
1. Press Settings.
2. Press Vehicle.
3. Press Lighting.
Activating the Automatic High Beam
Control
E281240
Switch the lighting control to the
autolamps position. See
Autolamps (page 106).
Note: The lighting control defaults to
autolamps each time you switch your vehicle
on.
When active, the high beams turn on if all of
the following occur:
•
The ambient light level is low enough.
•
There is no traffic in front of your vehicle.
•
The vehicle speed is greater than
approximately 32 mph (51 km/h).
When active, the high beams turn off if any
of the following occur:
•
The ambient light level is high enough
that the system does not require high
beams.
•
The system detects an approaching
vehicle's headlamps or tail lamps.
•
The system detects severe rain, snow or
fog.
•
The camera is blocked.
•
The vehicle speed falls below
approximately 27 mph (44 km/h).
Note: The deactivation speed is lower on
curves.
Note: There could be a delay in high beam
reactivation in certain curvy road situations.
Note: If there is a blocked sensor, the system
may not operate properly. Keep the
windshield free from obstruction or damage.
Note: The system may not operate properly
in cold or inclement conditions. You can
switch on the high beams by overriding the
system.
Note: If the system detects a blockage, for
example bird droppings, bug splatter, snow
or ice, the system goes into low beam mode
until you clear the blockage. If there is a
blocked camera, a message may appear in
the information display.
Note: Using much larger tires or adding
vehicle accessories such as snowplows can
modify your vehicle's ride height and
degrade automatic high beam control
performance.
113
Automatic High Beam Control
-------------------------------------------------------------------------------------------------------------------------------------------------------------
AUTOMATIC HIGH BEAM
CONTROL INDICATORS
The indicator illuminates to confirm
when the system is ready to assist.
OVERRIDING AUTOMATIC HIGH
BEAM CONTROL
WARNING: The system does not
relieve you of your responsibility to drive
with due care and attention. You may need
to override the system if it does not turn
the high beams on or off.
WARNING: You may need to
override the system when approaching
other road users.
WARNING: You may need to
override the system during inclement
weather.
E273182
Push the lever away from you to switch
between high beam and low beam.
114
Automatic High Beam Control
-------------------------------------------------------------------------------------------------------------------------------------------------------------
POWER WINDOWS
WARNING: Do not leave children
unattended in your vehicle and do not let
them play with the power windows. Failure
to follow this instruction could result in
personal injury.
WARNING: When closing the power
windows, verify they are free of obstruction
and make sure that children and pets are
not in the proximity of the window
openings.
Press the control to open the
window. Lift the control to close
the window.
To reduce wind noise or pulsing noise when
just one window is open, slightly open the
opposite window.
One-Touch Down
Press the switch fully and release it. Press
again or lift it to stop the window.
One-Touch Up
Lift the switch fully and release it. Press or
lift it again to stop the window.
Resetting One-Touch Up
Start the engine.
1. Lift and hold the window switch until you
fully close the door window. Continue to
hold the switch for a few seconds after
you close the window.
2. Release the window switch.
3. Press and hold the window switch until
you fully open the door window.
4. Release the window switch.
5. Lift and hold the window switch until you
fully close the window.
6. Test for correct window operation by
carrying out the one-touch down and
one-touch up features.
Rear Window Lock
Press the control to lock or unlock
the rear window controls. It
illuminates when you lock the rear
window controls.
Bounce-Back
(If Equipped)
The window stops and reverses if it detects
an obstruction.
Overriding the Bounce-Back Feature
WARNING: If you override
bounce-back, the window does not reverse
if it detects an obstacle. Take care when
closing the windows to avoid personal
injury or damage to your vehicle.
Pull up the window switch and hold within a
few seconds of the window reaching the
bounce-back position. The window travels
up with no bounce-back protection. The
window stops if you release the switch
before the window fully closes.
115
Windows and Mirrors
-------------------------------------------------------------------------------------------------------------------------------------------------------------
Accessory Delay
You can use the window controls for several
minutes after switching off the ignition or
until opening either front door.
GLOBAL OPENING AND CLOSING
You can use the remote control to operate
the windows with the ignition off.
Note: You can switch this feature on and off
in the information display or contact an
authorized dealer. See General Information
(page 136).
Note: To operate this feature, make sure the
accessory delay is not switched on.
Opening the Windows
You can open the windows only for a short
time after you unlock your vehicle with the
remote control. After you unlock your vehicle,
press and hold the remote control unlock
button to open the windows. Release the
button once movement starts. Press the lock
or unlock button to stop movement.
Closing the Windows
WARNING: When closing the
windows, you should verify they are free
of obstructions and make sure that children
and pets are not in the proximity of the
window openings.
To close the windows, press and hold the
remote control lock button. Release the
button once movement starts. Press the lock
or unlock button to stop movement.
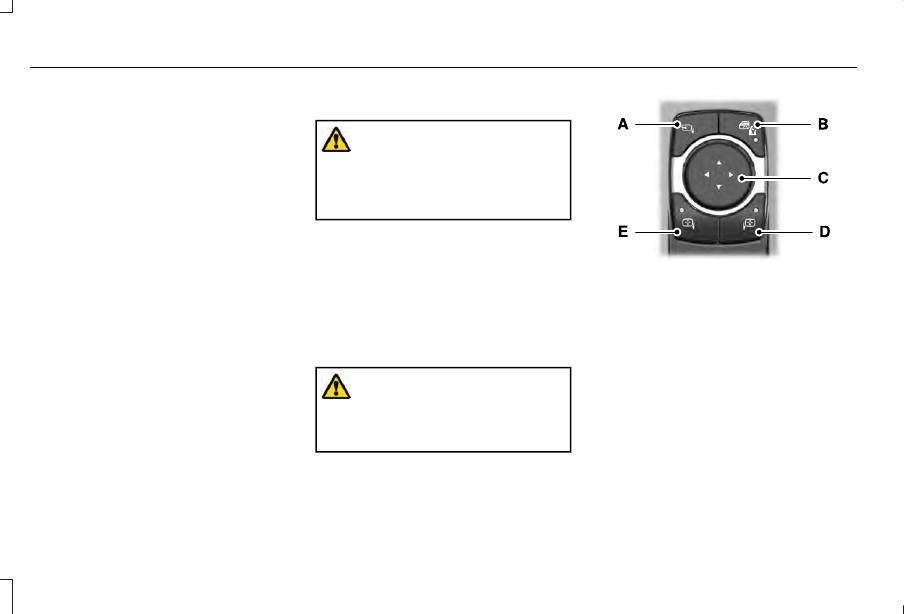
EXTERIOR MIRRORS
Power Exterior Mirrors
WARNING: Do not adjust the mirrors
when your vehicle is moving. This could
result in the loss of control of your vehicle,
serious personal injury or death.
E295322
Power-folding mirror control.
A
Window lockout.
B
Adjustment control.
C
Right-hand mirror.
D
Left-hand mirror.
E
116
Windows and Mirrors
-------------------------------------------------------------------------------------------------------------------------------------------------------------
To adjust your mirrors, switch your vehicle
on - with the ignition in accessory mode or
the engine running and then:
1. Select the mirror you want to adjust. The
control light turns on.
2. Use the adjustment control to adjust the
position of the mirror.
3. Press the mirror control again. The
control light turns off.
Fold-Away Exterior Mirrors
Push the mirror toward the door window
glass. Make sure that you fully engage the
mirror in its support when returning it to its
original position.
Auto-Folding Mirrors
The exterior mirrors fold in toward the glass
after you place the transmission into park (P),
turn off the vehicle, open and close the driver
side door and lock the vehicle. The exterior
mirrors unfold and return to their driving
position after you unlock the vehicle and
open and close the driver side door.
You can switch this feature on and off
through the information display. See General
Information (page 136).
Note: If you switch this feature off through
the information display, the welcome lighting
also switches off.
You can fold the mirrors on demand by
pressing the power-folding mirror control
located on the door. The control lights and
the mirrors fold in toward the glass. Press
the control again to unfold the mirrors. The
control light turns off.
Note: If you use the power-folding control to
fold the mirrors on demand and the auto fold
feature is switched on, the auto-folding
feature becomes disabled. To re-enable the
auto-folding feature, press the control again
to unfold the mirrors.
Loose Mirror
If your auto-folding mirrors are manually
folded or unfolded, they may not work
properly even after you re-position them.
You need to reset them if:
•
The mirrors vibrate when you drive.
•
The mirrors feel loose.
•
The mirrors do not stay in the folded or
unfolded position.
•
One of the mirrors is not in its normal
driving position.
To reset the auto-fold feature, use the
power-folding mirror control to fold and
unfold the mirrors. You may hear a loud noise
as you reset the mirrors. This sound is
normal. Repeat this process as needed each
time the mirrors are manually folded or
unfolded.
Heated Exterior Mirrors
See Heated Exterior Mirrors (page 173).
117
Windows and Mirrors
-------------------------------------------------------------------------------------------------------------------------------------------------------------
Memory Mirrors
You can save and recall the mirror positions
through the memory function. See Memory
Function (page 183).
Signal Indicator Mirrors
(If Equipped)
The outer portion of the appropriate mirror
housing blinks when you switch on the turn
signal.
Auto-Dimming Feature
(If Equipped)
The driver’s exterior mirror automatically
dims when the interior auto-dimming mirror
turns on.
Lincoln Welcome Mat
(If Equipped)
Projection lights, on the bottom of the mirror
housings, project an image onto the ground
a short distance from the vehicle. See
Welcome Lighting (page 110).
Blind Spot Monitor
See Blind Spot Information System (page
324).
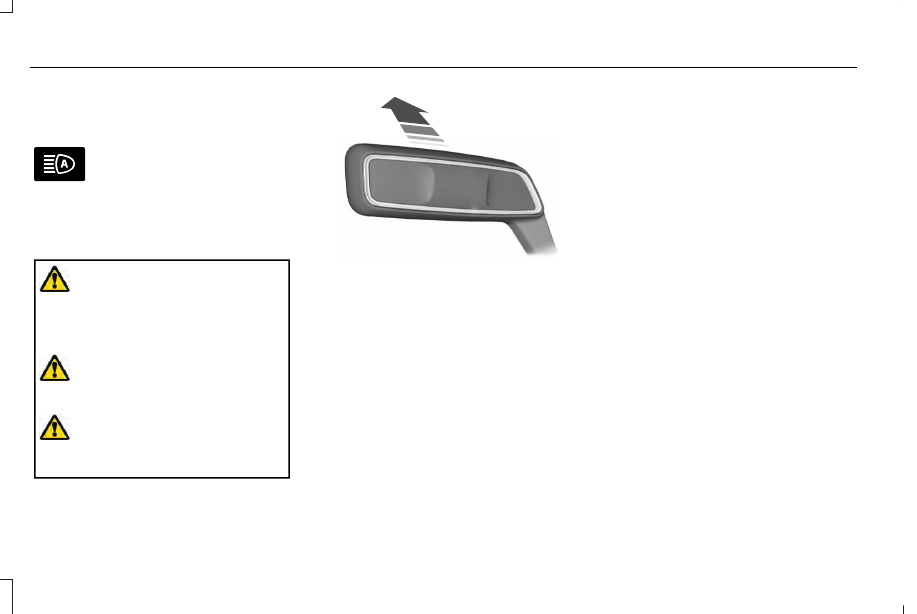
INTERIOR MIRROR
WARNING: Do not adjust the mirrors
when your vehicle is moving. This could
result in the loss of control of your vehicle,
serious personal injury or death.
Note: Do not clean the housing or glass of
any mirror with harsh abrasives, fuel or other
petroleum or ammonia-based cleaning
products.
You can adjust the interior mirror to your
preference. Some mirrors also have a second
pivot point. This lets you move the mirror
head up or down and from side to side.
Auto-Dimming Mirror
Do not block the sensors on the front and
back of the mirror. Mirror performance may
be affected. A rear center passenger or
raised rear center head restraint could
prevent light from reaching the sensor.
The mirror dims to reduce the effect of bright
light from behind. It returns to normal when
the bright light from behind is no longer
present or if you shift into reverse (R), to
make sure you have a clear view when
backing up.
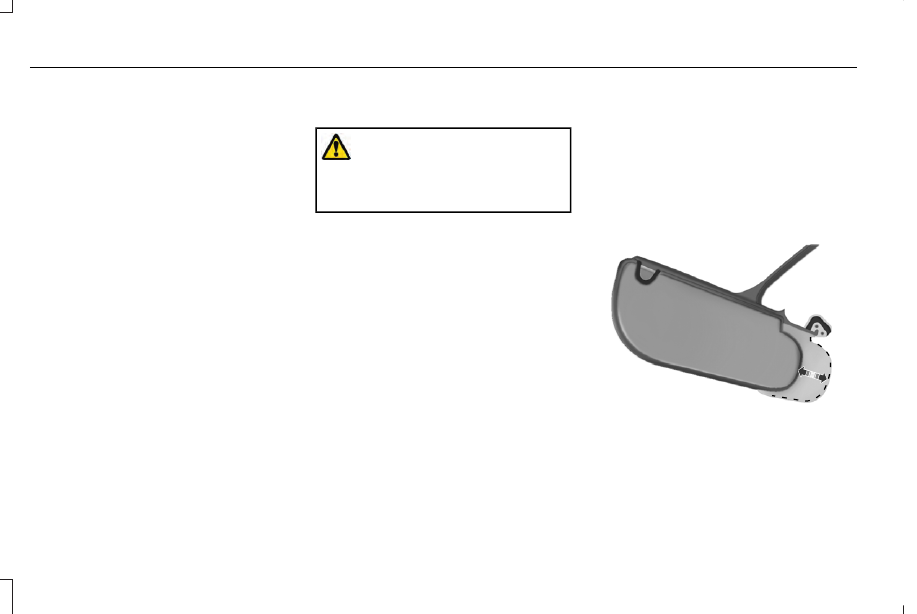
SUN VISORS
E138666
Rotate the sun visor toward the side window
and extend it rearward for extra shade.
118
Windows and Mirrors
-------------------------------------------------------------------------------------------------------------------------------------------------------------
Illuminated Vanity Mirror
E162197
Lift the cover to switch the lamp on.
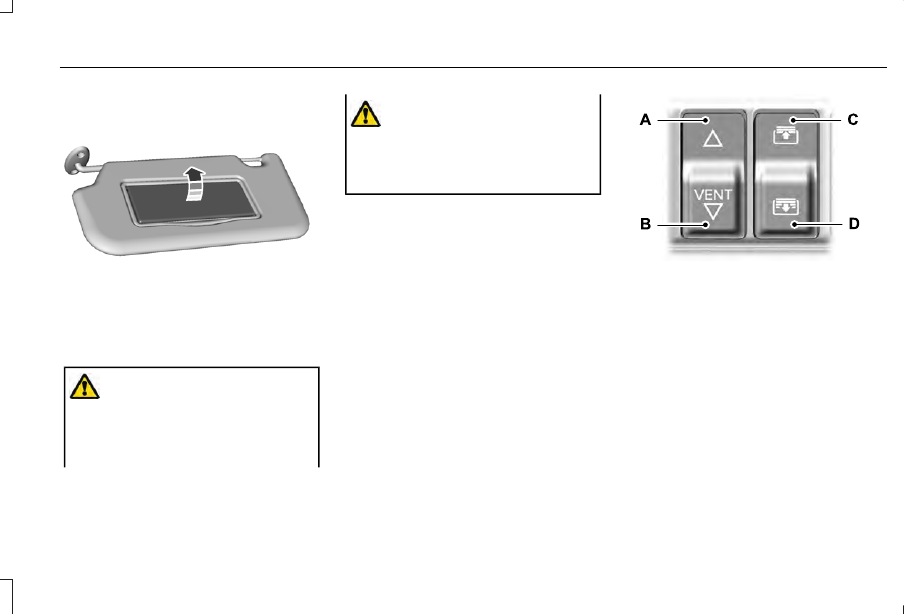
MOONROOF
(IF EQUIPPED)
WARNING: Do not leave children
unattended in your vehicle and do not let
them play with the moonroof. Failure to
follow this instruction could result in
personal injury.
WARNING: When closing the
moonroof, verify that it is free of
obstruction and make sure that children
and pets are not in the proximity of the roof
opening.
The moonroof and sunscreen controls are
on the overhead console and have a
one-touch open and close feature. To stop
the motion during a one-touch operation,
touch the control a second time.
E295253
Moonroof open. Press and release
to open the moonroof.
A
Moonroof vent/close. Press and
release to vent or close the
moonroof.
B
119
Windows and Mirrors
-------------------------------------------------------------------------------------------------------------------------------------------------------------
Нет комментариевНе стесняйтесь поделиться с нами вашим ценным мнением.
Текст