Lincoln Corsair (2022 year). Manual in english — page 25
Battery Management System
(If Equipped)
The system monitors battery conditions and
takes actions to extend battery life. If
excessive battery drain is detected, the
system temporarily disables some electrical
systems to protect the battery.
Systems included are:
•
Heated rear window.
•
Heated seats.
•
Climate control.
•
Heated steering wheel.
•
Audio unit.
•
Navigation system.
A message may appear in the information
display to alert you that battery protection
actions are active. This message is only for
notification that an action is taking place, and
not intended to indicate an electrical problem
or that the battery requires replacement.
After battery replacement, or in some cases
after charging the battery with an external
charger, the battery management system
requires eight hours of vehicle sleep time to
relearn the battery state of charge. During
this time, your vehicle must remain fully
locked with the ignition switched off.
Note: Prior to relearning the battery state of
charge, the battery management system
may temporarily disable some electrical
systems.
Electrical Accessory Installation
To make sure the battery management
system works correctly, do not connect an
electrical device ground connection directly
to the battery negative post. This can cause
inaccurate measurements of the battery
condition and potential incorrect system
operation.
Note: If you add electrical accessories or
components to the vehicle, it may adversely
affect battery performance and durability.
This may also affect the performance of
other electrical systems in the vehicle.
Remove and Reinstall the Battery
Install a battery approved for use by our
specifications. See Capacities and
Specifications (page 461).
To disconnect or remove the battery, do the
following:
1. Apply the parking brake and switch the
ignition off.
2. Switch all electrical equipment off, for
example lights and radio.
3. Wait a minimum of two minutes before
disconnecting the battery.
Note: The engine management system has
a power hold function and remains powered
for a period of time after you switch the
ignition off. This is to allow the system to
store diagnostic and adaptive tables.
Disconnecting the battery without waiting
can cause damage not covered by the
vehicle warranty.
4. Disconnect the negative battery cable
terminal.
5. Disconnect the positive battery cable
terminal.
408
Maintenance
-------------------------------------------------------------------------------------------------------------------------------------------------------------

6. Remove the battery securing clamp.
7. Remove the battery.
8. To install, reverse the removal procedure.
Note: Before reconnecting the battery, make
sure the ignition remains switched off.
Note: Make sure to fully tighten the battery
cables.
If you disconnect or replace the vehicle
battery, you must reset the following
features:
•
Window bounce-back. See Power
Windows (page 115).
•
Clock Settings.
•
Pre-set radio stations.
Battery Disposal
E107998
Make sure that you dispose of old
batteries in an environmentally
friendly way. Seek advice from
your local authority about recycling old
batteries.
ADJUSTING THE HEADLAMPS
Vertical Aim Adjustment
The assembly plant properly aims the
headlamps on your vehicle. If your vehicle
has been in an accident, have the alignment
of your headlamps checked by your
authorized dealer.
E142592
8 ft (2.4 m).
A
Center height of lamp to ground.
B
25 ft (7.6 m).
C
Horizontal reference line.
D
1. Park the vehicle directly in front of a wall
or screen on a level surface,
approximately 25 ft (7.6 m) away.
2. Measure the height of the headlamp
passing beam optical center from the
ground and mark an 8 ft (2.4 m)
horizontal reference line on the vertical
wall or screen at this height.
Note: To see a clearer light pattern for
adjusting, block the light from one headlamp
while adjusting the other.
3. Switch on the low beam headlamps to
light the wall or screen and open the
hood.
E142465
409
Maintenance
-------------------------------------------------------------------------------------------------------------------------------------------------------------
4. On the wall or screen, observe a flat zone
of high intensity light at the top of the
right-hand portion of the beam pattern.
If the top edge of the high intensity light
zone is not at the horizontal reference
line, adjust the headlamp.
E171165
5. Locate the vertical adjuster on each
headlamp. Turn the adjuster either
clockwise or counterclockwise to aim the
headlamp.
6. Close the hood and switch off the lamps.
Horizontal Aim Adjustment
Your vehicle does not require horizontal aim
as it is non-adjustable.
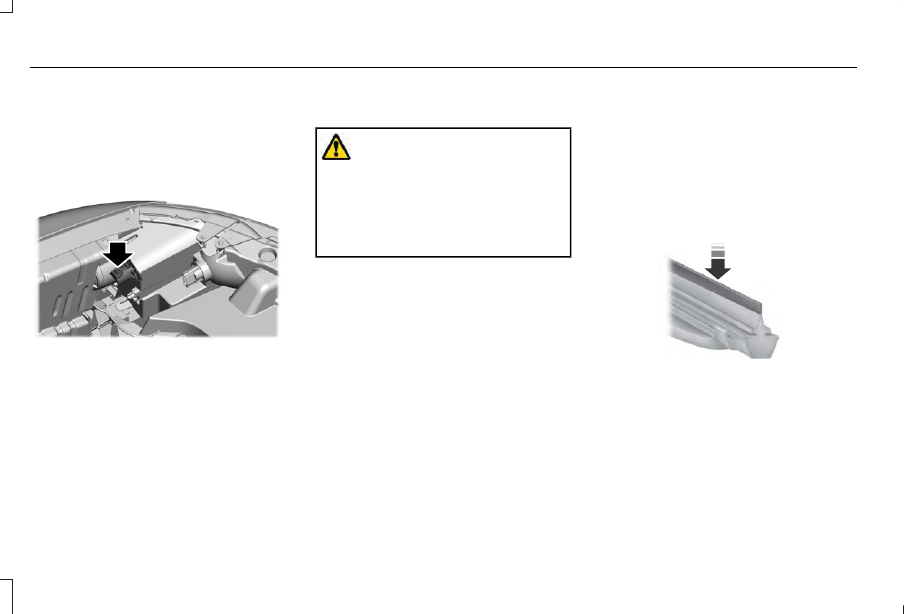
WASHER FLUID CHECK
WARNING: If you operate your
vehicle in temperatures below 41.0°F (5°C),
use washer fluid with antifreeze protection.
Failure to use washer fluid with antifreeze
protection in cold weather could result in
impaired windshield vision and increase
the risk of injury or accident.
Note: The front and rear washer systems
are supplied from the same reservoir.
Add fluid to fill the reservoir if the level is low.
Only use a washer fluid that meets our
specifications. See Capacities and
Specifications (page 461).
State or local regulations on volatile organic
compounds may restrict the use of methanol,
a common windshield washer antifreeze
additive. Washer fluids containing
non-methanol antifreeze agents should be
used only if they provide cold weather
protection without damaging the vehicle’s
paint finish, wiper blades or washer system.
FUEL FILTER
Your vehicle is equipped with a lifetime fuel
filter that is integrated with the fuel tank.
Regular maintenance or replacement is not
needed.
CHECKING THE WIPER BLADES
E142463
Run the tip of your fingers over the edge of
the blade to check for roughness.
Clean the wiper blades with washer fluid or
water applied with a soft sponge or cloth.
410
Maintenance
-------------------------------------------------------------------------------------------------------------------------------------------------------------
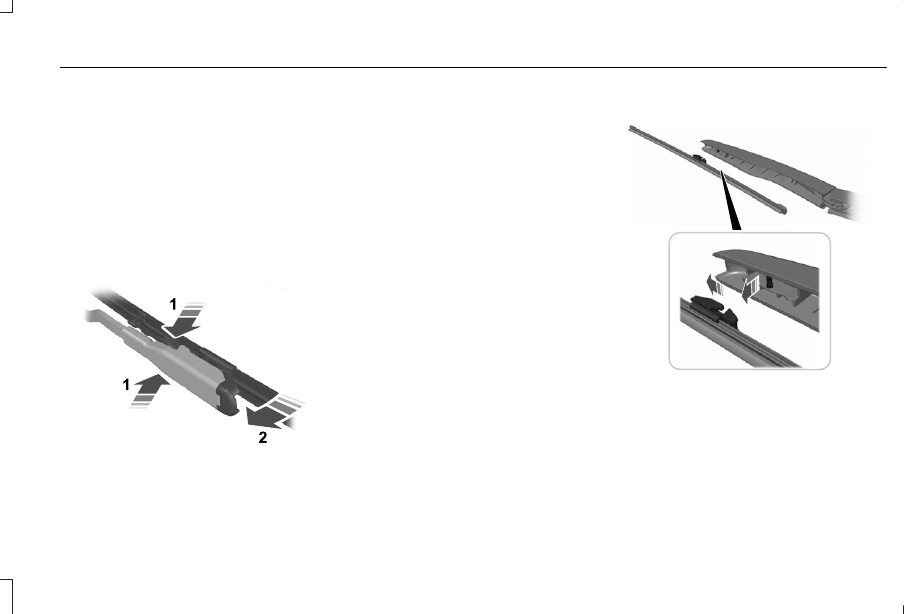
CHANGING THE WIPER BLADES
Clean the wiper blades and the windshield
to improve wiper performance.
Note: Do not move the wiper arm when the
ignition is on as it may cause damage to the
wiper motor.
Replace the wiper blades at least annually
for optimum performance.
Front Wiper Blades
E129990
1. Lift the wiper arm and then press the
wiper blade locking buttons together.
Note: Do not hold the wiper blade when
lifting the wiper arm.
Note: Make sure that the wiper arm does
not spring back against the glass when the
wiper blade is not attached.
2. Slightly rotate the wiper blade.
3. Remove the wiper blade.
4. Install in the reverse order.
Note: Make sure that the wiper blade locks
into place.
Rear Window Wiper Blade
E271380
1. Lift the wiper arm.
Note: Do not hold the wiper blade when
lifting the wiper arm.
Note: Make sure that the wiper arm does
not spring back against the glass when the
wiper blade is not attached.
2. Remove the wiper blade.
411
Maintenance
-------------------------------------------------------------------------------------------------------------------------------------------------------------
Note: Make sure that the wiper blade locks
into place.
REMOVING A HEADLAMP
To gain access to the headlamp securing
bolts and to remove the headlamp assembly,
you must first remove the front fascia and
front bumper assemblies. We recommend
you see an authorized dealer.
CHANGING A BULB
Your vehicle has LED lamps. These are not
serviceable. See your authorized dealer if
they fail.
412
Maintenance
-------------------------------------------------------------------------------------------------------------------------------------------------------------

GENERAL INFORMATION
Your dealer has many quality products
available to clean your vehicle and protect
its finishes.
CLEANING PRODUCTS
Materials
For best results, use the following products
or products of equivalent quality:
For additional information and assistance,
we recommend that you contact an
authorized dealer.
Specification
Name
Motorcraft® Bug and Tar Remover, ZC-42 (U.S. & Canada)
ESR-M5B194-B
Motorcraft® Custom Bright Metal Cleaner, ZC-15 (U.S. & Canada)
ESR-M14P4-A
Motorcraft® Detail Wash, ZC-3-A (U.S. & Canada)
ESR-M14P3-A
Motorcraft® Engine Shampoo and Degreaser, ZC-20 (U.S.)
Motorcraft® Engine Shampoo, CXC-66-A (Canada)
Motorcraft® Premium Leather and Vinyl Cleaner, ZC-56 (U.S. & Canada)
Motorcraft® Multi-Purpose Cleaner, CXC-101 (Canada)
WSS-M14P19-A
Motorcraft® Premium Windshield Wash Concentrate with Bitterant, ZC-32-B2 (U.S.)
WSS-M14P19-A
Motorcraft® Premium Quality Windshield Washer Fluid, CXC-37-F/M (Canada)
Motorcraft® Professional Strength Carpet & Upholstery Cleaner, ZC-54 (U.S. & Canada)
ESR-M14P5-A
Motorcraft® Premium Glass Cleaner, CXC-100 (Canada)
413
Vehicle Care
-------------------------------------------------------------------------------------------------------------------------------------------------------------

Specification
Name
Motorcraft® Spot and Stain Remover, ZC-14 (U.S.)
ESR-M14P5-A
Motorcraft® Ultra-Clear Spray Glass Cleaner, ZC-23 (U.S.)
Motorcraft® Wheel and Tire Cleaner, ZC-37-A (U.S. & Canada)
CLEANING THE EXTERIOR
Wash your vehicle regularly with cool or
lukewarm water and a neutral pH shampoo,
we recommend Motorcraft Detail Wash.
•
Never use strong household detergents
or soap, for example dish washing or
laundry liquid. These products can
discolor and spot painted surfaces.
•
Never wash your vehicle when it is hot
to the touch, or during strong or direct
sunlight.
•
Dry your vehicle with a chamois or soft
terry cloth towel to eliminate water
spotting.
•
Immediately remove fuel spillages, bird
droppings, insect deposits and road tar.
These may cause damage to your
vehicle’s paintwork or trim over time. We
recommend Motorcraft Bug and Tar
Remover.
•
Remove any exterior accessories, for
example antennas, before entering a car
wash.
•
When filling with AdBlue®, remove any
residue on painted surfaces immediately.
Note: Suntan lotions and insect repellents
can damage painted surfaces. If these
substances come in contact with your
vehicle, wash the affected area as soon as
possible.
Cleaning the Exterior Precautions
Immediately remove fuel spillages, AdBlue
residuals, bird droppings, insect deposits
and road tar. These may cause damage to
your vehicle’s paintwork or trim over time.
Remove any exterior accessories, for
example antennas, before entering a car
wash.
Cleaning the Exterior Lamps
Note: Do not scrape the exterior lamps
lenses or use abrasives, alcoholic solvents
or chemical solvents to clean them.
Note: Do not wipe the exterior lamps when
they are dry.
414
Vehicle Care
-------------------------------------------------------------------------------------------------------------------------------------------------------------
Exterior Chrome Parts
•
Apply a high quality-cleaning product to
bumpers and other chrome parts. Follow
the manufacturer’s instructions. We
recommend Motorcraft Custom Bright
Metal Cleaner.
•
Do not apply the cleaning product to hot
surfaces. Do not leave the cleaning
product on chrome surfaces longer than
the time recommended.
•
Using non-recommended cleaners can
result in severe and permanent cosmetic
damage.
Note: Never use abrasive materials, for
example steel wool or plastic pads as they
can scratch the chrome surface.
Note: Do not use chrome cleaner, metal
cleaner or polish on wheels or wheel covers.
Exterior Plastic Parts
For routine cleaning we recommend
Motorcraft Detail Wash. If tar or grease spots
are present, we recommend Motorcraft Bug
and Tar Remover.
Stripes or Graphics
(If Equipped)
Hand washing your vehicle is preferred
however, pressure washing may be used
under the following conditions:
•
Do not use water pressure higher than
2,000 psi (14,000 kPa).
•
Do not use water hotter than 179°F (82°C).
•
Use a spray with a 40 degree wide spray
angle pattern.
•
Keep the nozzle at a 12 in (305 mm)
distance and 90 degree angle to your
vehicle's surface.
Note: Holding the pressure washer nozzle
at an angle to the vehicle's surface may
damage graphics and cause the edges to
peel away from the vehicle's surface.
Underbody
Regularly clean the underside of your vehicle
using water. Keep body and door drain holes
free of debris or foreign material.
Under Hood
For removing black rubber marks from under
the hood we recommend Motorcraft Wheel
and Tire Cleaner or Motorcraft Bug and Tar
Remover.
WAXING
Regular waxing is necessary to protect your
car's paint from the elements. We
recommend that you wash and wax the
painted surface once or twice a year.
When washing and waxing, park your vehicle
in a shaded area out of direct sunlight.
Always wash your vehicle before applying
wax.
•
Use a quality wax that does not contain
abrasives.
•
Follow the manufacturer’s instructions to
apply and remove the wax.
•
Apply a small amount of wax in a
back-and-forth motion, not in circles.
415
Vehicle Care
-------------------------------------------------------------------------------------------------------------------------------------------------------------
•
Do not allow wax to come in contact with
any non-body (low-gloss black) colored
trim. The wax will discolor or stain the
parts over time.
•
Roof racks.
•
Bumpers.
•
Grained door handles.
•
Side moldings.
•
Mirror housings.
•
Windshield cowl area.
•
Do not apply wax to glass areas.
•
After waxing, your car's paint should feel
smooth, and be free of streaks and
smudges.
CLEANING THE ENGINE
Engines are more efficient when they are
clean because grease and dirt buildup keep
the engine warmer than normal.
When washing:
•
Take care when using a power washer
to clean the engine. The high-pressure
fluid could penetrate the sealed parts
and cause damage.
•
Do not spray a hot engine with cold water
to avoid cracking the engine block or
other engine components.
•
Spray Motorcraft Engine Shampoo and
Degreaser on all parts that require
cleaning and pressure rinse clean. In
Canada, use Motorcraft Engine Shampoo.
Note: If your vehicle has an engine cover
remove the cover before application of
Motorcraft Engine Shampoo and Degreaser.
Immediately rinse away any over spray.
•
Never wash or rinse the engine while it
is hot or running; water in the running
engine may cause internal damage.
•
Never wash or rinse any ignition coil,
spark plug wire or spark plug well, or the
area in and around these locations.
•
Cover the battery, power distribution box,
and air filter assembly to prevent water
damage when cleaning the engine.
CLEANING THE WINDOWS AND
WIPER BLADES
Car wash chemicals and environmental
fallout can result in windshield and wiper
blade contamination. Dirty windshield and
wipers will result in poor windshield wiper
operation. Keep the windshield and wiper
blades clean to maintain windshield wiper
performance.
To clean the windshield and wiper blades:
•
Clean the windshield with a non-abrasive
glass cleaner. When cleaning the interior
of the windshield, avoid getting any glass
cleaner on the instrument panel or door
panels. Wipe any glass cleaner off these
surfaces immediately.
•
For windshields contaminated with tree
sap, chemicals, wax or bugs, clean the
entire windshield using steel wool (no
greater than 0000 grade) in a circular
motion and rinse with water.
•
Clean the wiper blades with isopropyl
rubbing alcohol or windshield washer
concentrate.
416
Vehicle Care
-------------------------------------------------------------------------------------------------------------------------------------------------------------
Note: Do not use razor blades or other
sharp objects to clean or remove decals from
the inside of the heated rear window. The
vehicle warranty does not cover damage
caused to the heated rear window grid lines.
CLEANING THE INTERIOR
WARNING: Do not use cleaning
solvents, bleach or dye on the vehicle's
seatbelts, as these actions may weaken
the belt webbing.
WARNING: On vehicles equipped
with seat-mounted airbags, do not use
chemical solvents or strong detergents.
Such products could contaminate the side
airbag system and affect performance of
the side airbag in a crash.
Note: Follow the same procedure for
cleaning leather seats when cleaning leather
interior. See Cleaning Leather Seats (page
418).
Note: Do not use household cleaning
products or glass cleaners, which can stain
and discolor the fabric and affect the flame
retardant abilities of the seat materials.
For fabric, carpets, cloth seats, safety belts
and seats equipped with side airbags:
•
Remove dust and loose dirt with a
vacuum cleaner.
•
Remove light stains and soil with
Motorcraft® Professional Strength Carpet
& Upholstery Cleaner.
For grease or tar stains:
•
Spot clean the area with Motorcraft® Spot
and Stain Remover. In Canada, use
Motorcraft® Multi-Purpose Cleaner.
•
If a ring forms on the fabric after spot
cleaning, clean the entire area
immediately, but do not oversaturate or
the ring will set.
CLEANING THE INSTRUMENT
PANEL AND INSTRUMENT
CLUSTER LENS
WARNING: Do not use chemical
solvents or strong detergents when
cleaning the steering wheel or instrument
panel to avoid contamination of the airbag
system.
Note: Follow the same procedure as
cleaning leather seats for cleaning leather
instrument panels and leather interior trim
surfaces. See Cleaning Leather Seats (page
418).
Clean the instrument panel and cluster lens
with a clean, damp and soft cloth, then use
a clean, dry and soft cloth to dry these areas.
417
Vehicle Care
-------------------------------------------------------------------------------------------------------------------------------------------------------------
•
Avoid cleaners or polishes that increase
the gloss of the upper portion of the
instrument panel. The dull finish in this
area helps protect you from undesirable
windshield reflection.
•
Do not use any household cleaning
products or glass cleaners as these may
damage the finish of the instrument
panel, interior trim and cluster lens.
•
Wash or wipe your hands clean if you
have been in contact with certain
products such as insect repellent and
suntan lotion to avoid possible damage
to the interior painted surfaces.
•
Do not allow air fresheners and hand
sanitizers to spill onto interior surfaces.
If a spill occurs, wipe off immediately.
Your warranty may not cover these
damages.
If a staining liquid like coffee or juice has
been spilled on the instrument panel or on
interior trim surfaces:
1. Wipe up spilled liquid using a clean, soft
cloth as quickly as possible.
2. Use Motorcraft Premium Leather and
Vinyl Cleaner or a commercially available
leather cleaning product for automotive
interiors. Test any cleaner or stain
remover on an inconspicuous area.
3. Alternatively, wipe the surface with a
clean, soft cloth and a mild soap and
water solution. Dry the area with a clean,
soft cloth.
4. If necessary, apply more soap and water
solution or cleaning product to a clean,
soft cloth and press it onto the soiled
area. Allow this to set at room
temperature for 30 minutes.
5. Remove the soaked cloth, then with a
clean, damp cloth, use a rubbing motion
for 60 seconds on the soiled area.
6. Dry the area with a clean, soft cloth.
CLEANING LEATHER SEATS
Note: Follow the same procedure as
cleaning leather seats for cleaning leather
instrument panels and leather interior trim
surfaces.
For routine cleaning, wipe the surface with
a soft, damp cloth and a mild soap and water
solution. Dry the area with a clean, soft cloth.
Note: Test any cleaner or stain remover on
an inconspicuous area.
You should:
•
Remove dust and loose dirt with a
vacuum cleaner.
•
Clean and treat spills and stains as soon
as possible.
Do not use the following products as these
may damage the leather:
•
Oil and petroleum or silicone-based
leather conditioners.
•
Household cleaners.
•
Alcohol solutions.
•
Solvents or cleaners intended specifically
for rubber, vinyl and plastics.
418
Vehicle Care
-------------------------------------------------------------------------------------------------------------------------------------------------------------
REPAIRING MINOR PAINT
DAMAGE
Authorized dealers have touch-up paint to
match your vehicle’s color. Your vehicle
color code is printed on a sticker on the front,
left-hand side door jamb. Take your color
code to your authorized dealer to make sure
you get the correct color.
Before repairing minor paint damage, use a
cleaner to remove particles such as bird
droppings, tree sap, insect deposits, tar
spots, road salt and industrial fallout.
Read the instructions before using cleaning
products.
CLEANING THE WHEELS
Note: Do not apply a cleaning chemical to
warm or hot wheel rims and covers.
Note: Industrial-strength (heavy-duty)
cleaners, or cleaning chemicals, in
combination with brush agitation to remove
brake dust and dirt, could wear away the
clear coat finish over a period of time.
Note: Do not use hydrofluoric acid-based or
high caustic-based wheel cleaners, steel
wool, fuels or strong household detergent.
Note: If you intend to park your vehicle for
an extended period after cleaning the
wheels with a wheel cleaner, drive your
vehicle for a few minutes before doing so.
This reduces the risk of increased corrosion
of the brake discs, brake pads and linings.
Note: Some automatic car washes could
cause damage to the finish on your wheel
rims and covers.
Alloy wheels and wheel covers are coated
with a clear coat paint finish. To maintain
their condition we recommend that you:
•
Clean them weekly with the
recommended wheel and tire cleaner.
•
Use a sponge to remove heavy deposits
of dirt and brake dust accumulation.
•
Rinse them thoroughly with a pressurized
stream of water when you complete the
cleaning process.
We recommend that you use our surface
wheel cleaner. Make sure that you read and
follow the manufacturer’s instructions.
Using other non-recommended cleaning
products can result in severe and permanent
damage.
VEHICLE STORAGE
If you plan on storing your vehicle for 30
days or more, read the following
maintenance recommendations to make sure
your vehicle stays in good operating
condition.
We engineer and test all motor vehicles and
their components for reliable, regular driving.
Under various conditions, long-term storage
may lead to degraded engine performance
or failure unless you use specific precautions
to preserve engine components.
General
•
Store all vehicles in a dry, ventilated
place.
•
Protect from sunlight, if possible.
•
If vehicles are stored outside, they
require regular maintenance to protect
against rust and damage.
419
Vehicle Care
-------------------------------------------------------------------------------------------------------------------------------------------------------------
Body
•
Wash your vehicle thoroughly to remove
dirt, grease, oil, tar or mud from exterior
surfaces, rear-wheel housing and the
underside of front fenders.
•
Periodically wash your vehicle if it is
stored in exposed locations.
•
Touch-up exposed or primed metal to
prevent rust.
•
Cover chrome and stainless steel parts
with a thick coat of auto wax to prevent
discoloration. Re-wax as necessary when
you wash your vehicle.
•
Lubricate all hood, door and luggage
compartment hinges and latches with a
light grade oil.
•
Cover interior trim to prevent fading.
•
Keep all rubber parts free from oil and
solvents.
Engine
•
Change the engine oil and filter prior to
storage because used engine oil contains
contaminates which may cause engine
damage.
•
Start the engine every 15 days for a
minimum of 15 minutes. Run at fast idle
with the climate controls set to defrost
until the engine reaches normal
operating temperature.
•
With your foot on the brake, shift through
all the gears while the engine is running.
•
We recommend that you change the
engine oil before you use your vehicle
again.
Fuel system
•
Fill the fuel tank with high-quality fuel
until the first automatic shutoff of the fuel
pump nozzle.
Cooling system
•
Protect against freezing temperatures.
•
When removing your vehicle from
storage, check coolant fluid level.
Confirm that there are no cooling system
leaks and that fluid is at the
recommended level.
Disconnecting Your 12 Volt Battery
•
Check and recharge as necessary. Keep
connections clean.
•
If storing your vehicle for more than 30
days without recharging the battery, we
recommend that you disconnect the
battery cables to maintain battery charge
for quick starting.
Note: It is necessary to reset memory
features if you disconnect the battery cables.
420
Vehicle Care
-------------------------------------------------------------------------------------------------------------------------------------------------------------
Plugging in Your HYBRID
We recommend the following options for
your plug-in vehicle (PHEV) :
•
Leave your vehicle plugged in. The 12
volt battery maintains power if left
plugged in. However, this periodically
uses electricity from the household
outlet.
•
Connect a battery charger to your 12 volt
battery and leave it on a continuous, slow
charge.
•
Disconnect the 12 volt battery. If your 12
volt battery is located in the luggage
compartment, do not fully shut the
luggage compartment after
disconnecting the 12 volt battery. Only
leave the luggage compartment open if
your vehicle is stored in a locked
location.
Brakes
•
Make sure the brakes and parking brake
release fully.
Tires
•
Maintain recommended air pressure.
Miscellaneous
•
Make sure all linkages, cables, levers and
pins under your vehicle are covered with
grease to prevent rust.
•
Move vehicles at least 25 ft (7.5 m) every
15 days to lubricate working parts and
prevent corrosion.
Removing Vehicle From Storage
When your vehicle is ready to come out of
storage, do the following:
•
Wash your vehicle to remove any dirt or
grease film build-up on window surfaces.
•
Check windshield wipers for any
deterioration.
•
Check under the hood for any foreign
material that may have collected during
storage such as mice or squirrel nests.
•
Check the exhaust for any foreign
material that may have collected during
storage.
•
Check tire pressures and set tire inflation
per the Tire Label.
•
Check brake pedal operation. Drive your
vehicle 15 ft (4.5 m) back and forth to
remove rust build-up.
•
Check fluid levels (including coolant, oil
and gas) to make sure there are no leaks,
and fluids are at recommended levels.
•
If you remove the battery, clean the
battery cable ends and check for
damage.
Contact an authorized dealer if you have any
concerns or issues.
BODY STYLING KITS
The distance between the underside of your
vehicle and the ground is less than that of
other models. Drive with extreme care to
avoid damage to your vehicle.
421
Vehicle Care
-------------------------------------------------------------------------------------------------------------------------------------------------------------
GENERAL INFORMATION
The recommended tire inflation pressures
are found on the Tire Label which is located
on the B-pillar or the edge of the driver door.
This information can also be found on the
Safety Compliance Certification Label, affixed
to either the door hinge pillar, door-latch
post, or the door edge that meets the
door-latch post; next to the driver’s seating
position.
We strongly recommend maintaining these
tire pressures at all times. Failure to follow
the tire pressure recommendations can
cause uneven treadwear patterns, reduced
fuel economy, and adversely affect the way
your vehicle handles.
Note: Check and set the tire pressure at the
ambient temperature in which you are
intending to drive your vehicle and when the
tires are cold.
Note: Check your tire pressures at least once
per month.
If your vehicle has a spare tire, set the
pressure to the highest value given for your
vehicle and tire size combination.
Use only approved wheels and tire sizes,
using other sizes could damage your vehicle.
If you change the diameter of the factory
installed tires, the speedometer may not
display the correct speed. Take your vehicle
to an authorized dealer and have the engine
management system reprogrammed.
If you intend to change the size of the factory
installed tires, check the suitability with an
authorized dealer.
Additional information related to the
functionality and maintenance of your tires
can be found in the Wheels and Tire section.
See Tire Care (page 431).
Notice to utility vehicle and truck
owners
WARNING: Vehicles with a higher
center of gravity (utility and four-wheel
drive vehicles) handle differently than
vehicles with a lower center of gravity
(passenger cars). Avoid sharp turns,
excessive speed and abrupt steering in
these vehicles. Failure to drive cautiously
increases the risk of losing control of your
vehicle, vehicle rollover, personal injury
and death.
WARNING: In a rollover crash, an
unbelted person is significantly more likely
to die than a person wearing a seatbelt.
Utility vehicles and trucks handle differently
than passenger cars in the various driving
conditions that are encountered on streets,
highways and off-road. Utility vehicles and
trucks are not designed for cornering at
speeds as high as passenger cars any more
than low-slung sports cars are designed to
perform satisfactorily under off-road
conditions.
422
Wheels and Tires
-------------------------------------------------------------------------------------------------------------------------------------------------------------
Study your owner's manual and any
supplements for specific information about
equipment features, instructions for safe
driving and additional precautions to reduce
the risk of an accident or serious injury.
All-wheel drive system (if equipped)
WARNING: Do not become
overconfident in the ability of four-wheel
drive vehicles. Although a four-wheel drive
vehicle may accelerate better than a
two-wheel drive vehicle in low traction
situations, it won't stop any faster than
two-wheel drive vehicles. Always drive at
a safe speed.
A vehicle equipped with all-wheel drive has
the ability to use all four wheels to power
itself. This increases traction which may
enable you to safely drive over terrain and
road conditions that a conventional
two-wheel drive vehicle cannot.
For all-wheel-drive vehicles, a spare tire of
a different size other than the tire provided
should never be used. A dissimilar spare tire
size; other than the spare tire provided or
major dissimilar tire sized between the front
and rear axles could cause the
all-wheel-drive system to stop functioning
and default to front-wheel drive.
How your vehicle differs from other
vehicles
Sport utility vehicles and trucks can differ
from some other vehicles in a few noticeable
ways. Your vehicle may be:
•
Higher - to allow higher load carrying
capacity and to allow it to travel over
rough terrain without getting hung up or
damaging underbody components.
•
Shorter - to give it the capability to
approach inclines and drive over the
crest of a hill without getting hung up or
damaging underbody components. All
other things held equal, a shorter
wheelbase may make your vehicle
quicker to respond to steering inputs
than a vehicle with a longer wheelbase.
•
Narrower - to provide greater
maneuverability in tight spaces,
particularly in off-road use.
As a result of the above dimensional
differences, Sport utility vehicles and trucks
often have a higher center of gravity and a
greater difference in center of gravity
between the loaded and unloaded condition.
These differences that make your vehicle so
versatile also make it handle differently than
an ordinary passenger car.
423
Wheels and Tires
-------------------------------------------------------------------------------------------------------------------------------------------------------------
Нет комментариевНе стесняйтесь поделиться с нами вашим ценным мнением.
Текст